C#: Face Detection and Recognition with Azure Face API
Scope
In the present article, we'll analyze some functionalities offered by Microsoft Azure Cognitive Services, and in particular that part of Cognitive Services dedicated to facial recognition (Face API). At the end of the article, the reader will be able to develop a simple C# application to detect faces in images, as well as training webservice to recognize people in non-previously seen photos.
What are Cognitive Services?
As stated by Azure Cognitive Services Welcome Page, "Microsoft Cognitive Services (formerly Project Oxford) are a set of APIs, SDKs and services available to developers to make their applications more intelligent, engaging and discoverable. Microsoft Cognitive Services expands on Microsoft’s evolving portfolio of machine learning APIs and enables developers to easily add intelligent features – such as emotion and video detection; facial, speech and vision recognition; and speech and language understanding – into their applications. Our vision is for more personal computing experiences and enhanced productivity aided by systems that increasingly can see, hear, speak, understand and even begin to reason"
Among those services, we will see here Microsoft Face API, "a cloud-based service that provides the most advanced face algorithms. Face API has two main functions: face detection with attributes and face recognition" (Cognitive Services Face API Overview). We'll treat each of those function later in the article, while looking closer at them as we develop our sample solution.
Create Cognitive Service account on Azure
Go to https://portal.azure.com. You will need an Azure account to log on.
Once logged in, search for "Cognitive Services" in the search bar.
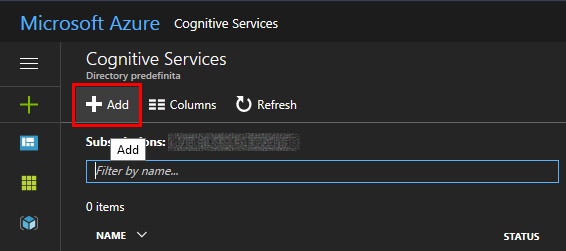
Now, let's click "Add" to create a new service
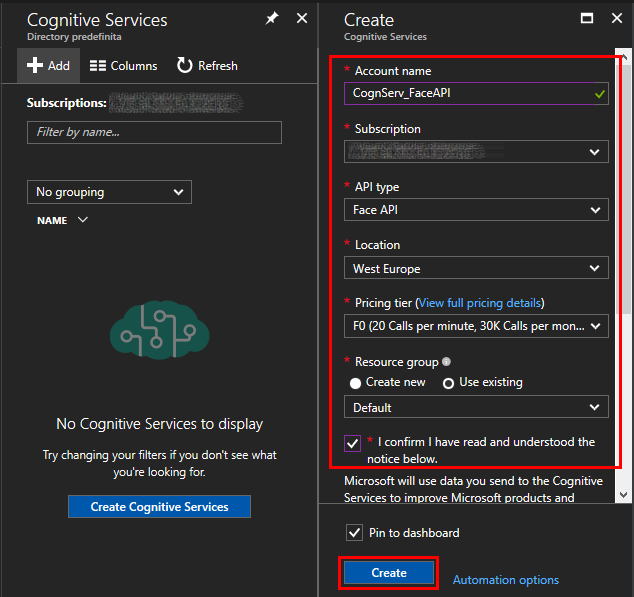
The wizard will ask for an account name, the type of API to use (in this case, Face API), the location of the service, and the pricing tier to use. In this example, we'll use F0, which gives a free service limited to 20 calls per minute, 30K monthly calls, and 1000 unique faces maximum. Type the required details, then press "Create" to start the creation procedure. You can also flag "Pin to dashboard" to create a useful link for the service in the dashboard.
After the due time (which is typically very short), the service will be deployed, and will be ready to use.
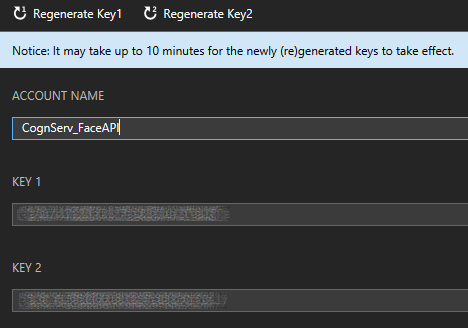
By clicking it, it is possible to access its properties, where resides a fundamental information - the service keys - for the service to be used in external context, like a local .NET application.
Clicking the proper links, we can see the keys assigned to the service. Two keys are created for each service, and can be regenerated at will. Those 32 hexadecimal values will be used in the .NET application we'll write shortly, to connect to the service and doing the request operations.
And that covers the Azure Cognitive Services Face API part about configuring the service. Now that everything has been set up, we can start developing our solution.
A simple C# solution
Through C# and Cognitive Services, what the following aim to obtain is a program that can process uploaded images searching for faces in them. Not only that, but each face should expose some added information, like the age, gender, and emotion of the spotted person. We desire to highlight the 27 characteristics that Face API uses to track a face. Lastly, given a set of images, we will see how to train the Face APi services to spot a precise person in a photo never exposed before to the service.
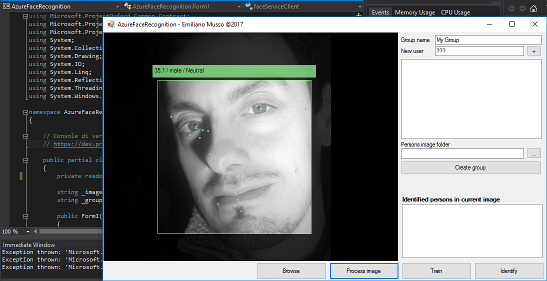
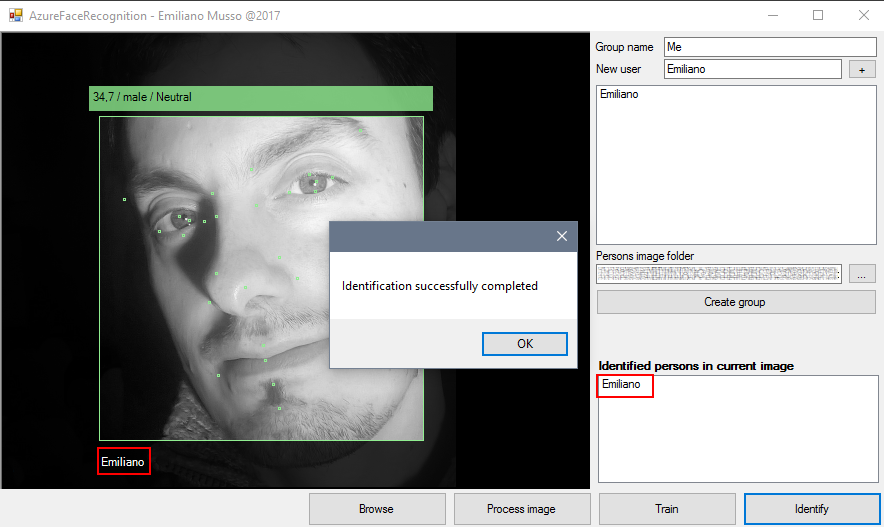
For the first part, using Winforms, we will get the following results:
Set up environment
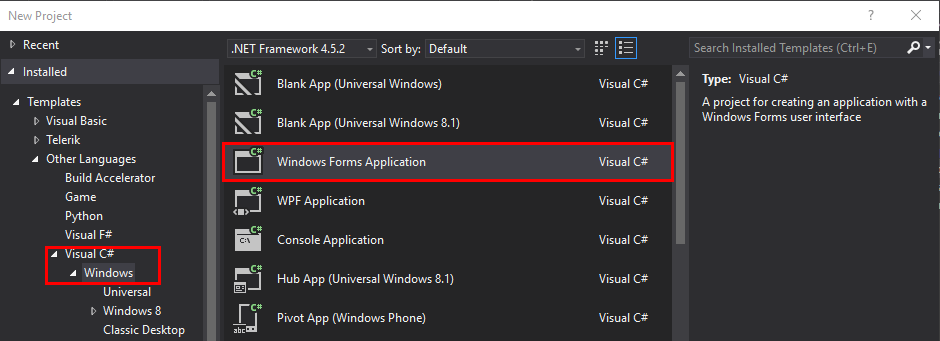
Create a new project in Visual Studio (Ctrl+N), selecting "Visual C#" then "Winforms Application", and after giving it a name, proceed to save it. That will allow use to install the NuGet packages needed to use Face API.
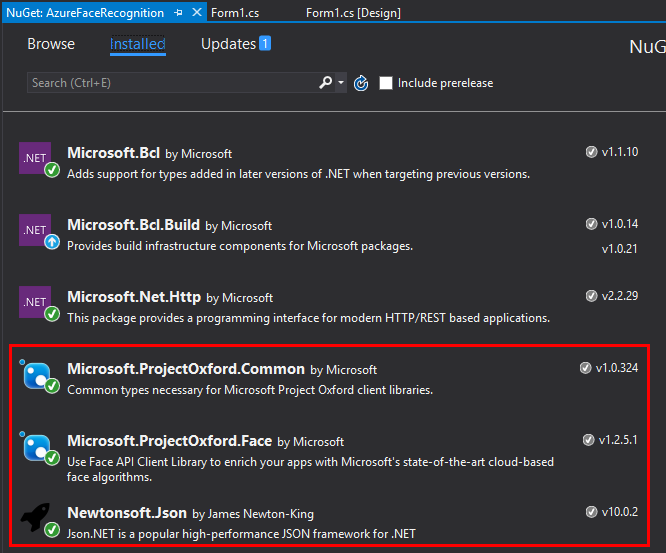
Next, we proceed in installing Newtonsoft.Json NuGet package, then Microsoft.ProjectOxford.Face (which will use Newtonsoft.Json to communicate with the web service).
Now we can start to write code.
Connect and query web service
The most important part of a Face API webserver based program, is the declaration of a variable of type IFaceServiceClient: this allows the connection and the authentication at the remote endpoint. It is easily declared with the following code:
private readonly IFaceServiceClient faceServiceClient = new FaceServiceClient("<PLACE_YOUR_SERVICE_KEY_HERE>");
The key you will use can be, indifferently, one of the two seen above and created on Azure portal.
Supposing we have an image we wish to analyze, we first will read it as a stream, passing it in that form to a method of our IFaceServiceClient, DetectAsync.
DetectAsync call can be customized, based on our needs and what information we wish to acquire. In the following snippet, we'll see how to open an image as a stream, calling then the method.
The first parameter is the image stream. The second one is to ask to return the face Id, while the third queries for the face landmarks. The last one is an array of FaceAttributeType, to retrieve those attributes we desire to check. In the snippet, we ask Id, landmarks, and analysis on the gender, age, and emotion of every face in an image.
What we will return is an array of those informations.
private async Task<Face[]> UploadAndDetectFaces(string imageFilePath)
{
    try
    {
        using (Stream imageFileStream = File.OpenRead(imageFilePath))
        {
            var faces = await faceServiceClient.DetectAsync(imageFileStream,
                true,
                true,
                new FaceAttributeType[] {
                    FaceAttributeType.Gender,
                    FaceAttributeType.Age,
                    FaceAttributeType.Emotion
                });
            return faces.ToArray();
        }
    }
    catch (Exception ex)
    {
        MessageBox.Show(ex.Message);
        return new  Face[0];
    }
}
Once retrieved, how those informations are used is a matter of need / preference. In the attached example, we parse the returning array to graphically showing each read property. Lets see the following snippet, related to the click of the button which uploads the image:
private async void btnProcess_Click(object sender, EventArgs e)
{
    Face[] faces = await UploadAndDetectFaces(_imagePath);

    if (faces.Length > 0)
    {
        var faceBitmap = new  Bitmap(imgBox.Image);

        using (var g = Graphics.FromImage(faceBitmap))
        {
            // Alpha-black rectangle on entire image
            g.FillRectangle(new SolidBrush(Color.FromArgb(200, 0, 0, 0)), g.ClipBounds);

            var br = new  SolidBrush(Color.FromArgb(200, Color.LightGreen));

            // Loop each face recognized
            foreach (var face in faces)
            {
                var fr = face.FaceRectangle;
                var fa = face.FaceAttributes;

                // Get original face image (color) to overlap the grayed image
                var faceRect = new  Rectangle(fr.Left, fr.Top, fr.Width, fr.Height);
                g.DrawImage(imgBox.Image, faceRect, faceRect, GraphicsUnit.Pixel);
                g.DrawRectangle(Pens.LightGreen, faceRect);

                // Loop face.FaceLandmarks properties for drawing landmark spots
                var pts = new  List<Point>();
                Type type = face.FaceLandmarks.GetType();
                foreach (PropertyInfo property in type.GetProperties())
                {
                    g.DrawRectangle(Pens.LightGreen, GetRectangle((FeatureCoordinate)property.GetValue(face.FaceLandmarks, null)));
                }

                // Calculate where to position the detail rectangle
                int rectTop = fr.Top + fr.Height + 10;
                if (rectTop + 45 > faceBitmap.Height) rectTop = fr.Top - 30;

                // Draw detail rectangle and write face informations
                g.FillRectangle(br, fr.Left - 10, rectTop, fr.Width < 120 ? 120 : fr.Width + 20, 25);
                g.DrawString(string.Format("{0:0.0} / {1} / {2}", fa.Age, fa.Gender, fa.Emotion.ToRankedList().OrderByDescending(x => x.Value).First().Key),
                             this.Font, Brushes.Black,
                             fr.Left - 8,
                             rectTop + 4);
            }
        }

        imgBox.Image = faceBitmap;
    }
}
As it can be seen, there are no particular difficulties in that code, which can be reduced to a simple graphical rendering of each element of interest. After calling UploadAndDetectFaces method, the obtained array is cycled through. The original image gets blacked, to better highlight the spotted face, inscribed into a rectangle, which will be draw separately in green. Each landmark (i.e. each point used by the webservice to determine what can be defined as a face) is drawn in the same way, with green 2x2 rectangles. Lastly, we draw a rectangle which will contain th read attributes: gender, age and emotion.
The Emotion API beta will assign a value between 0 and 1 to a predetermined set of emotions, like "Happiness", "Sadness", "Neutral", etc.
In our example, through the LINQ function
fa.Emotion.ToRankedList().OrderByDescending(x => x.Value).First().Key
we will read the preponderant emotion, i.e. the one which has received the highest value. That method lack precision, and it serves as a mere example, without claims of perfection.
Recognize faces with trained web service
Face API Cognitive Services allows to define group of persons, and that function is useful when we need to train the service in recognizing people.
Azure needs to know a name to assign to a particular face, and a discrete number of photos in which that face appears, in order to learn face's details, and becoming able to understand when a particular face appears into a new photo.
To define a person group, we can use the following instruction
await faceServiceClient.CreatePersonGroupAsync(_groupId, _groupName);
Where _groupId defines an unique ID associated to the group, and _groupName is simply a descriptor (for example, we could have a group name like "My friend list" and a group ID equals to "myfriends").
Let's suppose we have a list of folders, each of which named after a person, and containing a set of photo for every individual. We can associate those images to a given member of a group with a snippet like that
CreatePersonResult person = await faceServiceClient.CreatePersonAsync(_groupId, "Person 1");
foreach (string imagePath in Directory.GetFiles("<PATH_TO_PHOTOS_OF_PERSON_1>"))
{
    using (Stream s = File.OpenRead(imagePath))
    {
        await faceServiceClient.AddPersonFaceAsync(_groupId, person.PersonId, s);
    }
}
As it can be seen, we query the webservice to create a new person, associated to a given group (method CreatePersonAsync), then with the method AddPersonFaceAsync we proceed in feeding image streams to the service, binding each stream to the created person. In that way, we could populate a list of individuals to be recognized.
Done that, we could proceed to train the service. It can be done with a single instruction, but the following snippet is a bit more elaborated, because we don't want only to start training, we also want to retrieve the training status, waiting for its completion, and informing the user once finished.
await faceServiceClient.TrainPersonGroupAsync(_groupId);

TrainingStatus trainingStatus = null;
while (true)
{
    trainingStatus = await faceServiceClient.GetPersonGroupTrainingStatusAsync(_groupId);

    if (trainingStatus.Status != Status.Running)
    {
        break;
    }

    await Task.Delay(1000);
}

MessageBox.Show("Training successfully completed");
The first line starts the training on a given groupId. An infinite loop checks for current training status (method GetPersonGroupTrainingStatusAsync), and if it reads a status different from running, the loop will be exited, because the training is completed.
When a group is created, populated, and successfully trained, identification is pretty trivial.
Consider the following code:
Face[] faces = await UploadAndDetectFaces(_imagePath);
var faceIds = faces.Select(face => face.FaceId).ToArray();

foreach (var identifyResult in await faceServiceClient.IdentifyAsync(_groupId, faceIds))
{
    if (identifyResult.Candidates.Length != 0)
    {
        var candidateId = identifyResult.Candidates[0].PersonId;
        var person = await faceServiceClient.GetPersonAsync(_groupId, candidateId);

        // user identificated: person.name is the associated name
    }
    else
    {
        // user not recognized
    }
}
As we seen above, we need to upload an image we desire to process, with our UploadAndDetectFaces function. Then, parsing results received from the async method IdentifyAsync on a given group, we could simply loop candidates, to see which faces has been recognized by the service.
Again, what will be done with results is up to the developer. In our example, the name of the identified person is graphically written on the image, and inserted into a ListBox.
Source code
The source code used in the article can be download freely at: https://code.msdn.microsoft.com/Face-Detection-and-5ccb2fcb
Demonstrative project information
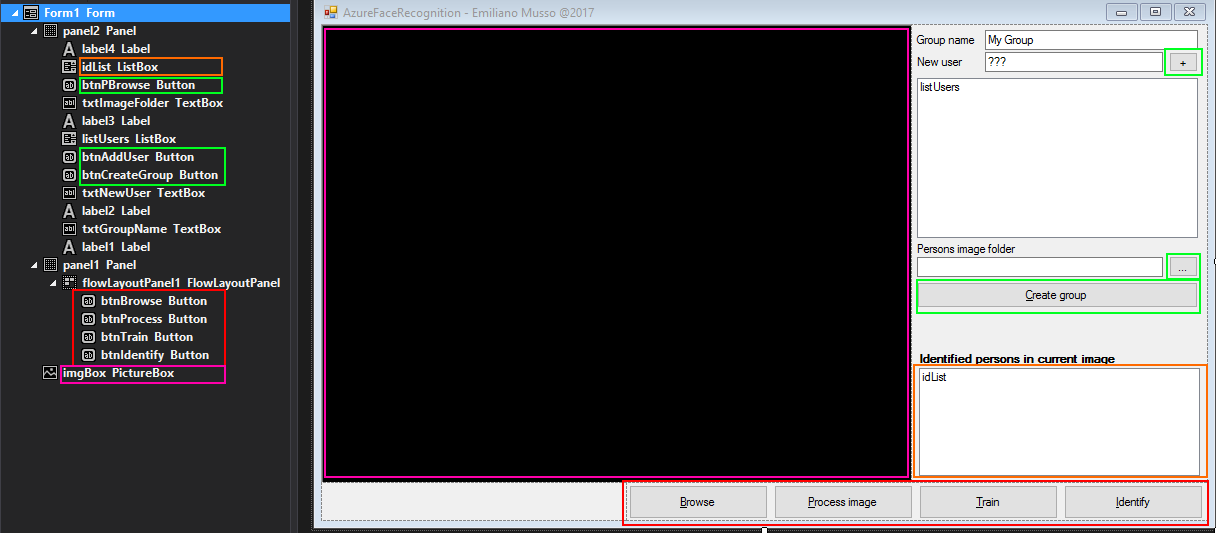
The downloadable C# project allows to experiment all the above seen function and possibilities. Here follows a brief reference to better understand each project component, as well as the complete source code associated to each component.
btnBrowse is used to load a particular image to process
private void  btnBrowse_Click(object sender, EventArgs e)
{
    using(var od = new  OpenFileDialog())
    {
        od.Filter = "All files(*.*)|*.*";
        if (od.ShowDialog() == DialogResult.OK)
        {
            _imagePath = od.FileName;
            imgBox.Load(_imagePath);
        }
    }
}
btnProcess calls UploadAndDetectFaces method, then proceeds - retrieving results - to alter the graphical contents of imgBox, to show face rectangle, landmarks, and detected informations
private async void btnProcess_Click(object sender, EventArgs e)
{
    Face[] faces = await UploadAndDetectFaces(_imagePath);

    if (faces.Length > 0)
    {
        var faceBitmap = new  Bitmap(imgBox.Image);

        using (var g = Graphics.FromImage(faceBitmap))
        {
            // Alpha-black rectangle on entire image
            g.FillRectangle(new SolidBrush(Color.FromArgb(200, 0, 0, 0)), g.ClipBounds);

            var br = new  SolidBrush(Color.FromArgb(200, Color.LightGreen));

            // Loop each face recognized
            foreach (var face in faces)
            {
                var fr = face.FaceRectangle;
                var fa = face.FaceAttributes;

                // Get original face image (color) to overlap the grayed image
                var faceRect = new  Rectangle(fr.Left, fr.Top, fr.Width, fr.Height);
                g.DrawImage(imgBox.Image, faceRect, faceRect, GraphicsUnit.Pixel);
                g.DrawRectangle(Pens.LightGreen, faceRect);

                // Loop face.FaceLandmarks properties for drawing landmark spots
                var pts = new  List<Point>();
                Type type = face.FaceLandmarks.GetType();
                foreach (PropertyInfo property in type.GetProperties())
                {
                    g.DrawRectangle(Pens.LightGreen, GetRectangle((FeatureCoordinate)property.GetValue(face.FaceLandmarks, null)));
                }

                // Calculate where to position the detail rectangle
                int rectTop = fr.Top + fr.Height + 10;
                if (rectTop + 45 > faceBitmap.Height) rectTop = fr.Top - 30;

                // Draw detail rectangle and write face informations
                g.FillRectangle(br, fr.Left - 10, rectTop, fr.Width < 120 ? 120 : fr.Width + 20, 25);
                g.DrawString(string.Format("{0:0.0} / {1} / {2}", fa.Age, fa.Gender, fa.Emotion.ToRankedList().OrderByDescending(x => x.Value).First().Key),
                             this.Font, Brushes.Black,
                             fr.Left - 8,
                             rectTop + 4);
            }
        }

        imgBox.Image = faceBitmap;
    }
}
btnAddUser add the digited string to a list of persons to identify. The group creation and training work as explained: the user first adds all the names associated with faces to recognize. Those names corresponds to folder names, subfolder of txtImageFolder.Text. When btnCreateGroup is pressed, the program creates the group based on the name inputed in txtGroupName, then loops the subfolders of txtImageFolder, searching for each of the entered users. For each file, it upload the photo to the server, associating it to the groupId / personId.
private void  btnAddUser_Click(object sender, EventArgs e)
{
    if (txtNewUser.Text == "") return;
    listUsers.Items.Add(txtNewUser.Text);
}

private async void btnCreateGroup_Click(object sender, EventArgs e)
{
    try
    {
        _groupId = txtGroupName.Text.ToLower().Replace(" ", "");

        try
        {
            await faceServiceClient.DeletePersonGroupAsync(_groupId);
        } catch  { }

        await faceServiceClient.CreatePersonGroupAsync(_groupId, txtGroupName.Text);

        foreach (var u in listUsers.Items)
        {
            CreatePersonResult person = await faceServiceClient.CreatePersonAsync(_groupId, u.ToString());
            foreach (string imagePath in Directory.GetFiles(txtImageFolder.Text + "\\" + u.ToString()))
            {
                using (Stream s = File.OpenRead(imagePath))
                {
                    await faceServiceClient.AddPersonFaceAsync(_groupId, person.PersonId, s);
                }
            }

            await Task.Delay(1000);
        }

        MessageBox.Show("Group successfully created");
    } catch  (Exception ex)
    {
        MessageBox.Show(ex.ToString());
    }
}
btnTrain starts the training procedures
private async void btnTrain_Click(object sender, EventArgs e)
{
    try
    {
        await faceServiceClient.TrainPersonGroupAsync(_groupId);

        TrainingStatus trainingStatus = null;
        while (true)
        {
            trainingStatus = await faceServiceClient.GetPersonGroupTrainingStatusAsync(_groupId);

            if (trainingStatus.Status != Status.Running)
            {
                break;
            }

            await Task.Delay(1000);
        }

        MessageBox.Show("Training successfully completed");
    } catch  (Exception ex)
    {
        MessageBox.Show(ex.Message);
    }
}
and btnIdentify proceed to the identification of faces in a given photo, adding the spotted names to the image - in the correct face position - and to the name list.
private async void btnIdentify_Click(object sender, EventArgs e)
{
    try
    {
        Face[] faces = await UploadAndDetectFaces(_imagePath);
        var faceIds = faces.Select(face => face.FaceId).ToArray();

        var faceBitmap = new  Bitmap(imgBox.Image);
        idList.Items.Clear();

        using (var g = Graphics.FromImage(faceBitmap))
        {

            foreach (var identifyResult in await faceServiceClient.IdentifyAsync(_groupId, faceIds))
            {
                if (identifyResult.Candidates.Length != 0)
                {
                    var candidateId = identifyResult.Candidates[0].PersonId;
                    var person = await faceServiceClient.GetPersonAsync(_groupId, candidateId);

                    // Writes name above face rectangle
                    var x = faces.FirstOrDefault(y => y.FaceId == identifyResult.FaceId);
                    if (x != null)
                    {
                        g.DrawString(person.Name, this.Font, Brushes.White, x.FaceRectangle.Left, x.FaceRectangle.Top + x.FaceRectangle.Height + 15);
                    }

                    idList.Items.Add(person.Name);
                }
                else
                {
                    idList.Items.Add("< Unknown person >");
                }

            }
        }

        imgBox.Image = faceBitmap;
        MessageBox.Show("Identification successfully completed");

    } catch  (Exception ex)
    {
        MessageBox.Show(ex.Message);
    }
}

