ASP.NET Core : Overview Of Dependency Injection
Introduction
A software developer writes a lot of code that is tightly coupled; and when complexity grows, the code will eventually deteriorate into spaghetti code; in other words, the application design being a bad design.
Dependency Injection (DI) is a pattern where objects are not responsible for creating their own dependencies. Dependency Injection is a way to remove hard-coded dependencies among objects, making it easier to replace an object's dependencies, either for testing (using mock objects in unit test) or to change run-time behavior.
Before understanding Dependency Injection, we should be familiar with the two concepts of Object Oriented Programming - tight coupling and loose coupling. Let's see each, one by one.
Tight Coupling
When a class is dependent on a concrete dependency, it is said to be tightly coupled to that class. A tightly coupled object is dependent on another object; that means changing one object in a tightly coupled application often requires changes to a number of other objects. It is not difficult when an application is small but in an enterprise level application, it is too difficult to make the changes.
Loose Coupling
It means two objects are independent and an object can use another object without being dependent on it. It is a design goal that seeks to reduce the inter- dependencies among components of a system with the goal of reducing the risk that changes in one component will require changes in any other component.
Now in short, Dependency Injection is a pattern that makes objects loosely coupled instead of tightly coupled. When we are designed classes with DI, they are more loosely coupled because they do not have direct, hard-coded dependencies on their collaborators. This follows the Dependency Inversion Principle(DIP).
There are three types of dependency injections,
- Constructor Dependency Injection
- Setter Dependency Injection
- Interface Dependency Injection
Dependency Inversion Principle (DIP)
It is the fifth principle of SOLID where “D” stands for Dependency Inversion Principle. Its main goal is decoupling software modules, in other words software design should be loosely coupled instead of tightly coupled. The principle states:
- High-level modules should not depend upon low-level modules. Both should depend upon abstractions.
- Abstractions should not depend upon details. Details should depend upon abstractions.
In short, the higher-level module defines an interface and lower-level module implements that interface. To explain this sentence we use a real-life example.
Suppose you are sitting on your desk. Your desk has some gadgets, like your development machine (LCD Monitor or Laptop) and mobile phone. The LCD Monitor has a cable that connects from the electric port (power cable) and the same as the mobile phone that also has a charging cable that also connects to an electric port. You could see that both devices connect from the electric port so the question occurs of who defined the port, your device or the cable? You will say that the devices define the port, in other words we don't purchase devices depending on port while the port is designed dependent on devices and the cable is just an interface that connects both devices and the port so you could say that a high-level module doesn't depend on the low-level module but both should be dependent on abstraction.
Inversion of Control (IoC) Pattern
In practice, an application is designed with many classes. So when we use DI with these classes then these classes are requesting their dependencies via their constructor that’s why it's helpful to have a class dedicated to creating these classes with their associated dependencies. These classes are referred to as containers, or more specifically, Inversion of Control (IoC) containers or Dependency Injection (DI) containers.
The Inversion of Control (IoC) containers is a factory that is responsible for providing instance of types that are requested from it. If a given type has declared that it has dependencies, and the container has been configured to provide the dependency types, it will create the dependencies as part of creating the requested instance. Suppose an application designed with the Strategy design pattern. There are designed interfaces and implemented with classes. The IoC container configured to such way that when application is requesting for interface then it provides that interface dependencies i.e class instance, hence class object can be provided to classes without the need for any hard-coded object construction.
ASP.NET Core and DI
The ASP.NET Core itself provides basic built in IoC container that is represented by IserviceProvider interface. It supports constructor dependency injection by default. ASP.NET Core uses DI for for instantiating all its components and services. The container is configured in ConfigureService method of the startup.cs class as this class is entry point to application. We configure the built-in and customer services and components that can be used in the entire application life cycle.
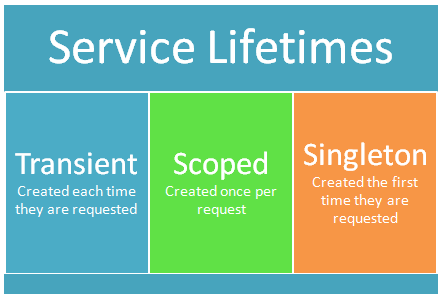
The ASP.NET Core services can be configured with the three lifetimes and registration options.
Figure 1: Service lifetime options
Let’s discuss the difference between these lifetime and registration options one by one.
Transient
The AddTransient method is used for the Transient lifetime option. This AddTransient method is used to register services in IoC container and it get instantiated each time when it is accessed. If we have a service which is used multiple places in same request, a new instance would be created each time.
Suppose we have a user service which is used to access user detail and user name so we create two method for these operations. One method is used in action method and another is used on view so there are two new instance create as we requested for both methods of user service from different part controller and view.
As this method get instantiated on each request that’s why it should be used for lightweight and stateless services.
We create an interface named IUniqueKeyProviderService which has a method signature as per following code snippet.
namespace DIApplication.Service
{
    public interface  IUniqueKeyProviderService
    {
        int GetUniqueKey();
    }
}
Now, we create a class named UniqueKeyProviderService which has implementation of IUniqueKeyProviderService interface per following code snippet.
namespace DIApplication.Service
{
    public class  UniqueKeyProviderService: IUniqueKeyProviderService
    {
        public int  GetUniqueKey()
        {
            return GetHashCode();
        }
    }
}
Now, we register this IUniqueKeyProviderService service with its dependencies using AddTransient option in the ConfigureServices method of the Startup class as per following code snippet.
public void  ConfigureServices(IServiceCollection services)
        {
            services.AddMvc();
            services.AddTransient<IUniqueKeyProviderService, UniqueKeyProviderService>();
        }
Now, we create HomeController to consume method of the IUniqueKeyProviderService service. The following code snippet is for the same.
using DIApplication.Service;
using Microsoft.AspNetCore.Mvc;

namespace DIApplication.Controllers
{
    public class  HomeController : Controller
    {
        private readonly  IUniqueKeyProviderService uniqueKeyProviderService;

        public HomeController(IUniqueKeyProviderService uniqueKeyProviderService)
        {
            this.uniqueKeyProviderService = uniqueKeyProviderService;
        }

        public IActionResult Index()
        {
            int model = uniqueKeyProviderService.GetUniqueKey();
            return View(model);
        }
    }
}
As per the above code, the controller used constructor dependency injection to inject IUniqueKeyProviderService service. We can also inject IUniqueKeyProviderService service on view to access any method of service. We show unique id on view so create index view as per following code snippet.
@model int
@inject DIApplication.Service.IUniqueKeyProviderService uniqueKeyProviderService;
<h2>Transient LifeTime</h2>
<h4>Unique key from service instance created in controller: @Model</h4>
<h4>Unique key from service instance created in view: @uniqueKeyProviderService.GetUniqueKey()</h4>
Now it runs the application and shows result as follows.
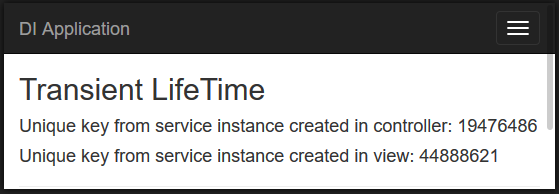
Figure 2: Transient Lifetime
As the result in the above figure shows that a unique key is different from both requests which means each request creates new instance of IUniqueKeyProviderService.
Scoped
The AddScoped method is used for the Scoped lifetime option. This Add Scoped method is used to register services in IoC container. It provides service instance once per request. If we have a service which is used multiple places in the same request, only single instance would be created for that.
We have the same view, controller and service. We register this IUniqueKeyProviderService service with its dependencies using AddScoped option in the ConfigureServices method of the Startup class as per following code snippet.
public void  ConfigureServices(IServiceCollection services)
        {
            services.AddMvc();
            services.AddScoped<IUniqueKeyProviderService, UniqueKeyProviderService>();
        }
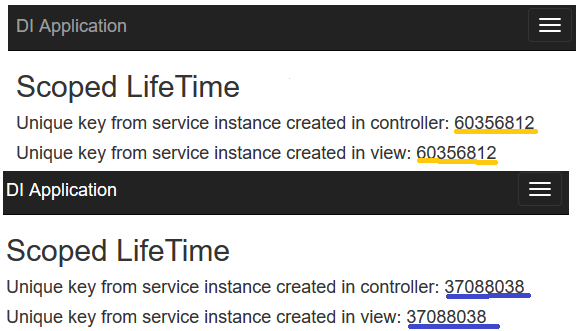
Now run the application and make two subsequent requests and results shown in the below figure.
Figure 3: Scoped Lifetime
As per the above figure, the AddScoped creates a single instance once per request. When we make another request, then it creates another instance of the service.
Singleton
The AddSingleton method is used for the Singleton lifetime option. This AddSingleton method is used to register services in IoC container. It provides service instance the first time it is requested. After that every subsequent request will use the same instance. If we have a service which is used multiple places in the same or separate requests, only single instance will be created for that.
We have same view, controller and service. We register this IUniqueKeyProviderService service with its dependencies using AddSingleton option in the ConfigureServices method of the Startup class as per following code snippet.
public void  ConfigureServices(IServiceCollection services)
        {
            services.AddMvc();
            services.AddSingleton<IUniqueKeyProviderService, UniqueKeyProviderService>();
        }
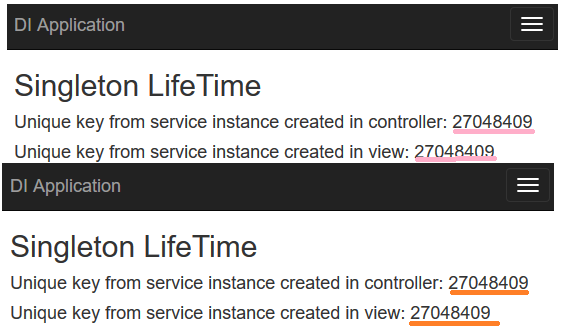
Now, run the application and make two subsequent requests. The result is shown below.
Figure 4: Singleton Lifetime option
As per the above figure, the AddSignleton creates a single instance when requested the first time. When we make two subsequent requests, then it uses same instance of the service in both requests.
If an application requires singleton behavior, allowing the services container to manage the service's lifetime is recommended instead of implementing the singleton design pattern and managing class object's lifetime in the class itself.
Framework-Provided Services
The ConfigureServices method in the Startup class is responsible for defining the services the application will use, including platform features like Entity Framework Core, ASP.NET Core MVC and ASP.NET Core Identity. The features and middleware provided by ASP.NET, such as MVC, follow a convention of using a single AddServiceName extension method to register all of the services required by that feature such as AddDbContext, AddIdentity, AddMVC and AddAuthorization etc.
- AddDbContext : This method is used to add application DbContext to the dependency injection.
- AddIdentity : The identity services are added to the application in the ConfigureServices method.
Conclusion
This article introduced the dependency injection in ASP.NET Core application. It explained the instance lifetime with registration options.
Downloads
You can download the complete source code from the MSDN Sample, using the links, mentioned below.
- Rating Star Application in ASP.NET Core
- CRUD Operations in ASP.NET Core and Entity Framework Core
- Repository Pattern In ASP.NET Core
- Generic Repository Pattern in ASP.NET Core
- Onion Architecture In ASP.NET Core MVC
- ASP.NET Core MVC: Authentication and Role Based Authorisation with Identity
- ASP.NET Core MVC: Authentication and Claim Based authorization with Identity
See Also
It's recommended to read more articles related to ASP.NET Core.
- ASP.NET Core: Overview
- ASP.NET Core With Visual Studio 2017 RC
- ASP.NET Core Entity Framework Core Code First: CRUD Operations
- Repository Pattern In ASP.NET Core
- ASP.NET Core: Generic Repository Pattern
- Onion Architecture In ASP.NET Core MVC
- ASP.NET Core MVC: Authentication And Role Based Authorization With ASP.NET Core Identity
- ASP.NET Core MVC: Authentication And Claim Based Authorisation With ASP.NET Identity Core


