SharePoint 2016 Client Side Rendering : Assign Column Values during run time and conditionally highlight list view rows
Introduction
Prior to SharePoint 2013, if we wanted to modify the SharePoint List View we usually had to edit the list XSLT. With SharePoint 2013 however things changed with the introduction of Client Side Rendering where we could tap in to the View Rendering process and inject JavaScript and HTML to override the default rendering. In this walk through let us go through a requirement I had to implement in one of the recent projects.
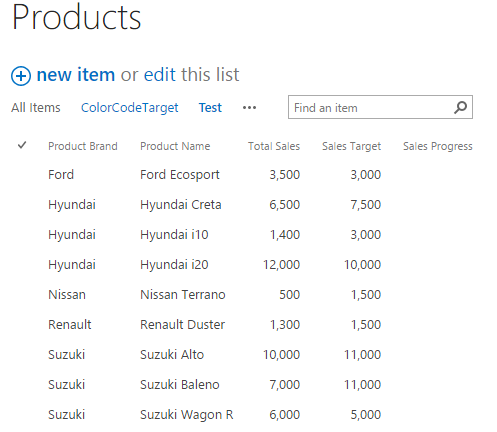
The requirement was to dynamically compare two column values at run time and assign the third column a value based on the comparison. In addition to it, based on the new value assigned, the row had to be highlighted with different colors. Conditionally assigning value was fairly simple as mentioned here. However there was an addition requirement to color code the rows based on the value as well. Combining both the functionality was a challenge. Thanks to Andrey for helping me out here. We will see in detail how we can implement it in this article.
Client side rendering is a powerful option to modify the list views and list forms. It simply means that the data is transformed and displayed using Client side technologies like HTML and JavaScript. Prior to SharePoint 2013 in case of any requirements to modify the list views we had to use SharePoint Designer and XSLT formatting.
Essentially JSLink taps into list view rendering and overrides properties that governs the list view look and feel . Some of the properties that can be over ridden are:
- OnPreRender
- OnPostRender
- View
- Body
- Item
- Fields
- Header
- Footer
In this article we will be over riding OnPostRender and Fields properties.’OnPostrender’ allows us to modify the list view once the view has been rendered. ‘Fields’ property helps us to override the styling behaviour during rendering time. Similarly each of the property can be over ridden during run time to accomplish different list view modifications and at different list view place holders.
Let’s see how we can modify the List view using JSLink and highlight rows conditionally.
JSLink Implementation
- The main entry point of client side rendering is SPClientTemplates.TemplateManager.RegisterTemplateOverrides . Prior to calling this function we will define which are the JSLink properties we will be overriding along the rendering process.
 var overrideCurrentContext = {};
 overrideCurrentContext.Templates = {};
 overrideCurrentContext.Templates.Fields = {
 'Sales_x0020_Progress': { 'View': HighlightProductRows }
 };

 overrideCurrentContext.OnPostRender = postRenderHandler;
Here we are overriding the View and OnPostRender Properties of client context.Once we have specified the overriding properties, call the RegisterTemplateOverride method
SPClientTemplates.TemplateManager.RegisterTemplateOverrides(overrideCurrentContext);
- The main logic is added within the function ‘HighlightProductRows.This function will compare Total sales and Sales target column values and return a value to Sales Progress column. Since this method is assigned as an override of ‘Fields’ property, it will run for each of the single list item within the list.
Ctx.CurrentItem.ColumnName will get the value of the column. Since it is a number field it has an inherent comma for values greater than 1000. To do numerical comparison we have to remove comma which is done as below:
var totalSalesVal =ctx.CurrentItem.Total_x0020_Sales.replace(",", "");
Once we have comma free value, we will compare 2 values(totalSalesVal, targetSalesVal) and assign 'Sales_x0020_Progress' a return value based on the result.
function HighlightProductRows(ctx) {

     var totalSalesVal =ctx.CurrentItem.Total_x0020_Sales.replace(",", "");
     var targetSalesVal =ctx.CurrentItem.Sales_x0020_Target.replace(",", "");

     var displayHtmls =  {
        'LongWay':'Long way to target !',
        'Reaching':'Reaching Target',
       'OnTarget':'On Target'
   };

    return displayHtmls[AnalyseSalesValues(totalSalesVal, targetSalesVal)];
}

function AnalyseSalesValues(totalSalesVal, targetSalesVal) {

   if(parseInt(totalSalesVal) > parseInt(targetSalesVal))
   {
        return "OnTarget";
    }
    else if(parseInt(targetSalesVal)- parseInt(totalSalesVal) <=1000 )
   {
       return "Reaching";
    }
  else
   {
       return "LongWay";
  }

}
On Post Render we will highlight the rows based on the value assigned to Sales Progress.
fun

                  function postRenderHandler(ctx)

      {
                      var statusColors =  {
                    'LongWay' : '#FFF1AD',
                    'Reaching' : '#FFD800',
                    'OnTarget' : '#01DF3A'
                 };


                     var rows = ctx.ListData.Row;
                for (var i=0;i<rows.length;i++)
                {
                   var totalSalesVal =rows[i]["Total_x0020_Sales"].replace(",", "");
                   var targetSalesVal =rows[i]["Sales_x0020_Target"].replace(",", "");
                   var status = AnalyseSalesValues(totalSalesVal, targetSalesVal);
                   var rowId = GenerateIIDForListItem(ctx, rows[i]);
                   var row = document.getElementById(rowId);
                  row.style.backgroundColor = statusColors[status];
               }

                 }
Here we are using a for loop to iterate through each of the list item using ctx.ListData.Row . Our aim is to read 'Sales_x0020_Progress' column value and based on it highlight the row if required. However there is a problem : We are calculating Sales Progress values during run time but we have not yet written it to the list as the rendering is not complete. We are midway of the rendering process and we have to highlight the row based on the value which is not yet there in the column. Unfortunately we will have to call the ‘AnalyseSalesValues’ method which was used previously once again to get the value based on which we will highlight the row as shown in Line No 14 above.
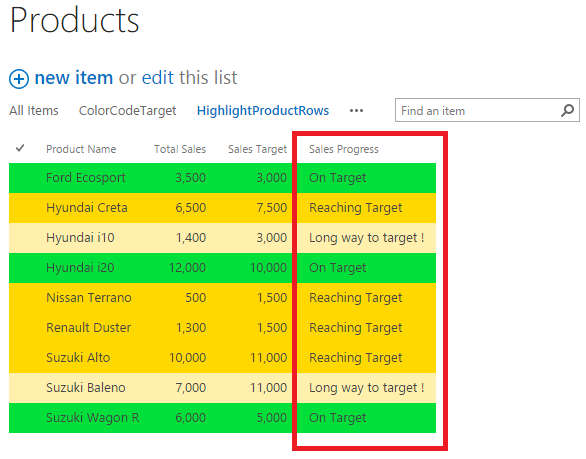
By defining the Conditional Assignment of column value by over riding the fields property and Highlighting the row in PostRender Handler we have achieved the purpose.
Full Code
(function () {

      varoverrideCurrentContext = {};
    overrideCurrentContext.Templates = {};
    overrideCurrentContext.Templates.Fields = {
        'Sales_x0020_Progress': { 'View': HighlightProductRows }
   };

    overrideCurrentContext.OnPostRender = postRenderHandler;
   SPClientTemplates.TemplateManager.RegisterTemplateOverrides(overrideCurrentContext);

})();


function AnalyseSalesValues(totalSalesVal, targetSalesVal) {

    if(parseInt(totalSalesVal) > parseInt(targetSalesVal))
   {
       return "OnTarget";
    }
  else if(parseInt(targetSalesVal)- parseInt(totalSalesVal) <=1000 )
   {
        return "Reaching";
    }
   else
   {
      return "LongWay";
  }

}

function HighlightProductRows(ctx) {

    var totalSalesVal =ctx.CurrentItem.Total_x0020_Sales.replace(",", "");
    var targetSalesVal =ctx.CurrentItem.Sales_x0020_Target.replace(",", "");
    var displayHtmls =  {
        'LongWay':'Long way to target !',
       'Reaching':'Reaching Target',
        'OnTarget':'On Target'
    };

  return displayHtmls[AnalyseSalesValues(totalSalesVal, targetSalesVal)];
}

function postRenderHandler(ctx)
{
    var statusColors =  {
        'LongWay' : '#FFF1AD',
        'Reaching' : '#FFD800',
       'OnTarget' : '#01DF3A'
    };

   var rows = ctx.ListData.Row;
    for (var i=0;i<rows.length;i++)
    {
        var totalSalesVal =rows[i]["Total_x0020_Sales"].replace(",", "");
        var targetSalesVal =rows[i]["Sales_x0020_Target"].replace(",", "");
        var status = AnalyseSalesValues(totalSalesVal, targetSalesVal);
        var rowId = GenerateIIDForListItem(ctx, rows[i]);
        var row = document.getElementById(rowId);
        row.style.backgroundColor = statusColors[status];

    }

}
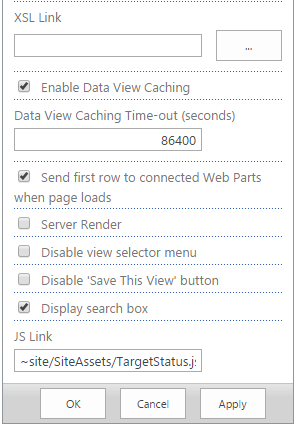
- Let’s see how to add the Code as JSLink to the List view. Save the code as a js file and upload it to one of the Libraries say: Site Assets.
- Go to the edit page of the list view by appending the url “? ToolpaneView=2” at the end of the list view’s .aspx url .
- Click on Edit Web part for the list view. Under Miscellaneous section there is a text box for entering JSLink .
- Add the relative URL of the js file after ~site or ~ sitecollection depending upon the location of the Site Assets Library (or any other repository) where you have uploaded the js file.
Click on Apply. This will apply JSLink to the list view.
Output
Summary
Thus we have conditionally assigned a value to Sales Progress column and based on that value we have highlighted the rows.
See Also
Assign Column Values During Runtime And Highlight The Rows Using Client Side Rendering


