Schedule Task to Empty Windows Temp Folder
Schedule Task to Empty Windows Temp Folder
In this post, we will talk about Windows Temp Folder and how to empty it. which by default exist under system partition and it may decrease the system partition size because it’s size is increasing every day based in your activities in the server or PC and this may affect services that need free space in the system partition like Exchange Hub transport queue …etc.
Firstly, we will define Temp Folder and why it increasing as per Microsoft description:
A Windows temporary file is created under the following three circumstances:
1.Windows Desktop applications, such as Write, and multiple document interface (MDI) applications, such as Excel, create temporary files to handle necessary user editing.
Because a Desktop application cannot have multiple documents open at once, it must immediately create a temporary file that allows you to undo any editing. MDI applications create temporary files only when necessary (for related editing), rather than for every worksheet that is open.
2. When you run an MS-DOS-based standard application with Windows/286, Windows/286 creates a temporary file (for example, ~PIFCHFA.TMP) so that it can swap to disk to make room for other applications to use memory.
3. When you print from Windows or any Windows-based application with the spooler enabled, Windows creates temporary files on the hard disk. Windows spools the print job to the temporary file and then sends it to the appropriate printer as a background operation.
Please refer to MS article for more info https://support.microsoft.com/en-us/kb/92635
Secondly, we will see how to create schedule task for cleaning up this folder
Requirements: Service Account with Local admin privilege and password set to never expired
Please follow below Steps to create the script and schedule task:
- Create PowerShell script by opening new TXT file and type
- Set-Location “C:\Windows\Temp”
- Remove-Item * -recurse -force
- Then save the file as CleanTempFolder.ps1
- Create New Folder Under C partition called Scripts
- Copy Powershell.exe from this location “C:\Windows\System32\WindowsPowerShell\v1.0” to newly created folder
- Copy the script we have created in step number 1 to Script folder under C
- Open control panel à Administrative Toolsà Task Scheduler
- Right click Task Scheduler and choose Create a Basic task
- In the opening window type Name and description if needed and then press next
- In the trigger choose when do you want this Task to start then press next, I would recommend to run it daily
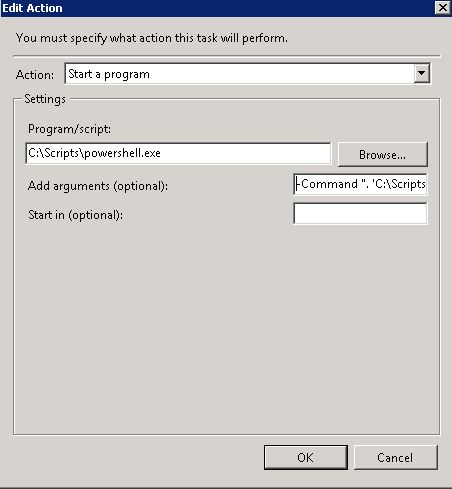
- In action select start program and then press Next
- In the program/script type (C:\Scripts\powershell.exe)
- In “Add Arguments ( -Command ". 'C:\Scripts\CleanTempFolder.ps1’ “ ) then Press Next
- Choose “open the Properties dialog for this task when I click finish” check box and then press finish
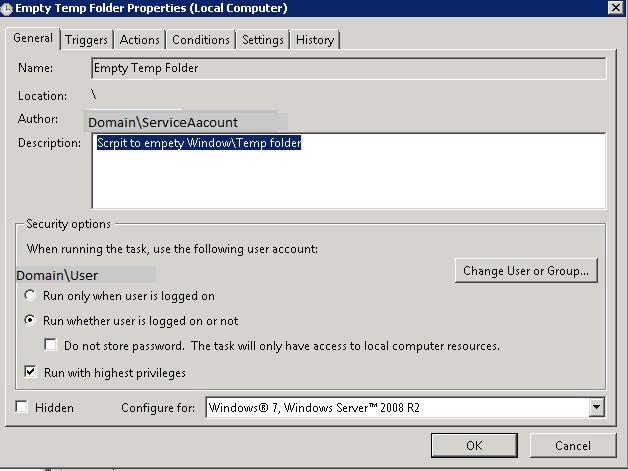
- In the General Tab click “Change User or group” check box to change the user account to service account
- After inserting service account please select “Run whether user is logged on or not” check box
- Select “Run whether user is logged on or not” checkbox
- Select “run with highest privileges” checkbox
- Press OK then you will be prompted to enter password for service account please type it and press OK
- Run the task and check the history tab assure that it run successfully
- If you see any error related to permissions , please give the service account permission on Temp folder , or you can just double click the folder and approve permissions

