ASP.NET Core With Visual Studio 2017 RC
Introduction
Microsoft released a new version of Visual Studio - Visual Studio 2017 RC. It has a lot of new features and development tools. We can download it from here. There are three editions of Visual Studio 2017, as follows.
- Visual Studio Community 2017 RC: Free, fully-featured IDE for students, open-source and individual developers.
- Visual Studio Professional 2017 RC: Professional developer tools, services, and subscription benefits for small teams.
- Visual Studio Enterprise 2017 RC: End-to-end solution to meet demanding quality and scale needs of teams of all sizes.
Installation
Download the Visual Studio 2017 RC using the above-mentioned URL and run the downloaded exe. We will see a launch screen, as shown below.
Figure 1: Set up launch screen
The Visual Studio 2017 RC installation process is online, so make sure the internet connection doesn’t break during the installation process.
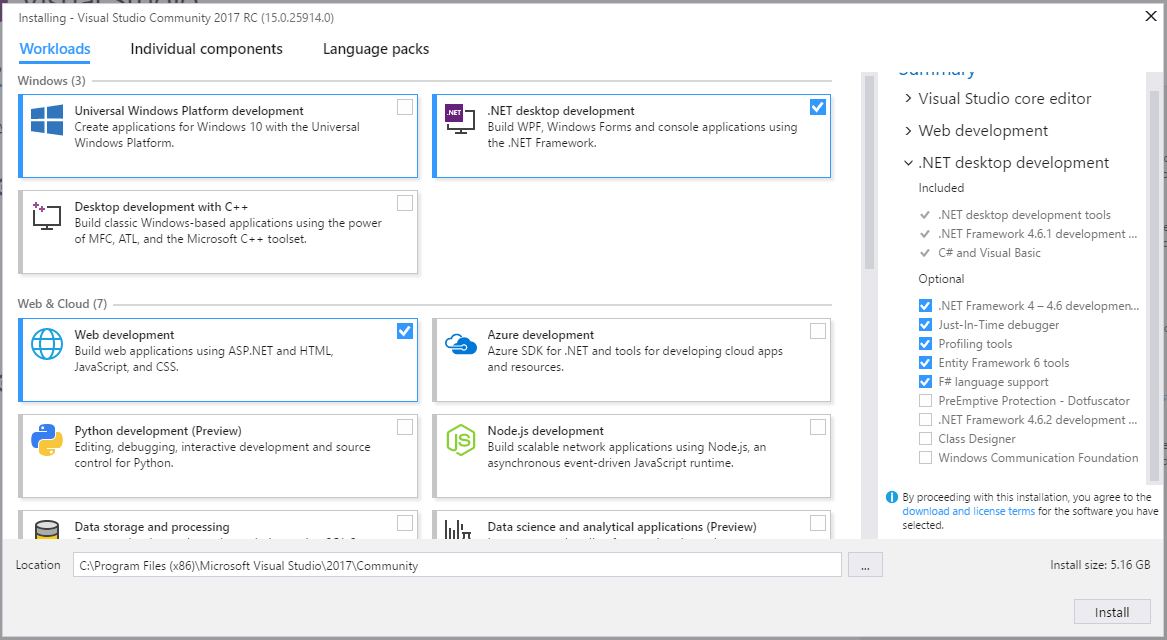
The Visual Studio 2017 RC offers a customization and smart way to choose the toolset. To install .NET Core, we have to select the “.NET Core and Docker (Preview)” from the Workloads panel. The following install screen shows Workloads set.
Figure 2: Workload set
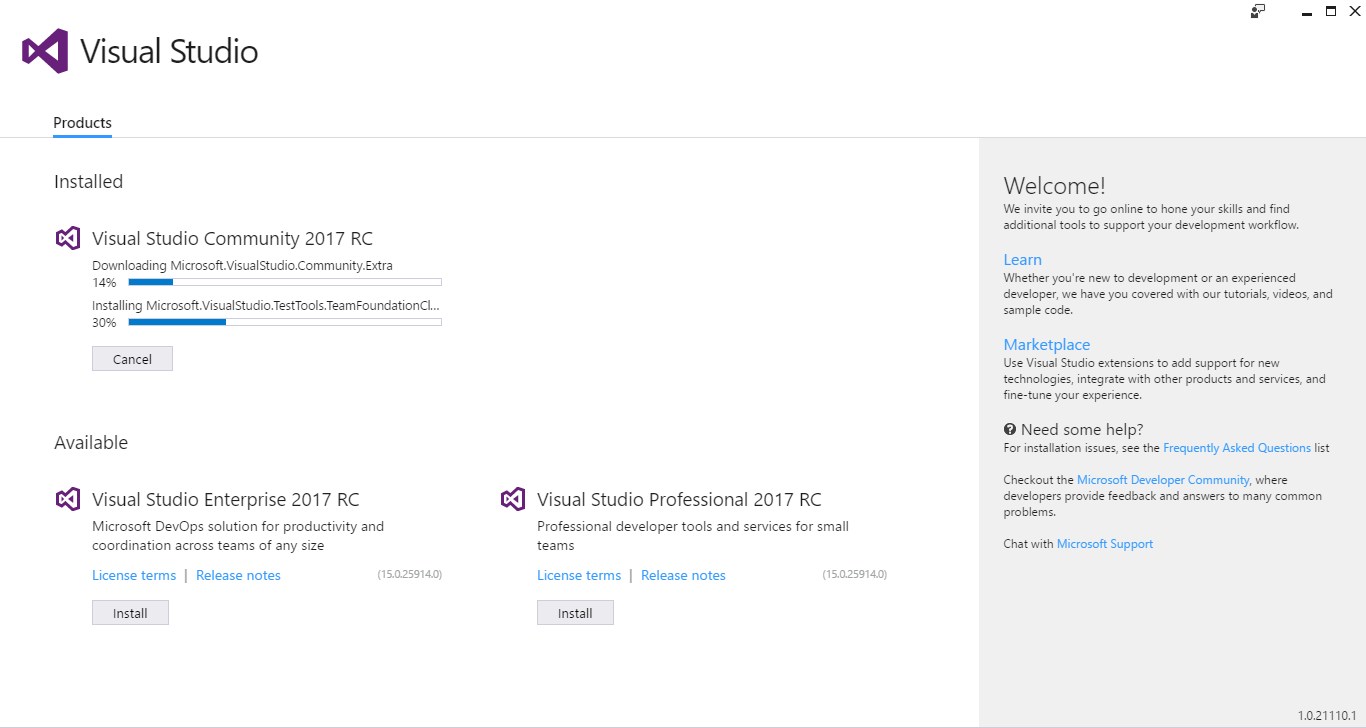
As per the above figure, there are three tabs which help in installing the required components and tools only. We choose required workload, components and language; after that click on install button. Now, the installation starts.
Figure 3: Installation screen
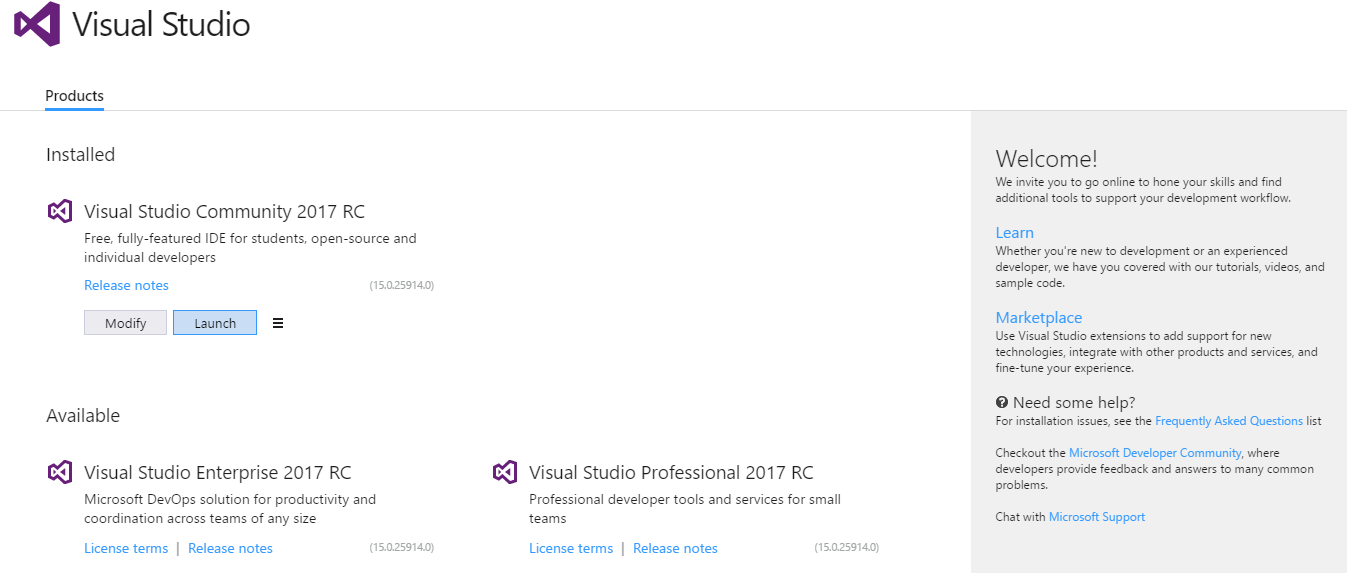
It downloads workload and components as per our selection. Once the Visual Studio 2017 RC installation is completed, we see the following screen.
Figure 4: Launch screen
This Launch screen has two buttons - Modify which is used to add more workloads and components, and Launch button which is used to launch the Visual Studio 2017 RC for application development. The bar icon shows the options for Repair and Uninstall.
Get Started Now
Once we have installed the Visual Studio 2017 RC with .NET Core, we can start building the ASP.NET Core application. Follow the below steps to create your first application.
Start Visual Studio 2017 RC.
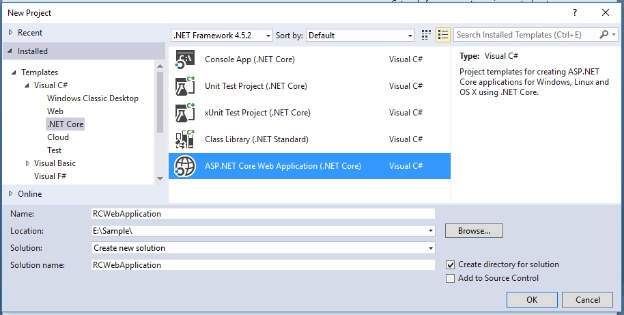
Go to File -> New Project and choose the ASP.NET Core Web Application (.NET Core) template from the collection of C# .NET Core templates, as shown in the below figure.
Figure 5: C# .NET Core Templates
It’s a web template for cross-platform compatible projects that run on .NET Core framework. With a destination folder location defined at the bottom, such as E:\Sample\ we click OK button and will be greeted by a second set of web application template choices.
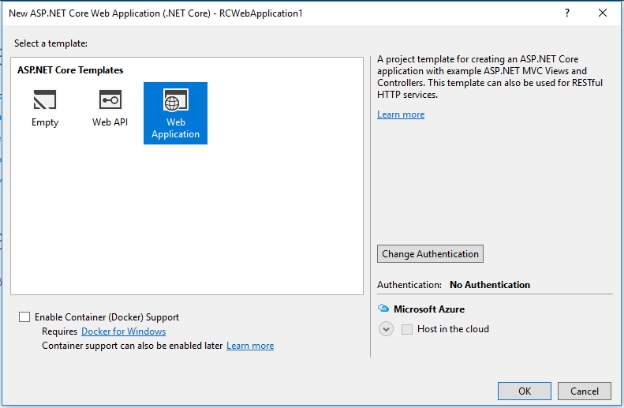
Figure 6: Select Template
It determines what features in ASP.NET Core are initially configured in our new application.
- Empty: The ‘Empty’ template will start with nothing except some middleware that outputs the text “Hello World”.
- Web API: The Web API template starts with a Controller class that will allow us to respond to RESTful requests at the /api/Values endpoint.
- Web Application: The Web Application template gives us an MVC framework enabled project with some Razor views, the bootstrap CSS framework, and jQuery library installed.
We will now develop a sample application using this predefined project template. As we don’t choose any authentication, that’s why there is not a create a Models folder. So, create a Model folder which holds a view model to pass data from view to controller and vice-versa, as per the following code snippet.
using System.ComponentModel.DataAnnotations;

namespace RCWebApplication.Models
{
    public class  CustomerViewModel
    {
        public long  Id { get; set; }
        [Display(Name = "First Name")]
        public string  FirstName { get; set; }
        [Display(Name = "Last Name")]
        public string  LastName { get; set; }
        public string  Name { get; set; }
        public string  Email { get; set; }
        [Display(Name = "Mobile No")]
        public string  MobileNo { get; set; }
    }
}
Now, we create another class to store customer data, as per the following code snippet.
using System.Collections.Generic;

namespace RCWebApplication.Models
{
    public class  CustomerData
    {
        public static  List<CustomerViewModel> Customers { get; set; } = new  List<CustomerViewModel>();
    }
}
We use the Home controller which has GET and POST action method as per the following code snippet.
using Microsoft.AspNetCore.Mvc;
using RCWebApplication.Models;

namespace RCWebApplication.Controllers
{
    public class  HomeController : Controller
    {
        public IActionResult Index()
        {
            return View(CustomerData.Customers);
        }
        public IActionResult AddCustomer()
        {
            CustomerViewModel model = new  CustomerViewModel();
            return View(model);
        }
        [HttpPost]
        public IActionResult AddCustomer(CustomerViewModel model)
        {
            if(ModelState.IsValid)
            {
                CustomerData.Customers.Add(model);
            }
            return RedirectToAction("Index");
        }
    }
}
The Controller is developed to handle add and view operation requests for a Customer entity. Now, let's develop the user interface for these operations. We develop it for the views for adding a customer and customer listing. Let's see each, one by one.
Customer List View
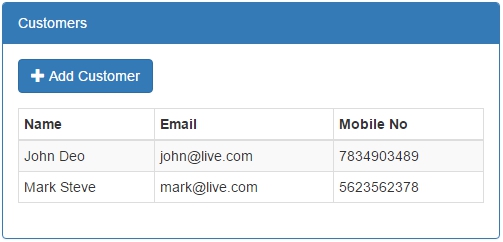
This is the first view when the application is accessed or the entry point of the application, when executed. It shows the customer listing as in the Figure. We display customer data in tabular format and on this view we create links to add a new customer. This view is an index view and the following is a code snippet for Index.cshtml under the Home folder of Views.
@model IEnumerable<RCWebApplication.Models.CustomerViewModel>
<div class="top-buffer"></div>
<div class="panel panel-primary">
    <div class="panel-heading panel-head">Customers</div>
    <div class="panel-body">
        <div class="btn-group">
            <a id="createEditCustomerModal" asp-action="AddCustomer" class="btn btn-primary">
                <i class="glyphicon glyphicon-plus"></i>  Add Customer
            </a>
        </div>
        <div class="top-buffer"></div>
        <table class="table table-bordered table-striped table-condensed">
            <thead>
                <tr>
                    <th>Name</th>
                    <th>Email</th>
                    <th>Mobile No</th>
                </tr>
            </thead>
            <tbody>
                @foreach (var item in Model)
                {
                    <tr>
                        <td>@Html.DisplayFor(modelItem => item.FirstName) @Html.DisplayFor(modelItem => item.LastName)</td>
                        <td>@Html.DisplayFor(modelItem => item.Email)</td>
                        <td>@Html.DisplayFor(modelItem => item.MobileNo)</td>
                    </tr>
                }
            </tbody>
        </table>
    </div>
</div>
When we run the application and call the Index() action with a HttpGet request, then we get all the customers listed in the UI as in Figure 7. This UI has an option for Add operation.
Figure 7: Customer Listing
Add Customer View
Now, define an "Add Customer" partial view. The following is the code snippet for AddCustomer.cshtml.
@model RCWebApplication.Models.CustomerViewModel
<div class="top-buffer"></div>
<div class="panel panel-primary">
    <div class="panel-heading panel-head">Add Customer</div>
    <div class="panel-body">
        <form asp-action="AddCustomer" role="form">
            <div class="form-horizontal">
                <div class="form-group">
                    <label asp-for="FirstName" class="col-lg-3 col-sm-3 control-label"></label>
                    <div class="col-lg-6">
                        <input asp-for="FirstName" class="form-control" />
                    </div>
                </div>
                <div class="form-group">
                    <label asp-for="LastName" class="col-lg-3 col-sm-3 control-label"></label>
                    <div class="col-lg-6">
                        <input asp-for="LastName" class="form-control" />
                    </div>
                </div>
                <div class="form-group">
                    <label asp-for="Email" class="col-lg-3 col-sm-3 control-label"></label>
                    <div class="col-lg-6">
                        <input asp-for="Email" class="form-control" />
                    </div>
                </div>
                <div class="form-group">
                    <label asp-for="MobileNo" class="col-lg-3 col-sm-3 control-label"></label>
                    <div class="col-lg-6">
                        <input asp-for="MobileNo" class="form-control" />
                    </div>
                </div>
                <div class="col-lg-6 col-sm-8 pull-right">
                    <button id="btnCancel" class="btn btn-default" type="button">Cancel</button>
                    <button class="btn btn-success" id="btn" type="submit">Submit</button>
                </div>
            </div>
        </form>
    </div>
</div>
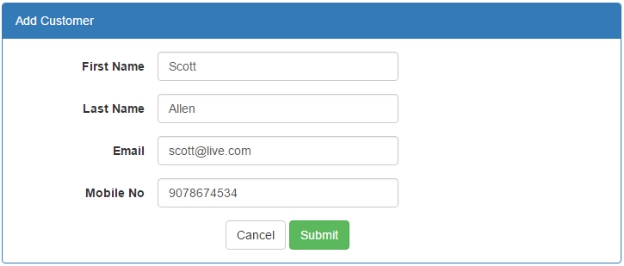
Now, run the application and click on Add Customer button which calls AddCustomer action method, then we get the UI as in Figure 8 to add a new customer.
Figure 8: Add Customer
Downloads
You can download other ASP.NET Core applications source code from TechNet Gallery, using the following links.
- Rating Star Application in ASP.NET Core
- CRUD Operations in ASP.NET Core and Entity Framework Core
- Repository Pattern In ASP.NET Core
- Generic Repository Pattern in ASP.NET Core
- Onion Architecture In ASP.NET Core MVC
- ASP.NET Core MVC: Authentication and Role Based Authorisation with Identity
- ASP.NET Core MVC: Authentication and Claim Based authorization with Identity
See Also
It's recommended to read these articles, which describe Entity Framework Code First approach basics. These are:
- ASP.NET Core: Overview
- ASP.NET Core Entity Framework Core Code First: CRUD Operations
- Repository Pattern In ASP.NET Core
- ASP.NET Core: Generic Repository Pattern
- Onion Architecture In ASP.NET Core MVC
- ASP.NET Core MVC: Authentication And Role Based Authorization With ASP.NET Core Identity
- ASP.NET Core MVC: Authentication And Claim Based Authorisation With ASP.NET Identity Core
- ASP.NET Core : Overview Of Dependency Injection
- ASP.NET Core: In-Memory Caching
Conclusion
The Visual Studio 2017 RC can be used to develop most of the applications for different platforms. As it’s the RC version, we need to still wait to use it in a production development environment.

