SQL Azure Database: Understanding Transactional Replication Step by Step
What is a Transaction?
The transaction is the term we hear quite frequently and of course, almost everyone working with the software industry is presumably familiar with it. In a nutshell, it is a unit of work, which must show ACID properties (remember the syllabus curriculum during college days? Atomicity, Consistency, Isolation, and Durability).
Assuming that we all have a basic understanding of those ACID properties, let’s move to the next term, i.e. Transactional Replication.
What is Transactional Replication?
If you think logically, it means replicating or migrating the transactional changes to somewhere, and which is exactly what this term means. Basically, it is a feature of SQL Server, using which, you can migrate committed changes (aka transactions) to the multiple targets (databases in this context).
Transactional Replication is one of the popular techniques when you want to migrate your production databases to cloud environments when SQL server always on, setup is not in place. Transactional replication ensures to perform the migration of your on-premises databases to cloud with minimal downtime.
When the term migration is referred, which includes the transfer of the data from one point to another, it means there must be someone to send the data and at another end, there must be someone to receive it. Also, there must be a channel present which will serve as a tunnel for data being transferred. If we were to give fancy names to the sender / receiver and channel terms used above, we can call the data sender as a publisher and data receiver as a subscriber.
How Transactional Replication Works?
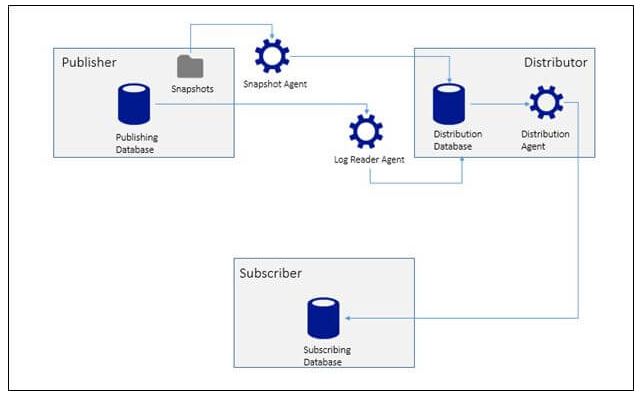
Transaction replication basically comprises of three main components-
- Snapshot agents
- Log reader agents
- Distribution agents
Snapshot agent is responsible for preparing the snapshot files containing schema and data of the database objects and creates the sync jobs on the distributor. At this point, it becomes important to provide a bit of a background on the snapshot concept mentioned here - directory meaning of snapshot is a photograph which captures the particular state or instance of the time at which it is taken. Similarly, database snapshot is the captured information of the database at a particular time instance including schema of the database.
Log reader agent keeps monitoring the transactional logs of the databases, which are configured for the transactional replication and copies those to the distributor’s database.
Distribution agent basically distributes or copies all the snapshot files of snapshot agent and log files from the distribution database to the subscribers.
The replication happens in near real time. We can easily visualize this system as shown below
Demo
Now, with this understanding, let’s see how we can use this concept to replicate our On-Premises database to SQL Azure database.
For this article, let’s assume that instead of actual On-Premises SQL Server Enterprise database, we have Azure Virtual Machine running SQL Server 2014 Enterprise edition, This will act as a publisher for us and we will have a brand new SQL Azure database provisioned in Azure subscription, which will act as a subscriber.
We will be going through high-level steps below
- Creating Azure ARM VM with SQL Server 2014 Enterprise Edition Template.
- Creating SQL Azure Database.
- Creating SQL Publications.
- Creating Subscription for created publication.
Create Azure ARM VM with SQL Server 2014 Enterprise version
Let’s start by creating Azure ARM VM by selecting SQL Server 2014 Enterprise edition template. We will name the virtual machine as “SQLVM1”.
This article assumes that you have a basic understanding of Azure and have basic experience with provisioning resources using Azure portal, so instead of going through the detailed steps of creating virtual machines and SQL azure databases on Azure, this article will mainly focus on setting the required steps for enabling the transaction replication for SQL Server database, hosted in Azure ARM VM.
You can go through the detailed steps of creating Azure VM and Azure databases, using the links, given below-
- Provision a SQL Server virtual machine in the Azure Portal
- SQL Database tutorial: Create a SQL database in minutes by using the Azure portal

Create SQL Azure Database
After SQL server VM is provisioned, let’s create a new SQL Azure database (PaaS), using Azure portal and name it as bgdb.
We will be using this database as a subscriber, meaning to replicate the data and changes from our source database created in the last step.
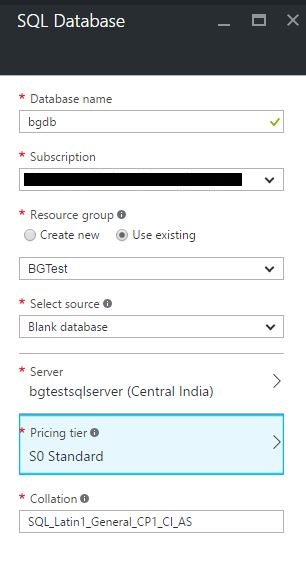
Note that this database is created just for the demo so S0 standard pricing tier has been selected. You can choose the right tier, as per your needs.
Remember the server user name and password. We will be needing it later in upcoming steps
Configure Azure VM database
Now, since we have both source and destination servers ready. let’s go ahead and create a sample database in the source by logging in to the Azure VM created in step 1.
Open SQL Server Management Studio in Azure VM -> Create a new database named “AzureVMDatabase” -> Create a new table and name it as “Person” -> add a few entries so that we have some data in the table.
CREATE DATABASE  [AzureVMDatabase] CONTAINMENT = NONE
    ON  PRIMARY  (
        NAME = N'AzureVMDatabase', FILENAME = N'F:\Data\AzureVMDatabase.mdf' , -- replace the path according to your need!
        SIZE = 128MB ,
        FILEGROWTH = 64MB
    )
    LOG ON  (
        NAME = N'AzureVMDatabase_log', FILENAME = N'F:\Log\AzureVMDatabase_log.ldf' , -- replace the path according to your need!
        SIZE = 64MB ,
        FILEGROWTH = 64MB )
GO

USE AzureVMDatabase
GO

CREATE TABLE  Person(
    id int  identity(1,1),
    Name nvarchar(100),
    [Address] nvarchar(250),
    Email nvarchar(250),
    Zip nvarchar(50),
    Phone nvarchar(50)
)
GO

-- We must have PRIMARY KEY for the replication
ALTER TABLE  Person
    ADD CONSTRAINT  pk_Person_id PRIMARY  KEY (id)
GO

Insert Person (Name,[Address])
values
    ('Ronen','Israel'),
    ('Ariely','India')
GO

SELECT * FROM Person
GO
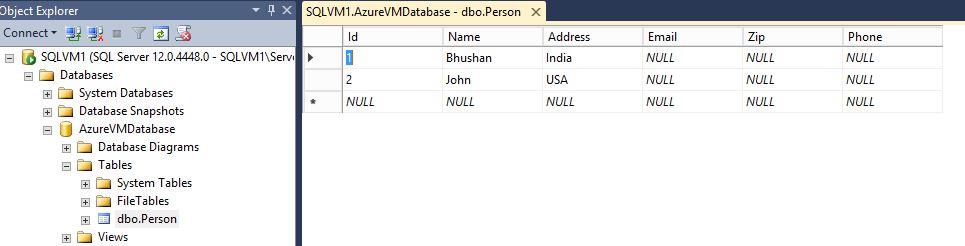
We have a schema and the data of our sample table ready.
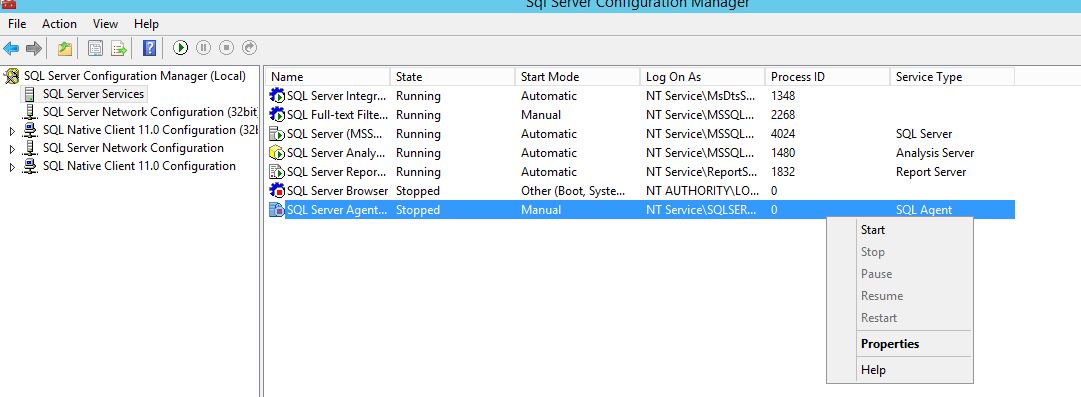
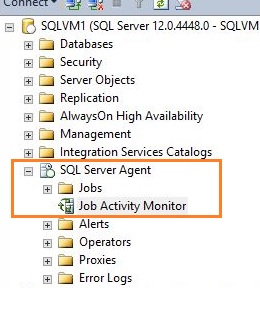
Let’s confirm that the SQL Server Agent service is running, and if If it is not started, make sure you start it.
There are several options to do this step.
Option 1: since we already using the SSMS and we have open connection to the server, you can see the "SQL Server Agent" in the Object explorer windows. If the icon looks like this  , then the service is running. If the Icon has white circle
  , then the status is unknown by the SSMS at this time. If the service has a red circle
  , then the service is not running. In order to start the service, simply right click on the "SQL Server Agent" and select "Start".
Option 2: You can start the service from the windows service list. It is a good idea to configure the service to start automatically if you want to use "run continuously" for your replication (more info in the following steps).
Option 3: Using "SQL Server Configuration Manager", as you can see in the below image.
Create and configure SQL Server Database Publication
In this step let's start by creating a new publication for source SQL server-
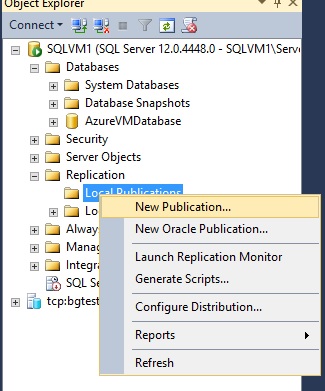
Open SQL Management Studio in Azure VM and connect to the local instance of SQL Server database. Expand the replication node and right click on Publication. Click New Publication.
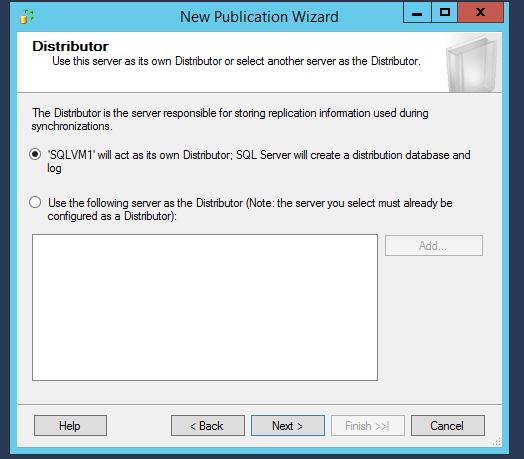
It launches a wizard, using which, you can configure your new publication before saving it. Click next.
In this step, we will configure the distributor settings. Since we have created only one virtual machine in Azure and it is hosting SQL Server, we will use same VM as a distributor but you can choose the different Server as your distributor (refer to the architectural image, given above).
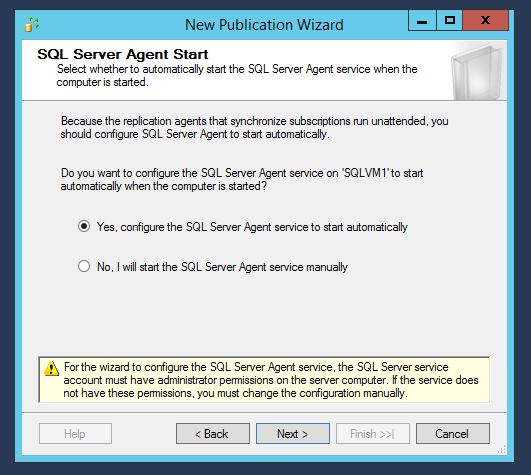
Click next. The next step is about the configuration of SQL Server agent Service. Choose SQL Server agent Service to start automatically.
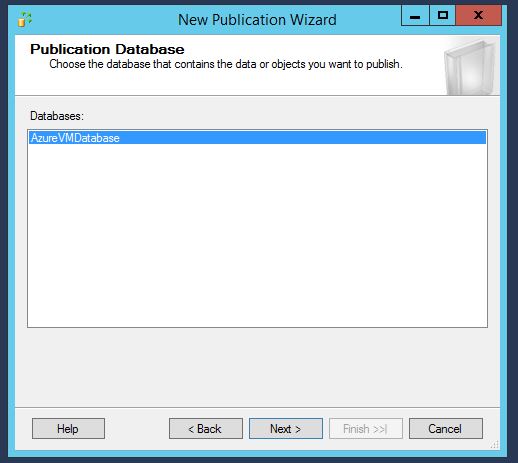
Click next. It asks to select the database for which you want to enable the transactional replication. Objects within this database will be picked for the publishing.
Let’s select our database i.e. AzureVMDatabase and click next.
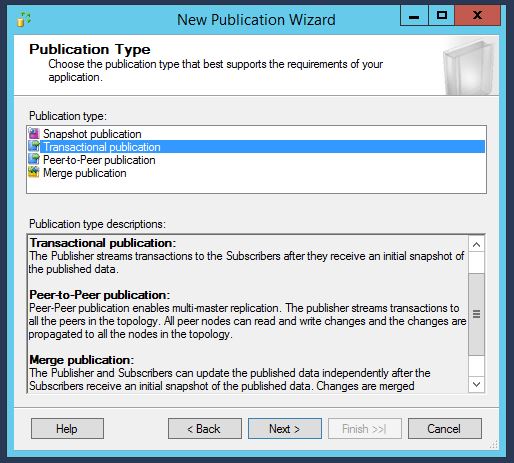
Next step is about selecting the publication type for the database. For this article, I will not go through the details of each publication type. We will simply select Transactional publication and click next.
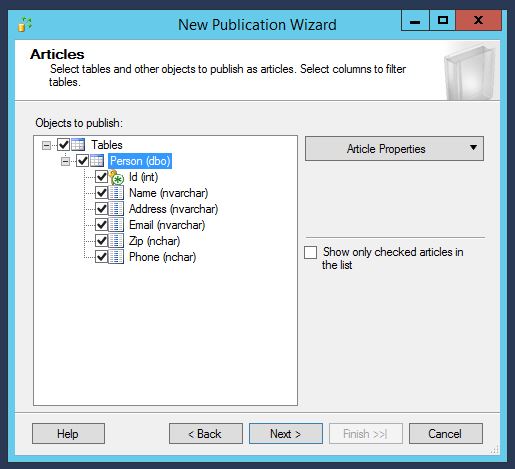
On the next step, select the database objects from the selected database. We will select our Person table for the publication.
Click next. Now, it asks about the configuration of the snapshot agent and it’s frequency, i.e when it should run. We will select the settings, as shown in the image, given below

Click next. It asks for the configuration of the account, which will be used to run the snapshot agent. Click Security settings to configure the settings, as shown below

As the last step, it shows all the configuration settings and asks to give a name to the publication job. We will name it as “SQLAzurePublication”.

Click Finish. If you have setup everything correctly as per the article, on next step, you should see something like-

Creating Subscription
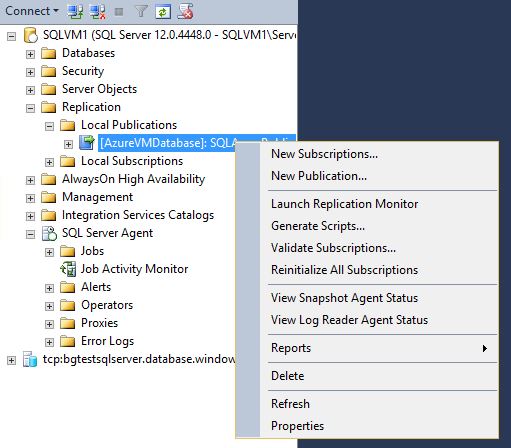
After creating the publication, refresh SQL server node, using SQL management studio, so that newly created publication appears under the local publications node for the database.
Right click on the publication and select the new subscription. It launches a wizard to create the subscription.
On the next screen, make sure, the correct publisher and publication are selected from the list. Click next.

Next step is about the configuration of deploying the distribution agents. We will select the option to run an agent on the same Azure VM , which we have created.
The meaning of Push subscription model is the distribution agent will be pushing the transactional changes to the subscribers, instead of the subscribers pulling those from the agent.

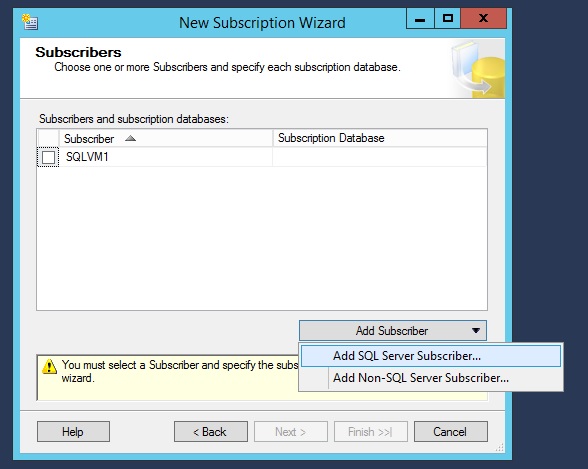
Click next. This step is crucial and here, you are actually selecting the target database, where you want to push all your data and schema of the source database. Select Add SQL Server subscriber option.
It opens up standard SQL Server authentication wizard (similar to logging into SSMS)
Enter the SQL server name, user name and password of the SQL Azure database which we created in step-2. You can obtain SQL server connection string from Azure portal by navigating to your SQL Azure database and by selecting Show database connection strings option from the essentials section.
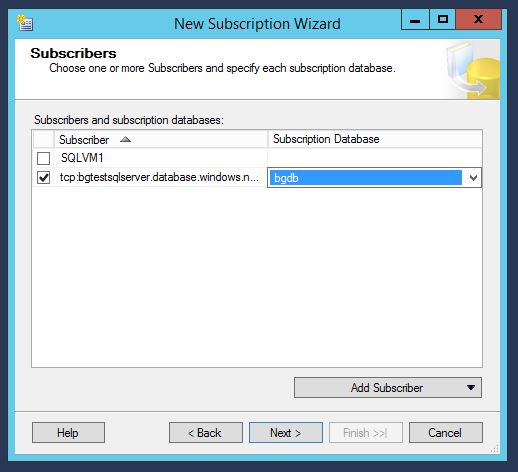
Select correct database name from the dropdown and click next.
Next step is about configuring the distribution agent security. We will use SQL Server agent Service account to connect to the source database i.e. SQL Server database running inside Azure VM and specify the credentials to connect to SQL Azure database (PaaS).

Click OK and click next. Select agent schedule as continuous.

Click next, select immediate subscription initialization.

In the next step, select the option to create the subscription. Once the subscription is created, you should see the success message like-
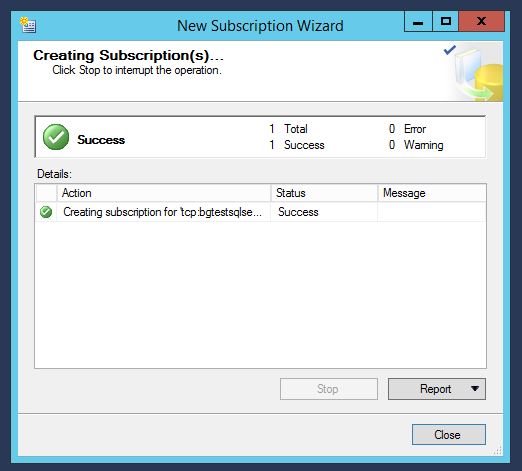
It immediately creates all the required jobs, which you can monitor, using SQL Server agent job activity monitor.
Now, If everything has been setup correctly and the replication job has worked properly, we should be able to see the Person table with two records in our SQL Azure database.
Validation
Log in to SQL Azure database, using SQL Server Management Studio and expand the bgdb, which was created as a blank database.
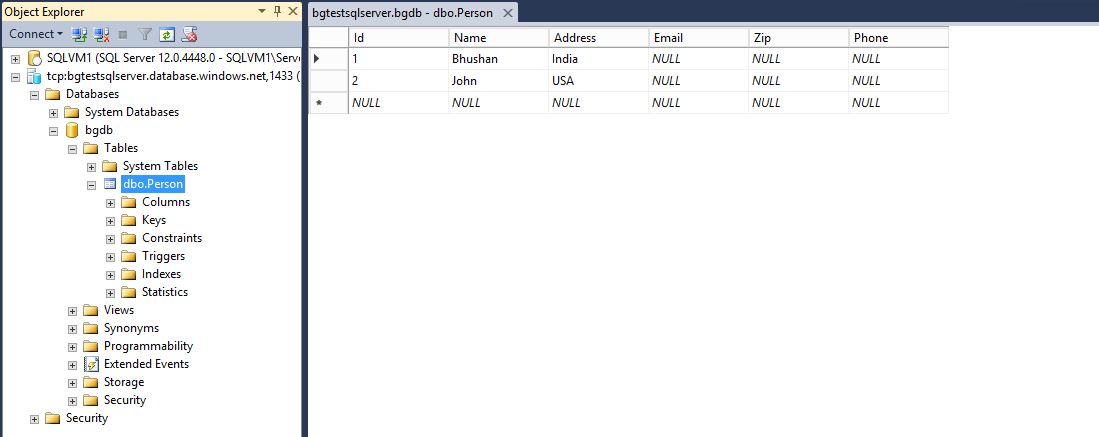
It has migrated all the data with the schema to SQL Azure.
Now let’s try to add one record in a source database and see if it gets replicated on SQL Azure database.

Now, let’s see, if the same gets replicated to SQL Azure database. Let’s connect to it by SSMS and select all the records from Person table.

This validates that the transactional replication to SQL Azure database's setup is successful.
References
This article was originally published at Understanding Transactional Replication In SQL Azure Database This link is external to TechNet Wiki. It will open in a new window. Please feel free to improve this article by adding new missing or important content, fix spell and so on.
Below are few links which helped a lot while drafting this article and few links for self learning