UWP - Launch an app on a remote device
Introduction
This article discuss how to open the app on a remote device in the Windows 10 Anniversary update version 1607 or greater, before implement this concept let's check what are Pre-requisites are needed
Prerequisites
1. Windows 10, Version 1607 or greater
2. Visual Studio 2015 Community edition or Higher with UWP tools
3. Windows 10 SDK 1607
Device
Windows Mobile 10 installed version 1607 or greater or any other windows 10 running device
Note: All the Device must be signed in with Microsoft Account (In this example Desktop and Mobile application sign in same Microsoft account)
Concept of this Sample :
Scenario concept from MSDN : One scenario for launching an app on a remote device is to allow a user to start a task on one device and finish it on another. Let's take this scenario
In this example, counter has started in the Desktop OS & once device has found , counter transfer to the Mobile application & continue the counter
Sample Design
Overview of the Project
Project 1 : App run in the Desktop
Start Button : Search the Device
Grid : Double click the select Item in the Grid , Transfer information to the Remote app ( Mobile)
DispatcherTimer : This control is use to the Increase the counter
ValueSet is used to transfer the data from one app to another app
Project 2 : App run in the Mobile
Opening application and get the input from the Remote app
DispatcherTimer : This control is used to the start increase the counter what value is received from the Remote App
Creating the Mobile (Client) App
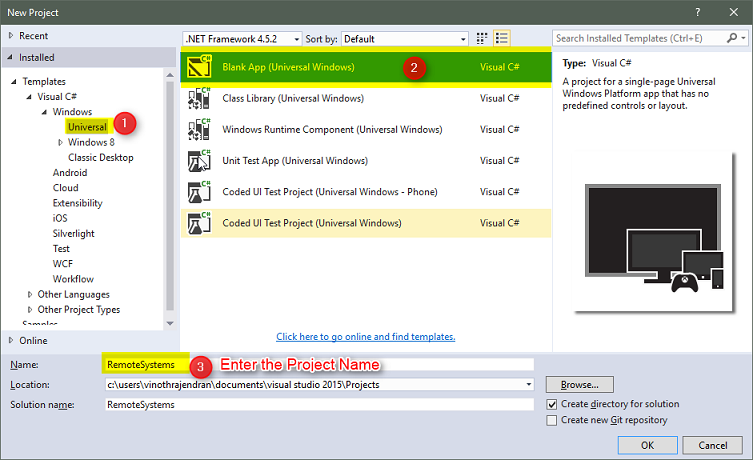
1.Creating a Blank Project ( VS -> File -> Visual C# -> Universal -> Blank App )
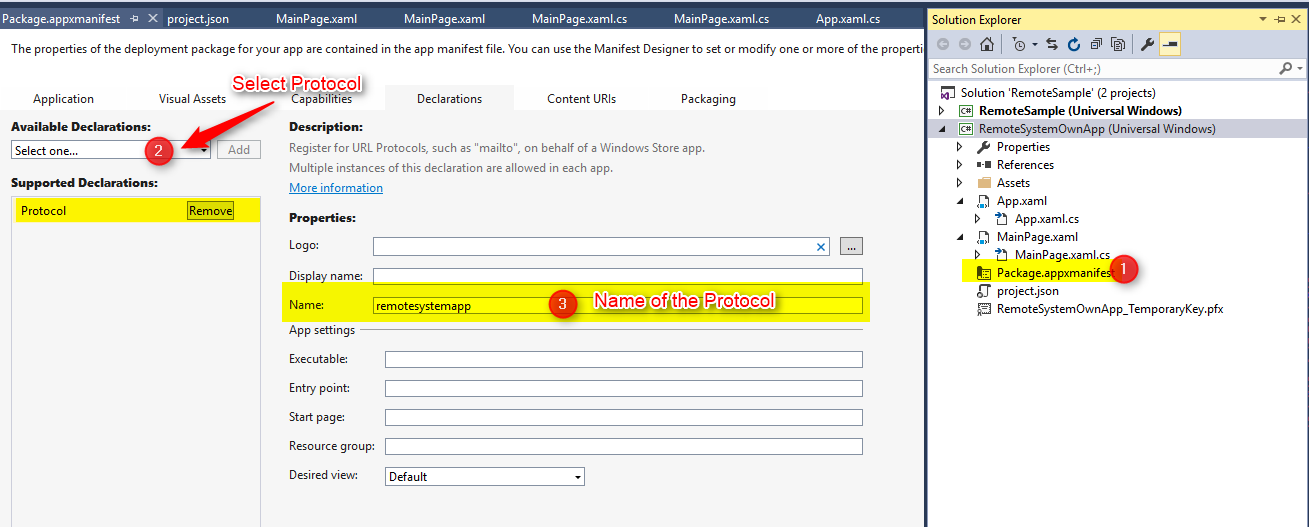
- Add the protocol capability in the Package.appxmanifest file ( Ex Name : remotesystemapp)
- App.Xaml.cs file , override the OnActivated method , check the activation type read , the data ( Remote device send the data) is available in the ProtocolActivatedEventArgs class
ProtocolActivatedEventArgs.Data contains the ValueSet , Here we read the Remote data value.
01.protected override void OnActivated(IActivatedEventArgs args)
02. {
03. if (args.Kind == ActivationKind.Protocol)
04. {
05. var protocolArgs = (ProtocolActivatedEventArgs)args;
06.
07. var uri = protocolArgs.Uri;
08.
09. var item = protocolArgs.Data["currentValue"];
10. ApplicationData.Current.LocalSettings.Values["value"] = item;
11.
12. var frame = Window.Current.Content as Frame ?? new Frame();
13. frame.Navigate(typeof(MainPage), uri);
14. Window.Current.Content = frame;
15. Window.Current.Activate();
16. }
17. }
After reading the ValueSet , is assigned to the Client (Mobile) ApplicationData class for application usage.
4. Navigated function read the value from ApplicationData
01.protected override void OnNavigatedTo(NavigationEventArgs e)
02. {
03. if (e.Parameter is Uri)
04. {
05. var value = ApplicationData.Current.LocalSettings.Values["value"];
06. _counter = Convert.ToInt32(value);
07. TxtRun.Text = _counter.ToString();
08. }
09. }
- Timer control increment the counter value.
1.private void Timer_Tick(object sender, object e)
2. {
3. _counter++;
4. TxtRun.Text = _counter.ToString();
5. }
- Sample Xaml Design and Start the Timer Control
01.private int _counter = 0;
02.
03. public MainPage()
04. {
05. this.InitializeComponent();
06. var timer = new DispatcherTimer();
07. timer.Tick += Timer_Tick; ;
08. timer.Interval = new TimeSpan(0, 0, 1);
09. timer.Start();
10. }
Xaml Design
1.<Grid Background="{ThemeResource ApplicationPageBackgroundThemeBrush}">
2. <StackPanel>
3. <TextBlock x:Name="TxtRun" Text="1" Foreground="Red"
4. HorizontalAlignment="Center" VerticalAlignment="Center"
5. FontWeight="Bold" FontSize="50"/>
6. <TextBlock x:Name="TxtStatus" Margin="10"/>
7. </StackPanel>
8. </Grid>
Mobile Application ready .
**Note : **
**To Launch Remote app , we need two data from the Mobile(client) application
- Protocol Name which has defined in the Step 2 ( ex: remotesystemapp )
- Package Name ( To get package name use "Windows.ApplicationModel.Package.Current.Id.FamilyName;" API)
**ex: "aab1a0d5-e933-4e26-ae76-2af5d8f19570_kz0gnaa3h8516"
Creating Project for Desktop App
1. 1. Creating a Blank Project ( VS -> File)
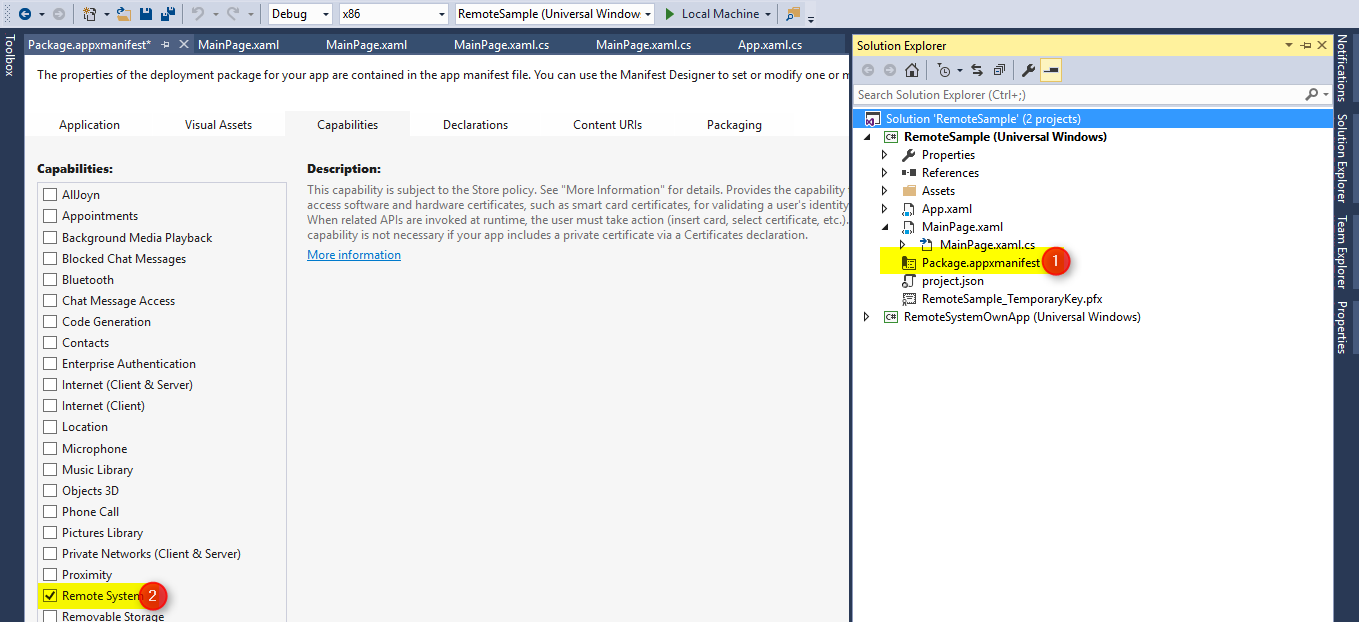
2.Set Remote System capability in the Package.appxmanifest file

Code Implementation
Before implement the concept first we need to check the permission has given to the system or user, for this purpose RemoteSystem.RequestAccessAsync(); API has used.
Note:
Most of the time two types of issue developer will face
1.DeniedBySystem
2.DeniedByUser
To Solve
DeniedBySystem: Please check the Package.appxmanifest file, Remote System has added or not, if not please add into the file.
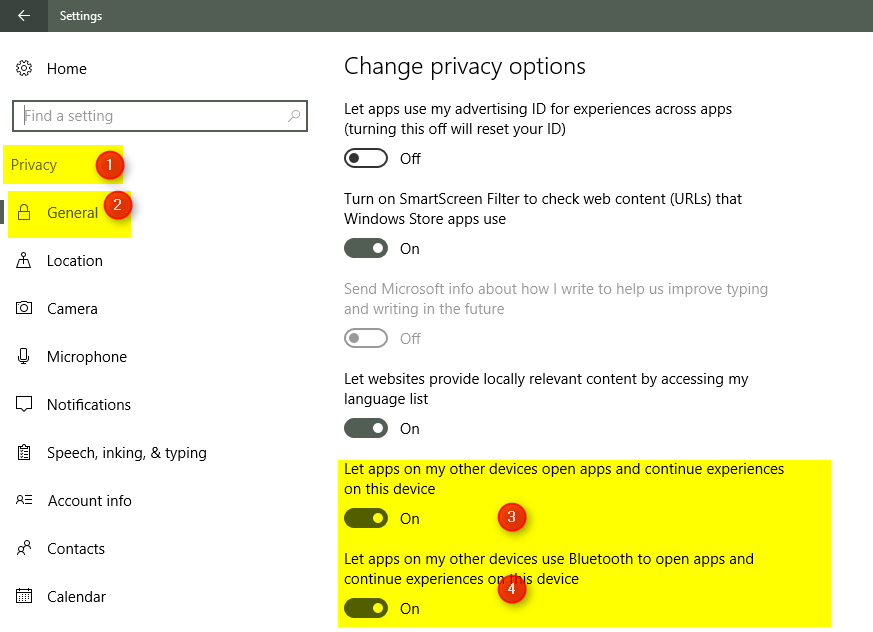
DeniedByUser: This is an issue; we need to check the Privacy option in system settings, below (Ref image) option should be enabled.
And implemented theRemoteSystem.CreateWatcher function & Event handler, to find the device is available in the network or cloud
RemoteSystem.**CreateWatcher two overload function is available with filter or without filter
**Filter: Based on the filter type we can discovery the system
In this example am using without filter
          private  async void  LoadDevices()
        {
            var requestAccess = await RemoteSystem.RequestAccessAsync();
            if (requestAccess != RemoteSystemAccessStatus.Allowed)  return;
            _remoteWatcher = RemoteSystem.CreateWatcher();
            if (_remoteWatcher == null) return;
            _remoteWatcher.RemoteSystemAdded += RemoteWatcher_RemoteSystemAdded;
            _remoteWatcher.RemoteSystemRemoved += _remoteWatcher_RemoteSystemRemoved;
            _remoteWatcher.RemoteSystemUpdated += _remoteWatcher_RemoteSystemUpdated;
            _remoteWatcher.Start();
        }
01.
         private async void _remoteWatcher_RemoteSystemRemoved(RemoteSystemWatcher sender, RemoteSystemRemovedEventArgs args)
       {
           await Dispatcher.RunAsync(CoreDispatcherPriority.Normal, () =>
           {
               if (args?.RemoteSystemId != null && RemoteSystems != null && RemoteSystems.Count > 0)
               {
                   var getRemoveItem = RemoteSystems.FirstOrDefault(item => item.Id == args.RemoteSystemId);
                   RemoteSystems.Remove(getRemoveItem);
               }
           });
       }

       private async void RemoteWatcher_RemoteSystemAdded(RemoteSystemWatcher sender,
           RemoteSystemAddedEventArgs args)
       {
           await Dispatcher.RunAsync(CoreDispatcherPriority.Normal, () =>
           {
               if (args?.RemoteSystem != null)
               {
                   RemoteSystems.Add(new RemoteDeviceInfo(args.RemoteSystem));
               }
           });
       }
- Start Button Click -> Call the LoadDevices() function to find the start & load the device information
        private void  BtnStart_OnClick(object sender, RoutedEventArgs e)
      {
          BtnStart.IsEnabled = false;
          LoadDevices();
          BtnStop.IsEnabled = true;

      }
- Launch Remote app RemoteLauncher.LaunchUriAsync API we use to launch application in the remote system
Arguments of this function ( for this sample)
a. Remote System -> Information RemoteSystemConnectionRequest class is use to get remote connection
b. Url -> Which Protocol to use ( Ex : Note section Ref the 1nd item) use the Uri class to create URL
c. Remote application package Name ( ex : Note section Ref the 2nd item)
use the RemoteLauncherOptions class to add the package Name
d.Set ( Ex : Pass the counter value) to use ValueSet
Grid Double click open the Remote app
01.
private async void GridViewCtrl_OnItemClick(object sender, ItemClickEventArgs e)
        {
            var selecteItem = (RemoteDeviceInfo) e.ClickedItem;
            if (selecteItem != null)
            {
                try
                {
                    var remoteSystem = new  RemoteSystemConnectionRequest(selecteItem.CurrentSystem);

                    timer.Stop();

                    var openUrl = new  Uri(@"remotesystemapp://");
                    RemoteLauncherOptions options = new  RemoteLauncherOptions();
                    options.PreferredAppIds.Add("aab1a0d5-e933-4e26-ae76-2af5d8f19570_kz0gnaa3h8516");
                    ValueSet setvalue = new  ValueSet { { "currentValue", counter } };

                    var launchUriStatus1 = await RemoteLauncher.LaunchUriAsync(remoteSystem, openUrl,
                        options, setvalue);
                    Status.Text = launchUriStatus1.ToString();
                }
                catch (Exception exception)
                {

                }
            }
        }
Sample Xaml & Timer control code
01.public MainPage()
02. {
03. this.InitializeComponent();
04. timer = new DispatcherTimer();
05. timer.Tick += Timer_Tick;
06. timer.Interval = new TimeSpan(0,0,1);
07. timer.Start();
08. RemoteSystems = new ObservableCollection<RemoteDeviceInfo>();
09. GridViewCtrl.ItemsSource = RemoteSystems;
10.
11. }
Userdefined class & ObservableCollection maintain the device information
01.public class RemoteDeviceInfo
02. {
03. public string DisplayName { get; set; }
04.
05. public string Kind { get; set; }
06.
07. public string Id;
08.
09. public RemoteSystem CurrentSystem;
10.
11. public RemoteDeviceInfo(RemoteSystem remoteSystem)
12. {
13. DisplayName = remoteSystem.DisplayName;
14. Id = remoteSystem.Id;
15. Kind = remoteSystem.Kind;
16. CurrentSystem = remoteSystem;
17. }
18. }
01.private DispatcherTimer timer;
02.
03. private RemoteSystemWatcher _remoteWatcher;
04.
05. private ObservableCollection<RemoteDeviceInfo> _remoteSystems;
06.
07. public ObservableCollection<RemoteDeviceInfo> RemoteSystems
08. {
09. get { return _remoteSystems; }
10. set
11. {
12. _remoteSystems = value;
13. OnPropertyChanged();
14. }
15. }
Xaml Code
01.<Page.Resources>
02. <Style x:Name="SubTitle" TargetType="TextBlock">
03. <Setter Property="FontSize" Value="15"/>
04. <Setter Property="FontWeight" Value="Bold"/>
05. <Setter Property="Margin" Value="10"/>
06. </Style>
07. </Page.Resources>
08.
09. <Grid Background="{ThemeResource ApplicationPageBackgroundThemeBrush}" Margin="10">
10.
11. <Grid.ColumnDefinitions>
12. <ColumnDefinition Width="80*"/>
13. <ColumnDefinition Width="20*"/>
14. </Grid.ColumnDefinitions>
15.
16. <StackPanel Grid.Column="1">
17. <TextBlock x:Name="TxtRun" Text="1" Foreground="Red"
18. HorizontalAlignment="Center" VerticalAlignment="Center"
19. FontWeight="Bold" FontSize="50"/>
20. </StackPanel>
21.
22. <Grid Grid.Column="0">
23. <Grid.RowDefinitions>
24. <RowDefinition Height="Auto"/>
25. <RowDefinition Height="Auto"/>
26. <RowDefinition Height="Auto"/>
27. <RowDefinition Height="Auto"/>
28. <RowDefinition Height="Auto"/>
29. </Grid.RowDefinitions>
30.
31.
32. <TextBlock Text="Remote System App( Mobile Demo) " FontSize="20" FontWeight="Bold"/>
33.
34. <StackPanel Grid.Row="1" Orientation="Horizontal">
35. <TextBlock Text="DisplayName" Style="{StaticResource SubTitle}"/>
36. <TextBlock Text="Kind" Margin="30,10,0,0" Style="{StaticResource SubTitle}"/>
37. </StackPanel>
38.
39. <GridView x:Name="GridViewCtrl" Grid.Row="2" IsItemClickEnabled="True" ItemClick="GridViewCtrl_OnItemClick">
40.
41. <GridView.ItemTemplate>
42. <DataTemplate>
43. <StackPanel Orientation="Horizontal">
44. <TextBlock Margin="10,0,0,0" Text="{Binding DisplayName}"></TextBlock>
45. <TextBlock Margin="10,0,0,0" Text="{Binding Kind}"></TextBlock>
46. </StackPanel>
47. </DataTemplate>
48. </GridView.ItemTemplate>
49. </GridView>
50.
51. <StackPanel Grid.Row="3">
52. <TextBlock x:Name="Status"></TextBlock>
53. </StackPanel>
54.
55. <StackPanel Grid.Row="4" Orientation="Horizontal">
56. <Button x:Name="BtnStart" Margin="10" Content="Start" Click="BtnStart_OnClick"/>
57. <Button x:Name="BtnStop" Margin="10" Content="Stop" Click="BtnStop_OnClick"/>
58. </StackPanel>
59. </Grid>
60. </Grid>
Final output
Youtube Link
Conclusion
Hope you understand this sample application , For API reference please check the MSDN
Please share your feedback & Suggestions
Thanks & Regards,
Vinoth.


