PowerShell: Monitoring servers with DiskSpace GUI Tool
Introduction
Monitoring server resources is a critical and important job of any Administrator. Keeping things organized might improve application availability and server availability. If your hard drive may be started to fill up, you may be wondering what exactly is taking up all that space also you need to ensure space available for other drives as well. That's where this tool comes in: it scans your server(local or remote) and shows you the utilization details, graphical form, where all that space is being wasted, giving you an idea of where to start your activity.
Solution
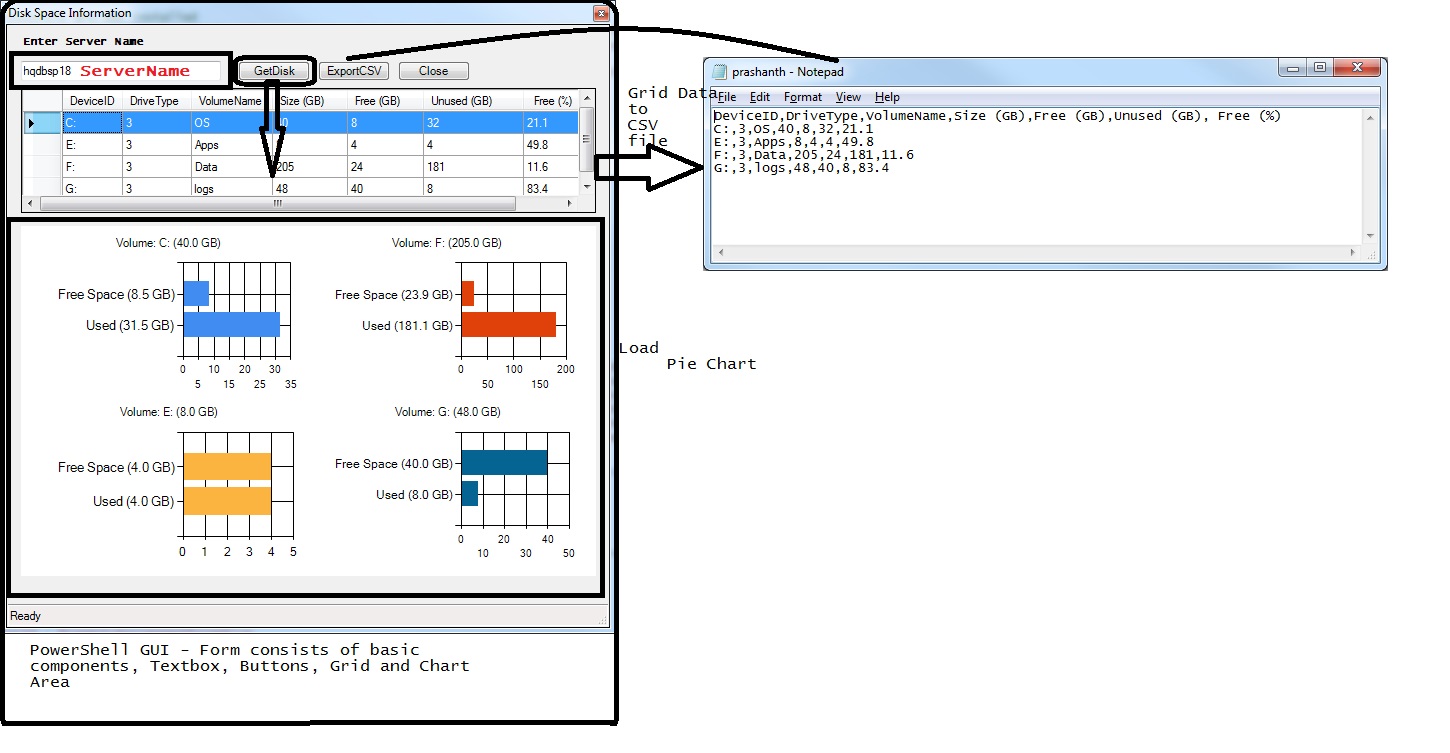
With a simple PowerShell GUI tool which has various features and quickly take us through the disk space utilization details of the server, you’ll basically feed a server to watch over, and it will report back on these for you. The chart representation is user-friendly and output can be exported to CSV.
Features
- Accepts server name as its input to process
- Scan all of your disks drives and Creates grid view of the data on your disk
- Provides graphical representation of the data in terms of chars
- The utilization can be exported to CSV file
- View entire server disk health
Where It Excels
Single shop to get the disk usage details of the server(local o remote). The fact that it gives you multiple different views all at once(Grid, CSV and Chart). The grid view has enough details with disk usage percentages and size, graphical charts are color-coded by drive type, and a list of all the drives. And, by clicking the export-CSV button, you can get the CSV output of the grid data. It's can be enhanced in many ways. The same code can be used for a various purpose to measure the system metrics.
Where It Falls Short
It can be enhanced to get credentials. At this moment have used to accept default login credentials.
Querying Win32_Volume
The Win32_Volume class represents an area of storage on a hard disk. The class returns local volumes that are formatted, unformatted, mounted, or offline. PowerShell script which collects disk space statistics is given below
Get-WmiObject -ComputerName <ComputerName> -Class Win 32 _Volume |where-object {$_.driveType -eq 3 }`
| Format-Table -``auto @{Label=``"Drive"``;Expression={$_.DriveLetter};Align=``"Right"``},@{Label=``"Free(GB)"``;Expression={``"{0:N0}" -f ($_.FreeSpace/``1``GB)};Align=``"Right"``` }, ``
``@{Label=``"% Free"``;Expression={``"{0:P0}" -f ($_.FreeSpace / $_.Capacity)};Align=``"Right"``` }, ``
``@{Label=``"Size(GB)"``;Expression={``"{0:N0}" -f ($_.Capacity / ``1``GB)};Align=``"Right"``},@{Label=``"Volume Label"``;Expression={$_.Label};Width=``25``}
Return to Top
Querying Win32_logicalDisk
The Win32_LogicalDisk WMI class represents a data source that resolves to an actual local storage device on a computer system running Windows.Win32_LogicalDisk includes information about disks on the computer. PowerShell script which collects disk space statistics is given below
Get-WmiObject Win 32 _logicaldisk -ComputerName <ComputerName>|Where-Object {$_.drivetype -eq 3 }`
| Format-Table DeviceID,`
@{Name=``"Size(GB)"``;Expression={[``decimal``](``"{0:N0}" -f($_.size/``1``` gb))}}, ``
@{Name=``"Free Space(GB)"``;Expression={[``decimal``](``"{0:N0}" -f($_.freespace/``1``` gb))}}, ``
@{Name=``"Free (%)"``;Expression={``"{0,6:P0}" -f(($_.freespace/``1``gb) / ($_.size/``1``` gb))}} ``
-AutoSize
About Tool
The Powershell DiskSpace GUI tool
This tool helps you get the disk space information on the computer of your choice. You can enter the server names in the text box.
Put the server name and hit ‘GetDisk’. It will query the disk space information from the computer and present it to you in tabular formats(Grid and Charts).The Grid view shows columns such as the amount of disk space in use, the name of the server, the volume name, the total size of the disk, the available free space, the partition identifier and the percentage of free space.
You can do an export of data using by hitting exportCSV button.
Code in Detail
Windows Forms
There are only three things required to launch a form from PowerShell:
- You must load the System.Windows.Forms assembly (if not already done);
- You must create a new object of type system.windows.forms.form
- You must call the ShowDialog() method on your new object
For example:
Add-Type -AssemblyName System.Windows.Forms
$Form = New-Object system.Windows.Forms.Form
$Form.ShowDialog()
The first section of the code defines the state of loading the required assemblies. This has been handled through try and catch method. The script begins by loading two .NET Framework classes: System.Drawing and System.Windows.Forms. You then start a new instance of the .NET Framework class System.Windows.Forms.Form; that provides a blank form or window to which you can start adding controls.
After you create an instance of the Form class, assign values to three properties of this class.
Text. This becomes the title of the window.
Size. This is the size of the form, in pixels. The preceding script creates a form that’s 300 pixels wide by 200 pixels tall.
StartingPosition. This optional property is set to CenterScreen in the preceding script. If you don’t add this property, Windows selects a location when the form is opened. By setting the StartingPosition to CenterScreen, you’re automatically displaying the form in the middle of the screen each time it loads.
Begin {
 # Assemblies
 try {
 Add-Type -AssemblyName "System.Drawing" -ErrorAction Stop
 Add-Type -AssemblyName "System.Windows.Forms" -ErrorAction Stop
 }
 catch [System.Exception] {
 Write-Warning -Message "Unable to load required assemblies. Error message: $($_.Exception.Message)" ; break
 }
}
Process {
 function Load-Form {
 $Form.Add_Shown({$Form.Activate()})
 $Form.ShowDialog()
 }

 # Forms
 $Form = New-Object System.Windows.Forms.Form
 $Form.Size = New-Object System.Drawing.Size(350,300)
 $Form.MinimumSize = New-Object System.Drawing.Size(350,100)
 $Form.MaximumSize = New-Object System.Drawing.Size(350,300)
 $Form.SizeGripStyle = "Hide"
 $Form.Text = "Header"
 $Form.ControlBox = $true
 $Form.TopMost = $true

 # Load Form
Load-Form
}
Grid
You could also generate the columns dynamically by selecting the properties you want to display, each property becomes a column name, and use the grid's DataSource property and an Array list to add the objects to the grid
Add the control (in this case, a text box, GridView ) that lets the system to populate the disk space information. There are many other controls you can apply besides text boxes, grid.
Begin {
 # Assemblies
 try {
 Add-Type -AssemblyName "System.Drawing" -ErrorAction Stop
 Add-Type -AssemblyName "System.Windows.Forms" -ErrorAction Stop
 }
 catch [System.Exception] {
 Write-Warning -Message "Unable to load required assemblies. Error message: $($_.Exception.Message)" ; break
 }
}
Process {
 function Load-Form {
 $Form.Add_Shown({$Form.Activate()})
 $Form.ShowDialog()
 }

 # Forms
 $Form = New-Object System.Windows.Forms.Form
 $list = New-Object System.collections.ArrayList
 $Form.Size = New-Object System.Drawing.Size(900,200)
 $Form.MinimumSize = New-Object System.Drawing.Size(900,200)
 $Form.MaximumSize = New-Object System.Drawing.Size(900,400)
 $Form.SizeGripStyle = "Hide"
 $Form.Text = "Header"
 $Form.ControlBox = $true
 $Form.TopMost = $true

 $gps =Get-WmiObject -Class Win32_logicaldisk -ComputerName abcd -Filter DriveType=3 | Select DeviceID,DriveType,@{n="VolumeName";e={$_.VolumeName}},@{n='Size (GB)';e={$_.Size / 1GB -as [int]}},@{n='Free (GB)';e={$_.FreeSpace /1GB -as [int]}},@{n='Unused (GB)';e={($_.Size / 1GB -as [int]) - ($_.FreeSpace / 1GB) -as [int]}},@{n=' Free (%)';e={"{0:N1}" -f (($_.FreeSpace/1GB -as [float])/($_.Size/1GB -as [float])*100 -as [float])}}
 $list.AddRange($gps)
 $dataGridView = New-Object System.Windows.Forms.DataGridView -Property @{
 Size=New-Object System.Drawing.Size(800,150)
 ColumnHeadersVisible = $true
 DataSource = $list
}
 $Form.Controls.Add($dataGridView)
 # Load Form
 Load-Form
}
Chart
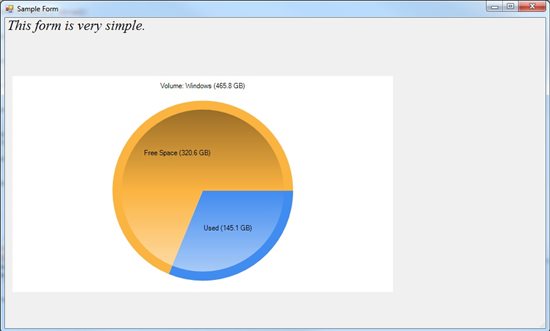
The Microsoft Chart Controls for Microsoft .NET Framework 3.5 is a set of .NET classes that allow you to draw bar, line, pie, charts.
Pre-requisites
- .NET Framework 3.5
- Microsoft Chart Controls for Microsoft .NET Framework 3.5
Load-Chart – By using this function you need not worry about what properties to set or what objects to create. All you need to do is pass the points to plot.
Clear-Chart – This function will remove all the chart areas, series, and points.
#Get Disk space using WMI and make sure it is an array
 $Disks = @(Get-WMIObject Win32_LogicalDisk -filter "DriveType=3" )

 #Remove all the current charts
 Clear-Chart $chart1

 #Loop through each drive
 foreach($disk in $Disks)
 {
 $UsedSpace =(($disk.size - $disk.freespace)/1gb)
 $FreeSpace = ($disk.freespace/1gb)

 #Load a Chart for each Drive
 Load-Chart $chart1 -XPoints ("Used ({0:N1} GB)" -f $UsedSpace),`
 ("Free Space ({0:N1} GB)" -f $FreeSpace) -YPoints $UsedSpace, $FreeSpace `
 -ChartType "Pie" `
 -Title ("Volume: {0} ({1:N1} GB)" -f $disk.VolumeName,($disk.size/1gb) )`
 -Append
 }

 #Set Custom Style
 foreach ($Series in $chart1.Series)
 {
 $Series.CustomProperties = "PieDrawingStyle=Concave"
 }
h
Installing Module
Follow steps to set up the module
Download the module file PowerShellGUI.psm1. It will open in a new window.
- Save the chart.psm1 file at any of the below location
- %windir%\System32\WindowsPowerShell\v1.0\Modules OR%UserProfile%\Documents\WindowsPowerShell\Modules (preferred)
- Once you are done with step 1 and 2, open a PowerShell window and run commands as listed below.
- Import-Module: Imports module into PowerShell and exposes the available functions to be used.
- Get-Module: Lists all available modules
- Get-Command: List all available function in a specific module
- Execute the function in the console
Export CSV
Export datagridview to CSV
We can reference output stream writer class. we’ve created a FileStream object in order to create a StreamWriterobject.
$output = New-Object -TypeName System.IO.StreamWriter(
 $outStream,
 [System.Text.Encoding]::ASCII);
The StreamReader.writeLine Method writes the Grid data to a file.
function export-DGV2CSV ([Windows.Forms.DataGridView] $grid, [String] $File)
{
 if ($grid.RowCount -eq 0) { return } # nothing to do

 $row = New-Object Windows.Forms.DataGridViewRow
 $sw  = new-object System.IO.StreamWriter($File)

 # write header line
 $sw.WriteLine( ($grid.Columns | % { $_.HeaderText } ) -join ',' )

 # dump values
 $grid.Rows | % {
 $sw.WriteLine(
 ($_.Cells | % { $_.Value }) -join ','
 )
 }
 $sw.Close()
}
Output
Download
PosH DiskSpace GUI Tool - Technet Gallery
Conclusion
Simple, self-explanatory, and easy to use GUI Tool. This is also one of the possible ways to monitor the system. The idea is to show how PoSH can integrate with GUI.
References
Blogs
- Building-forms-with-PowerShell
- Charting with PoSH
- Stream Writer Class
- System Windows Forms Namespace
Further reading
- http://www.codeproject.com/Articles/799161/Dealing-with-Powershell-Inputs-via-Basic-Windows-F
- https://www.sapien.com/blog/2011/05/05/primalforms-2011-designing-charts-for-powershell/
- https://iannotes.wordpress.com/2013/08/09/readingwriting-files/
See Also
- Disk Monitoring Guide
- Disk-space-GUI-tool-multi-server-s-search-grid-and-email-output-PowerSQL
- PowerShell : CSV - Disk Space Report - HTML
- PowerShell : CSV - Disk Space Report - Excel
- SQL Server: Monitoring Disk Space with FSUTIL command line utility
- SQL Server Operations: Monitoring Disk Space with WMI and OLE Automation Objects


