SharePoint Online: Enable and Set Record Management settings using PowerShell & CSOM and Route records to Record Center Site
Background
Records management is an interesting topic in SharePoint. It is one of the important aspects when dealing with sensitive and business critical data/documents.
Those Record documents can be treated as “Read-Only” copy, easily searchable using e-discovery sites and can be used for different legal, financial and business crucial data.
[Note: I assume that you are aware of the Record Management functionality in SharePoint. I am not concentrating on explaining the functionality of Record Management but just trying to give bit background about it.]
From Record management – “In SharePoint Online, you can manage records “in place,” which means that you can leave a document in its current location on a site, or you can store records in a specific archive called a Records Center site. The Records Center is intended to serve as a central repository in which an organization can store and manage all of its records, such as legal or financial documents. The Records Center supports the entire records management process, from records collection through records management to records disposition. If you choose in-place records management instead of the Records Center, you can still use any feature available in the Records Center, such as information management policy enforcement, routing, and hold, to manage records on any site.”
Please check more details on how to plan for record management from
Choose how to store and manage records
Functional Requirement
Consider a case when a company having different collaborations sites and they want to store their documents as records to one of the central place as ‘Record Center’. We want to achieve this using PowerShell and CSOM followed by some manual configurations where CSOM APIs are not available yet. The admin user can use PowerShell to enable and set record declaration settings for any particular site collection as and when to go.
Technical Design
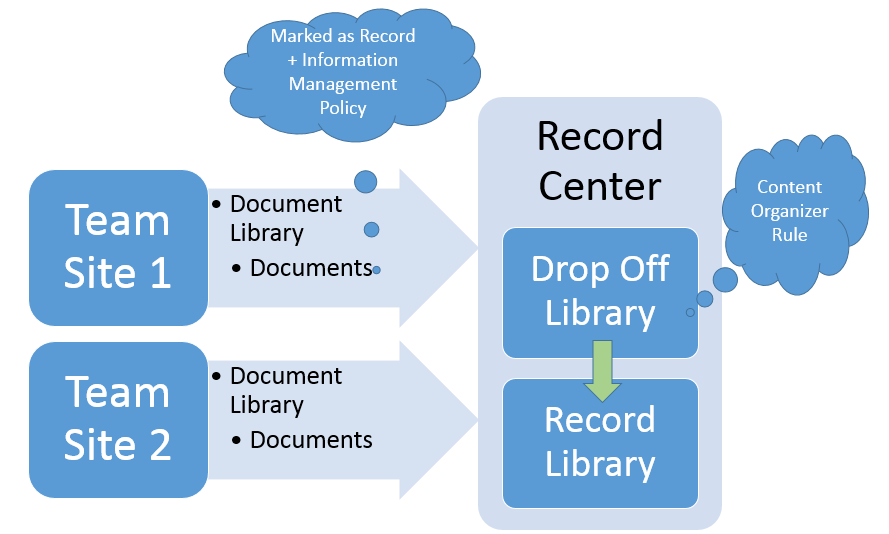
As per requirement, we are having different site collections where the user will mark their document as “Record” and through “Send to” connection and using “Content Organizer Rule” it will land in central Record Center. Please refer below graphical interface to outline our solution.
Please note some out of the box SharePoint timer jobs are responsible for handling all those content organizer rule and retention policy. They run on particular schedule and do their jobs.
Pre-Requisite
Windows PowerShell
SharePoint Online Client Components
Office 365 active account
Different Team/Collaboration sites
e.g. https://xyz.sharepoint.com/sites/CollaborationSite1 and https://xyz.sharepoint.com/sites/CollaborationSite2
Custom Site Content Type and attached to different document libraries of collaborations sites
One Record Center Site e.g. https://xyz.sharepoint.com/sites/TeamRecordCenter
Implementation
1. Setting up Record Declaration Settings using PowerShell and CSOM
It is done in 2 parts
-
- Enable “In Place Records Management” Feature
- Set Record declaration settings
Below is the script do it using PowerShell and CSOM. However, there's no CSOM API for records management. This code use web properties to define the site scoped settings. The properties used are:
-
- ecm_siterecorddeclarationdefault
- ecm_siterecordrestrictions
- ecm_siterecorddeclarationby
- ecm_siterecordundeclarationby
Currently, this script accepts site collection URL at which you need to enable it and different record declaration settings. However, you can extend this script by putting all your configuration using XML file and also you can iterate through an entire web application or site collections.
param
(
[Parameter(Mandatory=$``true`` , Position=0)]
``[string]$SiteCollUrl,
[Parameter(Mandatory=$``true`` , Position=1)]
``[ValidateSet(``'None'``,``'BlockDelete'``,``'BlockDeleteEdit'``)]
``[string]$RecordRestrictions,
[Parameter(Mandatory=$``true`` , Position=2)]
``[ValidateSet(``'True'``,``'False'``)]
``[string]$RecordManualDeclaration,
[Parameter(Mandatory=$``true`` , Position=3)]
``[ValidateSet(``'AllListContributors'``,``'OnlyAdmins'``,``'OnlyPolicy'``)]
``[string]$DeclarationBy,
[Parameter(Mandatory=$``true`` , Position=4)]
``[ValidateSet(``'AllListContributors'``,``'OnlyAdmins'``,``'OnlyPolicy'``)]
``[string]$UnDeclarationBy
)
try{
``#Add references to SharePoint client assemblies and authenticate to Office 365 site required for CSOM
Add-Type -Path ``"C:\Program Files\Common Files\Microsoft Shared\Web Server Extensions\16\ISAPI\Microsoft.SharePoint.Client.dll"
Add-Type -Path ``"C:\Program Files\Common Files\Microsoft Shared\Web Server Extensions\16\ISAPI\Microsoft.SharePoint.Client.Runtime.dll"
``# Provide here your O365 User name
$User = ``"keval@xyz.onmicrosoft.com"``;
$Password = Read-Host -Prompt ``"Please enter your password"-AsSecureString;
``$Credentials = New-Object Microsoft.SharePoint.Client.SharePointOnlineCredentials($User,$Password);
Write-Host ``"Started: Enable and set record declaration for $SiteCollUrl"``;
``# Bind to Site Collection
``$Context = New-Object Microsoft.SharePoint.Client.ClientContext($SiteCollUrl);
$Context.Credentials = $Credentials;
``$Site = $Context.Site.RootWeb;
``$Context.Load($Site);
Write-Host ``"Enable Feature..."``;
$recordFeatureId = ``"da2e115b-07e4-49d9-bb2c-35e93bb9fca9"`` ;
$featureguid = ``new``-object System.Guid $recordFeatureId;
``$Context.Site.Features.Add($featureguid,$``true``,[Microsoft.SharePoint.Client.FeatureDefinitionScope]::None);
``$Context.ExecuteQuery();
Write-Host ``"Set record declaration settings..."``;
``# Set record declaration settings
if`` ($RecordRestrictions -eq ``"BlockDeleteEdit"``)
``{
``# Need to construct string in acceptable format
$formatRecordRestrictions = ``'BlockDelete, BlockEdit'``;
$Site.AllProperties[``"ecm_siterecordrestrictions"`` ] = $formatRecordRestrictions;
``}
``else
``{
$Site.AllProperties[``"ecm_siterecordrestrictions"`` ] = $RecordRestrictions;
``}
$Site.AllProperties[``"ecm_siterecorddeclarationdefault"`` ] = $RecordManualDeclaration;
$Site.AllProperties[``"ecm_siterecorddeclarationby"`` ] = $DeclarationBy;
$Site.AllProperties[``"ecm_siterecordundeclarationby"`` ] = $UnDeclarationBy;
``$Site.Update();
``$Context.ExecuteQuery();
Write-Host ``"Completed!"
}
catch{
``Write-Host $_;
}
To use this command you need to provide parameters as
Where
Parameters |
Values |
SiteCollUrl |
Url of site collection |
RecordRestrictions |
No Additional restrictions = None Block Delete = BlockDelete Block Edit & Delete = BlockDeleteEdit |
RecordManualDeclaration |
Available in all locations by default = True Not available in all locations by default = False |
DeclarationBy |
All list contributors and administrators = AllListContributors Only list administrators = OnlyAdmins Only policy actions = OnlyPolicy |
UnDeclarationBy |
All list contributors and administrators = AllListContributors Only list administrators = OnlyAdmins Only policy actions = OnlyPolicy |
Example:
.\EnableAndSetRecrodDeclarationSettings.ps1 -SiteCollUrl "https://xyz.sharepoint.com/sites/CollabSite1" -RecordRestrictions BlockDeleteEdit -RecordManualDeclaration True -DeclarationBy AllListContributors -UnDeclarationBy OnlyAdmins
2. Manually Configure Send To Connection
[Note: When writing this article, there is no support for CSOM APIs to set these settings so we choose to do it manually.]
Go to SharePoint Admin Center -> Records Management -> Choose New Connection
Provide necessary information. Where
Display Name: Name of the connection
Send To URL: Where document will be routed based on condition.
Allow manual send to connection: Check if you wish user can send manually too.
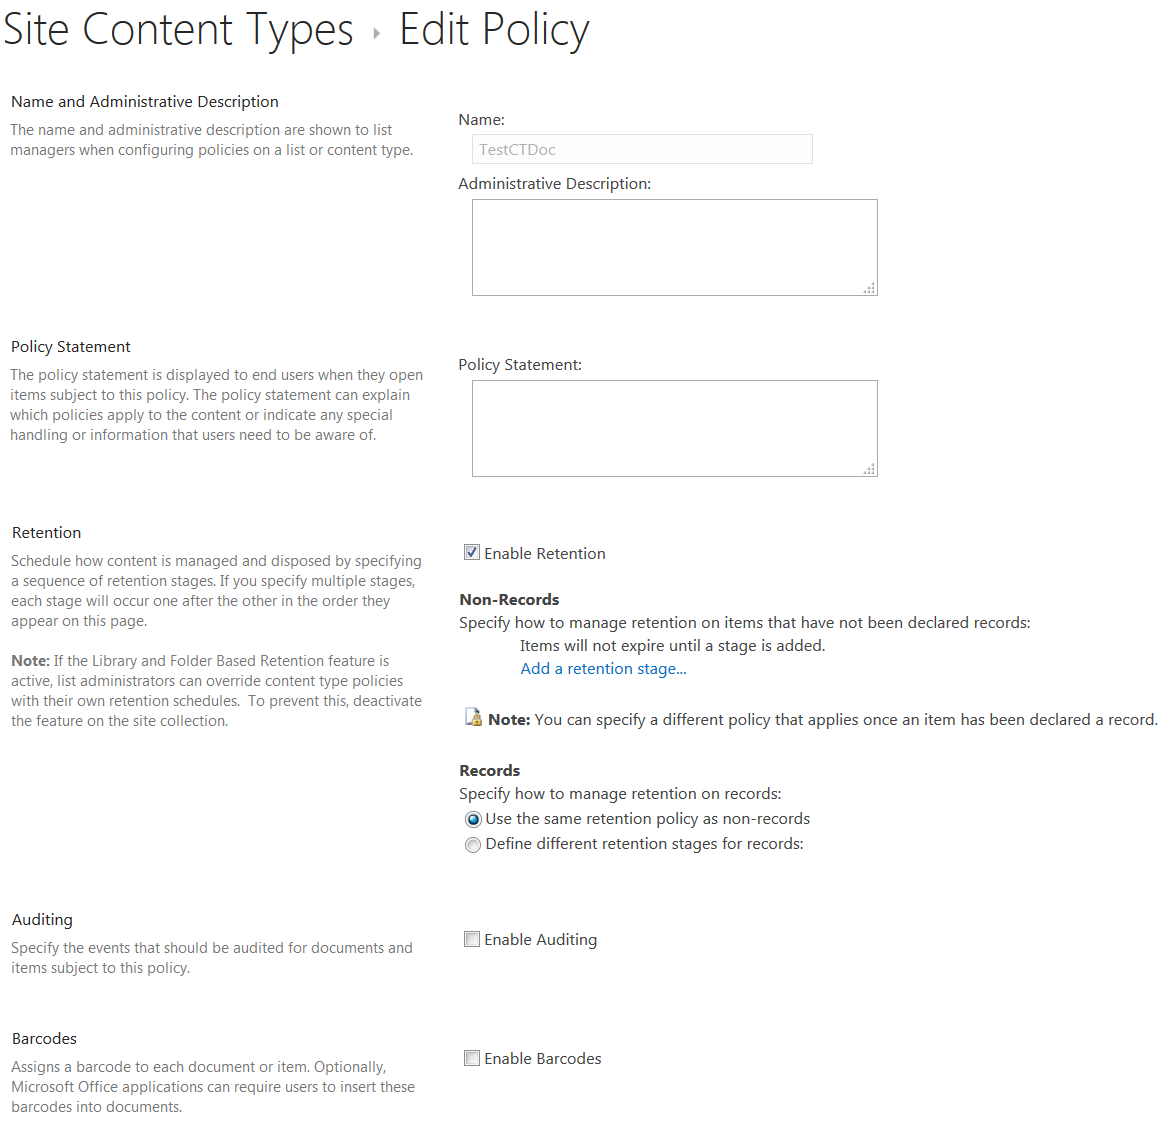
3. Manually Set Information Management Policy -> Retention Policy of Content Type
Information management policy we can define at the Content type level. It is giving different options like Retention, Auditing etc. but we are using this for setting up Retention Policy that can be used to send a record to another location.
[Note: When writing this article, there is no support of CSOM APIs to set these settings so we choose to do it manually.]
Go to Collaboration Site -> Site Settings -> Site Content Types
Choose your Content Type. For our example, we are using some test content type derived from “Document” content type itself. No new columns are added.
Choose “Information management policy settings” and Click on “Enable Retention”
Click on “Add a retention Stage” for “Non-Records” -> here we are setting that when user declares record then it will send copy to central Record Center. You can define your Event and Action using different parameters e.g. created date of the item is more than 1 year then move to recycle bin.
4. Manually Configure Content Organizer Rule
When writing this article, there is no support of CSOM APIs to set these settings so we choose to do it manually. However, I found one article which is giving example how to do it using PowerShell. https://sharepointstew.wordpress.com/2015/07/27/create-content-organizer-rule-using-client-object-model-csom
But as of now I am going with a manual step.
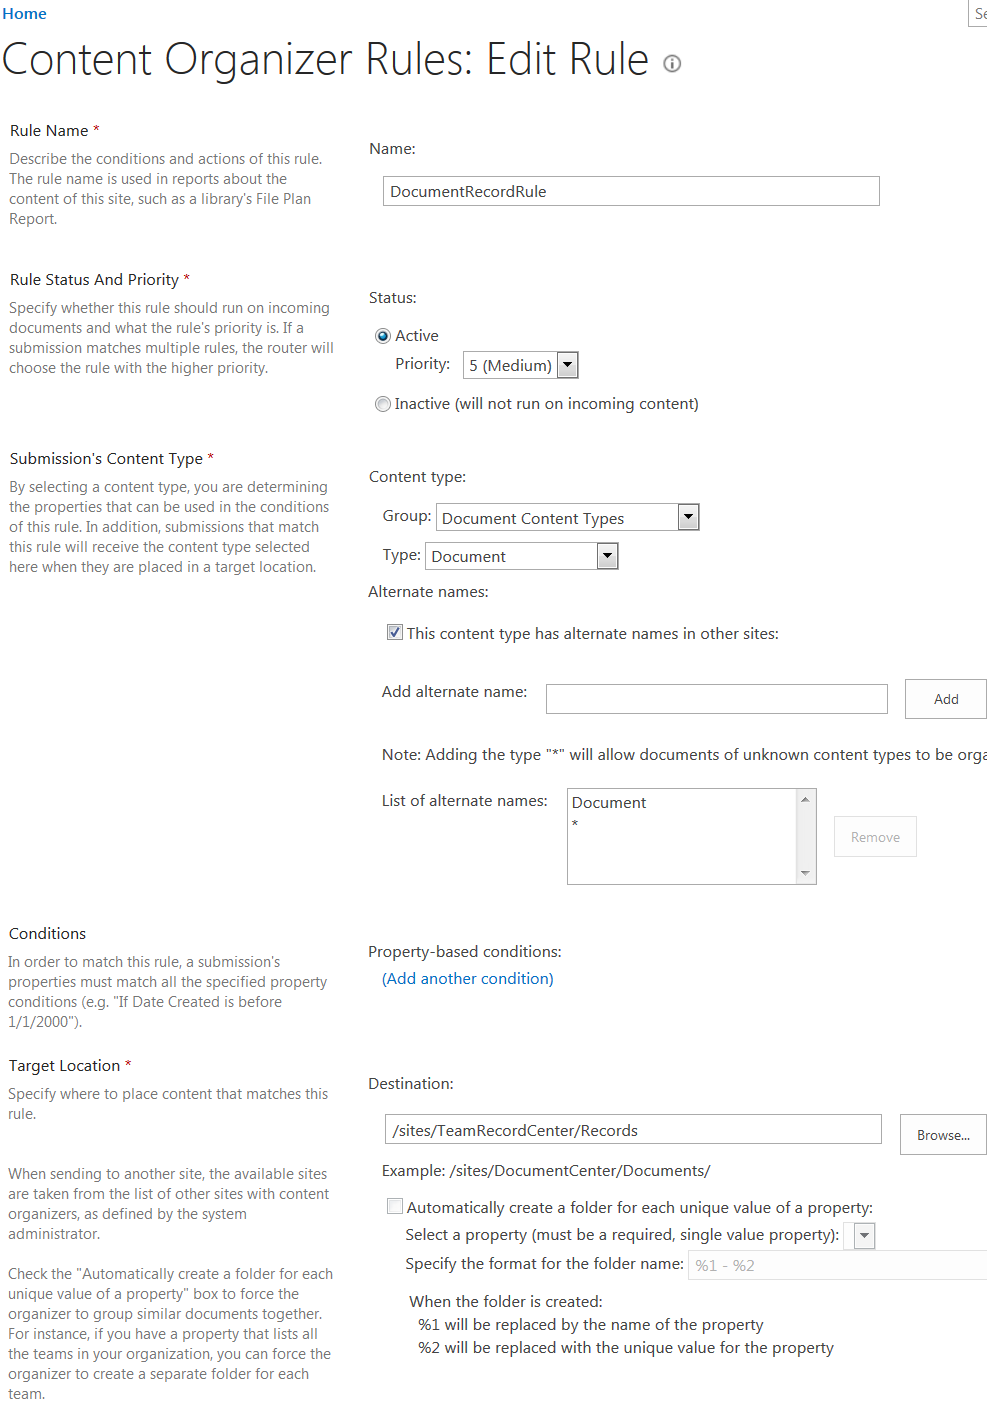
Go to your Record Center Site -> Go to “Site Settings” -> “Content Organizer Rules” Choose Create New Item/Rule
Now on that screen provides necessary information as you want. For our case, we are considering “Document” content type and if we receive any document which is having “Document” content type or any “Unknown Document” content type then it will route to target document library as specified.
Name: Name of the Rule
Status: Whether Action or not and choose the priority of the rule from 1 to 9 if more than one rule applies.
Submission’s Content Type: Choose a content type for using matching properties/metadata can be used as condition and when that condition will true for incoming documents then that document will be stored as this content type. If the content type is using a different name then you can use alternate names and for any unknown types provide “*”.For our example case, we are using “Document” content type and rest default values.
Conditions : Additional property-based filters for the rule.
Target Location : Defines when match rule then where to put items. For our case selected “Record Library”
Automatically create a folder for each unique value of a property: This is used to create your folder structure or hierarchy based structure based on any metadata.
See In Action
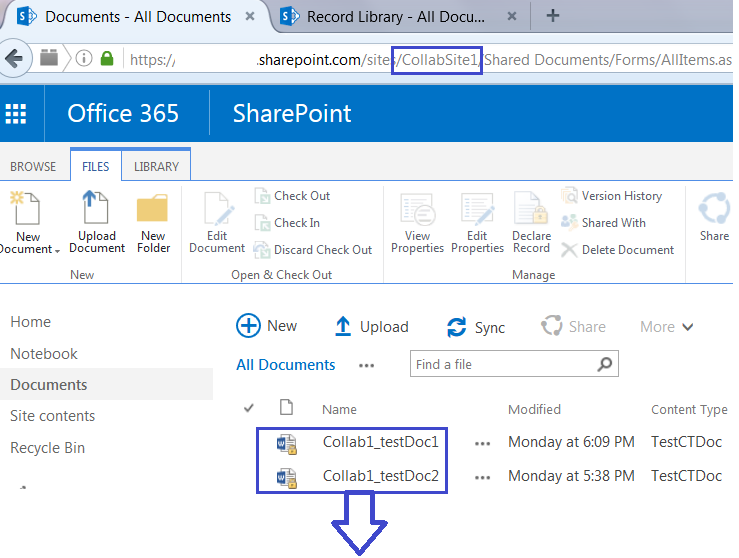
First of all, go to any Team/Collaboration site where you enabled the record management.
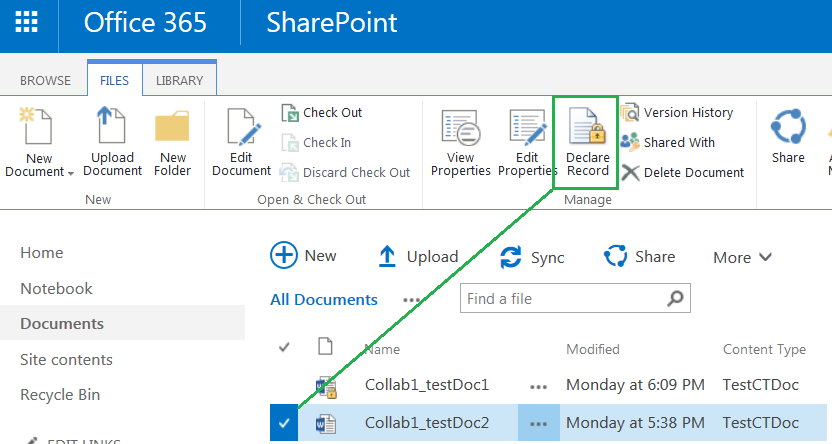
Go to Document Library. Search of any existing document or upload if empty. Now Select Document which you want to make as Record. For Classic or old style document library you can get “Declare Record” button from ribbon.
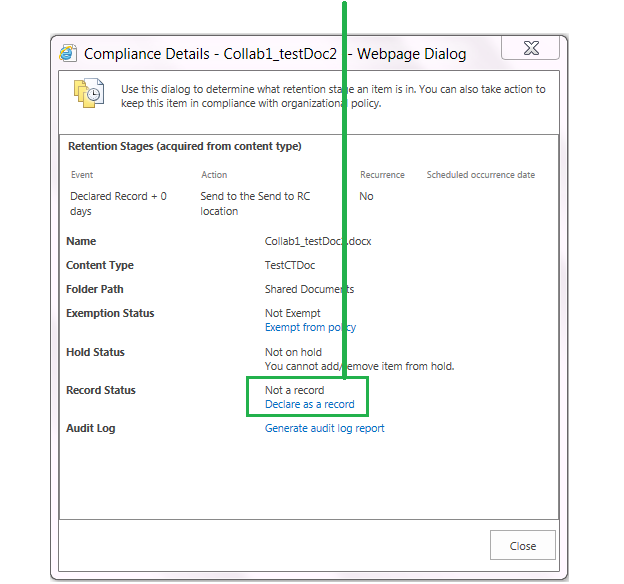
Or for newer version you can choose from “Compliance Details” as shown in below figure.
Mark it as “Record”.
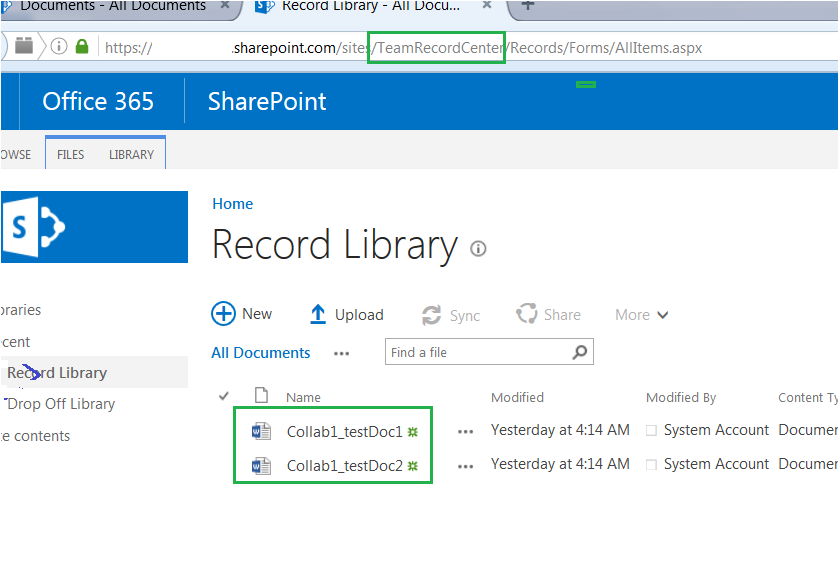
So depending on our configuration we made SharePoint out of the box Information management Policy and Expiration Policy will move this document to Record Center’s Drop off Library. And from there as per Content Organizer rules it will land to “Record Library”
You will get a delay in arriving that document in “Record Library” depending on the timer job schedule defined in SharePoint Online.
For me, it ran every night so I can see the document at destination next morning.
Hope you enjoyed this!
Download code
References
https://github.com/OfficeDev/PnP/tree/master/Samples/ECM.RecordsManagement
See Also
For more information about “Send To Connection” refer
For more information for setting up Retention Policy refer
For more information on content organizer rule refer
http://sharepointpromag.com/sharepoint-administration/create-rules-route-documents-sharepoint
You can also define condition based routing too
http://www.splessons.com/create-content-organizer-rules-route-documents-in-sharepoint-2013
