Exchange Online ATP: Introduction and Step by Step Deployment Guide
The number of attacks launched by hackers in today’s world is increasing immensely. They use various tactics to bypass the security to somehow hack and get into the most vital server systems in an organization.
Microsoft has launched Exchange Online Advanced Threat Protection or in other words “ATP” to safeguard email users from receiving malicious attachments and links from external parties thus safeguarding them from malicious attacks that are targeted by hackers.
In addition to the above protection, it also provides administrators with the ability to generate advanced reporting and tracking making it possible for the administrators to gain key insights when it comes to understanding who are the users who are getting targeted the most and the various category of attacks that the organization faces.
Exchange Online Advanced Threat Protection Policies
There are two types of policies which can be configured using ATP.
Safe Attachments: This policy lets administrators configure policies to block malicious attachments that users receive via email. Administrators will also be able to redirect the message to a designated mailbox so that checks can be made to ensure that the attachment is safe.
Safe Links: This policy lets administrators configure policies to check and block malicious website links or URLs contained in an email that users receive from an external party. When a user clicks on the link in an email, it will check against a list of known malicious links to protect the users from going to a malicious website or a link.
Fig 1. How ATP Works [1]
Exchange Online Advanced Threat Protection Licensing Requirements
ATP licenses cost USD 2.00 Per User Per Month and can be added to the following Office 365 Licensing SKU’s:
- Exchange Online Plan 1
- Exchange Online Plan 2
- Exchange Online Kiosk
- Office 365 Business Essentials
- Office 365 Business Premium
- Office 365 Enterprise E1, E2, E3
- Office 365 Enterprise K1 & K2
- Office 365 Education
ATP is included with the Office 365 Enterprise E5 Plan.
Configure Safe Attachments in Advanced Threat Protection
To configure “Safe Attachments”, the administrator needs to navigate to the “Exchange Admin Center” within the Office 365 portal.
Fig 2
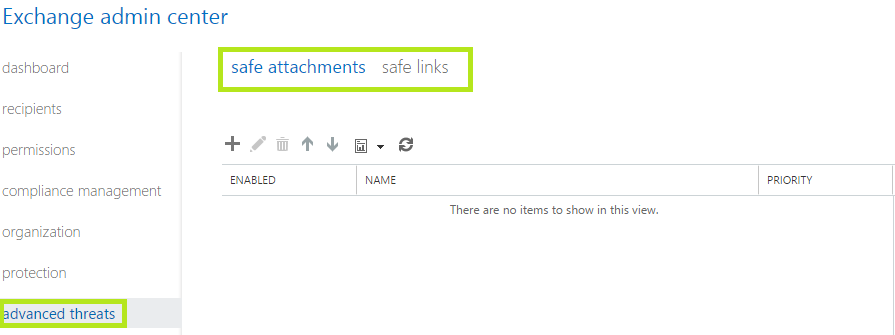
Once in the “Exchange Admin Center”, select “Advanced Threats” as shown below in Fig 3. This will load up the configuration settings for “Safe Attachments” & “Safe Links”.
Fig 3
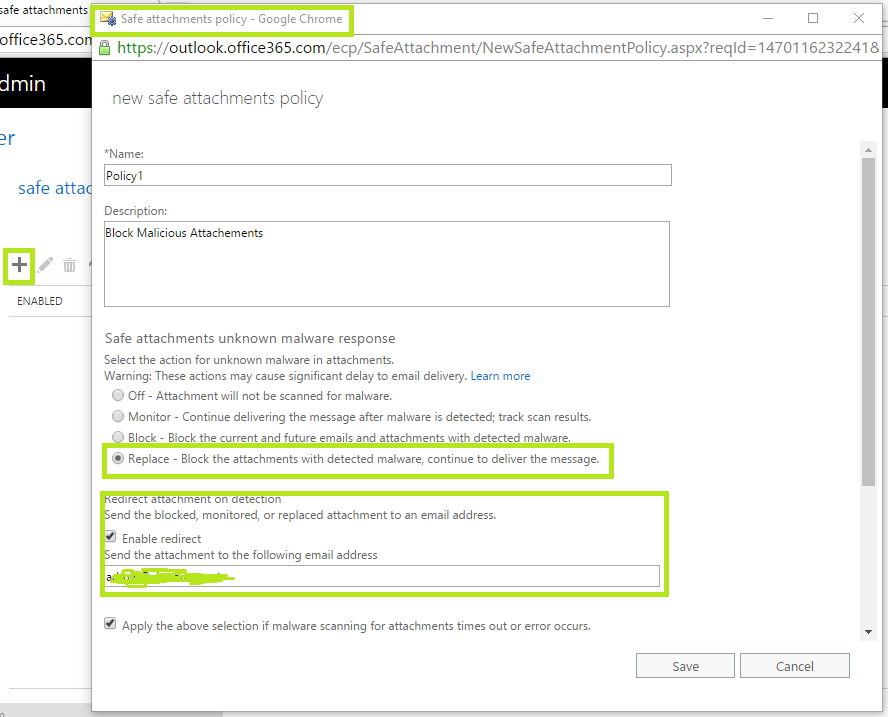
In order to create a “New Safe Attachment Policy”, under “Safe Attachments” click “+”. This will open up the “Safe Attachment Policy Configuration Window” as shown below in Fig 4.
Fig 4
In the above “Safe Attachment Policy Configuration Window”, give the policy a name, a description and select the actions for the unknown malware in attachments. These actions are self-explanatory.
To block the attachments, select “Replace” which will block the attachment found as malware but will continue to deliver the email message without the attachment to the recipient.
Options can be specified to redirect the blocked attachment to a designated mailbox under “Redirect Attachment on Detection” and checking “Enable Redirect” and specifying an email address under “Send the attachment to the following Email Address” option as shown in Fig 4 above.
Scroll down the “Safe Attachment Policy Configuration Window” to bring up the “Applied to” section to specify if the rule needs to be applied to a specific recipient, recipient domain or to a group where a recipient is a member.
Select “Recipient Domain” under the drop-down menu as this policy needs to be applied to everyone in the domain and click “Save” to create the new Safe Attachment Policy as shown below in Fig 5.
FIg 5
This new policy will now block the unsafe attachments that will be received and will deliver the attachment to the designated mailbox usually to the admin.
Configure Safe Links in Advanced Threat Protection
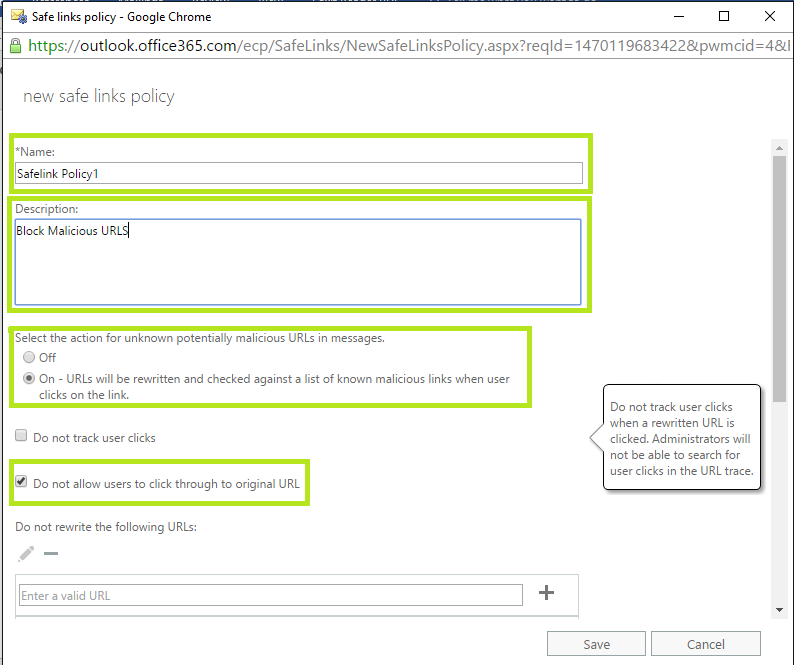
In order to create a “New Safe Links Policy”, under “Advanced Threats” select “Safe Links” click “+”. This will open up the “Safe Links Policy Configuration Window”.
Under the “Safe Links Policy Configuration Window”, give a name and a description of the policy. Under “Select the action for unknown potentially malicious URLs in messages” select “On” to turn on the policy. Also, select “Do not allow users to click through to the original URL” option.
Fig 6
Scroll down the “Safe Links Policy Configuration Window” to bring up the “Applied to” section to specify if the rule needs to be applied to a specific recipient, recipient domain or to a group where a recipient is a member.
Select “Recipient Domain” under the drop-down menu as this policy needs to be applied to everyone in the domain and click “Save” to create the new Safe Links Policy as shown below in Fig 7.
Fig 7
This policy will now prevent users from opening the unsafe URLs within their emails.


