Enable Ajax Loader in ASP.NET MVC 5 Step By Step
Introduction
This article explains about how to generate Ajax loader in ASP.NET MVC application using Ajax step by step procedure.
Background
User can use different application and they do not about application processing methodologies. When user gives request to server that it may be take time to respond for given request, while waiting for request we need to give indication to user. If do not give any indication, user do not know what is happening in application. Ajax loader indicates to user, application is processing in background.
Step 1
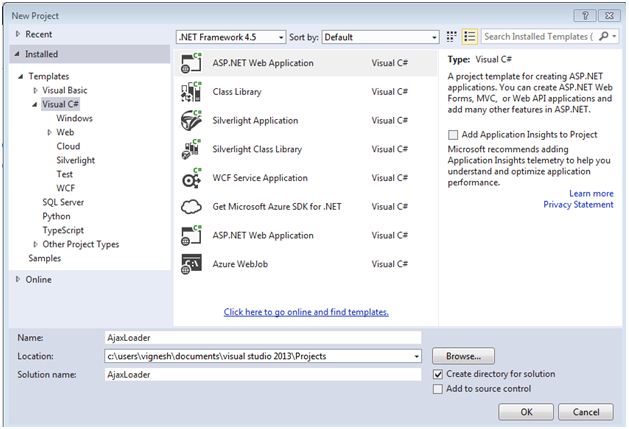
Go to Visual Studio and Select New Project. then select ASP.NET Web Application as per below image.
Step 2
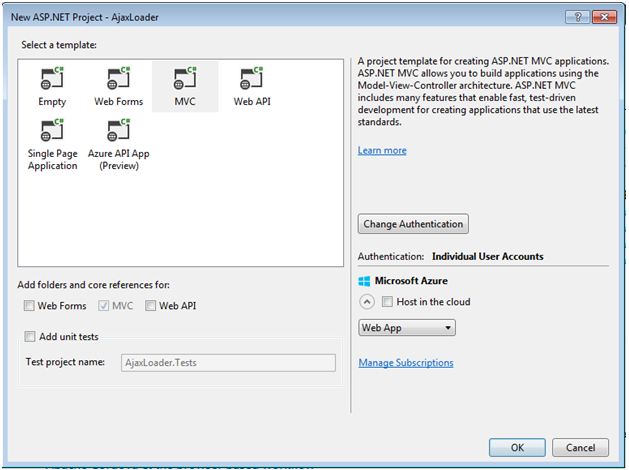
Select MVC from a template type. ASP.NET MVC allows you to build an application using the Model-View-Controller architecture.
**Step 3 **
Go to solution explorer. Right-click “Controller” folder and select Add then go to the controller.
After click controller “Add Scaffold” window will be open. Now select MVC 5 Controller – Empty in “Add Scaffold” window and click Add button.

Finally, give controller name whatever you want after click Add button.

**Step 5 **
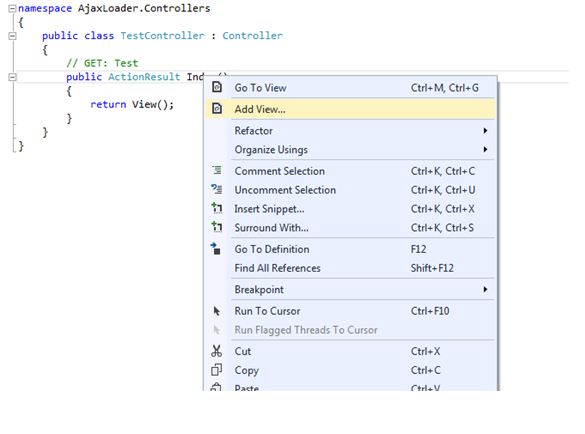
Add view from action results in the added controller. Right- click action result and add view.
Step 6
Download Ajax loader image from any free website. We can download from http://www.ajaxload.info/ website. There are many websites available for download Ajax loader image.
Step 7
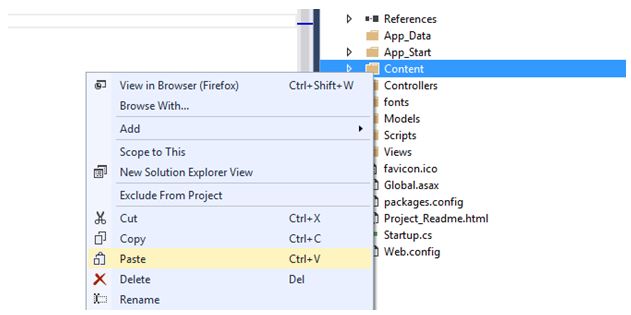
We can select loader color as well as background color and different loader style. After selecting your loader style and click download. After downloading, copy your loader image from your system and past into “Content” folder in your project.
Step 8
Now we can use Ajax loader wherever need in our applications. For example, if give request to get some report or result in the application it will take some times to response because it processing in the background.
Wherever take time to respond to given request at that place we use Ajax loader for indication to the user.
Write below Ajax code for enabling to Ajax Loader in View Page.
Code
<script src="~/Scripts/jquery-1.10.2.js"></script>
<h2>Welcome To Ajax Loader</h2>
<div id="divLoader" style="display:none;">
<img src="~/Content/ajax-loader.gif" alt="Loader" />
</div>
<input type="submit" id="btnSubmit" value="Submit" />
<script>
$("#btnSubmit").click(function () {
$("#divLoader").show();
$.ajax({
url: '/Test/Submit',
dataType: "json",
type: "POST",
contentType: 'application/json; charset=utf-8',
data: {},
//async: true,
//processData: false,
// cache: false,
success: function (data) {
$("#divLoader").hide();
alert(data);
},
error: function (xhr) {
$("#divLoader").hide();
alert('error');
}
})
});
</script>
Explanation
Insert “image” tag in “div” tag and give useful “Id” name for “div” tag. Normally we hide the div tag using style. When submitting to request to the server for processing we enable “div” tag, so Ajax loader image will be displayed. Using above code, enable Ajax loader image on button click. After we get a response from the server we hide the image wheatear response success or not. If success will show success message otherwise will show an error message.
** Step 9**
Finally, run the application and give request to submit form values to the server. While submitting form values to server Ajax loader will enable up to complete our request.
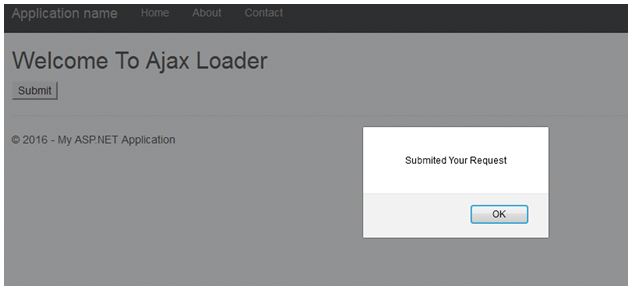
After processing given request finally, a success message will be displayed.
Conclusion
Every application we use Ajax loader to indication purpose to the user. These step by step Enable Ajax loader images in ASP.NET MVC help to many fresher and intermediate level developers.
