Azure Key Vault essentials for Beginners
Introduction
In the software world, there is always a special importance to the security aspect. For example – If you want to purchase software like Visual Studio Ultimate Edition, you can first download its demo version which lets you use the software for certain period of time and once that time is over, it would ask you for a valid license key. So in this context, the software vendor has used the key to safeguard the software. Let’s take a look at another example and to keep it easy, let’s talk about Azure. If one wants to access any set of services provided by Azure storage, then the user needs to have the access key of the storage account. In this example, the access key is used to safeguard the storage account and its services.
Recent changes to Azure services seem to be mostly focusing on the encryption e.g. encryption of storage services, built-in encryption capabilities in SQL Azure, disk encryption option of Azure VMs etc. When there is encryption, the encryption keys and their management come into the picture, you want to make sure that you store your encryption keys in a right and secure place and be assured about organisation compliance requirements.
Now to explain Azure key vault in layman’s terms i.e. Azure key vault provides a store where you can manage all your keys and secrets effectively. What is the difference between your keys and secrets? It’s a simple concept – keys are being referred to terms like your encryption keys. However, secrets can be any sensitive data like your SQL database connection string or storage access credentials, etc.
Let us see the dictionary meaning of vault – it is either a dome or a treasury, which when translated into the Azure world gives correct impression i.e. treasury of my keys and secrets. It acts as a central store for all my sensitive information which can be stored secretly and can be retrieved based on permissions.
Azure key vault service is backed by HSM i.e. hardware security modules using certain state of the art algorithms. In simple words – HSM is a mechanism which is used to manage and store these cryptographic keys securely. You can certainly go ahead and read more about it if you are interested in details of HSM and the algorithms it uses.
Let’s see what the capabilities Azure key vault offers.
Suppose you as an administrator of your Azure subscription logs into the Azure portal, you will be able to create the Azure key vault service and using it you will be able to perform operations below:
- Create, import or delete keys in key vault
- Authorise users to access keys and their secrets
- Configure and monitor key usage
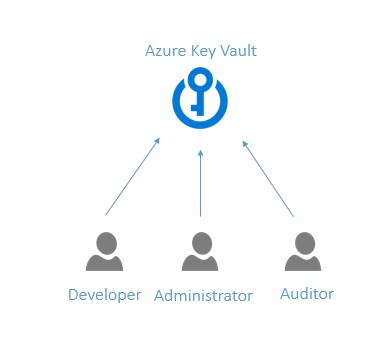
To access the keys and secrets stored inside the key vault, the requesting applications has to be added in Azure Active Directory and it also needs to have permissions to read keys and secrets in Azure key vault. We will take a detailed look at it later in this article.
Here is how it can be drawn to give high-level conceptual idea:
In the real world, let’s take a look at how things can work in conjunction with Azure key vault.
Concept
A subscription administrator or power user in an organisation creates the Azure key vault and creates some keys and adds secrets in it. These secrets can be consumed by many applications in an organisation.
Now suppose, there is this team of application developers who are deploying their application on Azure. The application talks to Azure key vault and has its architectural model in place to communicate to the key vault and read secrets out of it.
This application first has to be registered with Azure AD so that using AD’s client application ID access can be granted to Azure key vault services. Once all the setup is in place as shown in image above, and if a power user wants to update some secret’s value stored inside the key vault, then in this case power user don’t have to inform about the update to developers or application owners which actually saves re-deployment efforts, e.g. power user rotates the storage access key and updates it in key vault, and since the application already has the model to communicate to key vault based on its endpoint URI or name, so even though the key / secret is updated – the application always picks up the latest value.
For the demo, we will consider the exact same example, i.e. we will add storage access key in key vault as a secret, we will develop a web application which reads the secret from Azure key vault. We will rotate the storage access key and then update our secret’s value with updated access key and see if our deployed web application still picks up the latest value.
Demo
To start with, let’s see how we can set up Azure Key Vault and configure applications to use the secrets from the vault.
First thing first, as of writing this article – the only interface available to work with key vault is Azure PowerShell. You can download it from here and make sure that it has Azure Key Vault Cmdlets.
Note that currently, Azure has two modes of managing resources, i.e. standard and resource manager. We will be using Azure PowerShell with RM mode – this article focuses on key vault assuming that you have a basic understanding of Azure resource manager mode. If not, it is highly recommended that you take a look at it, e.g. here.
We will log into a Azure subscription and switch to Azure RM mode. Below are the Azure PowerShell cmdlets which let you do it:
PS:> Login-AzureRmAccount
PS:> Get-AzureRmAccount
Next, we will create a resource group under which we will be creating our key vault service:
PS:> New-AzureRmResourceGroup –Name 'BhushanKeyVaultRG' –Location 'SouthEast Asia'
Now we have created resource group with name BhushanKeyvaultRG and hosted in South East Asia DC, we will go ahead and create Azure key vault service in it:
PS:> New-AzureRmKeyVault -VaultName 'BhushanKeyVault' -ResourceGroupName 'BhushanKeyVaultRG' -Location SouthEast Asia'
After successful creation of key vault, it returns details of it. We can make a note of our key vault URI which is used later in this article.
https://BhushanKeyVault.vault.azure.net
We will now create a storage account within same resource group and name it as bhushandemostorageaccount. To speed up things, we can go ahead and create it using Azure portal and host it in same DC i.e. South East Asia.
Now let’s add the access key of the storage account in the key vault as a secret and name it as BhushanDemoStoragePrimaryKey. It can be done through command below:
PS:> $secretvalue = ConvertTo-SecureString 'xxxxxxxxxxxxxxxxxxxxxxxxxxxxxxxxxxxxxxxxxxxxxxxxxxxxxxxxxxxxxxxxxxxxxxxxxxxxyxxxxxxxxxxxxxxxxxxxx==' -AsPlainText –Force

PS:> Set-AzureKeyVaultSecret -VaultName 'BhushanKeyVault'  -Name 'BhushanDemoStoragePrimaryKey'  -SecretValue $secretvalue
Note that we are converting the access key to a secure string and then storing it in key vault using the above cmdlets. Now that we have added the access key in the key vault, let’s create a web application which consumes this secret from key vault. We will create an MVC web application and simply after creating it I will hit F5 so that it runs in IIS Express giving me it’s URL which we will need to add in Azure Active Directory. Suppose the application is running on URL – http://locahost:49993/ we will need to add this application in Azure Active Directory so that it can be given privileges to access Azure Key Vault.
Browse to Azure Active Directory in your subscription and click on applications tab.
Click on the Add button to register the application in AD.
As this is a demo app, so we won’t be paying much attention to required metadata.
Click OK and the application will be added to AD and you will be redirected to the dashboard of it.
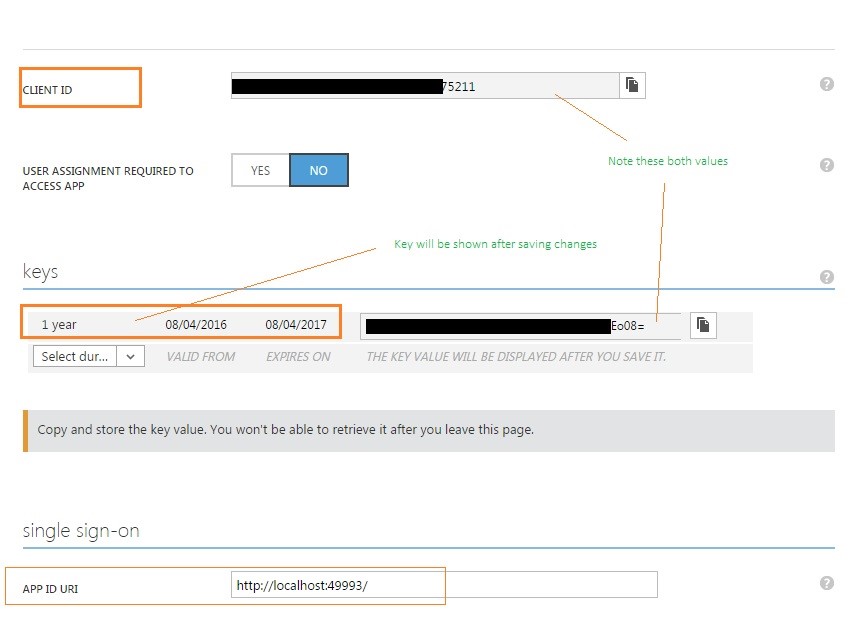
Click on the configure tab and note down the client ID, we will be using it later in this article. Also, on the same tab – browse to the keys section and select duration, once you save your changes – you will be shown the key.
Now the application is registered with Active Directory. However, our key vault still is unaware of our application so let’s go ahead and introduce them to each other.
We will use the PowerShell command below which grants all permission to the web application so that it read all keys and secrets in our key vault. You can control these permissions and grant only those permissions to applications which are required by them.
Set-AzureRmKeyVaultAccessPolicy -VaultName 'BhushanKeyVault' -ServicePrincipalName ‘xxxxxxxx-xxxx-xxxx-xxxx-6eb4e8975211' -PermissionsToKeys all -PermissionsToSecrets all –ResourceGroupName 'BhushanKeyVaultRG'
And now key vault knows our web application and allows it to read stored keys and secrets. Now let’s go ahead and write some code in our web application.
First, install NuGet packages in the solution. One is to communicate to Azure AD and the other is to perform azure key vault related actions.
and
Also, let’s add a few entries in our web configuration files as
Note that the ClientID is set to the value which was shown as ClientID in the Azure Active Directory and client secret is set to the key value generated after setting and saving duration on the same page in Azure AD.
For this demo, we can take a look at pre-built library shared at https://www.microsoft.com/en-us/download/details.aspx?id=45343 and use it to speed up things. It shows how basic actions to Azure Key Vault can be performed. (I have used some of the code from this library).
I have copied few classes from the HelloKeyVault.csproj to our web application project, copied some helper functions like GetAccessToken and GetHttpClient, also installed System.Net.Http.Formatting NuGet.
Add a DemoController and Index view and modify default routing of the application. We will be adding our logic in this action method which will fetch the stored secret.
public class  DemoController : Controller
{
  public ActionResult Index()
  {
    var vaultAddress = WebConfigurationManager.AppSettings["VaultUrl"];

    // Register authentication call back - this would be executed for any request to Azure key vault.

    KeyVaultClient keyVaultClient = new  KeyVaultClient(new        KeyVaultClient.AuthenticationCallback(GetAccessToken));

   var secret = keyVaultClient.GetSecretAsync(vaultAddress, "BhushanDemoStoragePrimaryKey", null).GetAwaiter().GetResult();

   var storagePrimaryAccessKey = secret.Value;

   return View();
  }

  public static  async Task<string> GetAccessToken(string authority, string resource, string scope)
  {
    var clientId = WebConfigurationManager.AppSettings["AuthClientId"];
    var clientSecret = WebConfigurationManager.AppSettings["AuthClientSecret"];
    ClientCredential clientCredential = new  ClientCredential(clientId, clientSecret);

    var context = new  AuthenticationContext(authority, TokenCache.DefaultShared);
    var result = await context.AcquireTokenAsync(resource, clientCredential);

    return result.AccessToken;
  }
 }
}
The code is quite self-explanatory. We are reading Client Id and secret from web configuration file and using it to get the access token from the authenticating authority.
Note that this is not the best way to get the authentication token. There is a certificate-based mechanism which you can use to achieve the same. You can take a look at the pre-built library for more explanation.
Once the above code is set and application is deployed on Azure, later even if vault administrator or power user changes the value of secret (e.g. by rotating storage access key periodically) it doesn’t impact the application and it will always read the latest value of storage access key.
Logging
Now that you have created the key vault and started adding your keys and secrets in it, you might want to monitor when and who is accessing your secure data.
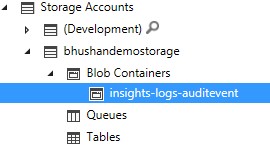
Logging works similarly to the way SQL Azure creates logs, i.e. in Azure storage. Since we have already created our storage account, we will use the same for storing key vault logs. Once we configure logging in key vault, a container named ‘insights-logs-auditevent’ is created in specified Azure storage. Retention and access to the information stored in a container has to be managed by you e.g. using standard protection techniques.
Let’s set up logging to our Azure Key Vault:
PS:> $keyvault = Get-AzureRmKeyVault -VaultName 'BhushanKeyVault'
PS:> $storageaccount = Get-AzureRmStorageAccount -StorageAccountName 'bhushandemostorage'
You can get the key vault resource Id and storage account Id using above parameters e.g.
$keyvault.ResourceId and $storageaccount.Id
We will be using these parameters in next command:
Set-AzureRmDiagnosticSetting -ResourceId '/subscriptions/xxxxxxxx-xxxx-xxxx-xxxx-xxxxxxxxxxxx/resourceGroups/BhushanKeyVaultRG/providers/Microsoft.KeyVault/vaults/BhushanKeyVault' -StorageAccountId '/subscriptions/xxxxxxxx-xxxxx-xxxxx-xxxx-xxxxxxxxxxx/resourceGroups/bhushankeyvaultrg/providers/Microsoft.Storage/storageAccounts/bhushandemostorage' -Enabled $true -Categories AuditEvent
Now the logging has been enabled on Azure Key Vault.
What is logged?
- All authenticated REST API requests will be logged. (including access denied requests).
- Actions on key vault e.g. creation, deletion, setting key-value access policies, etc
- Actions on the keys and secrets e.g. encrypt, decrypt, sign, verify, etc.
Let’s access the secret stored in key vault using our web application again and see what information is logged in the logging container.
It stores a JSON record in a deeply nested structure of containers:
If you explore the container and take a look at the JSON log file, you will observe that information like request Uri, client IP address, etc. information is logged.
References
This article was originally published at Getting Started with Azure Key Vault This link is external to TechNet Wiki. It will open in a new window. Please feel free to improve this article by adding new missing or important content, fix spelling and so on.


