Note
Access to this page requires authorization. You can try signing in or changing directories.
Access to this page requires authorization. You can try changing directories.
Introduction
In this second article, we will analyze the use of Entity Framework in relation to the Code-First paradigm, which - as we saw earlier - does not need a database schema already exists, rather than allowing to operate at the data level, starting from the definition of objects / classes that will characterize the entities. Again, it is made of C # use under WinForms, but - as mentioned in the previous article - this choice will not go to affect a different intended use that the developer may reasonably request.
Why Code-First?
Having evaluated the practical approach Database-First, one wonders what are the reasons that should lead us to the Code-First paradigm. On the other hand, you could design the database, working directly on SQL Server (for example) our scheme, entities, keys and relationships, then delegating the practical Database-First derivation of classes and their interconnections, however, taking advantage of the GUI that EDMX models provide.
In fact, there are several reasons why Code-First may be an appropriate choice. First, it proves to be the only feasible in the case in which the base data does not exist, but must be created by the application. In this case, the classes will be defined by the developer to represent the template on which to create the database and its entities. Code-First is optimally interface with existing databases: in addition, where the basic data should be accessible only in part (eg .: interests us derive not complete tables), Code-First allows the declaration of classes that contain only what we actually need. We have more control on the same database structure, which will be determined by the written code. If you need to apply changes to the database, we will have useful migration tools, redistributable with the application. Moreover, - and in part here we repeat - the code in use is actually the one written, avoiding the over-bloating that the Database-First approach, by its inherent structure, in a certain sense imposes, with its numerous files and the total derivation of the referenced tables.
Recall also that - although the present article deals with EF 6.1.3 - from version 7.0 Code-First becomes the only usable paradigm, and therefore know as of now involves a major advantage for the future.
Database creation
In this section, and related points, we will see how to create a database containing several tables, using only the classes we're going to write. Before that, we summarize briefly how referencing Entity Framework in our project, as was done in the previous article, "Introduction to the Entity Framework with C #, Part I (en-US)", to which we refer the reader to the preliminary information necessary to this second part.
Referencing Entity Framework into project
To reference EF within our project, ie make its libraries accessible to the solution, you must first create a new project in Visual Studio, choose the template that we need (in the example, as anticipated, will sort of C # WinForms). then save the solution (important to avoid alerts being added EF), and open manage Nuget packages.
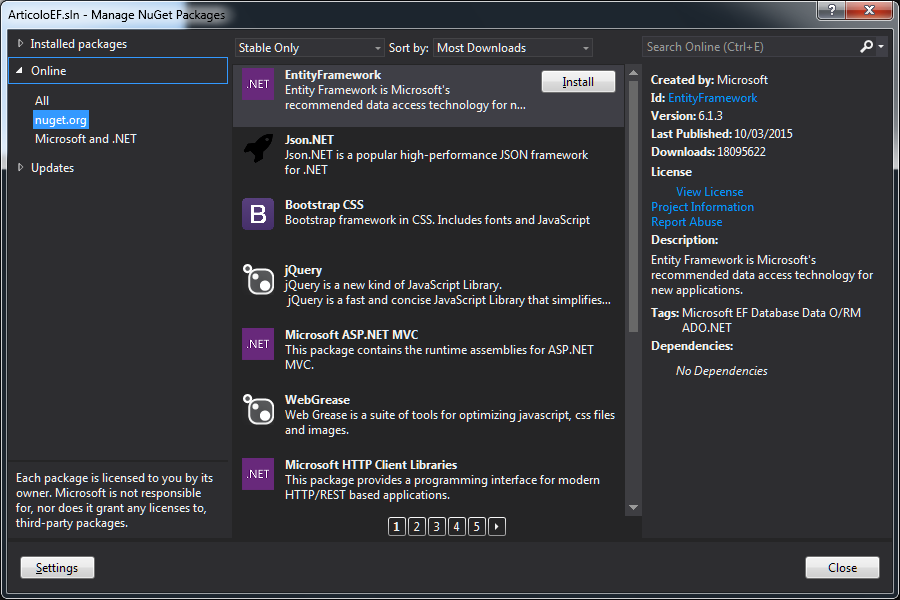
In it, we will package the Entity Framework, and simply will add to our solution using the "Install" button. When finished, we will see how one of the project References have been included those related to EF.
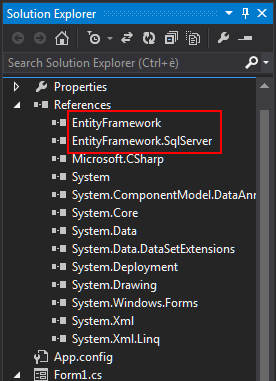
We are now ready to use the potential of our ORM regarding the development.
Development setup
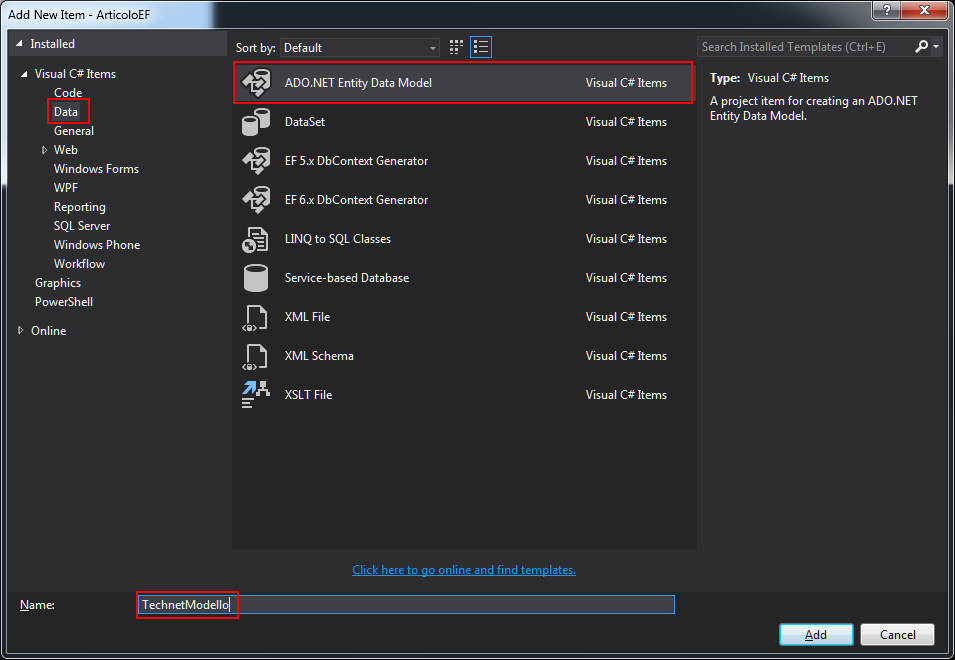
As discussed in the previous article, you will need to add to the project entity ADO.NET data. To this end, clicking on the solution, and choosing the "New Item" Add voice we will choose the section "Date" an object of type ADO.NET Entity Data Model, which we will call again "TechnetModello".
The creation wizard will continue, and this time we will select, as a content model, a blank template prepared for the Code-First
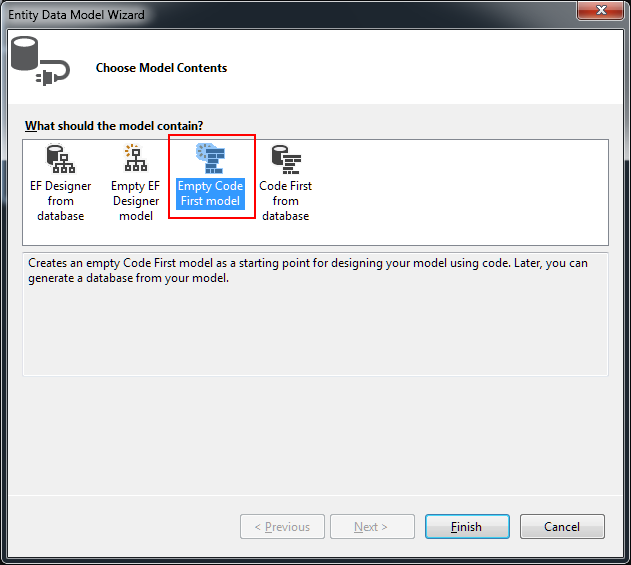
A press of the button "Finish", a class will be created in the project named TechnetModello, extending the type DbContext. This is the basic type that will allow us to create an initial database (or instantiate the connection to an existing database), allowing the definition of classes / entities that will be translated into the tables used by the database itself.
Connection string setting
Opening the class Technet Model, we will see its manufacturer have the following appearance:
public TechnetModello() : base("name=TechnetModello")
{
}
That is supplied to DbContext below a string in the form "name = TechnetModello". This syntax refers to the connection string to use as the class is referenced. In place of such a string can be passed, for example, an entire ODBC connection string formed by UDL. If you leave it in the format "name = ...", the name of the string to be found in the App.config file, where we will find a section called connectionStrings, inside which can be differentiated different connection strings, each having the name different. In our case, "name = TechnetModello" hints that in App.config, there is a named TechnetModello connection string.
Checking the contents of the file, we see that this is so:
<connectionStrings>
  <add name="TechnetModello" connectionString="data source=(LocalDb)\v11.0;initial catalog=ArticoloEF02.TechnetModello;integrated security=True;MultipleActiveResultSets=True;App=EntityFramework" providerName="System.Data.SqlClient" />
</connectionStrings>
All changes of the case: for example, we could take to report an instance of SQL Server already exists, or change the database name you created, which in connectionstring is defined by the Initial Catalog property can be applied in this string. LocalDB is a version of SQL Server Express specifically created for developers. It is typically installed with Visual Studio, and has many features of the usual versions of SQL Server, allowing the programmer to be able to avoid the installation of other instances which go to encumber the dedicated to the development machines. In this case, so we will use this database engine, limiting ourselves to change the database name, which will become TECHNET. The connection string in the App.config therefore assume the following value:
<connectionStrings>
  <add name="TechnetModello" connectionString="data source=(LocalDb)\v11.0;initial catalog=TECHNET;integrated security=True;MultipleActiveResultSets=True;App=EntityFramework" providerName="System.Data.SqlClient" />
</connectionStrings>
At this point, you will need to create the first migration, which - as we have previously observed - allows for Code-First contexts upgrading of the physical data model based on the predisposed classes.
Startup migration
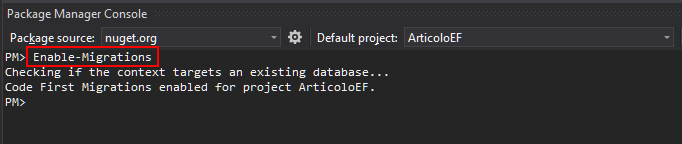
Enabled for the project migrations, running from Package Manager Console education
Enable-Migrations
And so we create the initial migration, with the command
Add-Migration InitialCreate –IgnoreChanges
At this point, our project will be enriched by the Migrations directory, which will contain a configuration file, called Configuration.cs, and from the first migration file, that we are now in a position to perform.

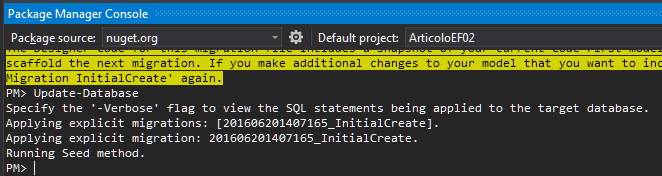
We proceed then typing in the Package Manager Console Update-Database education, and we await the processing is completed.
Once completed, we will be informed of migration performed on the database.
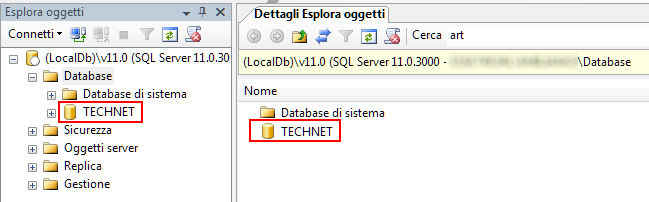
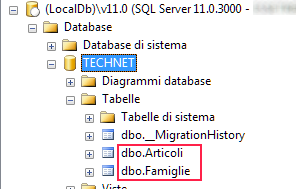
To check what happened on the server side, we can connect to the instance of LocalDB, for example via SQL Management Studio: we observe how she created the desired database.
The operations related to migration will be repeated in all those cases in which you need to make changes to the database structure itself. Just because we reason according to Code-First paradigm, it will be our code to have to make changes in the model, and not vice versa. We will see a second example of migration soon, once we have created some significant entities.
Creating entity classes
Now that we have a database, suppose we want to create in it two tables. They correspond, respectively, to an entity that will serve us to store a trivial Identifyng of products, while the second will contain some detailed information about the commodity families of products available. We can operate in two modes, namely to create a new class file, or append our classes to what is already contained in TechnetModello.cs file. For practical questions, here we will opt for the second way, though - to make it more maintainable code - in real applications it makes perfect sense that each class has its own characteristic file.
Articoli class
We define a class named "Articoli". As we saw earlier, the class will contain properties that - Database - correspond to as many fields. Let us then suppose you want to create a very simple class, consisting of a product code, a description, and a family code. Therefore we can write code like the following:
public class  Articoli
{
    public string  Codice { get; set; }
    public string  Descrizione { get; set; }
    public string  CodFamiglia { get; set; }
}
We mentioned in the last article, the so-called DataAnnotations, or to large synthetic instructions help in defining special properties of our fields. In Code-First syntax, they take on considerable importance, because - having to be the developer to map the structure of the classes - they serve to broaden the definition of property by specifying additional carattestiche their field, such as its length, l ' any compulsory, its being part of the primary key of the table, and so on.
We use then the DataAnnotations to better delineate the profile of our articles table.
In the following example, we put the key constraint on only the Code field, setting also the obligation, and - by DataAnnotation StringLength - defining a maximum length for each field.
public class  Articoli
{
    [Key]
    [StringLength(15)]
    [Required]
    public string  Codice { get; set; }
    [StringLength(50)]
    public string  Descrizione { get; set; }
    [StringLength(6)]
    public string  CodFamiglia { get; set; }
}
Famiglie class
The Families class instead will contain only two fields: Cod family, of course key, and Description, representative of the long description of the family.
public class  Famiglie
{
    [Key]
    [StringLength(6)]
    [Required]
    public string  CodFamiglia { get; set; }

    [StringLength(35)]
    public string  Descrizione { get; set; }
}
TechnetModello class
In order for the two classes can be exploited by the model, and associated with the database, they must be declared as DbSet type properties within the TechnetModello class. We will therefore make the following change:
public class  TechnetModello : DbContext
{
    public TechnetModello() : base("name=TechnetModello") { }

    public virtual  DbSet<Articoli> Articoli { get; set; }
    public virtual  DbSet<Famiglie> Famiglie { get; set; }
}
Second migration
With the new model ready for use, we can now proceed with the publication of the second migration, this time with the task of creating the tables on the database.
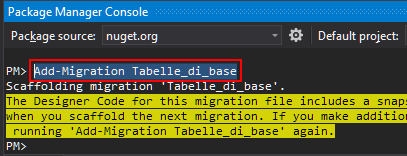
From the Package Manager Console, we perform instruction
Add-Migration Tabelle_di_base
And then, we perform as done previously
Update-Database
By connecting to the instance of LocalDB then, we will see how our tables have been added, in which the final character class name in English was added designates the plural.
This peculiarity, a bit 'annoying in our language, can be circumvented by a special DataAnnotation, which we will analyze in the context of the upcoming migration.

Initial data in migration context
It may happen that, after release of the model updates, you want to provide the preset table data (think, for example, a ministerial tables, to be provided as they are, and above all ready for operation). The migrations allow us to distribute precompiled data, exploiting the Seed () method that is located in Configuration.cs files. This method is executed subsequently to migration, and as such is suitable to perform various operations on the data base.
Following our example, we will want to migrate our application peoples tables Articles and Families with some data, which we will use for testing.
The Seed method will thus become:
protected override  void Seed(ArticoloEF02.TechnetModello context)
{

    context.Articoli.AddOrUpdate(
        new Articoli { Codice = "Test001", Descrizione = "Articolo di Test 001", CodFamiglia = "F01" },
        new Articoli { Codice = "Test002", Descrizione = "Articolo di Test 002", CodFamiglia = "F01" },
        new Articoli { Codice = "Test003", Descrizione = "Articolo di Test 003", CodFamiglia = "F03" },
        new Articoli { Codice = "Test004", Descrizione = "Articolo di Test 004", CodFamiglia = "F02" },
        new Articoli { Codice = "Test005", Descrizione = "Articolo di Test 005", CodFamiglia = "F02" },
        new Articoli { Codice = "Test006", Descrizione = "Articolo di Test 006", CodFamiglia = "F01" }
        );

    context.Famiglie.AddOrUpdate(
        new Famiglie{CodFamiglia = "F01", Descrizione = "Prodotti Finiti"},
        new Famiglie{CodFamiglia = "F02", Descrizione = "Semilavorati"},
        new Famiglie{CodFamiglia = "F03", Descrizione = "Materie Prime"}
        );

}
Notice how it uses, as a parameter, a context variable TechnetModello type: this will then allow you to refer directly to our data entities, calling - on classes representing the tables - those methods that allow you to change the underlying data. In our case, we add 6 items and 3 families.
We can now use the command again
Update-Database
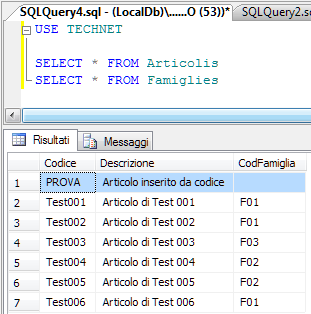
There are pending migration, but at the end of this command will always be executed Seed () method. Therefore, going back to query our database, and asking a simple SELECT from tables created, we get the following result:

Data access
In this section we will see some simple examples to make access to the data in the selection contexts, insert, update and delete.
For all these cases, it is necessary first to have a data context properly initialized. In our case, this is achieved with the simple definition of a new reference to a variable which belongs to the class that extends DbContext, namely:
TechnetModello db = new TechnetModello();
More generally, if we want to initialize a data context and environment delegate the task of having this connection upon completion of the operations you want, we can use the using clause, like this:
using (TechnetModello db = new TechnetModello()) {
    // TO DO: operazioni di lettura/scrittura
}
Data querying
Is shown here a simple routine to make the cyclic reading before, and especially then, the records in the Items table.
As appears to be clear from the premises, our tables can be thought of as lists belonging to a given type, in part precompiled (existing data in the table) and editable.
Consequently, once it initialized the data context, the entity items can be scrolled as normal custom.
using (TechnetModello db = new TechnetModello()) {

    foreach (Articoli a in db.Articoli)
    {
        MessageBox.Show(a.Codice + " " + a.Descrizione);
    }

}
The snippet above initializes the data context on the db variable. Then, within a for / each loop, we read the individual entities of the type contained in Articles db.Articoli list, emettendone screen the code description. In these cases, the LINQ syntax is obviously very useful to run queries or targeted selections.
For example, suppose you want to extract a type Articles variable, representing the first occurrence of items that the family code of F02.
With LINQ syntax, we can write concisely the following snippet:
using (TechnetModello db = new TechnetModello())
{
    Articoli a = db.Articoli.Where((x) => x.CodFamiglia == "F02").FirstOrDefault();
    if (a != null) MessageBox.Show(a.Codice);
}
New record insert
The operations of insertion pass - of course - for the referencing of a type compatible with that of the variable list, then append it to the latter, once it is the properties are enhanced. A new type Articles variable can be declared as follows:
Articoli a = new Articoli() { Codice = "PROVA", Descrizione = "Articolo inserito da codice", CodFamiglia = "" };
Obviously, the DbSet items has an Add () method, which will allow us to pass this variable to the set to add to it. No other controls, however, will expose us to the risk, that could groped to enter duplicate keys in the database. It therefore becomes necessary, before inserting our variable, check if its key elements are not already specified.
With LINQ, it all becomes very simple:
Articoli a = new  Articoli() { Codice = "PROVA", Descrizione = "Articolo inserito da codice", CodFamiglia = "" };

if (db.Articoli.Find(a.Codice) != null)
    MessageBox.Show("Articolo già presente su tabella Articoli");
else
    db.Articoli.Add(a);
Defined our type Articles variable, let's run the Find () method on the table DbSet representative looking at it any occurrences of a.Codice, or the primary key of the table. In case you find an existing item, we will issue a notice of inability to proceed, but if not add the element.
However, in the data modification operations simply not act on entities: it is necessary to consolidate the changes, or to inform the Entity Framework will to save the changes that occurred during the use of DbSet. DbContext has a method called SaveChanges (), by which precisely perform this consolidation. It also has a property to be used for control purposes with the changes that occurred on the database. You can then, before performing the save routine, introduce a preliminary check to make sure that this procedure is actually necessary.
using (TechnetModello db = new TechnetModello())
{
    Articoli a = new  Articoli() { Codice = "PROVA", Descrizione = "Articolo inserito da codice", CodFamiglia = "" };

    if (db.Articoli.Find(a.Codice) != null)
        MessageBox.Show("Articolo già presente su tabella Articoli");
    else
        db.Articoli.Add(a);


    if (db.ChangeTracker.HasChanges()) db.SaveChanges();
}
Since the snippet above may not produce variations in DbSet (the case in which a duplicate key is detected), we use the ChangeTracker properties and its HasChanges method to check whether the modifications on DbContext. If so, you run the SaveChanges method and consolidate current data.
Updating existent records
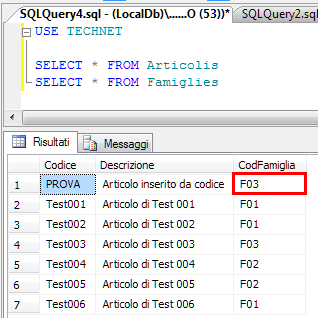
At this point, the update operations and delete data become obvious. Suppose we want to change the newly inserted record, or having key field code = TEST.
The first thing to do is locate the DbSet items, and then - if it is this - we can change its properties. This operation will update at the same time the ChangeTracker, by which we will determine whether to perform a data consolidation.
Very simply, the code will be:
using (TechnetModello db = new TechnetModello())
{
    Articoli a = db.Articoli.Find("PROVA");
    if (a != null)
    {
        a.CodFamiglia = "F03";
    }

    if (db.ChangeTracker.HasChanges()) db.SaveChanges();
}
In this case, we want to update, for the single record, the Family Code, bringing it to F03. Note that it is sufficient that the corresponding property setting, when you have found the record. This can of course be performed in a massive, all of the desired items. The SaveChanges () method must be called only once, in the end processing, to perform a global commit the changes.
Record deletion
Even deleting a record is simple: it is to remove a particular item from DbSet items, and re-consolidate the change.
In the following snippet, the research article having key field code = TEST is performed, and its subsequent removal if found:
using (TechnetModello db = new TechnetModello())
{

    Articoli a = db.Articoli.Find("PROVA");
    if (a != null) db.Articoli.Remove(a);

    if (db.ChangeTracker.HasChanges()) db.SaveChanges();
}
Table name modification
As a final aspect of this article, we still see how to change the names of the physical tables, here through DataAnnotations.
Additional considerations about will be made in the future when we will discuss more closely the so-called Fluent API.
We have seen how, by default, the Entity Framework generate tables giving them a character, queue name, which defines the plural in English. Since, in Italian, we have already declined the names in the plural class, we want to avoid that tables are created with a different nomenclature than you expect. enough will precede the declaration of classes and items Families DataAnnotation the Table, indicating the name that the tables will have to hire.
The TechnetModello files therefore will appear like this:
using System;
using System.ComponentModel.DataAnnotations;
using System.ComponentModel.DataAnnotations.Schema;
using System.Data.Entity;
using System.Linq;

public class  TechnetModello : DbContext
{
    public TechnetModello() : base("name=TechnetModello") { }

    public virtual  DbSet<Articoli> Articoli { get; set; }
    public virtual  DbSet<Famiglie> Famiglie { get; set; }
}

[Table("Articoli")]
public class  Articoli
{
    [Key]
    [StringLength(15)]
    [Required]
    public string  Codice { get; set; }
    [StringLength(50)]
    public string  Descrizione { get; set; }
    [StringLength(6)]
    public string  CodFamiglia { get; set; }
}

[Table("Famiglie")]
public class  Famiglie
{
    [Key]
    [StringLength(6)]
    [Required]
    public string  CodFamiglia { get; set; }

    [StringLength(35)]
    public string  Descrizione { get; set; }
}
At this point, we can generate a new migration
Add-Migration NomiTabelle
and subsequently run it
Update-Database
After the migration, going to query the database TECHNET we will see how the name of the tables has been changed, reflecting hours than desired.
Download
The source code used in the above examples can be download at: https://code.msdn.microsoft.com/Introduzione-ad-Entity-4ef8cec6
Conclusion
Here we've briefly outlined the methodologies concerning the Code-First paradigm of Entity Framework, showing some examples of use of the created entities, and focusing on data modeling possibilities underlying context. We recommend the reader to become familiar with these concepts, together with those of the previous article, waiting to continue in this overview, with the upcoming events of the series.
Other languages
The present article is available in the following localizations: