SCVMM 2012 R2 & Hyper-V: Storage Migration in Microsoft Private Cloud
This is a white paper that my buddy Aayush Bhatt and I wrote on Storage Migration using System Center 2012 R2 Virtual Machine Manager & Hyper-V on Windows Server 2012 R2 in Microsoft Private Cloud
Applies to
- System Center 2012 R2 Virtual Machine Manager
- Hyper-V on Windows Server 2012 R2
Introduction
In order to migrate the physical storage underneath the Fabric and Tenant environments of a Microsoft System Center 2012 Private Cloud, we need to consider several components of the Storage layer i.e. Boot LUNs, Storage LUNs, Quorum disk witness, Cluster Shared Volumes (CSV) etc.
Storage Migration Plan
Following is the high level overview of the Storage Migration plan.
| Procedural Activities | ||
| 1 | Formulation of Migration strategy. | |
| 2 | Formulation of Project plan with timelines and responsibilities. | |
| 3 | Formulation of Rollback strategy (each for Boot LUNs, Storage LUNs etc.) | |
| 4 | Formulation of Performance testing strategy for VMs and Hyper-V hosts. | |
| 5 | Workshop among all respective teams for process agreement. | |
| 6 | Informing respective Application team(s). | |
| 7 | Initiation of a change request in ITSM. |
| Technical Activities | ||
| 8 | Updating all the Hyper-V hosts with latest patches. | |
| 9 | Conversion of new storage to LUNs. | |
Storage LUN |
10 | Attaching LUNs to host clusters. |
| 11 | Conversion of new storage to CSVs. | |
| 12 | Performing Storage migration of test VMs. | |
| 13 | Performance testing of test VMs after storage migration. | |
| 14 | Testing Live Migration. | |
| 15 | Migration of Tenant and Fabric VMs to the new storage. | |
| 16 | Performance testing. | |
| 17 | Removal of Old Storage | |
Boot LUN |
||
| 18 | Attaching new Boot LUN's to Hyper-V hosts. | |
| 19 | Shutting down host and migrating boot configuration and Boot LUN. | |
| 20 | Removing old Boot LUN. | |
| 21 | Performance testing of Hyper-V hosts. | |
Quorum Disk |
||
| 22 | Attaching new quorum disk to Host cluster(s). | |
| 23 | Adding new disk as a cluster quorum disk. | |
| 24 | Removing old quorum disk. | |
| 25 | Verification and validation of the environment. | |
| 26 | Troubleshooting issues (if any) | |
| 27 | Sign-off of the activity |
Storage LUN Migration Process
Storage LUNs are used to save virtual machine hard disk files (.VHD and .VHDX), virtual machine configuration data files and snapshots etc. Typically, storage LUNs are usually converted to Cluster Shared Volumes (CSV), which in turn are shared by Hyper-V hosts in the cluster.
The process that happens behind the scenes while performing VM storage migration using SCVMM is as follows.
- A new VHD or VHDX file is created in the specified destination location (storage migration works with both VHD and VHDX).
- The VM continues to both read and write to the source VHD, but new write operations are now mirrored to the destination disk.
- All data is copied from the source disk to the destination disk in a single-pass copy operation. Writes continue to be mirrored to both disks during this copy operation, and uncopied blocks on the source disk that have been updated through a mirrored write are not recopied.
- When the copy operation is finished, the VM switches to using the destination disk.
- Once the VM is successfully using the destination disk, the source disk is deleted and the storage migration is finished. If any errors occur, the VM can fall back to using the source disk.
Using Microsoft System Center 2012 R2 Virtual Machine Manager with Hyper-V on Windows Server 2012 R2 provides you the functionality to live migrate the storage of a stand-alone virtual machine without any downtime. In case of Clustered VMs, or any virtual machines which have shared virtual hard disks, a downtime is required. The details of both the scenarios are described below.
Stand-alone Virtual Machine Storage Migration
Stand-alone virtual machines are those VMs which have their own VHDs and are neither clustered, nor have a shared VHD. These machine can be migrated without any downtime using the straight forward migration approach of SCVMM. Its process is as follows:
Perform pre-requisites on new storage.
Clean-up the environment by removing unused virtual machines, virtual hard disks, snap-shots etc.
Migrate the storage of a stand-alone virtual machine in VMM console. Right click and select 'Migrate Storage'.

Select the new CSV, where you want to save the VM data, then review the settings and select .

Validate the migration process by checking job status in VMM.
Initiate performance testing of the migrated VM using the performance metrics and test mentioned in https://msdn.microsoft.com/en-us/library/cc768535(v=bts.10).aspx
Once the storage of all the VMs are migrated, go to ‘Failover Cluster Manager’, select the Cluster Volume in the available disks. Right click and select ‘Take Offline’. It will put the CSV to offline mode from available.

Once the status of a disk shows as offline, right click and select the option as ‘Remove from Cluster Shared Volumes’. This step will remove this CSV.

Clustered/ Shared drive Virtual Machine Storage Migration
Second scenario includes virtual machines which are either clustered on Hyper-V hosts or have virtual hard disk attached to it which is shared among two or more virtual machines. Migration of such kind of virtual machines requires downtime as the shared drives needs to be removed before migrating the VM storage. Its process is as follows:
Stop Cluster service and shut down virtual machine(s).
** **Go to virtual machine properties and remove sharing in the 'Advanced Properties' of the shared virtual hard disks
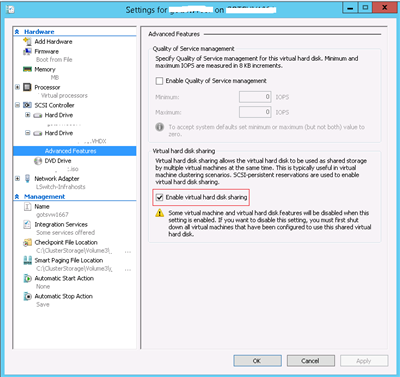
Remove shared virtual hard disks from the properties of the VM (Note: Kindly make a note of the order in which the shared VHDs were added)

Migrate virtual machine storage using the process mentioned above.
Manually move the shared virtual hard disks to the new storage location.
Once the storage of all the nodes (VMs) of the cluster are successfully migrated, re-add the shared VHDs to the VMs by changing its properties.
Change the sharing permissions in the shared virtual hard disks.
Turn on the virtual machines and make sure the cluster service is running.
Check the failover by pausing each node at a time.
Boot LUN Migration Process
Boot LUNs are attached to the physical Hyper-V hosts and contains booting configuration data of the host. Unlike storage LUNs, these are not shared and each host has one Boot LUN attached to it.
Migrating the Boot LUN of a Hyper-V hosts requires the host to be shut down. In case of a Hyper-V host clustering environment, we can live migrate all the virtual machines from one host to another host(s) before shutting it down, thus preventing any downtime. But if, Hyper-V hosts are not clustered, then the virtual machines running on top of the Hyper-V hosts needs to be shut down in order to perform the activity.
The overview of the Boot LUN migration process is as follows
Go to SCVMM console, select the desired node in the Hyper-V cluster. Right click and select 'Start Maintenance Mode'. This will stop the cluster service on that host.

Now as the maintenance mode is on, all the virtual machines on the Hyper-V host will automatically start live migrating to the other hosts in the cluster.
Once all the workloads are moved, the cluster service will show as 'Paused'.

Confirm the status in 'Job History'
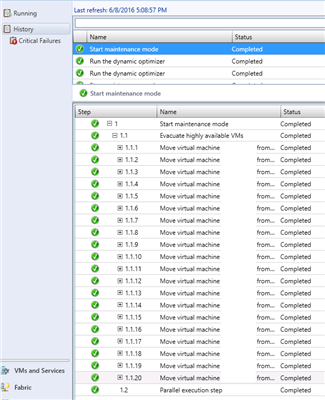
Shut down the Hyper-V host.
Perform Boot LUN migration by transferring all the boot configuration to the new storage.
Remove the old storage and attach new Boot LUN to the host.
Start the host and stop the maintenance mode. Performing this step will activate the cluster service on the host.
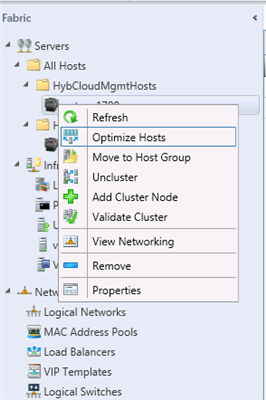
Once the cluster service is started, right click on the Hyper-V cluster and select 'Optimize Hosts'. It will optimize the workloads across all the hosts in the cluster. Make sure that the live migration is happening seamlessly.
Perform same steps for the remaining hosts in the cluster.
Quorum Disk Migration Process
The quorum configuration in a failover cluster determines the number of failures that the cluster can sustain. If an additional failure occurs, the cluster must stop running. A Quorum is a Disk Witness which contains a copy of the cluster configuration.
The process of migrating Quorum disk is as follows:
** **Add new quorum disk to the cluster storage.
** **Open 'Failover Cluster Manager', Right click and select 'More Actions' then select 'Configure Cluster Quorum Settings'.
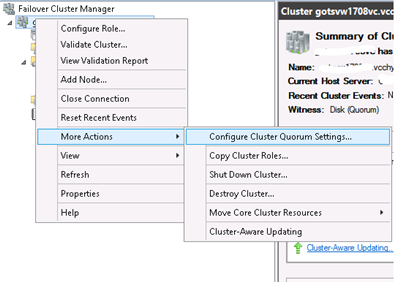
Proceed through the wizard by selecting 'Use Default Quorum Configuration'. Verify the details and make sure that the new quorum dis is selected as the Disk Witness.
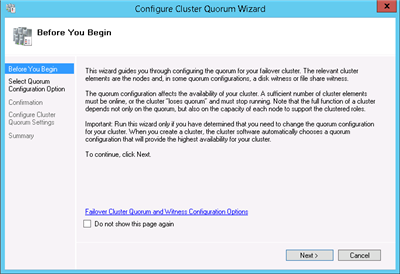
Close the wizard.
In 'Failover Cluster Manager', go to Disks under Storage and make sure that the new Quorum disk is reflecting there as 'Online' and 'Disk Witness in Quorum'.

Monitor the cluster by checking event logs etc.
