FIM 2010 / MIM 2016: Managing Contacts in the Portal
Applies To
- FIM 2010 (R2)
- MIM 2016
Scenario
Contoso is planning to use the MIM to manage contacts in the corporation’s Active Director Domain Services (ADDS). The business has decided a select group of service desk people will be allowed to utilize the MIM Portal to create, modify and delete contacts in the MIM Portal and have those contacts created, updated, and deleted in ADDS.
Requirements
| Provisioning Domain | CONTOSO |
Provisioning Organizational Unit |
OU=Contacts,DC=contoso,DC=com |
| Access Group | Contoso Service Desk Team |
| Active Directory Attributes |
|
| Deprovisioning | MIM Portal is authoritative for deletes and should be used for deleting contact objects. A delete of a contact in the MIM Portal will delete the object in AD. A delete of the object directly in AD will trigger recreation of the object in AD. |
Design
- Active Directory domain controller
- MIM Synchronization Server
- MIM Portal Server
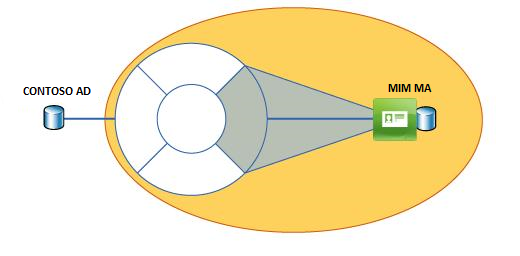
The following illustration outlines the required environment:
Implementation
Task 1: Create the Contact resource in the MIM Portal
We begin by creating the Contact resource in the MIM Portal.
- Go to the MIM Portal
- On the upper-right part of the MIM Home page, click on the Schema Management link
- Click on the All Resource Types link at the top of the Schema management page
- Click on New
- On the General page enter
- System name: Contact
- Display name: Contact
- Click Next
- On the Localization page click Next
- On the Summary page click Submit
Task 2: Bind attributes to the Contact resource
We now have to bind the attributes we want to use in the MIM Portal Contact resource.
- Go to the MIM Portal
- On the upper-right part of the MIM Home page, click on the Schema Management link
- Click on the Schema Management
- Click on the icon All Bindings
- Click New and add each of the needed attributes to the Contact resource
Task 3: Create the MIM Search Scope
Next, we will create a new Search Scope for use in the search boxes of the MIM Portal.
- Click on Home in the navigation bar
- Click on the Administration link on the left navigation bar
- Click on the Search Scopes link
- Click New
- On the General page enter
- Display Name: All Contacts
- Description: Returns all resources of type Contact
- Usage Keyword: (type on separate lines)
- BasicUI
- Global
- Site
- GlobalSearchResult
- Order: 10
- Click Next /li>
- On the Search Definition page enter (case sensitive!)
a. Attribute Searched:
- DisplayName
b. Search Scope Filter: /Contact
- Click Next
- On the Results page enter (case sensitive!)
- Resource Type: Contact
- Attribute: DisplayName;Email
- RedirectingURL:
- Click Next
- On the Localization page click Next
- On the Summary tab click Submit
Task 4: Refresh the MIM Portal Cache
In order for the new Search Scope to be visible in the MIM Portal, we will need to run IISRESET to refresh the MIM Portal cache.
- Click on the Windows Start button
- Launch a Command Prompt and enter IISRESET
- Navigate back to the MIM Home Page
- Click on the Search within drop-down menu in the upper right side
- You should see the inclusion of All Contacts towards the top of the drop down box. Do not attempt to create a Contact resource yet. You won’t be able to since we haven’t given the administrator the proper rights in a permission granting MPR yet.
Task 5: Customize the RCDC
We now need to create a web page for creating, viewing and editing Contact resources.
- On the MIM Home Page, click on the link for Resource Control Display Configurations
- Click New
- On the General page enter
- Display name: Configuration for Contacts
- Target Resource Type: Contact
- Click on Download default create mode template
- Save to the desktop as Configuration for Contact.XML
- Click Cancel
- Find the file Configuration for Contact.XML that you just saved on the desktop and double click on it. Notice that this default XML file generated contains the definition of a Resource Control Display Configuration (RCDC) with web controls for all the attributes that the resource type Contact contains in the MIM schema.
- Edit the RCDC to only include Display Name, First Name, Last Name, and E-Mail.
- Let's import the RCDC definition from an XML file that we have already customized. On the MIM Home Page, click on the link for Resource Control Display Configurations
- Click New
- On the General page do the followings:
- For Display name enter: Configuration for Contact
- For Target Resource Type select Contact
- For Configuration Data click on the Browse button
- Navigate to the desktop and select Configuration for Contact.XML
- Select the check box Applies to Create. This will make sure the RCDC you are defining will be used when you create a new resource of type Site.
- Select the check box Applies to Edit. This will make sure the RCDC you are defining will be used when you edit an existing resource of type Site.
- Select the check box Applies to View. This will make sure the RCDC you are defining will be used when you view an existing resource of type Site.
- Click Next
- On the Localization page, click Next
- On the Summary page click Submit
- Open a Command Prompt and run IISRESET for the new RCDC to take effect.
Task 6: Create a Set of All Contacts
Next, we create a Set which has a filter condition based on the resource type we previously created: Contact.
- On the left side Navigation Bar of the MIM Home page, click on the Sets link
- Click New
- On the General page enter: • Display name: All Contacts
- Description: Contains all resources of type Contact.
- Click Next
- On the Criteria-based Members page do the followings:
- Click on All resources
- Select Contact from the list
- Click Finish
- On the Summary page click Submit
Task 7: Create an MPR for Contact Resource Management
We are going to create an MPR for the CONTOSO Support Desk team.
- Click on Management Policies on the left side of the MIM Home Page
- Click on New
- On the General Information tab enter:
- Display Name: _Contoso_Support_Desk can Manage Contact Resources
- Type: Request
- Disabled: not selected
- Click on Next
- On the Operation and Users page do the followings:
- Requestors: Administrators in the Specific Set of Requestors
- Operations:
Create resource: checked
Delete resource: checked
iii. Read resource: checked
Modify a single-valued resource attribute: checked
- Grants permission: selected
- Click on Next
- On the Target Resources page enter:
- Target Resource Definition before request: enter All Contacts
- Target Resource Definition after request: enter All Contacts
- Attributes: select (Needed Attributes)
- Click on Next
- On the Policy Workflows page, Click on Next
- On the Summary page click Submit
Task 8: Add a Contact link to the MIM navigation bar
We will now add a Contact link to the bottom of the MIM Navigation Bar:
- Click on the Home link in the upper left
- Click on the All Resources link on the right of the MIM Home Page
- Find Contact in the list of All Resources and click on it
- Copy the URL of the page that loads for later use
- Click on the Home link in the upper left
- Click on the Navigation Bar Resources link on the right of the MIM Home Page
- Click New
- On the General tab enter: • Display Name: Contacts • Description: • Usage Keyword: BasicUI
- Click Next
- On the UI Position tab enter:
- • Parent Order: 99
- Order: 0
- On the Behavior tab enter
- Navigation URL: paste in the URL you copied earlier and replace the "http://...com" portion of the URL with a "~".
- Click Next
- On the Localization page, click Next
- On the Summary page, click Submit
- Click on the Windows Start button
- Launch a Command Prompt and enter IISRESET
- Open a new instance of Internet Explorer
- Navigate back to the MIM Home Page
- Note the Contacts link should appear beneath Administration on the left navigation bar.
Task 9: Add Contact Object to Sync Filter
Perform the next task to allow the MIM Synchronization Engine to see the new resource type and make it available for synchronization with other data sources.
- Click on the All Resources link on the right side of the MIM home page
- Click the right arrow to go to the second page of the resources listed
- Click on the Synchronization Filter link
- Click on the Synchronization Filter resource (there should be only one)
- Click on the Extended Attributes tab
- Add ;Contact to the end of the string in the Synchronize ObjectTypeDescription field
- Click the Validate and resolve control (the green checkmark)
- Click OK
- You should see a Select Resource window opening up with a list of resources that match Site. Select the resource which has a Resource Type of Resource Type Description.
- Click OK
- Click OK again and on the Summary page click Submit
Task 10: Refresh the MIM Management Agent Schema
In order to see the new object type in the MIM Management Agent, we need to refresh the schema.
- Launch the Synchronization Service Manager console
- Click the Management Agents tab
- Click on the MIM Management Agent
- In the Action menu to the right click Refresh Schema
- Click OK to proceed
- Supply the password
- Click Close
- Click on Properties in the Actions menu to the right
- Click on Select Object Type
- Click the Show All checkbox
- Click on the checkbox next to Contact
- Click on Select Attributes
- Click the Show All checkbox
- Click on the checkbox next to Name
- Click OK
Task 11: Create a Contact Metaverse schema object type
We will now create a Contact Metaverse schema object type.
- In the Synchronization Service Manager, go to the Metaverse Designer
- Click on the person object
- Click on Copy Object Type
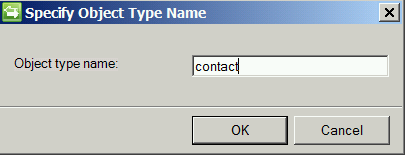
- Create the object type name: contact
- Click OK
Task 12: Configure the MIM Management Agent
We will now go to the MIM Management Agent and map the Contact (Connector Space) object to the Contact Metaverse object we just created.
Open up the properties of the MIM Management Agent
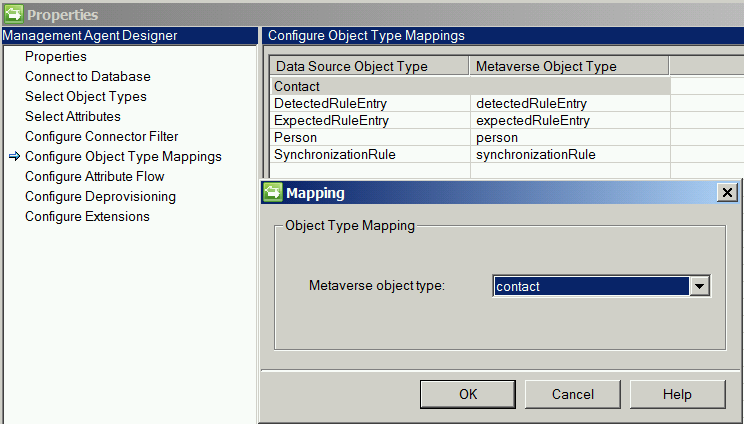
Click on Configure Object Type Mappings
Click on Contact
Click on Add Mapping and select the Metaverse object type: contact
Click OK
Click on Configure Attribute Flow
Make sure the following attributes are set for import flow (in addition to others required):
- Name --> cn
- displayName --> displayName
- FirstName --> firstName
- LastName --> lastName
- Email --> email
Task 13: Configure the ADDS Management Agent
We will now configure the ADDS Management Agent
- In the Synchronization Service Manager click on the ADDS Management Agent
- Click on Select Object Types
- Click on contact
- Click on Select Attributes and verify the following attributes are selected (in addition to others required):
- cn
- displayName
- givenName
- sn
- Click on Configure Attribute Flow
- Add contact object type
- Make sure the following attributes are set for export flow:
- cn <-- cn
- displayName <-- displayName
- givenName <-- firstName
- sn <-- lastName
- mail <-- email
Task 14: Create Outbound Sync Rule “AD Contact Inbound/Outbound Sync Rule”
We will now create the Outbound Sync Rule “AD Contact Inbound/Outbound Sync Rule” to specific metaverse resources of this type based on OSR
- Relationship: Contact, AD, contact
- displayName -> displayName
- Name --> cn
- displayName --> displayName
- FirstName --> firstName
- LastName --> lastName
- Email --> email “SMTP:” + email -> proxyaddresses
Create resource
Disconnect MIM resource
Outbound attribute flow
(initial flow only) “cn=” + cn + “,OU=Contacts,DC=contoso,DC=com” “cn=” + cn + “,OU=Contacts,DC=contoso,DC=com”
Task 15: Create Workflow “AD Contact Provision Workflow”
Create workflow “AD Contact Provision Workflow” and add “AD Contact Outbound Sync Rule” sync rule.
Task 16: Create MPR to tie Workflow to “All Contacts”
Set Create MPR to connect workflow to “All Contacts” Set
Task 17: Enable Synchronization Rule Provisioning
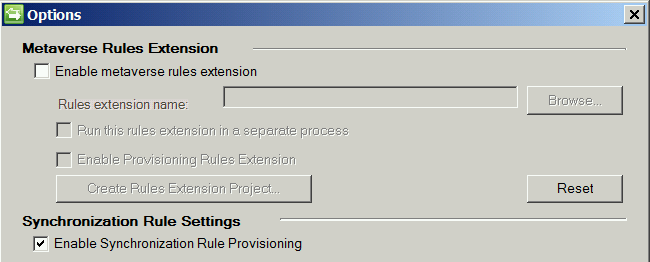
In the MIM Sync engine, click on Tools, Options, and select Enable Synchronization Rule Provisioning.
Task 18: Import MIM Test Contact
We will now import the MIM test contact into the Metaverse
- In the Synchronization Service Manager click on the MIM Management Agent
- On the Actions menu click Run
- Select Full Import
- Click OK
- Click on the Add link in the Status Pane to the lower left and verify that the test contact object was imported.
- On the Actions menu click Run
- Select Full Synchronization
- Click OK You should now see contact objects in the metaverse and AD connector space.
Task 19: Export the contact to ADDS
Run an export on AD MA. You should now see contact objects in ADDS.


