Localization for Windows Universal Apps
Hello All,
Sharing some notes for implementing localization in UWP apps for windows 10.
For localization in Windows 10, it is better to use .resx files.
Steps for implementing localization:
1)Create New Windows Universal App say "UWPLocalizationDemo"
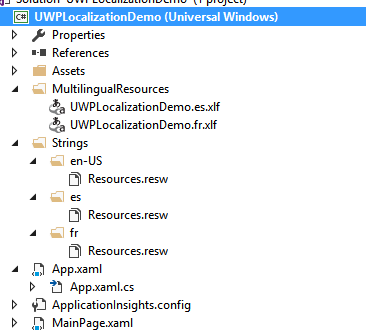
2)In Solution Explorer,right click on project select Add->New Folder(say : Strings)
3)Right Click on Strings folder and add new folder as a child folder.
4)Rename new folder as "en-US".These are naming conventions specific to a language and country/region name,found on National Language Support (NLS).
5)Add new item (.resx resource file) inside en-US folder(as Resources.resw).
6)Now open MainPage.xaml file
7)Give name to parent grid as(x:Uid="ParentGrid") and add a TextBlock inside this grid(<TextBlock x:Uid = "MyTextBlock" Foreground = "White" />)
8)Its up to you, either use MultiLingual Kit for translations or if you have translations for all languages already so just add it into project(Strings/<LanguageFolder Name>/Resources.resw).
9)For using Multilingual Kit: Go to Tools-> Extensions and updates
10) Download and install multi lingual kit and restart Visual studio after that.
11)Now Enable toolkit for the project: Tools->Multilingual App Toolkit ->Enable selection
12)Now its time to add languages : Right click on project ->Multilingual App Toolkit -> Add translation Languages
13)Select languages for which you want your app to do localization(say Spanish),click Ok.
14)Now you will see a folder "es" inside Strings folder and Resources.resw file inside "es" folder
15)Also you can see a new folder added into your project "MultilingualResources" inside it all supportive languages .xlf resides.You can open it using Multilingual editor, and do translation of strings in editor for every language.On rebuilding the app, these changes may reflect to your Resources.resw files inside the respective language folders.
Now Its time to check our localization:
1)Go to language and region settings.
2)Download respective language packs if not there,set language as primary language and keep.
3)Sign out and sign in to reflect language change.Or restart device if not works.
4)Run the app, and find the localization changes there :)
or::
For just to debug add this line in App.xaml.cs class under launching method or in App()
** Windows.Globalization.ApplicationLanguages.PrimaryLanguageOverride = "fr"; //Change your language code if needed**
It will override the existing device language.
There also some ways to get string via code
var context = new  ResourceContext();
         context.Languages = new  string[] { Windows.System.UserProfile.GlobalizationPreferences.Languages[0].ToString() };
         ResourceMap resourceMap = ResourceManager.Current.MainResourceMap.GetSubtree("Resources");
         GenerateToast(resourceMap.Uri.AbsoluteUri.ToString());
         String str = resourceMap.GetValue("MyTitle", context).ValueAsString;
and
public static  string Get(string key)
        {
            var getterString = Windows.ApplicationModel.Resources.ResourceLoader.GetForCurrentView().GetString(key);
            return getterString;
        }
Or you also write language converter
public class  LocalizedStrings : IValueConverter
    {
        private static  readonly Windows.ApplicationModel.Resources.ResourceLoader LocalizedResourceLoader = new  Windows.ApplicationModel.Resources.ResourceLoader();

        public static  string Get(string key)
        {
            return LocalizedResourceLoader.GetString(key);
        }

        public object  Convert(object  value, Type targetType, object parameter, string language)
        {
           if (parameter == null)
            {
                return string.Empty;
            }

            if (parameter is string)
            {
                return LocalizedResourceLoader.GetString((string)parameter);
            }
            else
            {
                return string.Empty;
            }
        }

        public object  ConvertBack(object  value, Type targetType, object parameter, System.String language)
        {
            throw new  NotImplementedException();
        }
    }
And call it from xaml:
<TextBlock Text="{Binding Converter={StaticResource LangConverter}, ConverterParameter=HeaderText}" />
Where HeaderText is a Key inside resources.resw file.

