BizTalk: How to Manually Reconfigure User and Group Security Settings without Deleting Databases
The main goal is to reconfigure the User Account and Groups that the initial configuration had set. There are many reasons for this, for example:
- Re-purpose a tier from PROD to UAT, and switch User and Groups domain objects to TEST rather than PROD.
- Promote a tier, and switch User and Group domain objects to ensure specificity in security
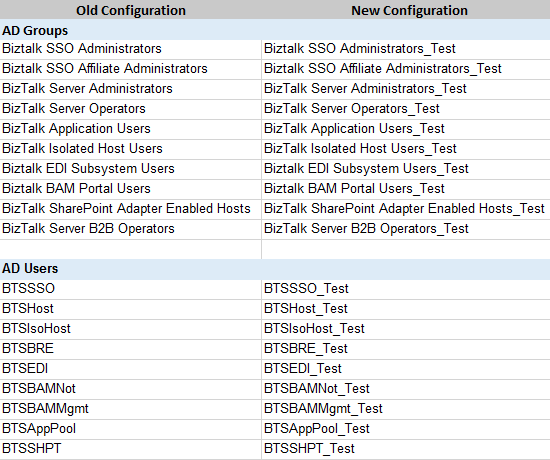
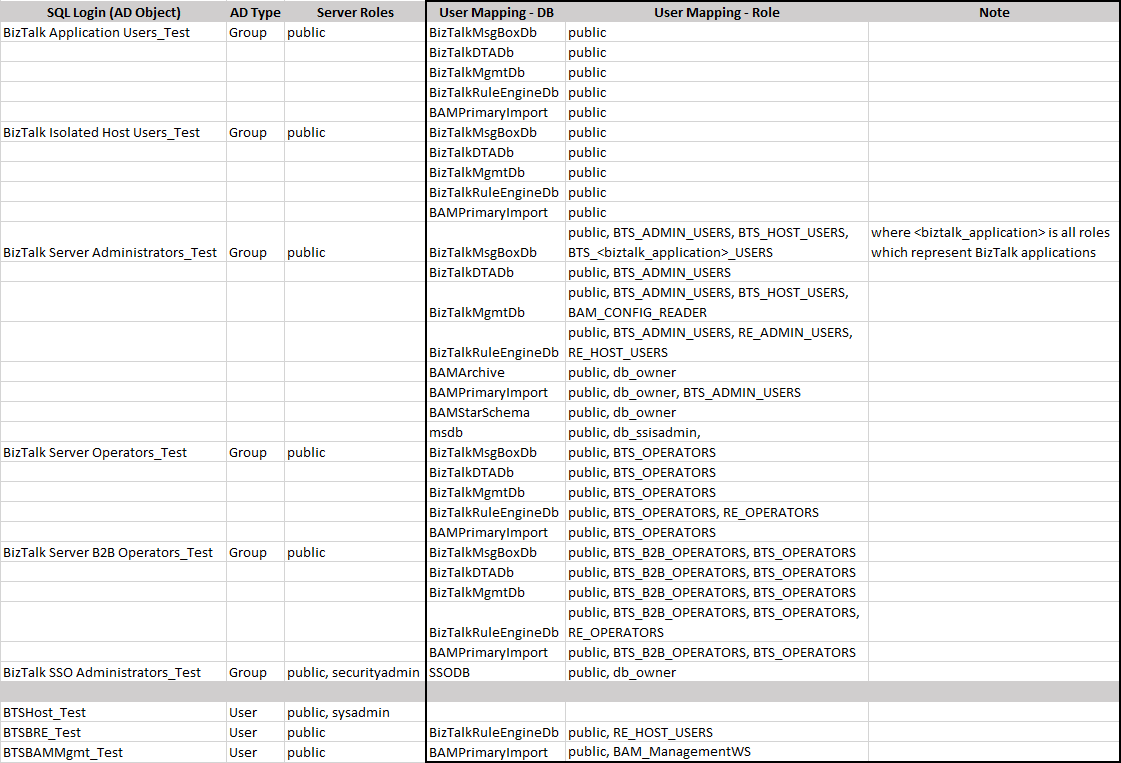
So, as an example of what we are looking to do. Our goal would be to take an initial working instance of BizTalk (single server, or multi-server), and switch the configuration via the following User and Group structure mapping:
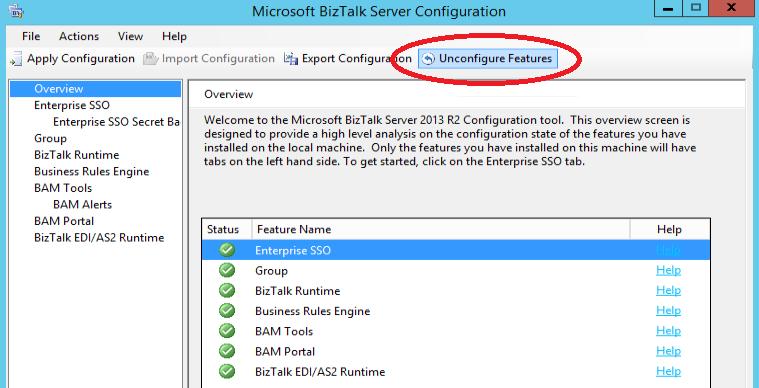
Seems easy enough, but as we all know, this is no easy task. We may utilize traditional BizTalk configuration (un-configuration) methods through the BizTalk Configuration tool, but this will cause databases to be lost.
Below are the manual steps used to reconfigure the group configuration to utilize different User Accounts and Groups.
Warning: These steps are not supported by Microsoft. You should not perform this in Production. You should back up your servers before attempting this. This may or may not be a comprehensive list of steps for your environment and usage. Any other warning that I could make,, please assume it is listed here. Finally, most BizTalk installations are different, so the following steps may or may not be comprehensive for your build.
Assumptions
- All domain object including Service Accounts and Groups are:
- Organized in accordance with Microsoft BizTalk requirements - Windows Groups and User Accounts in BizTalk Server
- Already set up on the organization's domain
Reconfigure SSO System
Your SSO configuration may exist on the same server as the BizTalk Application, on a separate SQL server, or on a SQL Cluster. Depending on your SQL setup, your SSO reconfiguration steps will vary.
On the SQL server node, perform the following:
- Be sure to know the location of your SSO.bak file, and the Master Secret password
- Open the SSO Administration tool
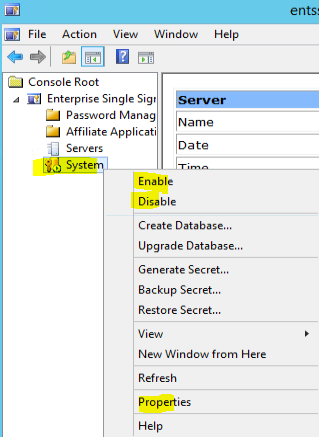
- Right-Click System, Select Disable
- Right-Click System, Select Properties
- Under SSO Administrators and SSO Affiliate Administrators, Add the new SSO Accounts, leave the current ones, respectively
- Right-Click System, Select Enable
You now must update the SSO Service account credential.
On all SQL server nodes, perform the following:
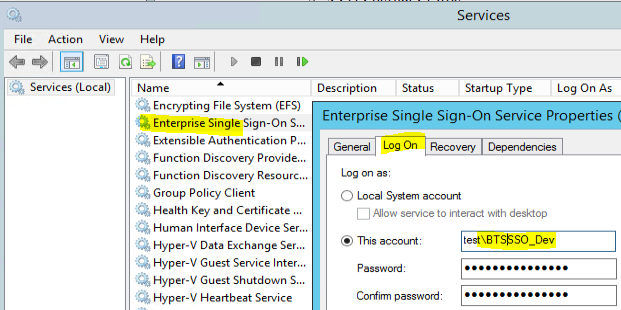
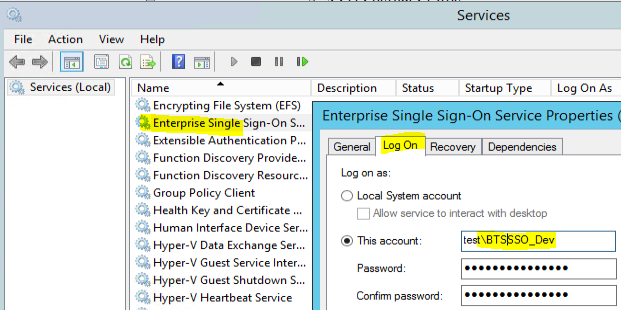
- Navigate to Services.msc and locate Enterprise Single Sign-on
- Right-Click, Select Properties, Select Log On, Update the Service Account
- Restart the Service
You now must conduct a traditional Master Secret Restore. This process will depend on your setup of SQL. There is much documentation out there on how to do this depending on your architecture. Here is a basic MSDN article. Nevertheless, here are the steps.
On all SQL server nodes, perform the following:
- On the SQL box, using the CMD prompt (running as Administrator) Navigate to ~\Program Files\Common Files\Enterprise Single Sign-On
- Run the following command: ssoconfig -restoreSecret <backupfile>
- for <backupfile> point to your sso.bak file
- Supply the Master Secret password
- The operation should complete successfully
- If on a SQL cluster
- Move the SQL SSO Resource to the other cluster node
- Disable the Enterprise SSO Service, Enable the Enterprise SSO Service
- Run the following command: ssoconfig -restoreSecret <backupfile>
- for <backupfile> point to your sso.bak file
- Supply the Master Secret password
- The operation should complete successfully
- You should now have an updated SSO Service, the Event Log should say it has recovered the Master Secret, and you should be able to failover between cluster nodes if on a cluster
If your BizTalk and SQL are on the same server, you are finished with this section. If your BizTalk and SQL are on separate servers, you now must update the BizTalk Application Server, since you just finished updating the SQL server.
If your BizTalk and SQL are on separate servers, on all BizTalk server nodes, perform the following:
- Navigate to Services.msc and locate Enterprise Single Sign-on
- Right-Click, Select Properties, Select Log On, Update the Service Account
- Restart the Service
- On restart, it will pull SSO details from the SSO service running on the SQL node or SQL clustered service. You should see in the event log, Master Secret Server Started Successfully.
Update the BRE Accounts
On all BizTalk server nodes:
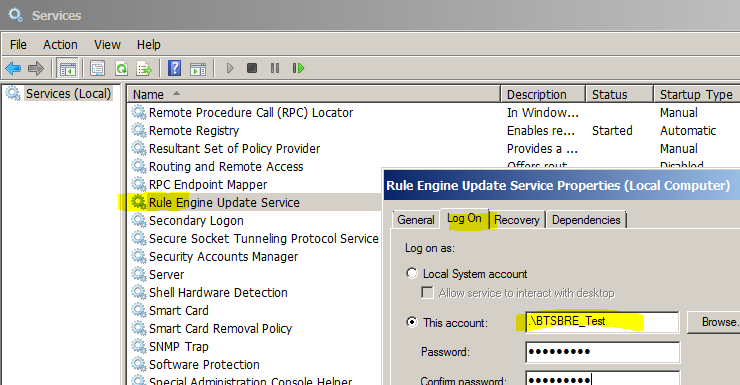
- Navigate to Services.msc and locate the Rule Engine Update Service
- Right-Click, Select Properties, Select Log On, Update the Service Account
- Restart the Service
Update the BAM Accounts
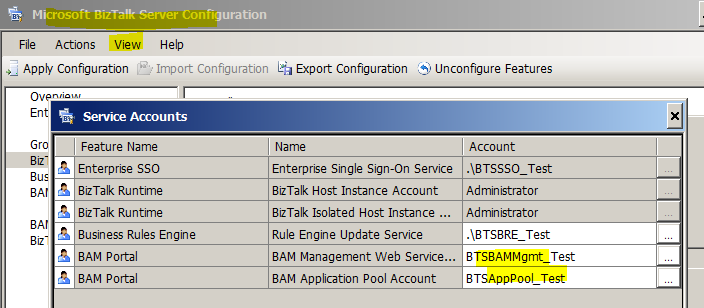
- Navigate to the BizTalk Server Configuration tool
- Select View, Select Service Accounts
- Update the BAM Portal Accounts
- Select Close
- Select Apply Configuration
- Upon Success, you can verify that IIS AppPool Settings are updated
- Validate proper AppPool Settings on other BizTalk nodes
Update the BizTalk Group Settings
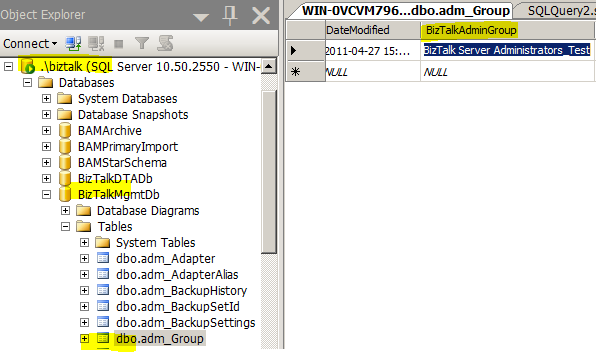
- Using SQL Server Management Studio, connect to your Database Engine SQL instance(s) which contain BizTalk objects
- Open the BizTalkMgmtDb, and Edit the dbo.adm_Group Table
- Update the following columns with the respective domain account, Save
- BizTalkAdminsGroup
- BizTalkOperatorGroup
- BizTalkB2BOperatorGroup
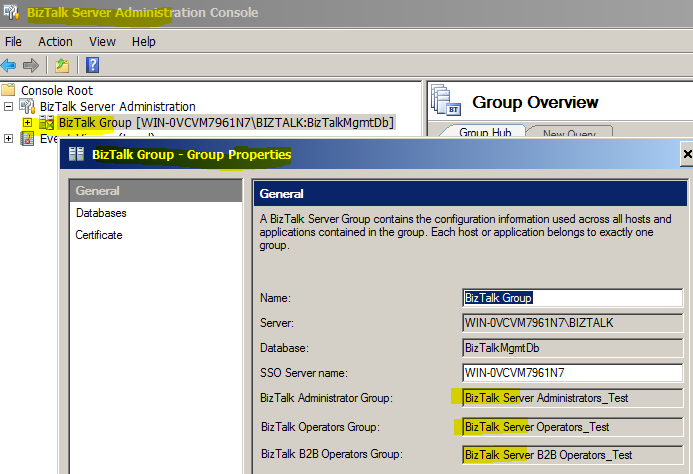
- To verify, Open the BizTalk Administrators Console
- Select the BizTalk Group, Right-Click, Properties
- Verify that Fields are as expected
Update SQL Server Security
For SQL Server Analysis Services, on a SQL Server node:
- Using SQL Server Management Studio, connect to your Analysis Services SQL instance which contains BizTalk objects
- Expand Databases, BAMAnalysis, Roles
- Right-Click BAM Administrator, Properties
- Select Membership, Add the proper BizTalk Server Administrators Group
For SQL Server Database Engine, on a SQL Server node:
- Using SQL Server Management Studio, connect to your Database Engine SQL instance(s) which contain BizTalk objects
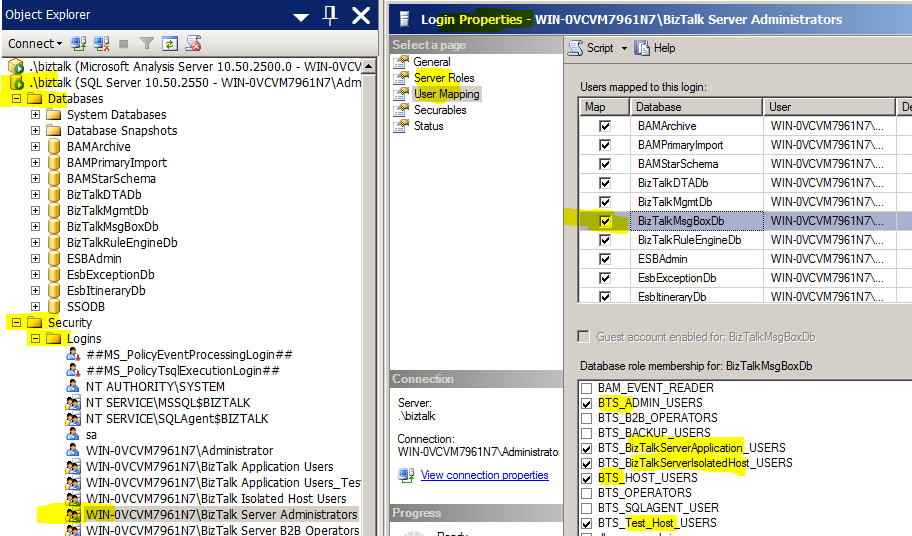
- Expand Databases, Security, Logins, Right-Click, New Login
- Create the Login entity in accordance with the below configuration table for all listed Groups and Users. This should bring your new AD objects up to BizTalk requirements, similar to the original Groups and Users.
- Be sure to implement all entries in the "SQL Login" column
- For each SQL Login, implement:
- "Server Roles" column
- "User Mapping" column - Database
- "User Mapping" column - Database Role Membership
Below is a sample of utilizing the SQL Server Management Studio to create Logins.
Update BizTalk Server Applications
This final section updates the BizTalk Server Applications to the desired User and Group AD objects.
It is important to preserve the default BizTalkServerApplication and BizTalkServerIsolatedHost. Many applications, SDK, sample code, development code, including BizTalk ESB, make use of these default applications. Preserving them will save some heartburn down the road. You can only change the Host Windows Group if Hosts Instances do not exist. You can only delete Host Instances if artifacts are not bound to the Host Instance. Further, you may have many new Hosts and Host Instances to deal with, which you may have artifacts deployed and bound, and would be painful to delete or re-bind.
There are a couple of options here:
Option 1: Traditional Application Update
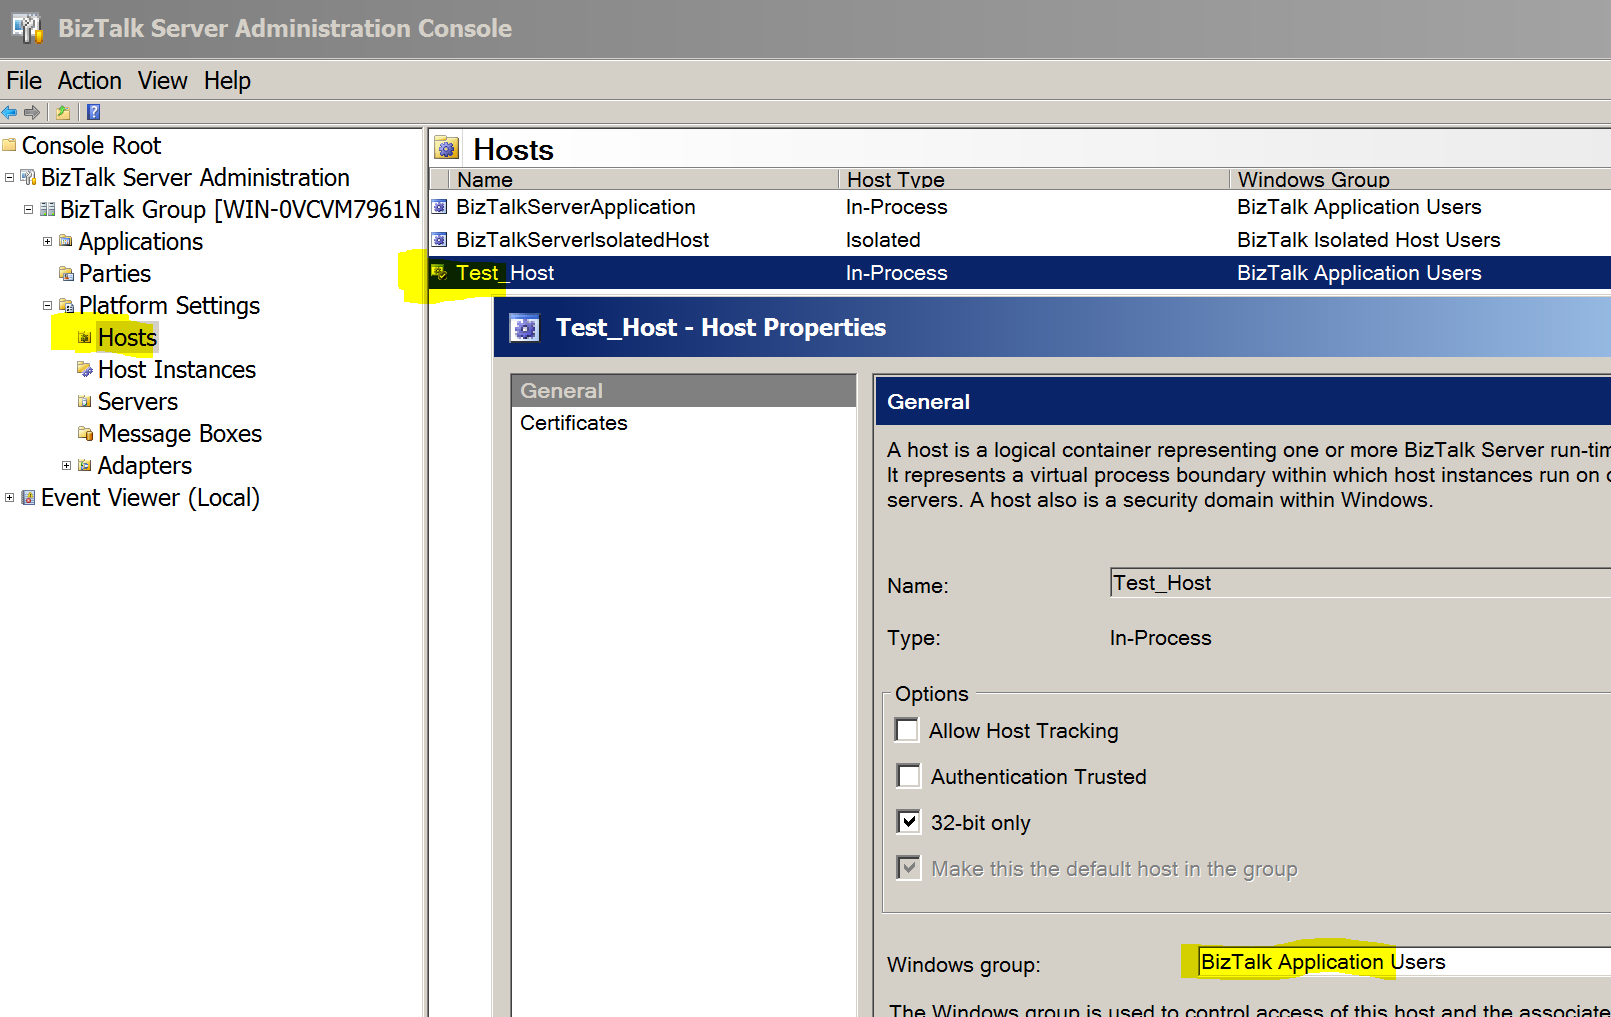
If possible, you will need to remove Host Instances, then select Properties of the target Host, and update the Windows Group. Then re-create the Host Instances, with the new Windows User. This will manage all the manipulations to the backend and application server. However, depending on your current application deploy state, this could end up being cumbersome.
Option 2: Non-Traditional Application Update
This approach is quick, leaves the current application state in place, and manages the manipulations utilizing the backend of the BizTalk application server. This is unsupported and adds risk. However, it gets the job done, quickly, with minimal fallout.
Update Host Windows Groups
- Stop all Host Instances
- Using SQL Server Management Studio, connect to your Database Engine SQL instance(s) which contain BizTalk objects
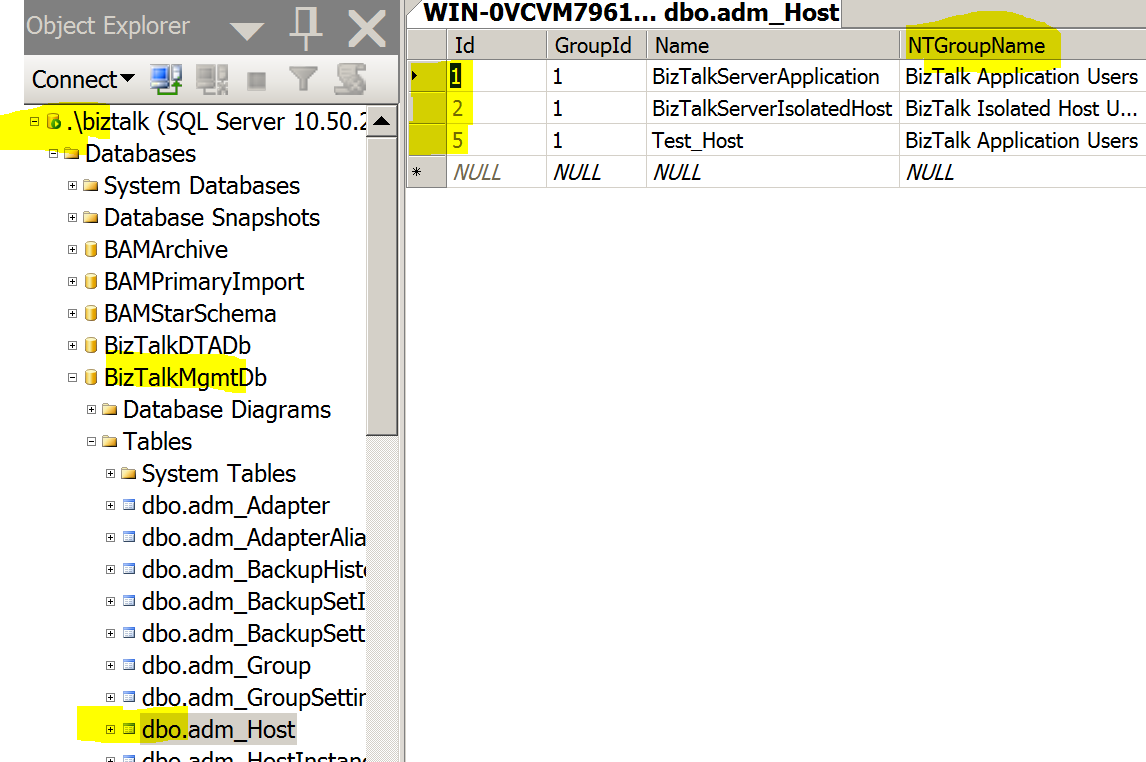
- Open the BizTalkMgmtDb, and Edit the dbo.adm_Host Table
- Update the following columns with the respective domain account, Save
- NTGroupName
- Perform this update for all Hosts, observed through the Name column. Be careful to select the proper AD Group, for example Host Account vs Isolated Host Account
Update Host Instances Service Account(s)
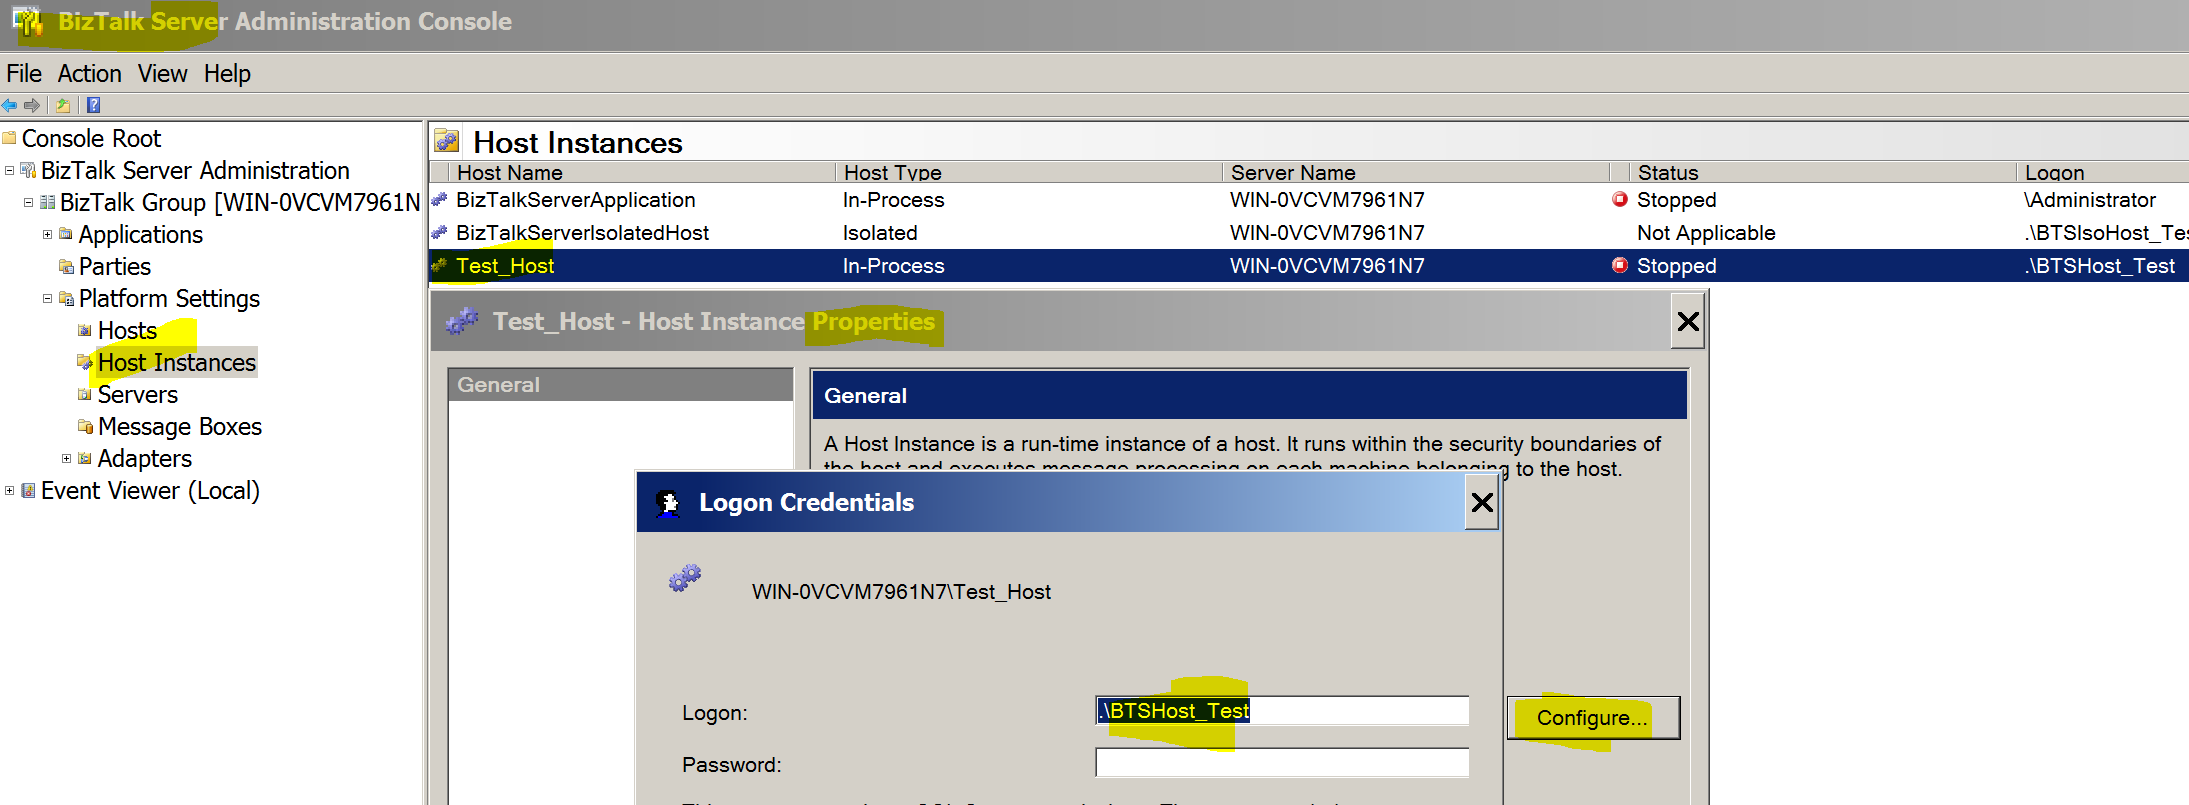
- Navigate to the BizTalk Server Admin Console
- Select Host Instances
- For each Host Instance, Right-Click, Select Configure, Enter new Service Account credential
- We are assuming all Service Accounts have proper Windows Group membership
Verification
After performing this, you can verify that your Host and Host Instances are as expected:
- Navigate to the BizTalk Server Configuration tool
- Select View, Select Service Accounts
- You should see that the BizTalk Runtime accounts are updated as expected
- Navigate to the BizTalk Server Admin Console
- Select Hosts and Host Instances to verify Group and Service account configuration
- Navigate to the Services.msc and verify that your BizTalk Services are running as the expected Service Account
Update BizTalk Server Registry
On all BizTalk Server nodes:
- Run regedit.exe
- Navigate to node: HKEY_LOCAL_MACHINE\SOFTWARE\Microsoft\BizTalk Server\3.0\Administration
- Select Administration, Update the key, BizTalkAdminNTGroup, with the new Windows Security
Follow-Up Steps
- Reboot the server(s) after performing these steps to ensure all services are functioning as expected.
- Security Note: Any Host Instance User manipulations will change the Service run-as account, which may impact security settings for integrating applications. It is prudent to determine if there are any BizTalk applications, target systems, directories, etc. that are depending on the Host Instance run-as account for Security. The same Security permissions for the previous Host Instance User account must be applied to the new Host Instance User account.
**Phidiax - How to Reconfigure BizTalk User and Group Security Settings, Manually without Deleting Databases
See Also
Another important place to find a huge amount of BizTalk related articles is the TechNet Wiki itself. The best entry point is BizTalk Server Resources on the TechNet Wiki.
