Azure & Windows 10: Full Home Automation with Voice Assistance using Intel Galileo Gen 1
About
We all know how Home Automation has been integrated into our day to day lives - from controlling window panes to making a secure house free from theft.
We plan on going even a step forward by integrating simple sensors lying around in my house and make a secure system that not only detects any activity inside the house but also informs the person of impending fire hazards and thefts. All of this will be sensed via the Raspberry Pi 2 and and sent to the user via a mobile app implementing Microsoft Azure services.
Components and Supplies
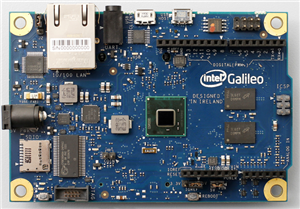
1. Intel Galileo Gen 1
Intel Galileo is the first in a line of Arduino-certified development boards based on Intel x86 architecture and is designed for the maker and education communities. Full technical details can be found on the Arduino site: http://arduino.cc/en/ArduinoCertified/IntelGalileo
2. Grove Starter Kit Plus Intel IoT Edition
The Grove Starter Kit Plus IoT Edition of Grove System is a modular, safe and easy to use group of items that allow you to minimize the effort required to get started with microcontroller-based experimentation and learning. Although there are many choices available for microcontroller development environments.

Temperature and Humidity Sensor
Grove Shield
Wires
LED
Resistor
PIR Motion Sensor

3. Power Supply (5 Volts)
4. USB Cable
5. MicroSD and SD Card Reader (Preferably over 8 GB)
6. Breadboard
7. PC Running Windows 10
8. Windows Phone running Windows 10
Steps
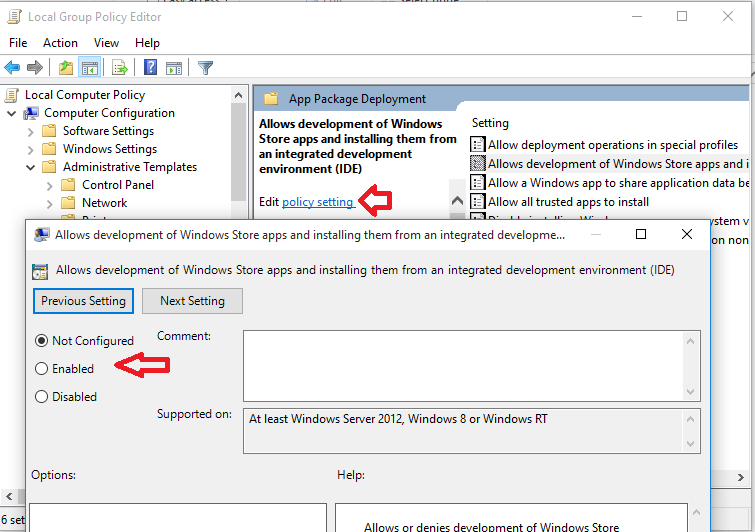
Step 1. VS2015
Assuming you've already installed Visual Studio 2015 Community or Professional, if not just download it from here.
- Search for
Windows IoT Core Project Templatesdirectly from Visual Studio in the Extension and Updates dialog (Tools > Extensions and Updates > Online). - Make sure you've enabled developer mode on your mobile and desktop.
NOTE: If you're using pre-existing Visual Studio version then, do a Custom install and: Select the checkbox Universal Windows App Development Tools -> Tools and Windows SDK.
IMPORTANT NOTE: Make sure you enable Windows 10 on your desktop/laptop. Refer to images for more clarity regarding the same.
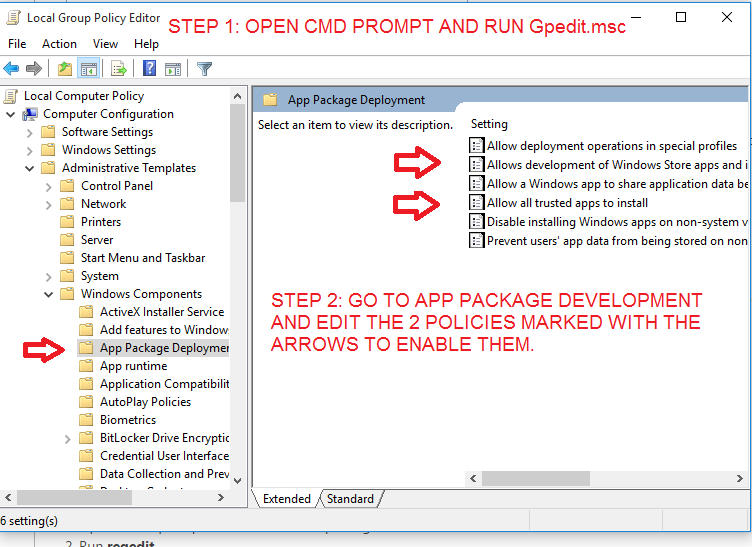
STEP 2. Galileo software
NOTE: Intel has released Firmware version 1.0.3 which needs to be applied to your board before running Microsoft Windows.
Create a Windows Bootable MicroSD Card
Format the microSD card with the Fat32 file system.
Open an Administrative command prompt:
Open the Start screen
type
cmdand right click or tap and hold onCommand Prompt, then selectRun as AdministratorIn the command window, type the following:
cd /d %USERPROFILE%\Downloadsapply-bootmedia.cmd -destination {YourSDCardDrive} -image {.wimFile downloaded above} -hostname mygalileo -password admin
Connecting and booting Windows
Connecting the Galileo directly to your computer will allow you to communicate with just your Galileo. Your computer will still have internet connectivity, and your computer will be able to communicate with your Galileo.
- Connect one end of the network cable to the ethernet port on your Galileo
- Connect the other end of the network cable to your computer using a built in Ethernet port or a USB Ethernet adapter.
- Plug the power cord in
- You should see activity on the microSD light as it boots. The LED is circled in green in the following picture.** **
**** ****
****
STEP III. SETTING UP GALILEO: HARDWARE
P.S - Microsoft recently announced that they'd be withdrawing support for the Galileo boards starting 1st November. Here's the link if you want any help with setting up your Galileo:
http://ms-iot.github.io/content/en-US/win8/SetupGalileo.htm
Now that we have the Galileo with Windos 10 IoT Core up and running we move on to the next step, i.e. make it a IoT slave. It will do what it is told to do, i.e Switch ON/OFF lights when it detects nobody is at home.
We will need to install the software packages needed to interact with our Azure Account. This would be done via the Python SDK for Azure. We have quite a few libraries to be imported now.
This is how imports should look like:
import sys import select from azure.servicebus import * import os
Though, it may seem a bit trivial, but it will also help a lot with understanding the connection between Azure and Python. The code is pretty straight forward:
AZURE_SERVICEBUS_NAMESPACE='CustomNamespace' AZURE_SERVICEBUS_SHARED_KEY_NAME='RootManageSharedAccessKey' AZURE_SERVICEBUS_ACCESS_KEY_VALUE='<INSERT_YOUR_ACCESS_KEY_HERE>'Essentially, this is your special "login Key' that will grant access to your Azure Service Bus. For now, don't worry about it (We'll find out where to get this Key in the next step!). Then, we will create a thread and have it target a new function (which we have not created yet) called process_messages. We will create this function in the next step. For now, let's create and start the thread.
# start a thread listening for incoming messages t = threading.Thread(target=process_messages) #will create 'process_messages' next step t.daemon=True; t.start()
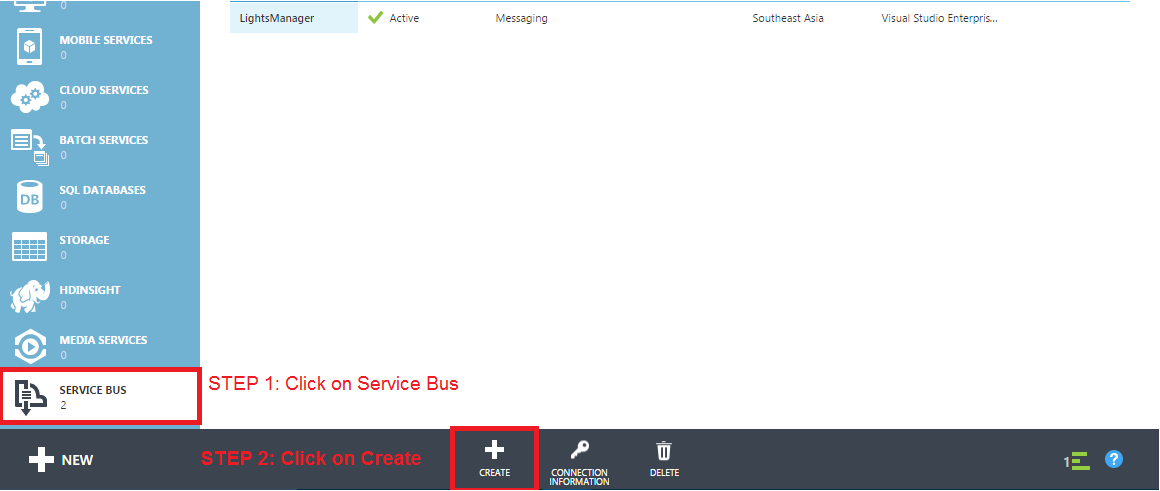
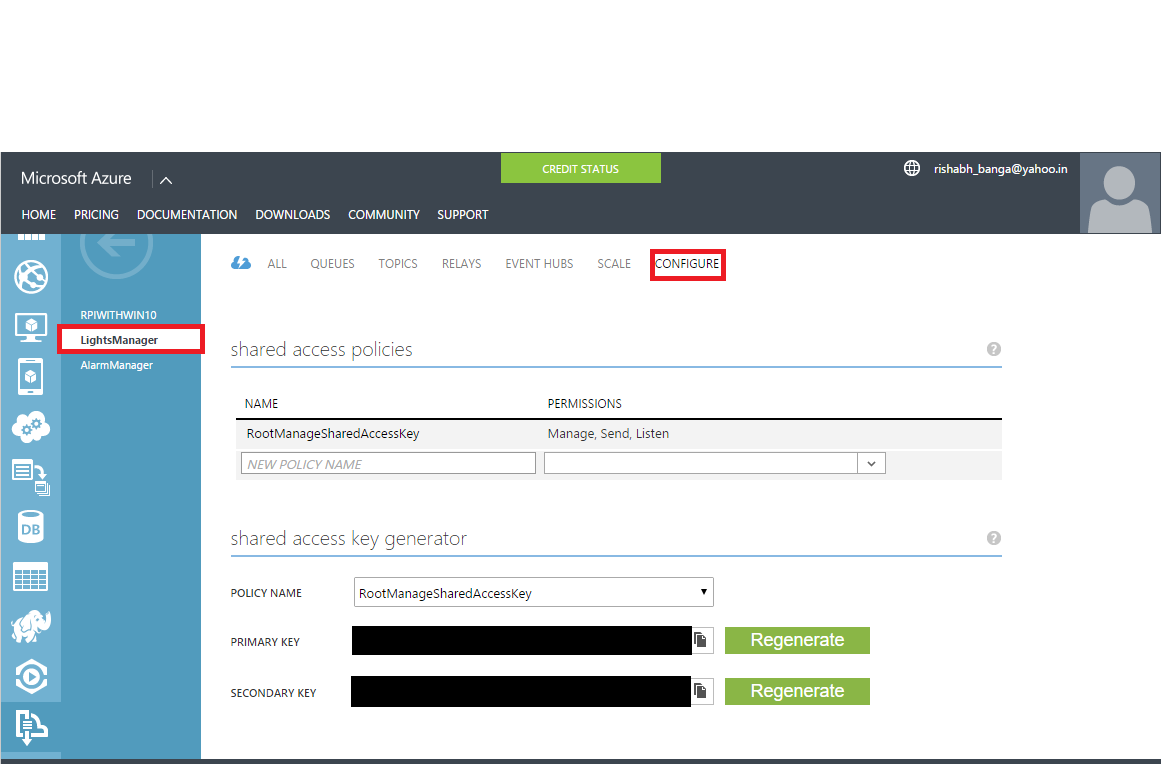
STEP 4. SETTING UP AZURE
Now that the Galileo is set up, it's time to move the data to the cloud. For this, we'd be going to make a Service Bus that will process **Topic **and Subscriptions. Steps are as follows (considering that you already have an Azure account. I'm a Microsoft Student Partner, so I already had access to Azure.)
1. Add a new Namespace
**  **
**
****  ****
****
2. Create a topic

3. Create a subscription Second image shows the default values.
Let them remain the same and click on Tick Mark Button.


4. Write Code for the subscription
We will now be using the Python Azure SDK to actively listen for messages from the Azure subscription and update our LED's accordingly. This will be done by Initializing the Service Bus Object , i.e Getting the Topic and Subscription, looping the logic and finally insert Azure Key (Primary and Secondary).
STEP V. USE VOICE ASSISTANCE
I'd be using a Universal Windows Application and be hard-coding Cortana to respond to distinct phrases: "Turn my lights/fan Off" - Will send a message to the Azure Service Bus to turn off the lights/fan. **"Turn my lights/fan On" - **Will send a message to the Azure Service Bus to turn on the lights/fan.
- **"Check Weather" - **Will send a message to the Azure Service Bus to check temperature & humidity and send back the temperature & humidity of your room and/or garden.
- **SSML - **Speech Synthesis Markup Language is how we tell Cortana what phrases to listen to and basic responses.
- **Installing **- On the first install of the app, we won't be able to interact with our app through Cortana until we manually start the app for the first time. This is because opening our app installs the voice commands Cortana needs to recognize the app. Pick your App name Wisely - We can't directly interact with our app through Cortana, we have to tell Cortana that we want to use the commands from a specific app, rather than her general list. So, we have to say "HomeAuto, what is the temperature?". This tells Cortana that the command ' what is the temperature? ' belongs to the 'HomeAuto' and she should consult that app to give the proper feedback.
APP.XAML.CS
using System;
using System.Collections.Generic;
using System.Diagnostics;
using System.IO;
using System.Linq;
using System.Runtime.InteropServices.WindowsRuntime;
using System.Text;
using Windows.ApplicationModel;
using Windows.ApplicationModel.Activation;
using Windows.Foundation;
using Windows.Foundation.Collections;
using Windows.UI.Xaml;
using Windows.UI.Xaml.Controls;
using Windows.UI.Xaml.Controls.Primitives;
using Windows.UI.Xaml.Data;
using Windows.UI.Xaml.Input;
using Windows.UI.Xaml.Media;
using Windows.UI.Xaml.Media.Animation;
using Windows.UI.Xaml.Navigation;
// The Blank Application template is documented at http://go.microsoft.com/fwlink/?LinkId=234227
using Newtonsoft.Json;
using Windows.Security.Cryptography;
using Windows.Security.Cryptography.Core;
using System.Net;
using System.Net.Http;
using System.Net.Http.Headers;
#if WINDOWS_PHONE_APP
using Windows.Media.SpeechRecognition;
#endif
namespace HOMEAUTO
{
/// <summary>
/// Provides application-specific behavior to supplement the default Application class.
/// </summary>
public sealed partial class App : Application
{
#if WINDOWS_PHONE_APP
private TransitionCollection transitions;
#endif
/// <summary>
/// Initializes the singleton application object. This is the first line of authored code
/// executed, and as such is the logical equivalent of main() or WinMain().
/// </summary>
public App()
{
this``.InitializeComponent();
this``.Suspending += ``this``.OnSuspending;
}
/// <summary>
/// Invoked when the application is launched normally by the end user. Other entry points
/// will be used when the application is launched to open a specific file, to display
/// search results, and so forth.
/// </summary>
/// <param name="e">Details about the launch request and process.</param>
protected override void OnLaunched(LaunchActivatedEventArgs e)
{
#if DEBUG
if (System.Diagnostics.Debugger.IsAttached)
{
this``.DebugSettings.EnableFrameRateCounter = ``true``;
}
#endif
Frame rootFrame = Window.Current.Content ``as Frame;
// Do not repeat app initialization when the Window already has content,
// just ensure that the window is active
if (rootFrame == ``null``)
{
// Create a Frame to act as the navigation context and navigate to the first page
rootFrame = ``new Frame();
// TODO: change this value to a cache size that is appropriate for your application
rootFrame.CacheSize = 1;
if (e.PreviousExecutionState == ApplicationExecutionState.Terminated)
{
// TODO: Load state from previously suspended application
}
// Place the frame in the current Window
Window.Current.Content = rootFrame;
}
if (rootFrame.Content == ``null``)
{
#if WINDOWS_PHONE_APP
// Removes the turnstile navigation for startup.
if (rootFrame.ContentTransitions != ``null``)
{
this``.transitions = ``new TransitionCollection();
foreach (var c ``in rootFrame.ContentTransitions)
{
this``.transitions.Add(c);
}
}
rootFrame.ContentTransitions = ``null``;
rootFrame.Navigated += ``this``.RootFrame_FirstNavigated;
#endif
// When the navigation stack isn't restored navigate to the first page,
// configuring the new page by passing required information as a navigation
// parameter
if (!rootFrame.Navigate(``typeof``(MainPage), e.Arguments))
{
throw new Exception(``"Failed to create initial page"``);
}
}
// Ensure the current window is active
Window.Current.Activate();
}
#if WINDOWS_PHONE_APP
/// <summary>
/// Restores the content transitions after the app has launched.
/// </summary>
/// <param name="sender">The object where the handler is attached.</param>
/// <param name="e">Details about the navigation event.</param>
private void RootFrame_FirstNavigated(``object sender, NavigationEventArgs e)
{
var rootFrame = sender ``as Frame;
rootFrame.ContentTransitions = this``.transitions ?? ``new TransitionCollection() { ``new NavigationThemeTransition() };
rootFrame.Navigated -= ``this``.RootFrame_FirstNavigated;
}
protected override void OnActivated(IActivatedEventArgs args)
{
base``.OnActivated(args);
if (args.Kind == ActivationKind.VoiceCommand)
{
var commandArgs = args ``as VoiceCommandActivatedEventArgs;
if (commandArgs != ``null``)
{
SpeechRecognitionResult speechRecognitionResult = commandArgs.Result;
var voiceCommandName = speechRecognitionResult.RulePath[0];
switch (voiceCommandName)
{
case "DeskLightsOff"``:
SendSBMessage(``"0"``);
break``;
case "DeskLightsOn"``:
SendSBMessage(``"1"``);
break``;
}
}
}
Window.Current.Activate();
}
#endif
/// <summary>
/// Invoked when application execution is being suspended. Application state is saved
/// without knowing whether the application will be terminated or resumed with the contents
/// of memory still intact.
/// </summary>
/// <param name="sender">The source of the suspend request.</param>
/// <param name="e">Details about the suspend request.</param>
private void OnSuspending(``object sender, SuspendingEventArgs e)
{
var deferral = e.SuspendingOperation.GetDeferral();
// TODO: Save application state and stop any background activity
deferral.Complete();
}
private static void SendSBMessage(``string message)
{
try
{
string baseUri = ``"https://CustomNamespace.servicebus.windows.net"``;
using (System.Net.Http.HttpClient client = ``new System.Net.Http.HttpClient())
{
client.BaseAddress = ``new Uri(baseUri);
client.DefaultRequestHeaders.Accept.Clear();
string token = SASTokenHelper();
client.DefaultRequestHeaders.Authorization = ``new AuthenticationHeaderValue(``"SharedAccessSignature"``, token);
string json = JsonConvert.SerializeObject(message);
HttpContent content = ``new StringContent(json, Encoding.UTF8);
content.Headers.ContentType = ``new MediaTypeHeaderValue(``"application/json"``);
content.Headers.Add(``"led"``, message);
string path = "/lighttopic/messages"``;
var response = client.PostAsync(path, content).Result;
if (response.IsSuccessStatusCode)
{
// Do something
Debug.WriteLine(``"Success!"``);
}
else
{
Debug.WriteLine(``"Failure!" + response);
}
}
}
catch (Exception ex)
{
Debug.WriteLine(``"ERORR!" + ex.ToString());
}
}
private static string SASTokenHelper()
{
//Endpoint=``sb://CustomNamespace.servicebus.windows.net/``;SharedAccessKeyName=RootManageSharedAccessKey;SharedAccessKey=pWq4OwxD5Bjfrq14YYk0oZ6wird8LdIuitGZbTyop8Y=
string keyName = ``"RootManageSharedAccessKey"``;
string key = "<INSERT_YOU_KEY_HERE>"``;
string uri = ``"CustomNamespace.servicebus.windows.net"``;
int expiry = (``int``)DateTime.UtcNow.AddMinutes(20).Subtract(``new DateTime(1970, 1, 1)).TotalSeconds;
string stringToSign = WebUtility.UrlEncode(uri) + ``"\n" + expiry.ToString();
string signature = HmacSha256(key, stringToSign);
string token = String.Format(``"sr={0}&sig={1}&se={2}&skn={3}"``, WebUtility.UrlEncode(uri), WebUtility.UrlEncode(signature), expiry, keyName);
return token;
}
// Because Windows.Security.Cryptography.Core.MacAlgorithmNames.HmacSha256 doesn't
// exist in WP8.1 context we need to do another implementation
public static string HmacSha256(``string key, ``string value)
{
var keyStrm = CryptographicBuffer.ConvertStringToBinary(key, BinaryStringEncoding.Utf8);
var valueStrm = CryptographicBuffer.ConvertStringToBinary(value, BinaryStringEncoding.Utf8);
var objMacProv = MacAlgorithmProvider.OpenAlgorithm(MacAlgorithmNames.HmacSha256);
var hash = objMacProv.CreateHash(keyStrm);
hash.Append(valueStrm);
return CryptographicBuffer.EncodeToBase64String(hash.GetValueAndReset());
}
}
} CONTROLCOMMANDS.XML <?xml version=``"1.0" encoding=``"utf-8"``?>
<VoiceCommands xmlns=``"http://schemas.microsoft.com/voicecommands/1.1"``>
<CommandSet xml:lang=``"en-US"``>
<CommandPrefix>HOMEAUTO</CommandPrefix>
<Example> turn on my desk lights</Example>
<Command Name=``"DeskLightsOn"``>
<Example> turn on my desk lights </Example>
<ListenFor> turn on my desk lights </ListenFor>
<Feedback> Turning On Your Desk Lights... </Feedback>
<Navigate />
</Command>
<Command Name=``"DeskLightsOff"``>
<Example> turn off my desk lights </Example>
<ListenFor> turn off my desk lights </ListenFor>
<Feedback> Turning Off Your Desk Lights...</Feedback>
<Navigate />
</Command>
<Command Name=``"DetectWeather"``>
<Example>Check Weather </Example>
<ListenFor> Check Weather </ListenFor>
<Feedback> Checking Weather...</Feedback>
<Navigate />
</Command>
</CommandSet>
</VoiceCommands> APP.XAML.CS using System;
using System.Collections.Generic;
using System.IO;
using System.Linq;
using System.Runtime.InteropServices.WindowsRuntime;
using System.Threading.Tasks;
using Windows.Foundation;
using Windows.Foundation.Collections;
using Windows.Media.SpeechRecognition;
using Windows.Storage;
using Windows.UI.Xaml;
using Windows.UI.Xaml.Controls;
using Windows.UI.Xaml.Controls.Primitives;
using Windows.UI.Xaml.Data;
using Windows.UI.Xaml.Input;
using Windows.UI.Xaml.Media;
using Windows.UI.Xaml.Navigation;
// The Blank Page item template is documented at http://go.microsoft.com/fwlink/?LinkId=234238
namespace HOMEAUTO
{
/// <summary>
/// An empty page that can be used on its own or navigated to within a Frame.
/// </summary>
public sealed partial class MainPage : Page
{
public MainPage()
{
this``.InitializeComponent();
this``.NavigationCacheMode = NavigationCacheMode.Required;
}
/// <summary>
/// Invoked when this page is about to be displayed in a Frame.
/// </summary>
/// <param name="e">Event data that describes how this page was reached.
/// This parameter is typically used to configure the page.</param>
protected override async ``void OnNavigatedTo(NavigationEventArgs e)
{
// TODO: Prepare page for display here.
if (e.NavigationMode == NavigationMode.New)
{
await InstallVoiceCommandsAsync();
}
// TODO: If your application contains multiple pages, ensure that you are
// handling the hardware Back button by registering for the
// Windows.Phone.UI.Input.HardwareButtons.BackPressed event.
// If you are using the NavigationHelper provided by some templates,
// this event is handled for you.
}
private async Task InstallVoiceCommandsAsync()
{
var storageFile = await StorageFile.GetFileFromApplicationUriAsync(``new Uri(``"ms-``appx:///ControlCommands.xml``"``));
await VoiceCommandManager.InstallCommandSetsFromStorageFileAsync(storageFile);
}
}
}
NOTE: You would encounter issues once you paste the code into your project so follow the following steps:
- Right Click on the WindowsPhone project and select 'Manage NuGet Packages...'
- Search for 'Json' in the search bar on the upper right, and click on 'Json.NET', then 'Install' iii. Close out of the Package Manager
Great, we've got the libraries we need. Now we need to enable the 'Microphone' and 'Internet' capabilities for our app. This will let our app allow us to use Cortana and post messages to our Azure Service Bus.
Steps are as follows:
- Double Click on 'Package.appxmanifest'
- Switch to the Capabilities Tab c. Make sure that 'Internet(Client and Server) and 'Microphone' are checked.
NOTE: The ControlCommands.xml file uploaded here is just to show one aspect of the project and I thank jckelley for helping me with this.
STEP 6. Final step
Since we're now done with the most crucial parts, the only things that remain are the connections. As you may have noticed from the Hardware List I have tried to integrate as many components as possible to achieve complete home automation.
Setting up Temperature and Humidity Sensor
This involves a fairly easier setup. All you have to do is place the Grove shield on top of the Galileo properly. Once done with that connect your Temperature and Humidity Sensor to the D4 socket and run the program that I've given in the Code sections and you're done. (Refer to Schematics for more details regarding the setup).

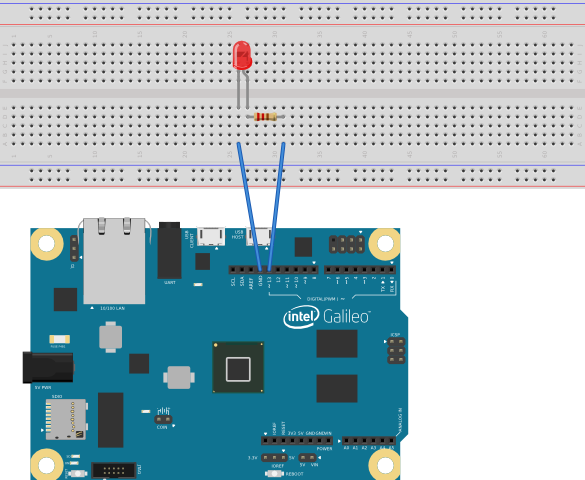
NOTE: You'd be need the rgb_lcd.h file to run this program on Arduino. //Check and display temperature -> Setting up LED: The image should be self explanatory. Run the code I have provided and using Cortana Switch On and Off the lights or in this case the LED.
#include <Wire.h>
#include "rgb_lcd.h"
const int pinTemp = A0;
rgb_lcd lcd;
// Assigning initial color that'll be seen once the Galileo boots
int colorR = 255;
int colorG = 255;
int colorB = 0;
const int b=3975;
float resistance;
float temperature;
float humidity;
void setup()
{
lcd.begin(16, 2);
lcd.setRGB(colorR, colorG, colorB);
delay(1000);
}
void loop()
{
lcd.clear();
delay(1000);
``int val = analogRead(pinTemp);
resistance=(``float``)(1023-val)*10000/val;
//calculate the temperature
temperature=1/(log(resistance/10000)/b+1/298.15)-273.15-30;
humidity=1/(log(resistance/10000)/b+1/298.15)-273.15-37;
``if (temperature < 25)
{
``// display color blue
colorR = 0;
colorG = 0;
colorB = 255;
lcd.setRGB(colorR, colorG, colorB);
``//display temperature and
lcd.print(``"It's cool at: "``);
lcd.print(temperature);
lcd.setCursor (0 ,1);
``//display humidity
lcd.print(``"Humidity is: "``);
lcd.print(humidity);
lcd.setCursor (0 ,1);
}
``else
{
``//display color red
colorR = 255;
colorG = 0;
colorB = 0;
lcd.setRGB(colorR, colorG, colorB);
``//display temperature
lcd.print(``"It's warm at: "``);
lcd.print(temperature);
lcd.setCursor (0 ,1);
``//display humidity
lcd.print(``"Humidity is: "``);
lcd.print(humidity);
lcd.setCursor (0 ,1);
}
delay(5000);
``//display current temperature every reading 5 seconds
}
int led = 13; // This is the pin the LED is attached to.
void setup()
{
pinMode(led, OUTPUT); ``// Configure the pin for OUTPUT so you can turn on the LED.
}
// the loop routine runs over and over again forever:
void loop()
{
digitalWrite(led, LOW); ``// turn the LED off by making the voltage LOW
Log(L``"LED OFF\n"``);
delay(1000); ``// wait for a second
digitalWrite(led, HIGH); ``// turn the LED on by making the voltage HIGH
Log(L``"LED ON\n"``);
delay(1000); ``// wait for a second
}
Setting up Presence Detector
Deploy this after you're done with connecting PIR Motion Sensor, Ultrasonic Sensor and LED. if ( IRdis < 5 )
{
_handle_blueled(ON);
tm1637.display(2, IRdis);
delay(10); ``// a little delay to wait Ultrasonic trigger
distance = ultrasonic.MeasureInCentimeters();
``if``(distance <=40)
{
Serial.print(``"After IR Trigger - distance : "``);
Serial.println(distance);
memset(bits, 0, 4); ``// reset array when we use it
for``(``int i = 1; i >= 0; i--) {
// get single bits of the analog value
bits[i] = distance % 10;
distance = distance / 10;
tm1637.display(i, bits[i]);}
PeopleCount++;
``if``(PeopleCount == 1)
{
myservo.attach(SERVO);
delay(100);
myservo.write(125); ``// on
delay(100);
myservo.write(80); ``// center position
delay(100);
myservo.detach();
}
delay(1000); ``// delay for PIR trigger duration
}
}
``else
{
_handle_blueled(OFF);
distance = ultrasonic.MeasureInCentimeters();
``if``(distance <=40)
{
Serial.print(``"Ultrasonic Trigger - distance : "``);
Serial.println(distance);
memset(bits, 0, 4); ``// reset array when we use it
for``(``int i = 1; i >= 0; i--) {
// get single bits of the analog value
bits[i] = distance % 10;
distance = distance / 10;
tm1637.display(i, bits[i]);}
delay(100);
sensor_val = analogRead(IR80);
voltFromRaw=map(sensor_val, 0, 1023, 0, 5000);
IRdis=27.728*pow(voltFromRaw/1000, -1.2045); ``// 10-80 model
``if ( IRdis < 5 )
{
_handle_blueled(ON);
tm1637.display(2, IRdis);
PeopleCount--;
``if``(PeopleCount == 0)
{
myservo.attach(SERVO);
delay(100);
myservo.write(50); ``// off
delay(100);
myservo.write(80); ``// center position
delay(100);
myservo.detach();
}
delay(1000);
}
}
}
/*
memset(bits, 0, 4); // reset array when we use it
for(int i = 1; i >= 0; i--) {
// get single bits of the analog value
bits[i] = distance % 10;
distance = distance / 10;
tm1637.display(i, bits[i]);} // display by 4-digital display }
/*
memset(bits, 0, 4); // reset array when we use it
for(int i = 3; i >= 2; i--) {
// get single bits of the analog value
bits[i] = IRdis % 10;
IRdis = IRdis / 10;
tm1637.display(i, bits[i]);} // display by 4-digital display }
*/
``//tm1637.display(2, IRdis);
tm1637.display(0, 0xff);
tm1637.display(1, 0xff);
tm1637.display(2, 0xff);
tm1637.display(3, PeopleCount);
} ``// end loop
STEP 7. Future Plans
While we try to integrate Temperature and Humidity Sensor and Light controlling and presence detection functionality, there are still a lot of things that can be achieved namely printer at your place, dimming lights, automating door close based on presence, controlling Washing Machine and so on.