BizTalk Server integration with SharePoint Server using WSS adapter
Acknowledgements
We in the BizTalk Server CCxG team gratefully acknowledge the contributions of the following individuals for providing their valuable inputs for setting up the end-to-end scenario used in this article:
- Anand Bheemarajaiah, BizTalk Server Product Team
- Madhumita Chakraborty, BizTalk Server Product Team
Overview
The integration of BizTalk Server 2010 and SharePoint Server 2010 described in this document is based on a multi-computer environment where BizTalk Server and SharePoint Server are on separate machines. The key to the integration however, is the possibility to exchange messages between the two products by the BizTalk Windows SharePoint Services (WSS) adapter. The WSS adapter can be used to send and receive messages between BizTalk Server and SharePoint. Under the covers, this is based on a Web services layer added to the SharePoint environment during configuration of BizTalk Server.
How does Windows SharePoint Service adapter work
The BizTalk Server adapter for Windows SharePoint Services consists of three main components:
- Windows SharePoint Services adapter Web service
- Windows SharePoint Services receive adapter
- Windows SharePoint Services send adapter
On the Windows SharePoint Services server, the Web service (BTSharePointAdapterWS.asmx) is installed to provide access to the Windows SharePoint Services libraries and lists. The Web service exposes methods to get, put, delete, and archive documents from a SharePoint library. The receive adapter retrieves files from the Web service and the send adapter posts files to it.
Receive documents from Windows SharePoint Services
The receive adapter polls Windows SharePoint Services document library views. It calls a Web method on the Windows SharePoint Services server which uses the Windows SharePoint Services object model to browse the library, check out the files and return the file data to the adapter. The adapter then submits the files to the BizTalk Server MessageBox and calls another Web method to delete or archive the files from Windows SharePoint Services. In order to filter files in a Windows SharePoint Services library, the adapter polls the Windows SharePoint Services library through a Windows SharePoint Services view.
The centralized (polling) approach offers a simple management model where configuration is done on the BizTalk Server. It also offers better performance because it enables batching of the messages.
Because platform-level transaction support is not available across Windows SharePoint Services, Web services, and BizTalk Server, the check-out mechanism is used to minimize errors associated with failure conditions. Under certain conditions (that is, files are successfully sent into the BizTalk Server MessageBox database but cannot be deleted from Windows SharePoint Services), the files will remain checked out on the Windows SharePoint Services server even though they were submitted to BizTalk Server. Errors will be logged to the event log on the BizTalk Server.
Send documents to Windows SharePoint Services
The adapter sends documents to Windows SharePoint Services by calling a Web method on the Windows SharePoint Services server. The adapter specifies the Windows SharePoint Services site URL, document library or list URL relative to the site, file, or list item name and promoted properties to associate with the file.
You can set the file name to a fixed string or to a name derived from the XML data in the document. Deriving the name can be very useful to enforce standard naming conventions. The adapter can also set promoted property values on the file as column values. As with the file names, the promoted property values can be fixed or can be derived from the XML data in the document.
Important
*Promoted properties in the Windows SharePoint Services adapter are different entities than promoted properties in BizTalk Server, or promoted properties in Windows SharePoint Services.
*
Windows SharePoint Services promoted properties are used to make XML elements visible when browsing a Windows SharePoint Services forms library. When an InfoPath form is published to a Windows SharePoint Services forms library, InfoPath configures the forms library to promote key elements, making this happen automatically. This feature is available in Windows SharePoint Services only when using InfoPath form libraries (document libraries that store InfoPath forms with the same XSD schema and InfoPath solution).
Windows SharePoint Services adapter property promotion enables the user to promote properties into Windows SharePoint Services when documents with different schemas are stored in the same document library.
BizTalk Server property promotion is a similar concept, only that properties are made visible to the orchestration as properties on the message and not to the end user in the UI. In addition, BizTalk Server supports a concept of property demotion when the property values are saved back into the document.
When using the Windows SharePoint Services adapter with InfoPath forms and forms libraries (rather than arbitrary XML and document libraries), you do not need to set the promoted properties through the send adapter. Instead, the document can be changed within the orchestration (directly by changing the message or indirectly through properties that will be demoted). The values will be automatically promoted by Windows SharePoint Services.
Scenario
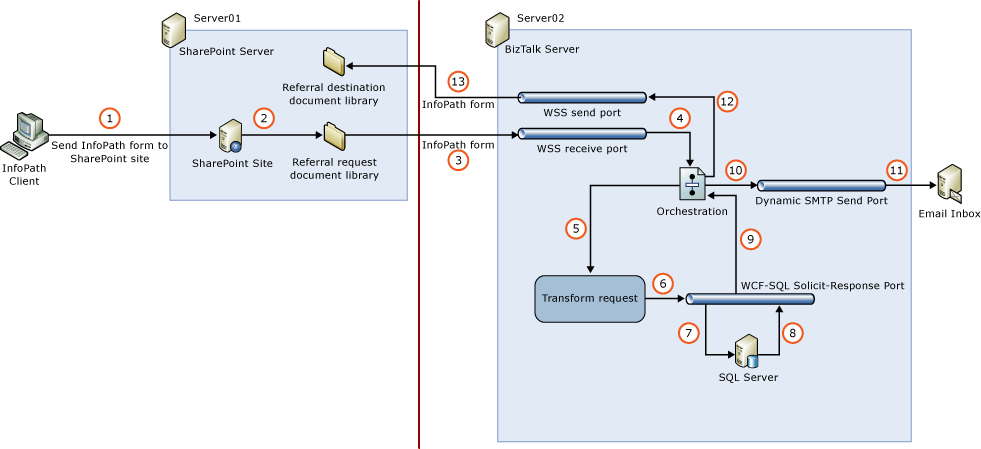
The scenario outlined in this document gives you a basic example of how to integrate BizTalk Server with SharePoint Server by using a BizTalk Server adapter for Windows SharePoint Services in a multi-computer environment. The following diagram walks you step-by-step through the scenario.
This scenario includes the following workflow:
- The scenario uses an employee referral application (BizTalk application) that lets users submit an InfoPath referral request form into a SharePoint site’s source (referral request) document library.
- The BizTalk Server collects the referral request form from the source document library. The BizTalk orchestration transforms the referral request form received from the Windows SharePoint Services adapter and forwards it to the WCF-SQL adapter.
- In this scenario, each referral request form is uniquely identified by candidate’s name, email-id and job-id existing in the RecruitmentDB (SQL Server database). The WCF–SQL adapter polls and executes a query on the SQL Server to check whether a referral request form with the candidate’s Name, EmailId, JobId exists in the database.
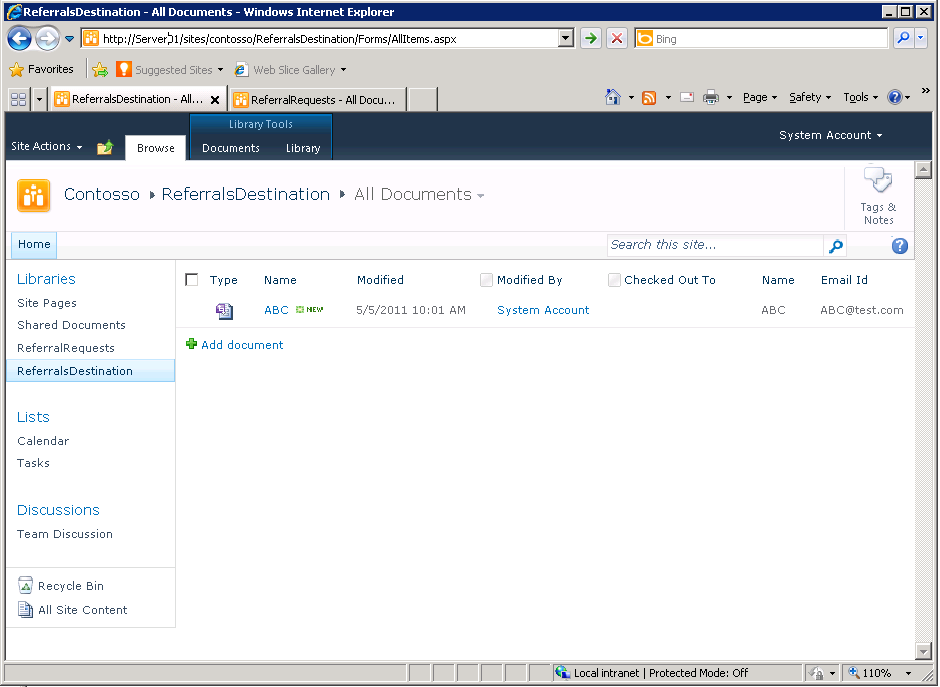
- If the referral request form does not exist in the RecruitmentDB database, then the BizTalk orchestration sends that referral request form to the destination (referral destination) document library through the WSS adapter. Additionally, an associated email message is sent to the users through a SMTP adapter.
- If the referral request form exists in the RecruitmentDB database, an associated email message is sent to the users through the SMTP adapter.
- The referral request form that is sent to the destination SharePoint document library is now accessed by the recruitment team for additional processing.
Note: In this scenario, we assume that the candidate’s data is updated and exists in the RecruitmentDB database.
How to use this article
This article is based on the described scenario, followed by a sample that will soon be available at the MSDN Code Gallery. You can use the sample and follow this article to understand how the sample was built and use this article to create your own BizTalk Server application.
Prerequisites
This setup uses a single physical server that runs on Windows Server 2008 R2 Hyper-V. On this platform, you host two virtual machines having the same operating system – Windows Server 2008 R2. To set up this scenario, you must have the following:
- A computer that has SharePoint Server 2010, InfoPath 2010 (GUI interface to demonstrate the capabilities of submitting documents to SharePoint) and BizTalk Server adapter for Windows SharePoint Services installed and configured. We will call this computer "Server01". Note the following:
- Before you configure SharePoint Server 2010, you must install Office Web Components 2010.
- Side-by-side installation of both Windows SharePoint Services 3.0 SP2 and SharePoint Foundation 2010 is not supported.
- To set up and deploy BizTalk Server adapter for Windows SharePoint Services, see Installing the Windows SharePoint Services adapter in a multiserver deployment.
- A computer that has BizTalk Server 2010, BizTalk Adapter Pack, Visual Studio 2010 and SQL Server 2008 R2 installed and configured. For more information about how to install BizTalk Server 2010, see Installing and Configuring BizTalk Server 2010. We will call this computer "Server02".
Set up the scenario on Server01 (SharePoint Server)
This section provides instructions on how to create a SharePoint site, document libraries, create and publish InfoPath form in to the SharePoint site.
Create a Windows SharePoint Services site
- Click Start, point to All Programs, point to Administrative Tools, and then click SharePoint Central Administration.
- Under Virtual Server Configuration, click Create a top-level Web site.
- Under Virtual Server List, select the Web site that you installed the Windows SharePoint Services Adapter on. For example, Default Website.
- In the Web Site Address section, in the URL name field, type Contoso.
- In the Site Collection Owner section, in the User name field, type a user name. This user will be the owner for the website and does not have to have special permissions in BizTalk Server.
- In the Site Collection Owner section, in the Email field, type an email address.
- Click OK.
- On the Top-Level Site Successfully Created page, click the new top-level website you just created. For example, http://Server01/sites/Contoso.
- Select the Team Site template from the list of templates, and then click OK. This will open the Team Website Home page.
Create a "Source" document library
- On the Team Web Site Home page, on the top navigation bar, click Create.
- Under Document Libraries, click Document Library.
- In the Name and Description section, in the Name field, type ReferralRequests.
- In the Navigation section, select Yes to display this form library on the Quick Launch bar.
- In the Document Template section, in the Document Template drop-down list, select None.
- Click Create. The document library will be created and you will be redirected to the empty library.
Create a "Destination" document library
- On the Team Web Site Home page, on the top navigation bar, click Create.
- Under Document Libraries, click Document Library.
- In the Name and Description section, in the Name field, type ReferralDestination.
- In the Navigation section, select Yes to display this form library on the Quick Launch bar.
- In the Document Template section, in the Document Template drop-down list, select None.
- Click Create. The document library will be created and you will be redirected to the empty library.
Configure Windows security
- Click Start, point to All Programs, point to Administrative Tools, and then click Computer Management.
- In the console tree, expand Local Users and Groups, and then click Groups.
- Right-click the SharePoint Enabled Hosts group, click Add to Group, and then click Add.
- In the Select Users, Computers, or Groups dialog box, under Enter the object names to select, type the name of the account that you configured the BizTalk Server Host Instance to run under, and then click OK.
- In the console tree, expand Services and Applications, and then click Services.
- Right-click BizTalk Service BizTalk Group: <BizTalk_Host_Name>, and then click Restart.
- Close Computer Management.
Create and Publish the InfoPath form to a SharePoint Services document library
In this procedure, you create a ReferralRequests InfoPath form that is used by the users to submit referral request in to the SharePoint site. To create an InfoPath form, follow these steps:
- Start InfoPath 2010.
- In Popular Form Templates, click SharePoint Form Library, and then click Design this Form.
- If there is no Design Tasks pane, click Data Source.
- If there is no Fields pane displayed to the right, then on the Data tab, click Show Fields.
- In the Add Field or Group window, type Candidate’s Name as the name of the field, and then click OK.
- Add another field. In the Add Field or Group window, type Candidate’s Email ID as the name of the field, and then click OK.
- Add another field. In the Add Field or Group window, type Job ID as the name of the field, and then click OK.
- Add another field. In the Add Field or Group window, type Resume as the name of the field, and then click OK.
- Add another field. In the Add Field or Group window, type Employee Email ID as the name of the field, and then click OK.
- Add the myFields group to the form.
- Save the form.
To publish an InfoPath form to a SharePoint document library, follow these steps:
- Click File.
- Click Publish.
- Click SharePoint Server.
- Enter the Web address (http://Server01/sites/Contoso) of the SharePoint site in the text box.
- Click Next
- Select the Enable this form to be filled out by using the browser check box. Select Form Library.
- Click Next
- Click Update the form template in an existing form library radio button and select ReferralRequests.
- Click Next
- To display data from your form as a column in the form library, use property promotion. To do this, click Add, select a desired field, and then type a name for the column in the Column name box. In this example, the form fields are candidate’s Name, EmailId, JobId and Employee EmailId.
- Click Publish.
Set up the scenario on Server02 (BizTalk Server)
This section provides instructions on how to set up the BizTalk Server environment for the planned scenario.
Create a BizTalk project
In this procedure, you create an empty BizTalk project and a schemas using the BizTalk Editor in Visual Studio. Before you create a BizTalk project, you must create a strong name key file. After you create a BizTalk project, you must associate the key file with the assembly.
To create a name key file:
- Click Start, point to All Programs, point to Microsoft Visual Studio 2010, point to Visual Studio Tools, and then right-click Visual Studio 2010 Command Prompt, and then click Run as administrator.
- Type sn -k C:\Users\username>\documents\visual studio 2010\Projects\ReferralRequestFilter\ReferralRequestFilter\key.snk, and then press Enter. The key pair will be written.
- Close the command prompt.
To create a BizTalk project:
- Start Visual Studio as an administrator. Click Start, click All Programs, click Microsoft Visual Studio 2010, right-click Microsoft Visual Studio 2010, and then click Run as administrator
- Click File, click New, and then click Project.
- Under Project types, select BizTalk Projects.
- Under Templates, select Empty BizTalk Server Project.
- Type ReferralRequestFilter in the Name field.
- Type the file path of your working directory in the Location field. For example, C:\Users\username>\Documents\Visual Studio 2010\Projects\ReferralRequestFilter\ReferralRequestFilter
- Click OK.
To associate the key file with the assembly:
- In Solution Explorer, right-click the ReferralRequestFilter project, and then click Properties to launch the Project Designer.
- Click the Signing tab.
- Select Sign the assembly option, click the drop-down list for the Choose a strong name key file option, and then click Browse.
- Type C:\Users\username>\documents\visual studio 2010\Projects\ReferralRequestFilter\ReferralRequestFilter\key.snk.
- Click Open.
Create an XSD Schema (InfoPath referral request form) by using the BizTalk Editor
In this procedure, based on the fields that are defined in the referral request form, you create a schema that will be used in the BizTalk orchestration. This schema qualifies and validates the InfoPath referral request form (XML) placed in the source (ReferralRequests) SharePoint document library.
- Click Start, click All Programs, click Microsoft Visual Studio 2010, right-click Microsoft Visual Studio 2010, and then click Run as administrator.
- Click File, click Open, and then click Project/Solutions. Select the ReferralRequestFilter project.
- In Solution Explorer, right-click the ReferralRequestFilter project, click Add, and then click New Item.
- Under Categories, click Schema Files.
- Under Templates, click Schema.
- Type ReferralRequestSchema in the Name field, and then click Add.
- In the Properties Window for ReferralRequestSchema, select Qualified for the Element FormDefault property.
- In the BizTalk Editor, right-click Root, click Rename, and then type MyFields.
- Right-click the MyFields node, click Insert Schema Node, and then click Child Field Element.
- Name the child field element Name.
- Create another child field element and name it CEmailID.
- Create another child field element and name it Resume.
- Create another child field element and name it JobID.
- Create another child field element and name it EmpEmailID.
- In the Properties Window, set the Data Type property for all the child fields to xs:string.
- Click File, and then click Save All.
- Close Visual Studio.
Create an XSD Schema (WCF-SQL adapter) by using the BizTalk Editor
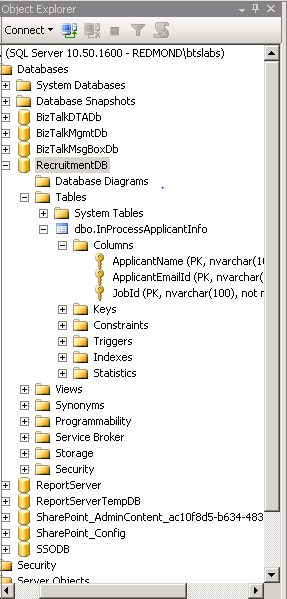
In this scenario, there is a RecruitmentDB database that exists in the SQL Server which is managed by the recruitment team. The snapshot of the RecruitmentDB database is listed here:
In this RecruitmentDB database , you have a table with three unique columns - ApplicantName, ApplicantEmailId and JobId. Based on this database information, the WCF-SQL adapter lets you generate a schema.
To generate the SQL Server schema, you use the Microsoft Windows Communication Foundation (WCF) Line of Business (LOB) Adapter from BizTalk Server using the Consume Adapter Service BizTalk Project Add-in.
The Consume Adapter Service wizard lets you connect to the SQL Server database (RecruitmentDB) and select the items (Applicants name, email id and Job Id) and the operations.
Click Start, click All Programs, click Microsoft Visual Studio 2010, right-click Microsoft Visual Studio 2010, and then click Run as administrator.
Click File, click Open, and then click Project/Solutions. Select the ReferralRequestFilter project.
In Solution Explorer, right-click the ReferralRequestFilter project, click Add, and then choose Add | Add Generated Items | Consume Adapter Service.
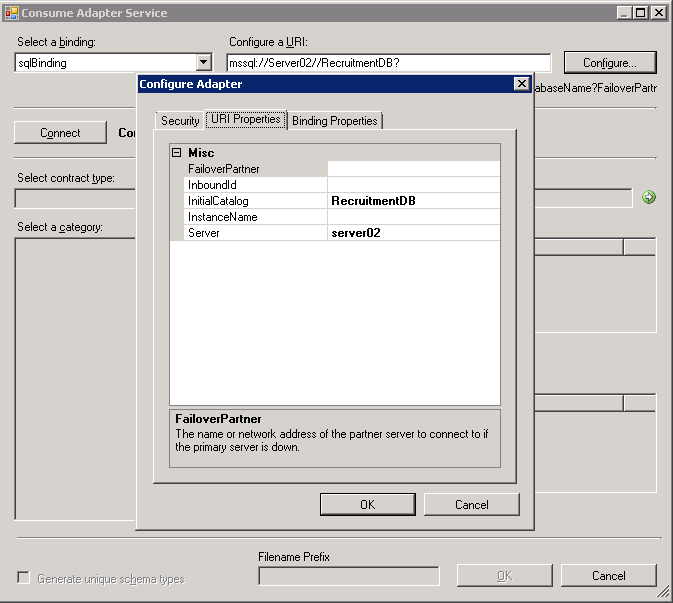
In the Consume Adapter Service Add-in screen, select sqlBinding from the Select a binding drop-down list.
In the Configure a URI field, type mssql://Server02//RecruitmentDB?. Click Configure to configure the connection URI for the SQL adapter binding and to provide the URI properties. Click OK.
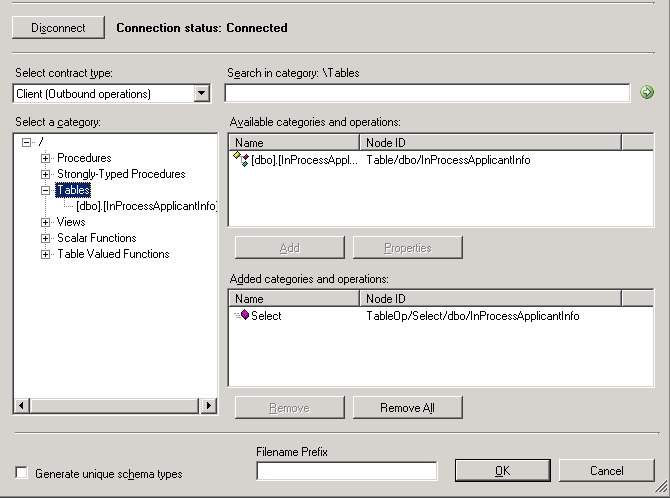
Click Connect. If the connection URI is valid and client credentials (if any) are accepted, the Category pane should be populated with the categories and operations provided by the adapter.
Select Client Operations (Outbound Operations) as the contract type. This contains configuration XML for the WCF-Custom send port.
Select the table that you created in the RecruitmentDB, InPrrocessApplicantInfo and select the Select operation. Click OK.
The following generated artifacts are used to generate the WCF-Custom port with SQL binding:
- Table.dbo.XSD
- TableOperation.dbo.InProcessApplicantInfo.xsd. The TableOperation.dbo.InProcessApplicantInfo.xsd schema consists of two child schemas:
- ReferralRequestFilter.TableOperation_dbo_InProcessApplicantInfo.Select. This schema is used to send the transformed SQL query message to the logical send-receive (WCF-SQL solicit-response) request port to select the records (candidate’s Name, EmailId, and JobId) that exists in the recruitment DB. The WCF-SQL adapter consumes this message and passes on to the SQL Server.
- ReferralRequestFilter.TableOperation_dbo_InProcessApplicantInfo.SelectResponse. Based on the transformed SQL query message, this schema is used by the SQL Server to send a response with the select query results (SelectResponse) to the logical send-receive (WCF-SQL solicit-response) response port.
- WcfSendPort_SqlAdapterBinding_Custom.bindinginfo.xml.
Create a BizTalk Map
You use the BizTalk mapper to define a transformation (a map) from the InfoPath referral request form schema to the WCF-SQL adapter schema. In this procedure, you map the source schema, which is based on the referral request form fields (candidate’s Name, EmailId, JobId) to the destination schema, which is based on the WCF-SQL select query schema ( Table( InPrrocessApplicantInfo) with columns ( ApplicantName ( refers to candidate's name), Applicant EmailId (refers to candidate's emailid) and JobId ) in RecruitmentDB database.
Click Start, click All Programs, click Microsoft Visual Studio 2010, right-click Microsoft Visual Studio 2010, and then click Run as administrator.
Click File, click Open, and then click Project/Solutions. Select the ReferralRequestFilter project.
In Solution Explorer, right-click the ReferralRequestFilter project, click Add and then click New Item.
Under Categories, click Map Files.
Under Templates, click Map.
Type SpDataToSqlData.btm in the Name field, and then click Add.
Add the ReferralRequestSchema.xsd schema as the source.
Add the TableOperation_dbo_InProcessApplicantInfo.Select.xsd schema as the destination.
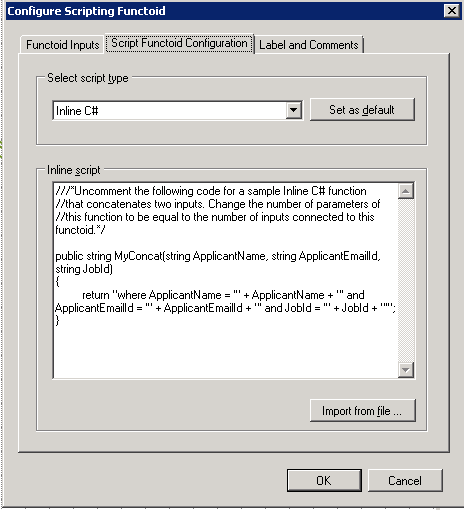
Add a Scripting functoid and connect the referral request InfoPath form fields (Candidates name, Emailid and JobId) in the source schema to the Query field of the destination schema.
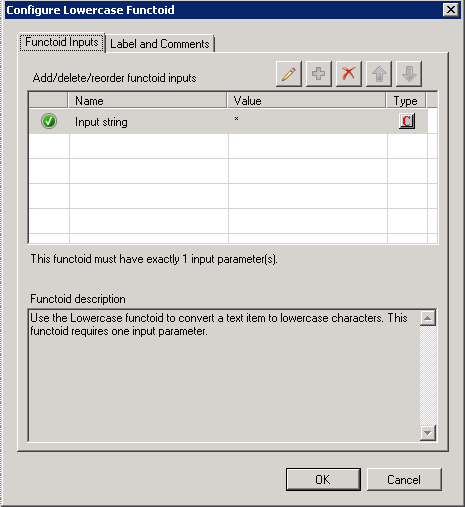
Add a Lowercase functoid and connect it to the Columns field of the of the destination schema.
Double-click Scripting functoid, in the Functoid tab of the Configure Scripting Functoid window; add the input fields (Name, EmailId and JobId).
Click the Script Functoid Configuration tab of the Configure Scripting Functoid window, select Inline C# as the script type and type the table query with a Where clause. Click OK
Double-click the Lowercase functoid, in the Functoid Inputs tab of the Configure Lowercase Functoid window, add an Input string with table columns defaulted to "*" Click OK
Save the map.
Create an Orchestration
After creating the BizTalk project, associated schemas and map, you will create an orchestration. In this procedure, you create a BizTalk orchestration to process the message (referral request) received by the Windows SharePoint Services adapter.
- Click Start, click All Programs, click Microsoft Visual Studio 2010, right-click Microsoft Visual Studio 2010, and then click Run as administrator.
- Click File, click Open, and then click Project/Solutions. Select the ReferralRequestFilter project.
- In Solution Explorer, right-click the ReferralRequestFilter project, click Add and then click New Item.
- In the Add New Item dialog box, in the Categories pane, click BizTalk Project Items, and then in the Templates pane, click BizTalk Orchestration.
- In the Name box at the bottom of the dialog box, type ReferralRequestFilterOrch as the name for the orchestration, and then click Add.
The new orchestration is created and displayed in Orchestration Designer, and a corresponding .odx file is created and displayed in Solution Explorer
Set up the orchestration
In this section, you set up the BizTalk orchestration. The BizTalk orchestration includes a workflow of shapes and logical ports.
Create receive information
In this procedure, you create a new message, receive port, and receive shape for the orchestration. This is required to receive a referral request form from the ReferalRequests SharePoint document library through a receive port and send it to the Receive shape in the orchestration.
Create a new message
- In Orchestration View, right-click Messages, and then click New Message. This generates a new message with the name Message_1.
- Right-click Message_1, click Rename, and then type SharePointMessage.
- Right-click SharePointMessage, and then click Properties Window.
- In the Message Type property, expand Schemas, and then select ReferralRequestFilter.ReferralRequestSchema.
Create a receive port
In this procedure, you create a receive (WSS) port to receive an Employee referral InfoPath form submitted by an employee to the ReferralRequests SharePoint document library.
- Under BizTalk Orchestrations in the Toolbox, drag a Port shape to the Port Surface. The Port Configuration Wizard will start.
- On the Welcome screen, click Next.
- Type RecvFromLibrary in the Name field, and then click Next.
- Select Create a new Port Type.
- Type RecvFromLibrary in the Port Type Name field, and then click Next.
- On the Port Binding screen, select I’ll always be receiving messages on this port from the Port direction of communication drop-down list. In the port binding drop-down list, leave the default values, and then click Next.
- Click Finish.
Add a Receive shape to the orchestration
The Receive shape is used to start an orchestration. The runtime engine will test an incoming message (employee referral request) to see whether it is of the right type, creates and runs a new orchestration instance, and the Receive shape receives the message.
- Under BizTalk Orchestrations in the Toolbox, drag a Receive shape to the orchestration. This generates a new shape with the name Receive_1.
- Right-click the Receive shape, and then click Properties Window.
- Set the Activate property to True.
- In the Properties Window, select SharePointMessage for the Message property.
- Select RecvFormLibrary.Operation_1.Request for the Operation property. This ties the port to the Receive shape in the Orchestration Designer.
- Connect the Receive port to the Receive shape.
Construct a new message
In this procedure, you add a Construct shape which will construct a new instance of a message type (SQL query) within the orchestration. We also add a Transform shape inside the Construct message. The BizTalk orchestration transforms the referral request InfoPath form received from the Windows SharePoint Services adapter into an SQL query message and sends it to the Send shape.
- Under BizTalk Orchestrations in the Toolbox, drag a Construct Message shape below the Receive_1 Receive shape. This generates a new shape with the name ConstructMessage_1.
- Select SqlQueryMessage for the Messages Constructed property.
- Under BizTalk Orchestrations in the Toolbox, drag a Transform shape into the ConstructMessage_1 Construct Message shape. This generates a new shape with the name Transform_1. Because the Transform shape always constructs a new message when the orchestration’s running, the Transform shape is always added in a Construct Message shape.
- In the Transform Configuration dialog box, in the Fully Qualified Map Name drop-down list, select Select from Referenced Assembly.
- In the Select Artifact Type dialog box, select ReferralRequestFilter.SpDataToSqlData. Click OK.
- In the Transform Configuration dialog box, click Source, and then from the Variable Name drop-down list, select SharePointMessage.
- In the Transform Configuration dialog box, click Destination, and then from the Variable Name drop-down list, select SqlQueryMessage.
- Click OK.
Add a Send shape to send transformed SQL query message to the send-receive (WCF-SQL solicit-response) port
In this procedure, you create a Send shape to send the transformed SQL query message which is based on the SQL query schema (ReferralRequestFilter.TableOperation_dbo_InProcessApplicantInfo.Select) to the send-receive (WCF-SQL solicit-response) port. The SQL adapter consumes this message and passes on to the SQL Server.
Create a new message
- In Orchestration View, right-click Messages, and then click New Message. This generates a new message with the name Message_2.
- Right-click Message_2, click Rename, and then type SQLQueryMessage.
- Right-click SQLQueryMessage, and then click Properties Window.
- In the Message Type property, expand Schemas, and then select ReferralRequestFilter.TableOperation_dbo_InProcessApplicantInfo.Select
Add a Send shape to the orchestration
- Under BizTalk Orchestrations in the Toolbox, drag a Send shape to the Orchestration Designer. Place it below the Transform_1 Transform shape. This generates a new shape with the name Send_1.
- Select SQLQueryMessage for the Message property.
- Select ReferralRequestFilter.TableOperation_dbo_InProcessApplicantInfo.Select for the Operation property. This will tie the port to the Send shape in the Orchestration Designer.
Add a Receive shape to receive a response from the send-receive (WCF-SQL solicit-response) port
In this procedure, you create a Receive shape to receive the SQL query response from the SQL Server based on the referralRequestFilter.TableOperation_dbo_InProcessApplicantInfo.SelectResponse schema.
Create a new message
- In Orchestration View, right-click Messages, and then click New Message. This generates a new message with the name Message_3.
- Right-click Message_3, click Rename, and then type SqlResponseMessage.
- Right-click SqlResponseMessage, and then click Properties Window.
- In the Message Type property, expand Schemas, and then select ReferralRequestFilter.TableOperation_dbo_InProcessApplicantInfo.SelectResponse.
Add a Receive shape to the orchestration
- Under BizTalk Orchestrations in the Toolbox, drag a Receive shape to the orchestration. This generates a new shape with the name Receive_2.
- Right-click the Receive shape, and then click Properties Window.
- Set the Activate property to True.
- In the Properties Window, select SqlResponseMessage for the Message property.
- Select SqlReqResponsePort.Select.Response for the Operation property. This ties the port to the Receive shape in the Orchestration Designer.
Create a request-response (WCF-SQL solicit-response) port
In this procedure, you create a send-receive (WCF-SQL solicit-response) port to receive an SQL query message based on the transformed SQL query message. The SQL adapter consumes this message and sends it to the SQL Server. The SQL Server sends a response to the Receive shape in the orchestration.
- Under BizTalk Orchestrations in the Toolbox, drag a Port shape to the Port Surface. The Port Configuration Wizard will start.
- On the Welcome screen, click Next.
- Type SqlReqResponsePort in the Name field, and then click Next.
- Select Create a new Port Type.
- Type SqlReqResponsePort in the Port Type Name field, select Request-Response as the Communication pattern , and then click Next.
- On the Port Binding screen, select I’ll be sending a request and receiving a response from the Port direction of communication drop-down list. In the port binding drop-down list, leave the default values, and then click Next.
- Click Finish.
- Connect the Send shape ( Send_1) to the Request message of the request-response port.
- Connect the Receive shape (Receive_2) to the Response message of the request-response port.
Create a new expression
In this procedure, you create an expression shape which enables you to enter XML Path Language (Xpath) expression in the orchestration to check for any elements that exists in the response message sent by the SQL Server in form of an SQL query message. For example, the expression checks if any record entry exists for the element <ApplicantName> in the RecruitmentDB database. The expression also checks if any null values exits for the elements listed in the SQL query.
Under BizTalk Orchestrations in the Toolbox, drag an Expression shape after the Receive_2 Receive shape. This generates a new shape with the name Expression_1.
Click the Expression property field, and then click the ellipsis (…) button.
In the BizTalk Expression Editor, type the following:
Copy Code
noEntryExists = System.String.IsNullOrEmpty(xpath(SqlResponseMessage,
"string(/*[local-name()='SelectResponse' and
namespace-uri()='http://schemas.microsoft.com/Sql/2008/05/TableOp/dbo/InProcessApplicantInfo']/*[local-name()='SelectResult'
and
namespace-uri()='http://schemas.microsoft.com/Sql/2008/05/TableOp/dbo/InProcessApplicantInfo']/*[local-name()='InProcessApplicantInfo'
and
namespace-uri()='http://schemas.microsoft.com/Sql/2008/05/Types/Tables/dbo']/*[local-name()='ApplicantName'
and
namespace-uri()='http://schemas.microsoft.com/Sql/2008/05/Types/Tables/dbo']/text())"));
Click OK
Add a Decide shape to the orchestration
In this procedure, you create a Decide shape that has a Rule associated with it. You use BizTalk Expression Editor to create a Boolean expression (referral request does not exist in the RecruitmentDB database) in the rule that is evaluated for the execution of that branch. The else branch implies the negation of the Boolean expression and has an associated expression.
Under BizTalk Orchestrations in the Toolbox, drag a Decide shape to the Orchestration Designer. Place it below the Expression_1 Expression shape. This generates a new shape with the name Decide_1.
Drag an Expression shape inside the Decide_1 Decide shape. This generates a new shape with the name Expression_2.
Click the Expression property field, and then click the ellipsis (…) button.
In the BizTalk Expression Editor, type or copy the following:
Copy Code
emailMessageString = "Thank you for referring your candidate for future positions at Contoso. Your referral’s details will be logged in our recruitment database as an active referral. Thank you again for your recent referral";Drag another Expression shape inside the Decide_1 Decide shape. This generates a new shape with the name Expression_3
Click the Expression property field, and then click the ellipsis (…) button
In the BizTalk Expression Editor, type or copy the following:
Copy Code
emailMessageString = " Your referral’s detail already exists in our recruitment
database. If a suitable position is identified, a member of the Recruitment Team
will make contact with them directly. Thank you again for your recent referral
";
Click OK
Add a Send shape to the orchestration
In this procedure, you create a Send shape to send the new referral request information not found in the RecruitmentDB database to the send (WSS) port.
- Under BizTalk Orchestrations in the Toolbox, drag a Send shape to the Orchestration Designer. Place it below the Expression_2 Expression shape. This generates a new shape with the name Send_3.
- Select SharePointMessage for the Message property.
- Select WssSendPortSuccess.Operation_1.Request for the Operation property. This ties the port to the Send shape in the Orchestration Designer.
Add a send port to the orchestration
In this procedure, you create a send (WSS) port to send the new referral request information to the ReferralsDestination SharePoint document library.
- Under BizTalk Orchestrations in the Toolbox, drag a Port shape to the Port Surface. The Port Configuration Wizard will start.
- On the Welcome screen, click Next.
- Type WssSendPortSuccess in the Name field, and then click Next.
- Select Create a new Port Type.
- Type WssSendPortSuccess in the Port Type Name field, and then click Next.
- On the Port Binding screen, select I’ll always be sending messages on this port from the Port direction of communication drop-down list. In the port binding drop-down list, leave the default values, and then click Next.
- Click Finish.
Email notification
In this procedure, you add a Construct shape which will construct a new instance of a message type (email message) within the orchestration. We also add a Message Assignment shape inside the Construct message. Each message has a multipart message type, a description of the message structure that consists of two message parts. These message parts are based on the two expressions created under the Decide shape in the orchestration.
Create a new message
- In Orchestration View, right-click Messages, and then click New Message. This generates a new message with the name Message_1.
- Right-click Message_1, click Rename, and then type EmailMessage.
- Right-click EmailMessage, and then click Properties Window.
- In the Message Type property, expand Multipart Message Types, and then select ReferralRequestFilter.MultipartType_1.
Add a construct shape
Under BizTalk Orchestrations in the Toolbox, drag a Construct Message shape below the Decide_1 Decide shape. This generates a new shape with the name ConstructMessage_2.
Select EmailMessage for the Messages Constructed property.
Under BizTalk Orchestrations in the Toolbox, drag a Message Assignment shape into the ConstructMessage_2 Construct Message shape. This generates a new shape with the name MessageAssignment_1.
Click the Expression property field, and then click the ellipsis (…) button.
In the BizTalk Expression Editor, type or copy the following:
Copy Code
EmailMessage.EmailBody = emailMessageString;
EmailMessage.EmailBody(Microsoft.XLANGs.BaseTypes.ContentType) = "text/html";
EmailMessage(SMTP.Subject) = "Employee Referral Response";
EmailMessage(SMTP.From) = "<username>@<A
href="mailto:btslabs@microsoft.com">contoso.com</A>";
EmailMessage(SMTP.SMTPHost) = "smtphost";
SmtpSendPort(Microsoft.XLANGs.BaseTypes.Address) = "mailto:" +
(System.String)xpath(SharePointMessage,"string(/*[local-name()='myFields' and
namespace-uri()='http://schemas.microsoft.com/office/infopath/2003/myXSD/2011-04-13T10:17:47']/*[local-name()='field5'
and
namespace-uri()='http://schemas.microsoft.com/office/infopath/2003/myXSD/2011-04-13T10:17:47']/text())");<BR>Based
on the query results, an associated email is sent to the employee with the
subject line (Employee Referral Response).
On the File menu, click Save All.
Add a Send shape to the orchestration
- Under BizTalk Orchestrations in the Toolbox, drag a Send shape to the Orchestration Designer. Place it below the MessageAssignment_1 Message Assignment shape. This generates a new shape with the name Send_1.
- Select EmailMessage for the Message property.
- Select SmtpSendPort.Operation_1.Request for the Operation property. This ties the port to the Send shape in the Orchestration Designer.
Add Dynamic SMTP send port to the orchestration
The SMTP Send Port will enable you to send SMTP email from an orchestration by using a dynamic send port.
- Under BizTalk Orchestrations in the Toolbox, drag a Port shape to the Port Surface. The Port Configuration Wizard will start.
- On the Welcome screen, click Next.
- Type SmtpSendPort in the Name field, and then click Next.
- Select Create a new Port Type.
- Type SmtpSendPort in the Port Type Name field, and then click Next.
- On the Port Binding screen, select I’ll always be sending messages on this port from the Port direction of communication drop-down list. From the port binding drop-down list, select Dynamic as binding type, and then click Next.
- In the Send Pipeline drop-down list, select Select from Referenced Assembly.
- In the Select Artifact Type dialog box, select Microsoft.BizTalk.DefaultPipelines.PassThruTransmit.
- Click Finish.
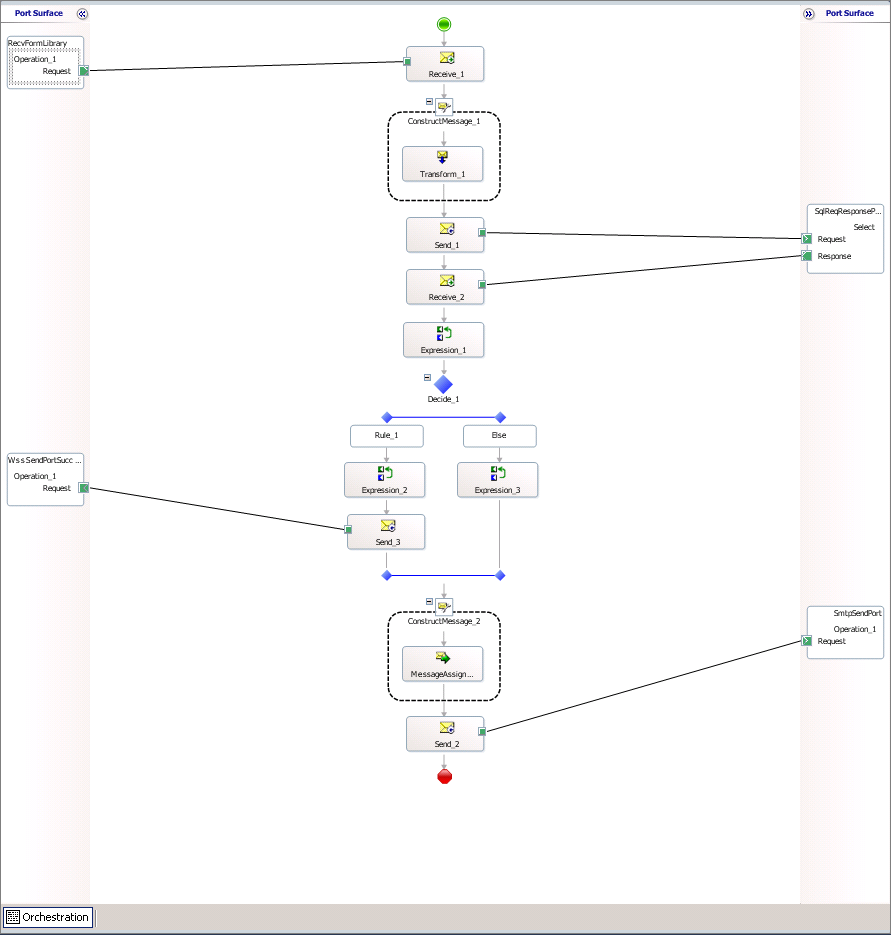
The finished orchestration looks like:
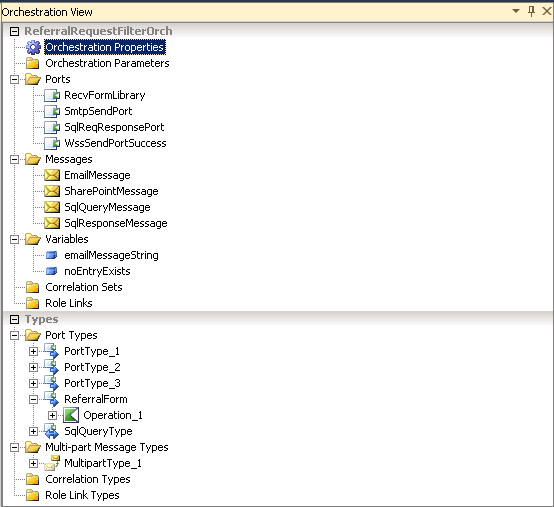
The Snapshot of the orchestration view looks like:
Build and deploy the application
- Click Start, click All Programs, click Microsoft Visual Studio 2010, right-click Microsoft Visual Studio 2010, and then click Run as administrator.
- Click File, click Open, and then click Project/Solutions. Select the ReferralRequestFilter project.
- In Solution Explorer, right-click the ReferralRequestFilter project, and then click Build Solution. The bottom of the screen should display: Build succeeded.
- Right-click ReferralRequestFilter, and then click Deploy Solution. The bottom of the screen should display: Deploy succeeded.
Import SQL binding file into the ReferralRequestProcessApplication
In this procedure, we import the SQL bindings file so that we do not have to create a new physical WCF-Custom adapter to perform outbound and inbound operations on SQL Server by using the SQL adapter.
In the BizTalk Server Administration console, expand BizTalk Server 2010 Administration, right-click BizTalk Group, and then click Refresh.
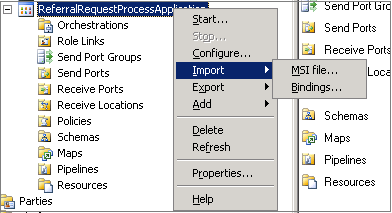
Expand BizTalk Group, expand Applications, right-click ReferralRequestProcessApplication, point to Import, and then click Bindings.
Click the binding file (C:\Users\username>\Documents\visual Visual Studio 2010\Projects\ReferralRequestFilter\ReferralRequestFilter\WcfSendPort_SqlAdapterBinding_Custom.bindinginfo), and then click Open. The artifacts in the binding file are written to the application. They display in appropriate folders of the application.
Configure and start the application developed for this scenario
When you created the orchestration in Visual Studio, you created one inbound logical receive port, one outbound send port for the Windows SharePoint Services adapter. These ports are points of entry into and out of BizTalk Server for ReferralRequests InfoPath form received and sent by the Windows SharePoint Services adapter.
Additionally, you also created an outbound logical WCF-Custom send-receive port to perform outbound and inbound operations on SQL Server by using the SQL adapter and a dynamic SMTP send port for sending email notifications to the users.
When you created logical ports in Visual Studio, for the “Port binding” option, you chose “Specify later”. What you actually did was to postpone the physical port configuration. So, now as part of this procedure, you will create a physical port for each logical port that you created as part of the orchestration.
To configure ReferralRequestsProcess application
Click Start, point to All Programs, point to Microsoft BizTalk Server 2010, and then click BizTalk Server Administration.
In the console tree on the left side of the BizTalk Server Administration console, expand BizTalk Server 2010 Administration, right-click BizTalk Group, and then click Refresh.
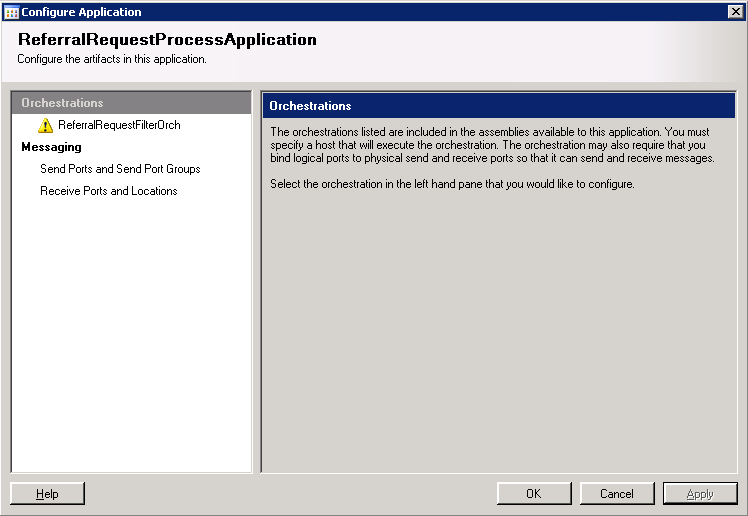
Expand BizTalk Group, expand Applications, right-click ReferralRequestProcess, and then click Configure.
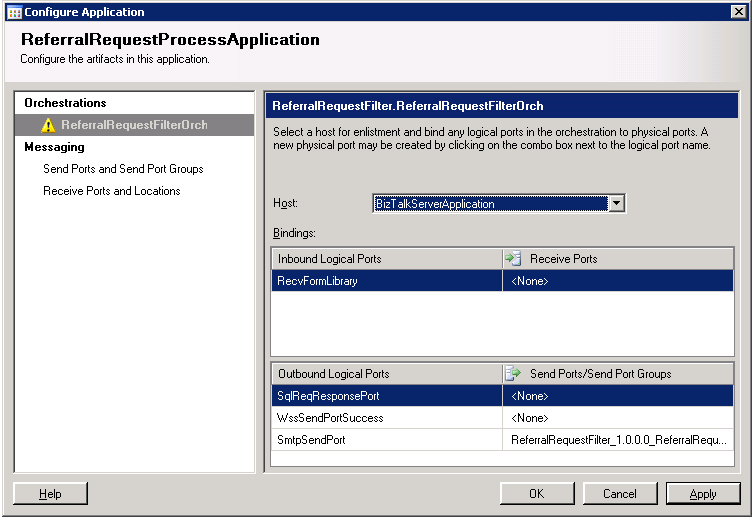
In the Configure Application dialog box, on the left pane, click ReferralRequestFilterOrch and do the following:
Creating a WSS receive port
- In the Receive Port Properties dialog box, under General, type FromSource-WSS in the Name field.
- Click OK.
- In the Receive Location Properties dialog box, under General, type FromSource-WSS in the Name field.
- In the Transport section, in the Type drop-down list, select Windows SharePoint Services.
- Click Configure to configure the Windows SharePoint Services adapter properties.
- In the Adapter Web Service Port property, type the port number of the virtual server where the Windows SharePoint Services adapter Web service was installed. By default, this is port 80.
- Type Archive in the Archive Location property.
- Type 10 in the Polling Interval property.
- Type the URL to the SharePoint site in the SharePoint Site Url property. In this scenario, http://Server01/sites/contosso.
- Type ReferralRequests for the Source Document Library property.
- Click OK.
- In the Receive Location Properties dialog box, select BizTalkServerApplication as the Receive handler.
- In the Receive pipeline drop-down list, select XMLReceive.
- Click OK
Creating a WSS send port
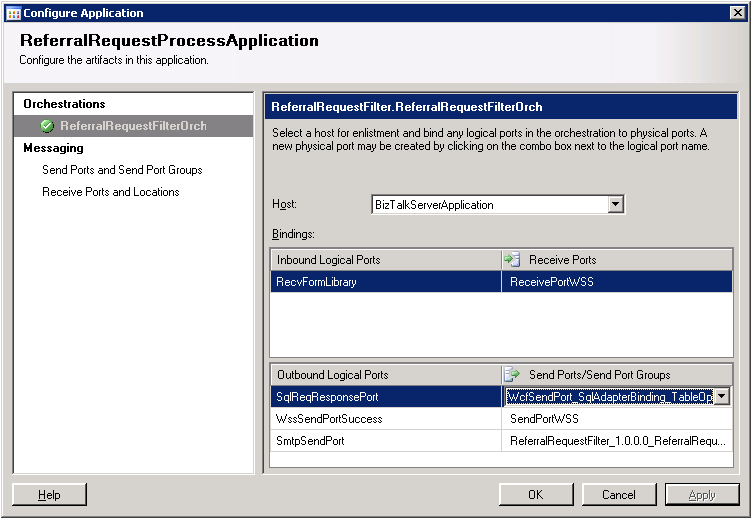
- In the Configure Application dialog box, from the drop-down list under WSSSendPortSucess, select New send port
- In the Send Port Properties dialog box, under General, type ToDestination-WSS in the Name field.
- In the Transport section, select Windows SharePoint Services for the type.
- Click Configure to configure the Windows SharePoint Services adapter properties.
- In the Adapter Web Service Port property, type the port number of the virtual server where the Windows SharePoint Services adapter Web service was installed. By default, this is port 80.
- Type ReferralsDestination for the Destination Folder property.
- Set the Overwrite property to No.
- Type the URL to the SharePoint site in the SharePoint Site Url property. In this example, http://Server01/sites/contosso.
- Set the Microsoft Office Integration property to Optional.
- Click OK.
- In the Send Port Properties dialog box, in the Send handler drop-down list, select BizTalkServerApplication.
- In the Send pipeline drop-down list, select PassThruTransmit.
- Click OK.
Configure the WCF-Custom send-receive ports to perform outbound and inbound operations on SQL Server By Using the SQL adapter. Since we had imported the SQL binding file in the application, we do not have to create a new physical send-receive WCF-Custom port. Select the WcfSendPort_SqlAdapterBinding_TableOp_dbo_InProcessApplicantInfo_Custom binding file from the SQLReqResponsePort drop-down list.
The SMTP Send Port listed in the configuration dialog box enables you to send SMTP email from an orchestration using a dynamic send port.
Click OK
Start the application
- In the console tree, right-click ReferralRequestProcess Application, and then click Start.
- In the Start ReferralRequestProcess Application dialog box, click Options, ensure that all the check boxes are selected, and then click Start.
- In the console tree, click Applications.
- In the Applications details pane, check that the Status of ReferralRequestProcess Application is Started
Test the application
Open the SharePoint site (http://Server01/sites/Contoso), and then click the ReferralRequests document library.
To open the Employee Referral Form, click Add Document link . Fill the form fields, and then click Submit.
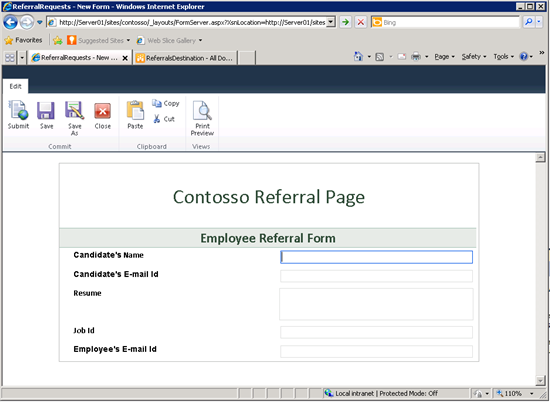
This form is processed by the BizTalk Server. If the referral’s request form does not exist in the SQL Server database, then the BizTalk orchestration sends that referral request form to the ReferralsDestination document library through the WSS adapter. Additionally, an associated email notification (Thank you for referring your candidate for future positions at Contoso. Your referral’s details will be logged in our recruitment database as an active referral. Thank you again for your recent referral.) is sent to the users email inbox through a SMTP adapter.
If the referral’s request form exists in the SQL Server database, an email notification (“Your referral’s detail already exists in our recruitment database. If a suitable position is identified, a member of the Recruitment Team will make contact with them directly. Thank you again for your recent referral.”) is sent to the users email inbox through a SMTP adapter.
Common errors and troubleshooting steps
For all troubleshooting information related to Windows SharePoint Services adapter, see Troubleshooting the Windows SharePoint Services Adapter.
See Also
Another important place to find a huge amount of BizTalk related articles is the TechNet Wiki itself. The best entry point is BizTalk Server Resources on the TechNet Wiki.
