VB.NET: Size and Rotate Images Using Matrix Transforms in GDI+
One of the easiest ways to draw complex graphics in Visual Basic is by using the Graphics Transformation Matrix. Although the name is a bit intimidating, some basic matrix operations are quite simple. For this discussion we will focus on three matrix transforms of the global coordinate system that we draw within. First we will scale the coordinate system, next we translate the origin, and finally rotate the system.
DRAWING COORDINATE SYSTEMS
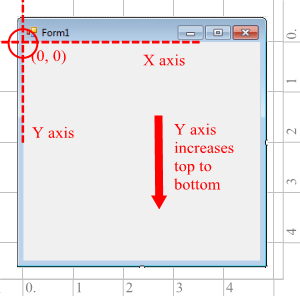
When we arrange controls on a form and draw on those controls, we can make use of the various coordinate systems to position everything on the form. A control has the .top and .left properties which are nothing more than the x and y coordinates of the upper left corner of the control. In Visual Basic's default coordinate system, X coordinates increase from left to right while Y coordinates increase from top to bottom. That's right, Y is top to bottom.
Control coordinate system origin (0, 0).
By default, the coordinate system has units of Pixels and that is the unit we will use in our example.
DRAWIMAGE REVIEW CENTERING THE IMAGE ON THE FORM
Before we get into the scaling and rotating transforms we need to review the DrawImage statement and decide how to locate the image on the form. The DrawImage statement places the image with its upper left corner at the location you specify. For example, to center the image in the form window, we need to calculate the coordinates of the image upper left by centering the image size in the form.
First we need the size of the form. The size can be retrieved using either: Me.ClientSize or e.Graphics.VisibleClipBounds. Next we get the size of the image using its .Width property.
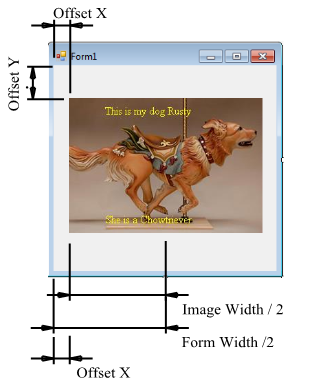
Now to center the image in the form window we simply subtract half the width of the image from half the width of the form window and this gives us the offset coordinates of the image upper left corner. The coordinates of the image are the offset from the form origin at (0, 0) to the image corner.
Locating the image in the center of the form window.
Here is the centering calculation in code:
    'non rotated position of image centered in window
     Dim OffsetX As Single  = .VisibleClipBounds.Width / 2 - bm_rusty.Width / 2
     Dim OffsetY As Single  = .VisibleClipBounds.Height / 2 - bm_rusty.Height / 2
Now we can use DrawImage to locate the upper left of the image at our offset point to center the image.
e.Graphics.DrawImage(bm_rusty, Offsetx, Offsety)
This offset method works fine for drawing images in simple cases. However for our ultimate goal of scaling and rotating the image we will need to use a few more tools.
SCALING THE COORDINATE SYSTEM
We can enlarge or decrease the size of the image on the form using ScaleTransform. The transform simply increases or decreases the size of the coordinate system by the scale factors that we give it.
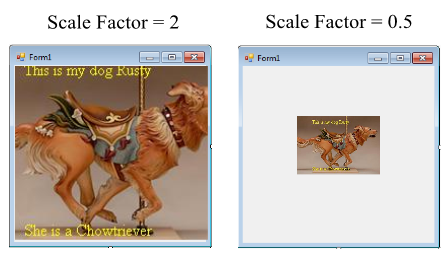
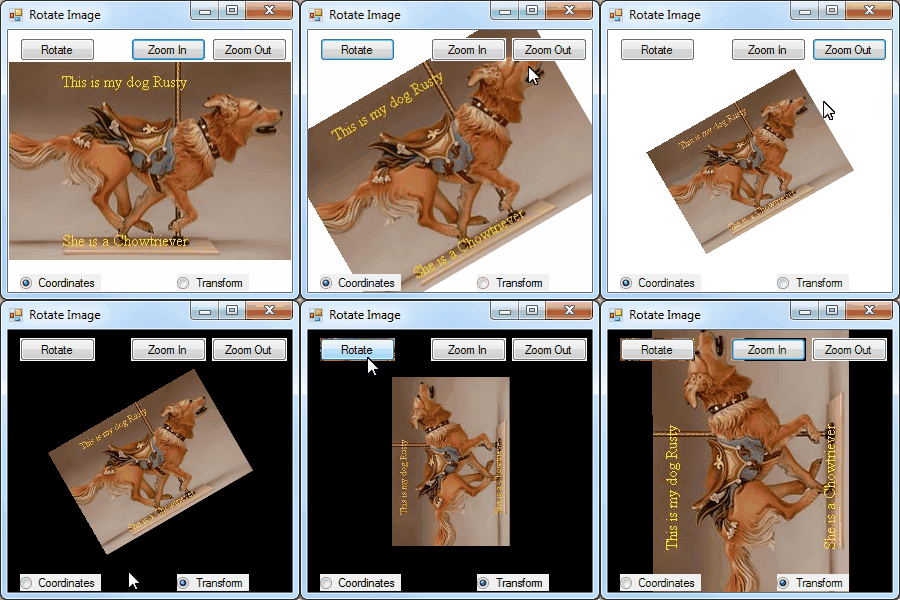
For example, if we entered scale factors of (1, 1), we would multiply the coordinate system by the value 1 and so there would be no change in size. If we use an X scale factor of 2 then the width would become (width * 2) or double the size. A scale factor of 0.5 would make the image half its original size on the form. The sample images show the scaling results after centering the image on the form.
The example scaling code:
       'apply the scaling
     e.Graphics.ScaleTransform(ScaleFactor, ScaleFactor)
TRANSLATING THE COORDINATE SYSTEM
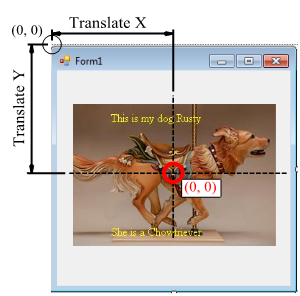
We can use the TranslateTransform when we need to move the origin of the coordinate system from upper left of the form window to some other location. Translate is a fancy word for move. In the transform statement we enter the X and Y distances to translate the coordinate origin. In the next step of the example we will rotate the image around its center point by first translating the origin to the center of the image with the TranslateTransform Class.
Translate coordinate origin (0,0) to center of image.
Here is the translation code:
'translate origin coordinate from upper left of form to center e.Graphics.TranslateTransform(.VisibleClipBounds.Width / 2, .VisibleClipBounds.Height / 2)
ROTATING THE SYSTEM
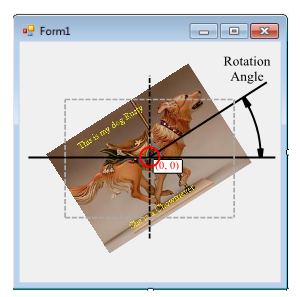
To rotate the image we will use the RotateTransform to turn the entire coordinate system about the origin. If we leave the origin at its default location in the upper left of the visible form window, the position of the image will be rotated about that point, including the distance from the origin to the image upper left corner.
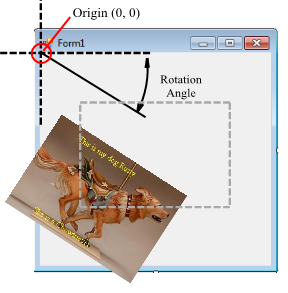
Rotation about the default origin at upper left.
It is possible to achieve our goal this way. But, it is much easier if we rotate everything about the center of the image. That is why we first translate the coordinate system to the center of the image and then rotate the image with RotateTransform.
Rotation around the translated origin at the center of the Image.
In the transform we enter the rotation value in degrees. After rotating we can draw the image:
'rotate the image about its centere.Graphics.RotateTransform(Rotation * -57.3)'draw the imagee.Graphics.DrawImage(bm_rusty, CInt(OffsetX), CInt(OffsetY))
THE EXAMPLE PROJECT
For our example we have created a project that shows how to size and rotate an image. The example uses the TranslateTranform to locate the coordinate origin at the center of the form.
The Zoom In and Zoom Out buttons simply change the scaling factor used by the ScaleTransform. For rotation, the Rotate button increments the rotation angle used in the RotateTransform.
The tranforms make it easier to do complex drawing. However, in the example application we have provided an option to draw the image using either manual mathematical calculations or the transform method. The code for the manual calculations is shown but not explained here. Use the Coordinates option (radio button) for the manual calculation and the Transform option for the Transform method.
You will need to add 3 buttons to the form as well as 2 radio buttons. Finally you will need to specify your own image for the bm_rusty variable declared at the start of the code.
Example Project Animated Gif (click to play).
'rotate/scale image using coordinate geometry or matrix transforms
Option Strict On

Public Class  RotateImageExamples
    Dim bm_rusty As Bitmap = Image.FromFile("c:\bitmaps\rusty.jpg")  'replace this path with your own image path
    Dim Rotation As Single  = 0
    Dim ScaleFactor As Single  = 1

    Private Sub  Form1_Paint(sender As Object, e As  PaintEventArgs) Handles Me.Paint

        If RadioButton1.Checked Then
            'draw using manual coordinate calculations
            Dim cx As Double  = Me.ClientSize.Width / 2
            Dim cy As Double  = Me.ClientSize.Height / 2

            'center in form and scale
            Dim corners(2) As PointF
            corners(0) = New  PointF(CSng(cx - (ScaleFactor * bm_rusty.Width / 2)), CSng(cy - (ScaleFactor * bm_rusty.Height / 2)))
            corners(1) = New  PointF(CSng(cx + (ScaleFactor * bm_rusty.Width / 2)), CSng(cy - (ScaleFactor * bm_rusty.Height / 2)))
            corners(2) = New  PointF(CSng(cx - (ScaleFactor * bm_rusty.Width / 2)), CSng(cy + (ScaleFactor * bm_rusty.Height / 2)))

            'rotate
            Dim X As Double
            For i = 0 To 2
                X = corners(i).X
                corners(i).X = CSng(corners(i).X * Math.Cos(Rotation) + corners(i).Y * Math.Sin(Rotation))
                corners(i).Y = CSng((corners(i).Y * Math.Cos(Rotation)) - (X * Math.Sin(Rotation)))
            Next i

            'translate back to center
            Dim newcx As Double  = corners(2).X + (corners(1).X - corners(2).X) / 2
            Dim newcy As Double  = corners(2).Y + (corners(1).Y - corners(2).Y) / 2

            For i = 0 To 2
                corners(i).X = CSng(corners(i).X + (cx - newcx))
                corners(i).Y = CSng(corners(i).Y + (cy - newcy))
            Next i

            e.Graphics.Clear(Color.White)
            e.Graphics.DrawImage(bm_rusty, corners)

        Else
            'draw with matrix transform methods
            With e.Graphics
                .Clear(Color.Black)

                'apply the scaling and rotate the image about the center of the window
                .ScaleTransform(ScaleFactor, ScaleFactor)
                'translate origin coordinate from upper left of form to center for rotation
                .TranslateTransform(.VisibleClipBounds.Width / 2, .VisibleClipBounds.Height / 2)
                'rotate the image about its center
                .RotateTransform(CSng(Rotation * -57.3))
                'draw the image with its upperleft corner located half distance from the center point
                .DrawImage(bm_rusty, CInt(-bm_rusty.Width / 2), CInt(-bm_rusty.Height / 2))

            End With
        End If
    End Sub

    Private Sub  Buttons_Click_1(sender As Object, e As  EventArgs) Handles  Button1.Click, Button2.Click, Button3.Click

        Select Case  CType(sender, Button).Text
            Case "Rotate"
                Rotation = CSng(Rotation + (Math.PI / 6))
            Case "Zoom In"
                ScaleFactor = CSng(ScaleFactor + 0.2)
                If ScaleFactor > 2 Then ScaleFactor = 2
            Case "Zoom Out"
                ScaleFactor = CSng(ScaleFactor - 0.2)
                If ScaleFactor < 0.2 Then ScaleFactor = 0.2
        End Select

        Me.Invalidate()

    End Sub

    Private Sub  RadioButton1_CheckedChanged(sender As Object, e As  EventArgs) Handles  RadioButton1.CheckedChanged, RadioButton2.CheckedChanged
        Me.Invalidate()
    End Sub

    Private Sub  Form1_Load(sender As  Object, e As EventArgs) Handles Me.Load
        Me.DoubleBuffered = True
        RadioButton1.Checked = True
    End Sub

    Private Sub  Form1_Resize(sender As Object, e As  EventArgs) Handles  Me.Resize
        Me.Invalidate()
    End Sub
End Class
**SUMMARY **
The matrix transforms are an easy to use tool for basic graphic drawing. We learned to use the scale, translate, and rotate transforms to size and rotate an image.
There is much more to learn about the coordinate system and the matrix transforms. This article is just a simplified beginning example. For example the order that you perform the matrix operations can affect the result. Furthermore, each transform in our example has been appended or added to the preceding operation. There are many more details that we have not covered.
