Cloud App Discovery Group Policy Deployment Guide
The objective of this article is to provide you with instructions, and critical considerations for deploying the Cloud App Discovery agent in an enterprise environment with Active Directory Group Policy Management
Overview
| What’s covered | Instructions, and critical considerations for deploying the Cloud App Discovery agent in an enterprise environment with Active Directory Group Policy Management |
| Primary audience | Microsoft Windows administrators |
| IT environment | Microsoft Windows 7 and above, Windows Server 2008 R2, Windows Server 2012 |
Requirements
- Download and install the WiX Toolset
- Change permissions on the certificate file to ‘read-only’
Best Practices
We strongly recommend enabling auto-updates on the agent (this is the default policy setting) to ensure that users have the latest features and security fixes.
Deployment
The Cloud App Discovery agent includes both an executable (.exe) and a certificate file (.cert) bundled in a zipped folder.
Active Directory Group Policy requires a standard MSI installer.
You have the option to deploy the MSI and certificate file at the same location on a server or in different location.
This guide will walk through both options.
Extract the MSI installer from EndpointAgentSetup.exe
- Download and install the WiX Toolset
- Run <system root>\Program Files (x86)\WiX Toolset v3.8\bin\dark.exe with the following command:
Dark.exe path to EndpointAgentSetup.exe -x path to output folder
Option 1: Deploy MSI and certificate at the same location on a server
Log on to the server computer as Administrator
Create a shared network folder where you will put the Microsoft Windows Installer package (.msi file) and certificate (.cert) that you want to distribute
Note
This share MUST be accessible by your client machine. The client machine will request the file from this location. Verify the share is working correctly
Open Group Policy Software Installation.
In the console tree, right-click Software installation, point to New, and then click Package.
In the Open dialog box, use the search boxes to find the application you want to deploy, click the Windows Installer package, and then click Open.
In the Deploy Software dialog box, click Assigned, and then click OK.
Additional considerations
- To complete this procedure, you must have Edit setting permission to edit a GPO.
By default, members of the Domain Administrators security group, the Enterprise Administrators security group, and the Group Policy Creator Owners security group have Edit setting permission to edit a GPO. - The Open dialog box shows the packages that are located at a software distribution point that you specify as the default.
- If the Windows Installer package is located on a different shared network directory, navigate to the correct software distribution point in the Open dialog box, click the package, and then click Open.
- Administrators are responsible for securing that location using technologies, such as IPSEC, and using file servers with mutual authentication, such as Kerberos, to prevent spoofing or tampering on the wire.
Option 2: Deploy MSI and certificate in different locations on a server
Download and install the Windows SDK
Run <system root>\Program Files (x86)\Windows Kits\8.0\bin\x86\Orca-x86_en-us.msi to install the Orca tool
Open Orca.exe
Right-click File Open select the MSI
Right-click Transform > New Transform
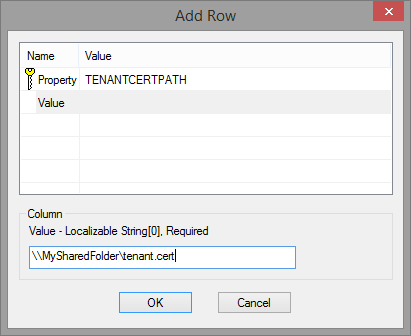
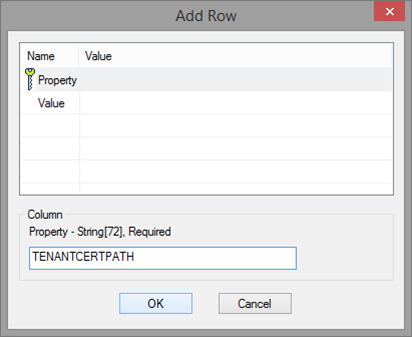
In the Property table, Add a row with TENANTCERTPATH as the property name and the location of the tenant.cert as the value:
Right-click Transform > Generate Transform
Save the transform file as .mst (package transform)
Note
This share MUST be accessible by your client machine.
The client machine will request the file from this location.
Verify the share is working correctly
Open Group Policy Software Installation
In the console tree, right-click Software installation, point to New, and then click Package
In the Open dialog box, use the search boxes to find the application you want to deploy, click the Windows Installer package, and then click Open.
In the Deploy Software dialog box, click Assigned, and then click OK.
Additional considerations
- To complete this procedure, you must have Edit setting permission to edit a GPO. By default, members of the Domain Administrators security group, the Enterprise Administrators security group, or the Group Policy Creator Owners security group have Edit setting permission to edit a GPO.
- The Open dialog box shows the packages that are located at a software distribution point that you specify as the default.
- If the Windows Installer package is located on a different shared network directory, navigate to the correct software distribution point in the Open dialog box, click the package, and then click Open.
- Administrators are responsible for securing that location using technologies such as IPSEC and using file servers with mutual authentication such as Kerberos to prevent spoofing or tampering on the wire.
See Also
- Cloud App Discovery
- Active Directory Group Policy Management
- Assign an Application
- How to use Group Policy to remotely install software in Windows Server 2008 and in Windows Server 2003


