Note
Access to this page requires authorization. You can try signing in or changing directories.
Access to this page requires authorization. You can try changing directories.
- Configure Outgoing e-mail settings in SharePoint 2013 Central Administration - part 1
- Configure Outgoing e-mail settings with existing email server in SharePoint Server 2013 - part 2
- Configure Outgoing e-mail settings with Gmail/Google SMTP server with SharePoint Server 2013 - part 3
- Configure Outgoing e-mail settings with Office 365 SMTP server with SharePoint Server 2013 - part 4
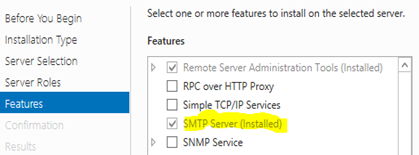
First, check whether SMTP is installed on the server. You can check that on Server Manager and Features section.
http://lh5.ggpht.com/-Q8Q4lkBJzvM/VR2NrlO9bEI/AAAAAAAAD78/lrKFWSS8yxo/image_thumb9_thumb_thumb_thumb.png?imgmax=800
You will (obviously) need to install SMTP on the server if it isn't installed already. SMTP server needs an open port in any firewall to work, by default this is port 25.
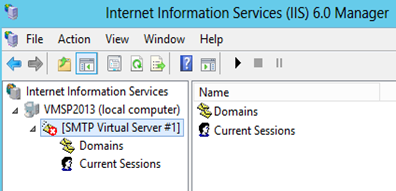
After setting up the SMTP server, open IIS Manager.
http://lh3.ggpht.com/-jl7VxGBOFpQ/VR2NsiyD5KI/AAAAAAAAD8M/SM149w4RX98/image_thumb12_thumb_thumb_thumb.png?imgmax=800
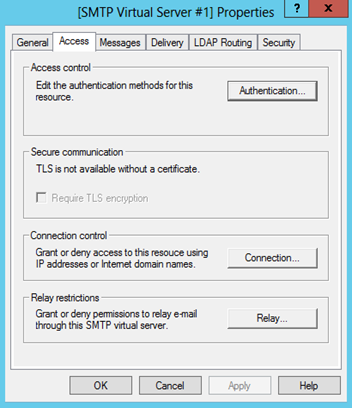
Before starting the SMTP Virtual server some properties will need to be configured. Right-click the SMTP virtual Server and click on the Access Tab. Click the Relay.. button on the Relay restrictions.
http://lh4.ggpht.com/-RLi1NXCk3B4/VR2NuBReZUI/AAAAAAAAD8c/0qj06oy30OI/image_thumb15_thumb_thumb_thumb.png?imgmax=800
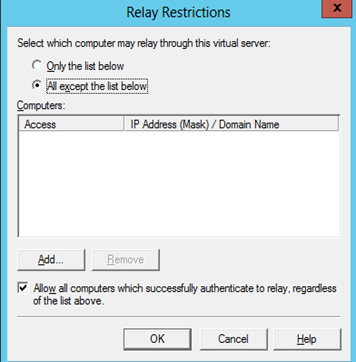
This section specifies which server can use the SMTP for mail relay. So either you need to select **Only the list below **and add IP Addresses of all server which used to send the emails (ex:-WFE, APP) or let all servers to send emails by All except the list below and putting nothing in the list.
http://lh6.ggpht.com/-RogdYzjAmvU/VR2NvVg_QBI/AAAAAAAAD8s/qIrPbeyb1k0/image_thumb19_thumb_thumb_thumb.png?imgmax=800
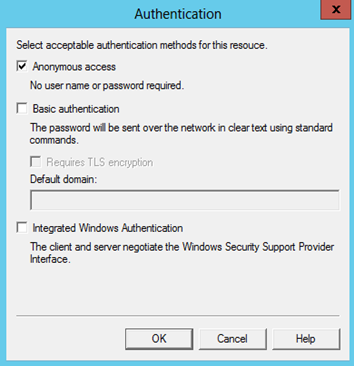
Then click Authentication.. button on Access Control section and set the checkbox for Anonymous access.
http://lh6.ggpht.com/-a30hiWydN2E/VR2Nwp8OLsI/AAAAAAAAD88/e5n2ld8Goss/image_thumb22_thumb_thumb_thumb.png?imgmax=800
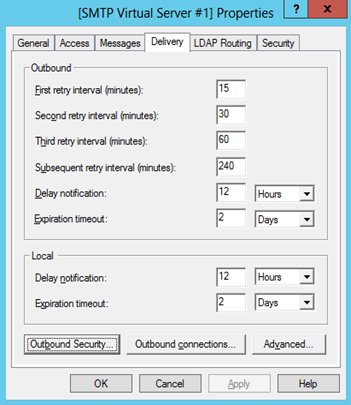
Then click OK and go to the Delivery Tab.
http://lh3.ggpht.com/-L2kkA4XBrZo/VR2NxxhysHI/AAAAAAAAD9M/YgEzmQvXal0/image_thumb%25255B2%25255D_thumb_thumb.png?imgmax=800
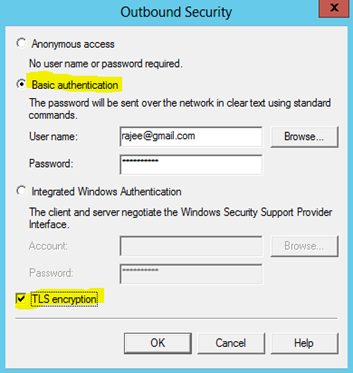
Outbound Security section allows you to provide credentials for the receiving server. Since we are using local the SMTP server you can set this as a Basic authentication. Type your **User name and Password **and click TLS encryption.
http://lh6.ggpht.com/-vudLbSYfa-U/VR2NzCLUn-I/AAAAAAAAD9c/IQqjzle-rZc/image_thumb%25255B3%25255D_thumb.png?imgmax=800
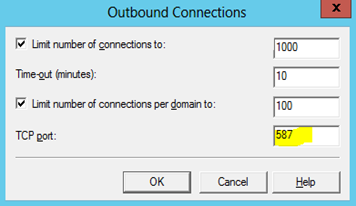
Outbound Connection section you can change the default port.
http://lh6.ggpht.com/-3dD0MpS6jUE/VR2N0HTc4QI/AAAAAAAAD9s/78TReN9WeKI/image_thumb%25255B6%25255D_thumb.png?imgmax=800
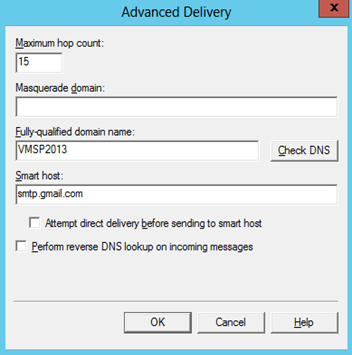
Advanced.. section you need specify the Smart host for forwarding the email for the Gmail SMTP server (smtp.gmail.com).
“You can route all outgoing messages for remote domains through a smart host instead of sending them directly to the domain. This permits you to route messages over a connection that may be more direct or less costly than other routes. The smart host is similar to the route domain option for remote domains. The difference is that after a smart host is designated, all outgoing messages are routed to that server. With a route domain, only messages for the remote domain are routed to a specific server.”
http://lh5.ggpht.com/-iB3NKEEBo_0/VR2N1cFuoZI/AAAAAAAAD98/NATt11dflW0/image_thumb%25255B9%25255D_thumb.png?imgmax=800
You can find the Gmail SMTP server settings here.
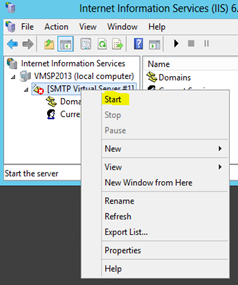
Then start the SMTP virtual server.
http://lh5.ggpht.com/-6JY8iTEzbtY/VR2N2i4BswI/AAAAAAAAD-M/ZUoG1eaAY_c/image_thumb%25255B19%25255D_thumb_thumb.png?imgmax=800
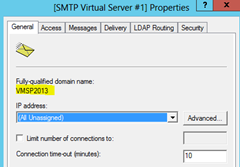
After that, you can find the fully qualified name in General tab and proceed with the Outbound SMTP settings in Part 1.
http://lh3.ggpht.com/-FqSGzqH_qt8/VR2N3uXXQWI/AAAAAAAAD-c/VmDCJO4lnWM/image_thumb%25255B16%25255D_thumb_thumb.png?imgmax=800