Windows: How to educate your users to regularly restart their PCs
Introduction
It is suggested to restart Windows PCs at least once a week. Restarting closes all the software running on a PC. That software includes dozens of services that might have been started by various programs and never stopped. This practice helps in fixing mysterious performance problems when the exact cause is hard to pinpoint.
One of the main concerns for Desktop Engineers is how to push their end users to regularly restart their computers. Some companies address it by forcibly restarting connected computers to their networks outside of Business Hours. This is probably not the best solution as it usually ends with a lot of frustration: Your end users might have left their files open or are still working outside of Business Hours.
If you are one of these Desktop Engineers and you do not want to be the “most hated person” in your company then this Wiki was made for you.
Educating your users is the best way to make them properly use their computers. In this Wiki, we will share a “smart” way to achieve that by displaying a popup that is similar to the following one when a user does not restart his computer after a certain number of days:
Display popup
To display a popup when a user has not restarted his PC for a certain number of days, we will need the following:
- An HTA file that contains the popup to display
- Some scripts to check the conditions under which the popup should be displayed
- SCCM to periodically push the popup as an application
HTA file
Let’s start with the funniest part: The HTA file.
Below is an example you can use:
|
In our case, we have named the HTA file Reboot_Display.hta.
Content description
To detail more the code, you can find below the description of its content:
Code |
Description |
|
The Head defines the title of our HTA file and the CSS file we use. The CSS file is used to define how HTML elements are to be displayed. In our case, the CSS file is named reboot.css |
<script language="VBScript"> </script>
|
Resizeto is used to set the size of the popup window. The script that will be used when the end user clicks on Restart Now button is also wired up. In our case, the script name is reboot.bat |
|
The header body includes header.png and another image (This is where the funny guy appears) Slowness.png. It also adds a Restart Now button. |
As you have already seen, the HTA file points to a CSS file reboot.css.
Reboot CSS file
Below is its content:
body { font-family : Verdana, Arial, Helvetica, sans-serif; font-size : 11px; color : #000; margin : 0; }
a { color : #BF5426; text-decoration : none; }
a:hover{ color : #000000; text-decoration : none; }
div { width:628px; }
p { padding:10px; } |
Reboot batch file
The reboot batch file reboot.bat (The one we highlighted before) content is the following:
cmd /c shutdown /r /f /t 0 |
Other scripts
Two other scripts are needed:
- A Powershell script that checks if the computer have not been restarted after a certain number of days:
- A VBS script that runs the Powershell script in a silent mode.
1. PowerShell script
In our case, the script name is Reboot_Display.ps1 and it displays the popup when a user have not restarted his computer since 5 days – The popup is redisplayed every 5 days.
$StartDate = (Get-WmiObject win32_operatingsystem | select csname, @{LABEL='LastBootUpTime';EXPRESSION={$_.ConverttoDateTime($_.lastbootuptime)}}).lastBootUpTime $CurrentDate = Get-Date $difference = (New-Timespan -Start $StartDate -End $CurrentDate).TotalDays $comparison = [int]$difference / 5 if (([int]$comparison -eq $comparison) -AND ($comparison -ne 0)) { C:\RebootCheck\Reboot_Display.hta } |
2. VBS Script
No Powershell Window is then displayed when we run the previous Powershell script. In our case, the script is named silent.vbsstrong>
Set objShell = WScript.CreateObject("WScript.Shell") objShell.Run("cmd /c C:\Windows\System32\WindowsPowershell\v1.0\powershell.exe -NoLogo -NonInteractive -File C:\RebootCheck\Reboot_Display.ps1"), 0, True |
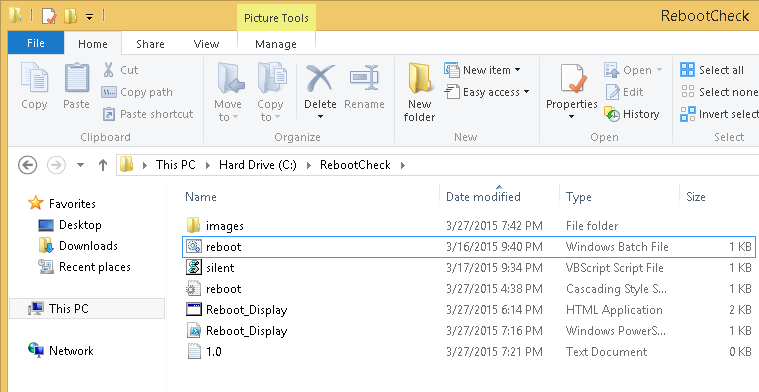
All you need to do now is to create a folder and copy the HTA file, the CSS file and the scripts we created.
Images folder
Do not also forget to create a folder named images where you store the images header.png and Slowness.png. Also, create a text file named 1.0 – We will explain later what that is for.
So far so good – We are now ready for the SCCM part.
SCCM Part
On SCCM level, we will need to create two packages:
1st SCCM Application: copy the folder content
2nd SCCM Application: regularly run checks
1st SCCM Application
All you need to do are:
- Copy the folder containing the files we previously created to SCCM i>
- Add a new Batch file inside the folder (It is named setup.bat in our case) that copies the folder content to your computers
@echo off if not exist "C:\RebootCheck\" (mkdir "C:\RebootCheck\") xcopy /E /Y *.* "C:\RebootCheck\" del "C:\RebootCheck\setup.bat" |
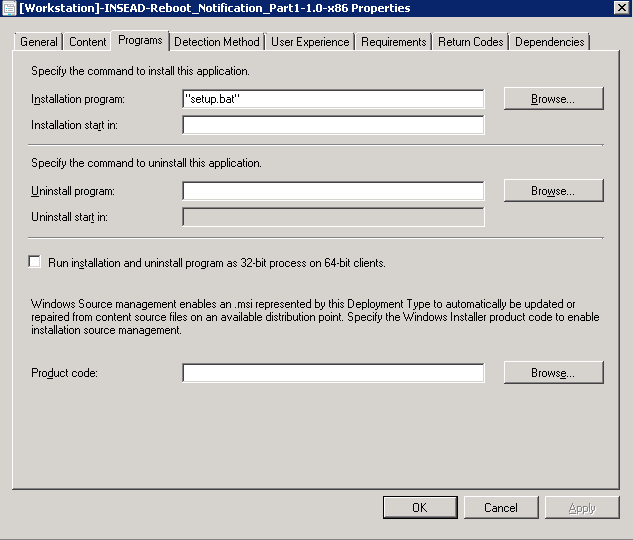
- Create a new SCCM Application that:
- Runs setup.bat as installation program
-
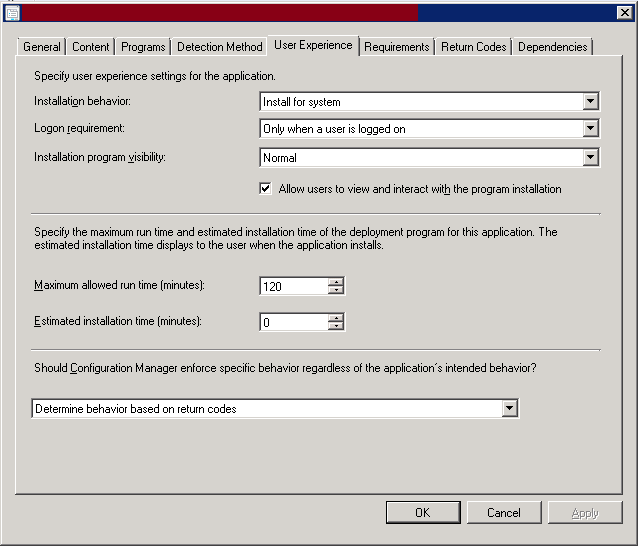
- Runs the installation for the system but requires a user to be logged on to get launched. The installation program should run interactively with users
-
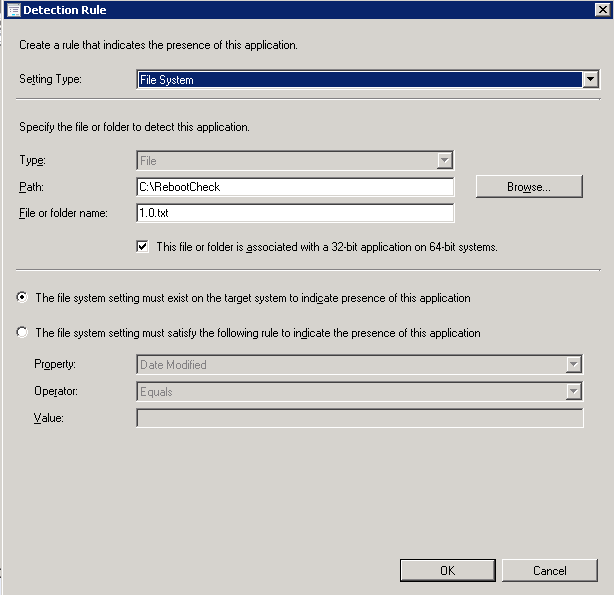
- Detects that the application is already install by checking if C:\RebootCheck\1.0.txt file exists. That is the purpose of the text file we previously created.
If later on, you would like to make updates on the scripts or the HTA file then you could simply create a new package and rename 1.0.txt file to 1.1.txt and then update the detection method to check if C:\RebootCheck\1.1.txt file exists or not. If not then clients on which you deployed the previous application will have C:\RebootCheck\ fo folder content overwritten. That should make it easy for you to make minor updates in the future.
2nd SCCM Application: Run checks
This package will be used to regularly run checks against the last computer restart date.
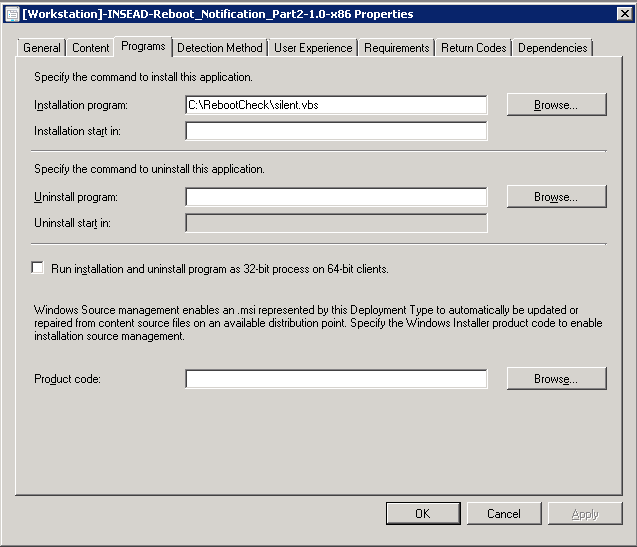
It simply runs C:\RebootCheck\slient.vbs trong>script. To run the script only when a user is logged on, you need to select Install for system as Installation behaviour under User Experience of the package deployment type.
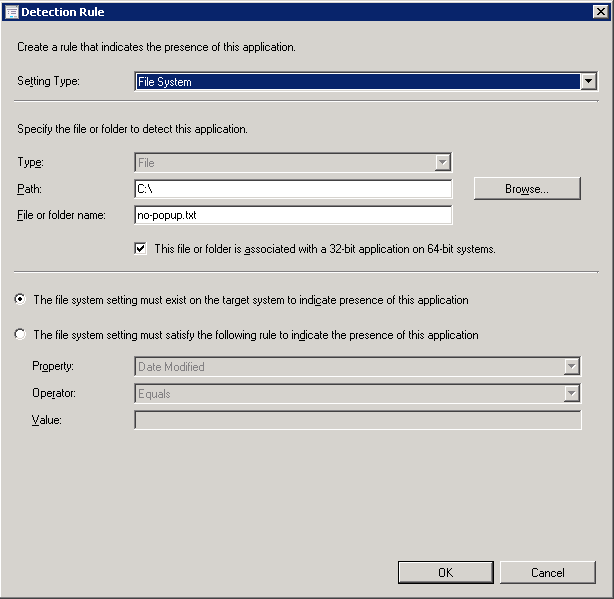
Also, add C:\no-popup.txt as the package installation detection rule. In fact, since this condition is not true, the package will keep retrying its installation every Application Deployment Evaluation Cycle. If, for some reasons, you no longer want to have the popup for a specific client then simply create no-popup.txt file under the C drive.
The 1st application should be set as a dependency for the 2nd pa package. This is needed so that the checks do not start before getting the required files copied locally.
Deploy SCCM Packages
Now that everything is ready, you just need to deploy both SCCM packages on your target client computers.
One last point you need to take care about is the frequency of your Application Deployment Evaluation Cycle. You can adjust that by the schedule for the re-evaluation for your deployments on your Client Settings to be once a day. Just note that this might not be recommended in case if the re-evaluation of your existing deployments take long time to process (This is just in order to avoid impacting the computer performance when it is done and this applicable for very few environments).
References
- Optimising Windows for better performance: http://windows.microsoft.com/en-gb/windows/optimize-windows-better-performance#optimize-windows-better-performance=windows-7
