Using the Windows Azure Web Role and SQL Database with PHP
Overview
This tutorial demonstrates how to use the Microsoft Drivers for SQL Server for PHP and the Windows Azure Command-Line Tools for PHP Developers to create, test, and deploy a PHP application to Windows Azure. The Microsoft Drivers for SQL Server for PHP allow you to leverage relational data stored in SQL Database from a PHP application. This tutorial parallels another tutorial (here) that builds a similar application using Visual Studio and ASP.NET.
Note
If you wish to contribute to this page, use the Edit tab at the top (sign-in required). If you wish to provide feedback for this documentation please either send e-mail to azuredocs@microsoft.com or use the Comment field at the bottom of this page (sign-in required).
In this tutorial, you will create a simple golfer message board application. In the application, a Web role provides the front-end that allows golfers to view the contents of the message board and add new entries. Each entry contains a name and a message. When a golfer posts a new message, the Web role sends message information to SQL Database for permanent storage. The Web role also renders message information in the browser so golfers can view the content of messages.
Note: The tutorial code has been tested on Windows Azure SDK versions 1.3 and 1.4.20227.1419, the Microsoft Drivers for SQL Server for PHP v2.0, and the Windows Azure Command-Line Tools for PHP Developers March 2011 Update.
This tutorial builds an application with functionality that is the same as the application built in this tutorial: Using the Windows Azure Web Role and Windows Azure Table Service with PHP. However, in this tutorial, SQL Database is used as the back-end data store instead of the Table service. Completing the application that uses the Table Service is not a prerequisite for this tutorial.
Note: This tutorial is not intended to show you how to choose between SQL Database and the Table service, but to show you how to use SQL Database . For information on SQL Database and Windows Azure Table service comparison, see SQL Database and Windows Azure Table Service at, and [[Understanding Data Storage Offerings on the Windows Azure Platform]].
Objectives
In this tutorial, you will learn...
- The process of developing a PHP application for Windows Azure
- How to use the Windows Azure Web Role with PHP
- How to interact with SQL Database as a cloud-hosted database platform from PHP
- How to deploy a PHP application to Windows Azure
Prerequisites
Note the following requirements before you begin this lesson:
In order to complete the deployment portion in thistutorial, you must sign up for a Windows Azure account and purchase a subscription. For more information, see Get Started with the Windows Azure Platform and Provisioning Windows Azure.
Download and install the Windows Azure Command-Line Tools for PHP Developers. Instructions for doing so can be found in the Setup Guide.
Note: The command line tools can also be installed with the Web Platform Installer. If you choose to use the Web PI, you can install PHP and configure IIS to handle PHP requests at the same time.
Download install the Microsoft Drivers for SQL Server for PHP. Installation instructions are here: http://msdn.microsoft.com/en-us/library/cc296173.aspx.
Configure IIS to run PHP applications.
Note: It is possible to use Apache to handle PHP requests in Windows Azure, but this tutorial will use IIS.
Understanding the Architecture
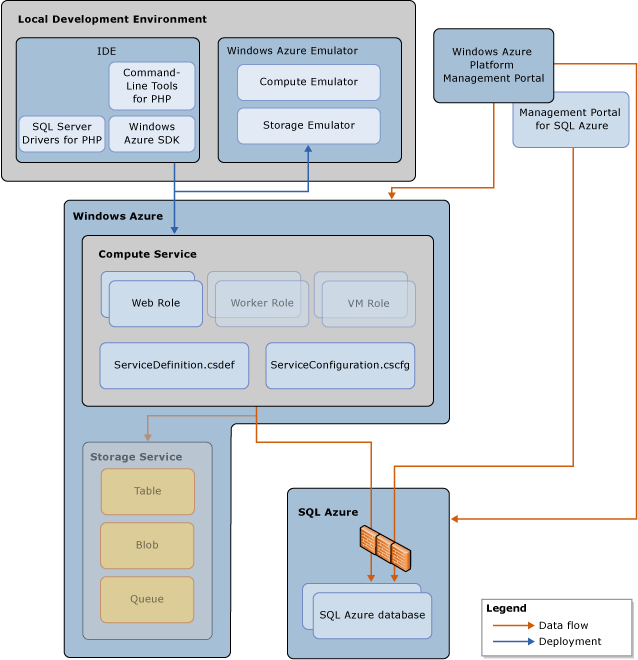
The following diagram illustrates the development components and the runtime components involved in this tutorial:
- You develop the PHP application in your IDE of choice and use the Windows Azure Command Line Tools for PHP Developers (which is dependent on the Windows Azure SDK) and the Microsoft SQL Server Drivers for PHP.
- You deploy the application to Windows Azure Emulator for testing and to Windows Azure for production. Note that you cannot use the Storage Emulator with SQL Database applications (you will test against a live SQL Database database).
- A Windows Azure project includes two configuration files: ServiceDefinition.csdef and ServiceConfiguration.cscfg. These files are packaged with your Windows Azure application and deployed to Windows Azure.
- A service hosted in Windows Azure consists of one or more Web roles and worker roles. A Web role hosts a PHP application and is accessible via an HTTP or HTTPS endpoint. A Web roles commonly the front-end for an application. A worker role is a role that is useful for generalized development, and may perform background processing for a Web role. In this tutorial you will create a Web role project. For more information, see Overview of a Windows Azure Application.
- SQL Database provides persistent, redundant storage in the cloud.
- You can use the portal to administrate Windows Azure platform resources.
Part 1: Prepare Your SQL Database Account
You must have a Windows Azure Platform subscription. For more information on creating a subscription, see [[articles:Getting Started with SQL Database using the Windows Azure Platform Management Portal]].
To create a SQL Database server
Open a Web browser, and browse to http://windows.azure.com.
Log in to your Windows Live account.
If you are asked to choose between the new portal and the old portal, click Use the New Portal.
In the left pane, click Database.
In the left pane, click the subscription associated with your SQL Database account.
From the top menu, click Create.
In Create Server, select a region for the database, and then click Next. The region is where you wish to run the service, which is most likely the one that is closest to your current location.
Type the following values, and then click Next:
Name Value Administrator Username
MyAdmin
Administrator Password
<your password>
Retype Password
<your password>
Note: An administrator account is a master account used to manage the new server. You should avoid using this account in connection strings where the username and password may be exposed. To simplify the tutorial instructions, this tutorial uses the administrator account. The default administrator username is MyAdmin, and the default password is pass@word1. If you change the username and the password in this step, you must change them accordingly in the rest of the tutorial.
Note: The password policy requires that this password contain at least one number, one character, one letter, and one symbol. In addition, the password cannot be less than six characters nor contain three consecutive characters from the username.
From Create Server, click Add.
In Add Firewall Rule, type the following values, and then click OK. The IP address of your computer must be within the IP address range of one of the firewall settings.
Name Value Rule name
The dev box
IP range start
(type the IP address of the computer you are using. The IP address is listed on bottom of the dialog.)
IP range end
(type the IP address of the computer you are using.)
Note: SQL Database has two types of access control: firewall and SQL authentication. You must configure the SQL Database firewall settings to allow connections from your computer(s). You must also allow connections from Windows Azure, because the golfer message board application is hosted in Windows Azure. For more information on SQL Database security, see [[Security Guidelines for SQL Database ]].
Important: In addition to configuring the SQL Database server-side firewall, you must also configure your client-side environment to allow outbound TCP connections over TCP port 1433. For more information, see [[Security Guidelines for SQL Database ]].
Select Allow other Windows Azure services to access this server, and then click Finish. This step is required otherwise the Golfer Message Board application cannot connect to the SQL Database server. A new server is added to the server list. The fully qualified domain name of the server uses the following format:
<ServerName>.database.windows.net, where the <ServerName> identifies the server. Write down the server name, you will need it later in the tutorial.In the left pane, expand the subscription, and then click the new database server. For each new server, there is only a master database.
From the top menu, click Test Connectivity.
In Test Connectivity, type the following values, and then click Connect.
Name Value Login
MyAdmin
Password
<your password>
Allow other Windows Azure services to access this server
(selected)
Make sure the test is successful, and then click Close.
You can use either SQL Server Management Studio or Windows Azure Platform Management Portal to manage your SQL Database database. To connect to SQL Database from SQL Server Management Studio, you must provide the fully qualified domain name of the server. In this tutorial, you will use the New Windows Azure Platform Management Portal.
Note: The SQL Server Management Studio from SQL Server 2008 R2 and SQL Server 2008 R2 Express can be used to access, configure, manage and administer SQL Database. Previous versions of SQL Server Management Studio are not supported.
To create a database
From Windows Azure Platform Management Portal, in the left pane, click the server you created in the last procedure.
From the top menu, click Manage. A Database Manager page appears on a new tab or a new window depending on your browser configuration.
Switch to the new tab or window.
In Database Manager, type the following values, and then click Connect.
Name Value Server
(use default value)
Database
master
Login
MyAdmin
Password
<your password>
On the upper right corner of the tab, it lists the database server, database name, login user, and other information. Notice, the database is the master database.
From the top menu, click New Query.
In the Query window, type the following query, and then click Execute.
SELECT * FROM sys.databases
GO
CREATE DATABASE GolferMessageBoardDB
GO
SELECT * FROM sys.databases;
GOMake sure the query is executed successfully. You should see two sets of results; the first set shows the master database, and the second set shows the master database and the GolferMessageBoardDB database.
Click Logout from the upper right corner. You must log out from the master database, and connect to the GolferMessageboardDB to create the new table.
Click Yes to proceed if you get a prompt. Don’t close Database Manager. You will need it in the next procedure.
The Golfer Message Board application has one table for storing the messages.
To create a table
In Database Manager, type the following values, and then click Connect.
Name Value Server
(use default value)
Database
GolferMessageBoardDB
Login
MyAdmin
Password
pass@word1
Note: Make sure the database name is GolferMessageBoardDB. The default name is master. After you login, the server name, the database name, and the login username is shown on the upper right corner of the windows.
From the top menu, click New Query.
In the Query window, type the following query, and then click Execute.
CREATE TABLE [Messages](
[MessageID] [int] IDENTITY(1,1) NOT NULL PRIMARY KEY,[GolferName] [nvarchar](100) NOT NULL,[GolferMessage] [nvarchar](1000) NOT NULL,[Timestamp] [datetime] NOT NULL
)Click the Message button on the bottom of the main pane, and make sure the query is completed successfully.
Part 2: Create Your Windows Azure/SQL Database PHP Project
The only difference between developing a Windows Azure/SQL Database PHP project and any other PHP project is that a Windows Azure/SQL Database PHP project will use the Microsoft Drivers for SQL Server for PHP to interact with the data store (SQL Database).
1. Create a directory for the application. In the root directory for IIS (C:\inetpub\wwwroot), create a directory called GolferMessageBoard.
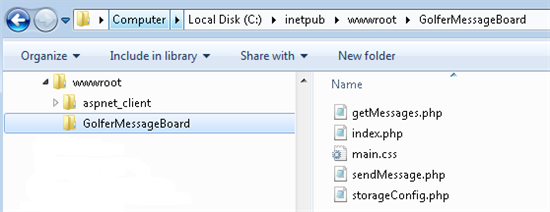
2. Create the files for the application. This application will consist of 5 files: index.php, sendMessage.php, getMessages.php, storageConfig.php, and main.css.
Note: You can download the source code for this application from the MSDN Code Gallery at Windows Azure Platform Tutorials - PHP.
You directory should now look as follows:
Configure Storage Information (storageConfig.php)
The information necessary for establishing a connection to SQL Database is stored in the storageConfig.php file. Add the following code to the storageConfig.php file:
<?php
define("SQLAZURE_SERVER_ID", "Your_server_ID_here");
define("SQLAZURE_DB", "GolferMessageBoardDB");
define("SQLAZURE_USER", "Your_user_name_here");
define("SQLAZURE_PASSWORD", "Your_password_here");
?>
Note the following about the code above:
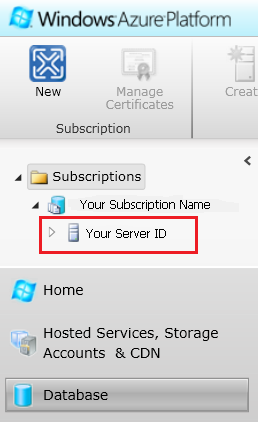
- When you created a SQL Database database, your server was assigned an ID. You can find the ID by returning to the Windows Azure Developer Portal, selecting Database in the left-hand pane, and expanding your subscription details (see image below). Replace Your_server_ID_here with your server ID.
- When you created a SQL Database database, you provided an administrator name and password. Replace Your_user_name_here with your administrator name and Your_password_here with the corresponding password. Note that you can create other users and passwords. For more information, see Managing Databases and Logins in SQL Database . Also note that your fully-qualified user name is UserName@ServerID. Only replace Your_user_name_here with your user name (not your fully-qualified user name).
Create Functionality for Sending a Message (sendMessage.php)
Inserting data in SQL Database is the same as inserting data into a SQL Server database. To add functionality for saving a message, add the following code to the sendMessage.php file:
<?php
require_once 'storageConfig.php';
function sendMessage($name, $message)
{
$conn = sqlsrv_connect(SQLAZURE_SERVER_ID.".database.windows.net,1433",
array("UID"=>SQLAZURE_USER."@".SQLAZURE_SERVER_ID
, "PWD"=>SQLAZURE_PASSWORD
, "Database"=>SQLAZURE_DB
, 'ReturnDatesAsStrings'=>true));
if(!$conn)
{
print_r(sqlsrv_errors());
exit;
}
$date = date("Y-m-d h:i:s");
$params = array($name, $message, $date);
$stmt = sqlsrv_query($conn, "INSERT INTO Messages (GolferName, GolferMessage, Timestamp)
VALUES (?,?,?)", $params);
if($stmt === false)
{
print_r(sqlsrv_errors());
exit;
}
}
?>
Note the following about the code above:
- The sqlsrv_connect and sqlsrv_query functions are used to establish a connection to SQL Database and execute a query respectively. For information about the sqlsrv_connect and sqlsrv_query functions, see SQLSRV Driver API Reference.
- A parameterized SQL query is used when sending data to the database to avoid SQL injection attacks.
Create Functionality for Retrieving Messages (getMessages.php)
To add functionality for retrieving messages from the GolferMessageBoardDB database, add the following code to the getMessages.php file:
<?php
require_once 'storageConfig.php';
$conn = sqlsrv_connect(SQLAZURE_SERVER_ID.".database.windows.net,1433",
array("UID"=>SQLAZURE_USER."@".SQLAZURE_SERVER_ID
, "PWD"=>SQLAZURE_PASSWORD
, "Database"=>SQLAZURE_DB
, 'ReturnDatesAsStrings'=>true));
if(!$conn)
{
print_r(sqlsrv_errors());
exit;
}
$messages = array();
$stmt = sqlsrv_query($conn, "SELECT GolferName, GolferMessage, Timestamp
FROM Messages ORDER BY Timestamp DESC");
while($message= sqlsrv_fetch_array($stmt, SQLSRV_FETCH_ASSOC))
{
echo "<tr>
<td>
<div class='signature'>
<div class='signatureDescription'>
<div class='signatureName'>"
.$message['GolferName'].
"</div>
<div class='signatureSays'>
says
</div>
<div class='signatureDate'>"
.date("n/j/Y", strtotime($message['Timestamp'])).
"</div>
<div class='signatureMessage'>"
.$message['GolferMessage'].
"</div>
</div>
</div>
</td>
</tr>";
}
?>
Note the following about the code above:
- To ensure that a cached version of the page is not retrieved, the “no-cache” headers are sent via the PHP header function.
- To return messages ordered by timestamp, the ORDER BY Timestamp DESC clause is executed as part of the SQL.
- After messages are retrieved, each one is formatted as an HTML table row. Because this script will be invoked by an AJAX call when the main page is loaded and every 60 seconds thereafter, the formatting is necessary to update the table in the main page.
- For information about the sqlsrv_connect, sqlsrv_query, and sqlsrv_fetch_array functions, see SQLSRV Driver API Reference.
Build the Main page (index.php)
The index.php file is the main page for the GolferMessageBoard application. It essentially has 3 sections, divided by language: PHP, Javascript, and HTML. Breaking these sections down one-by-one will help in understanding how the page works.
HTML
The body of the HTML markup is a form (for entering a new message) and a table (for displaying sent messages). After creating the basic layout of an HTML page in the index.php file (i.e. <html>, <head>, and <body> elements), replace the body element with the following:
<body onload='getMessages()'>
<form method="post"
action="./index.php"
id="frmMessageBoard"
onsubmit='return validateInput()'>
<div class="general">
<div class="title">
<h1>Golfer Message Board</h1>
</div>
<div class="inputSection">
<dl>
<dt>
<label for="NameLabel">Name:</label>
</dt>
<dd>
<input name="txtName" type="text" id="txtName" class="field" />
</dd>
<dt>
<label for="MessageLabel">Message:</label>
</dt>
<dd>
<textarea name="txtMessage"
rows="2"
cols="20"
id="txtMessage"
class="field"></textarea>
</dd>
</dl>
<div class="submitSection">
<input type="submit" name="btnSend" value="Send" id="btnSend" />
</div>
</div>
<div id="upMessageBoard">
<table id='dlMessages'
cellspacing='0'
style='border-collapse:collapse;'>
<div id="tablerows">
</div>
</table>
</div>
</div>
</form>
</body>
Note the following about the code above:
- Each time the page is loaded, the Javascript function getMessages is called. This function makes an AJAX call to get the output of the getMessages.php script.
- Messages cannot be sent without specifying a name and a message. The Javascript function validateInput is called to make sure these have been entered before the form is submitted.
- The HTML markup will be formatted by a Cascading Style Sheet (CSS).
Javascript
Add the following <script> element to the <head> element of the index.php file to facilitate retrieval of Table messages and validation of form input:
<script type="text/javascript">
function getMessages()
{
xmlhttp=new XMLHttpRequest();
var url="getMessages.php";
xmlhttp.onreadystatechange=getMessagesInfoStateChanged;
xmlhttp.open("GET", url, true);
xmlhttp.send(null);
}
function getMessagesInfoStateChanged()
{
if (xmlhttp.readyState==4)
{
document.getElementById("tablerows").innerHTML =
'<div id="tablerows">' +
xmlhttp.responseText +
'</div>';
setTimeout('getMessages()', 60000);
}
}
function validateInput()
{
var name = document.getElementById('txtName');
var message = document.getElementById('txtMessage');
if(name.value == '' || message.value == '')
{
alert("Both Name and Message are required.");
return false;
}
return true;
}
</script>
Note the following about the code above:
- The getMessages function makes an AJAX call that retrieves the output of the getMessages.php script.
- The setTimeout function is used to trigger the getMessages function every 60 seconds. The effectively refreshes the messages on the page every minute (allowing the user to view messages from other users in a timely manner).
- The validateInput will not allow the form to be submitted unless both the user and message input are not empty.
PHP
PHP is used on the main page to handle form submission (sending of a message). To process a submitted form, add the following code at the top of theindex.php file:
<?php
// Send new message if one has been POSTed.
if(isset($_POST['txtName']))
{
require_once 'sendMessage.php';
sendMessage($_POST['txtName'], $_POST['txtMessage']);
}
?>
Note the following about the code above:
- The page submission contains POST data (which is checked for by looking at the $_POST[‘txtName’] variable, then the body of the if statement is executed.
- In the body of the statement, the sendMessage function (defined in the sendMessage.php file) is called with the golfer's name and message as parameters.
CSS
How the HTML in this application is formatted is arbitrary and up to you. Add CCS code the main.css file as you see fit. If you choose, you can use the CSS code that is available in source code download for this application, available here: MSDN Code Gallery at Windows Azure Platform Tutorials - PHP.
Your application is now ready for testing.
Part 2: Test Your Windows Azure PHP Project
In this section you will test your application by running it locally in the Windows Azure Compute Emulator. Note that messages will not be stored in the Windows Azure Storage Emulator, but will be stored in your live SQL Database GolferMessageBoardDB database. When testing is complete, you will deploy the application to a Windows Azure hosted service.
Testing in the Windows Azure Compute Emulators
To run your application locally, follow these steps:
1. In a command prompt, navigate to your Windows Azure Command-Line Tools for PHP Developers directory and execute the following command without line breaks:
>php package.php --project=GolferMessageBoard
--source="c:\inetpub\wwwroot\GolferMessageBoard"
--phpRuntime="C:\Program Files (x86)\PHP\v5.3.4"
--target="c:\workspace"
--runDevFabric
Note: You may need to change values for the source and phpRuntime parameters if your application source code and PHP installation are in different directories.
Note: All paths in your php.ini file need to be relative before deploying an application to Windows Azure. (e.g. extension_dir='.\ext' instead ofextension_dir='c:\PHP\ext'). Now is a good time to make sure that all paths are relative.
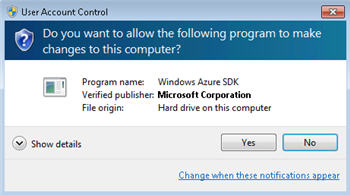
2. When you are prompted to provide administrator privilege, click Yes (you may be prompted more than once):
3. You should now be able to access your running application at this URL: http://127.0.0.1:81/.
Part 3: Deploy Your Application to Windows Azure
In this section you will deploy the GolferMesageBoard application to the Windows Azure staging environment, then move it to the production environment.
Deploying to the Staging Environment
To deploy your application to the Windows Azure staging environment, follow these steps:
1. Assuming that you made some changes to your application in testing, you will need to rebuild the deployment package created by the Windows Azure Command-Line Tools. To do this, in a command prompt navigate to the Windows Azure Command-Line Tools directory and execute the following command (without line breaks):
>php package.php --project=GolferMessageBoard
--source="c:\inetpub\wwwroot\GolferMessageBoard"
--phpRuntime="C:\Program Files (x86)\PHP\v5.3.4"
--target="c:\workspace"
--cleanRebuild
Note: You may need to change values for the source and phpRuntime parameters if your application source code and PHP installation are in different directories.
The command above will create the following directory: c:\workspace\GolferMessageBoard_Build. That directory will contain two directories:GolferMessageBoard and GolferMessageBoard_WebRole. You will need the GolferMessageBoard.cspkg file andServiceConfiguration.cscfg file in the GolferMessageBoard directory for deployment.
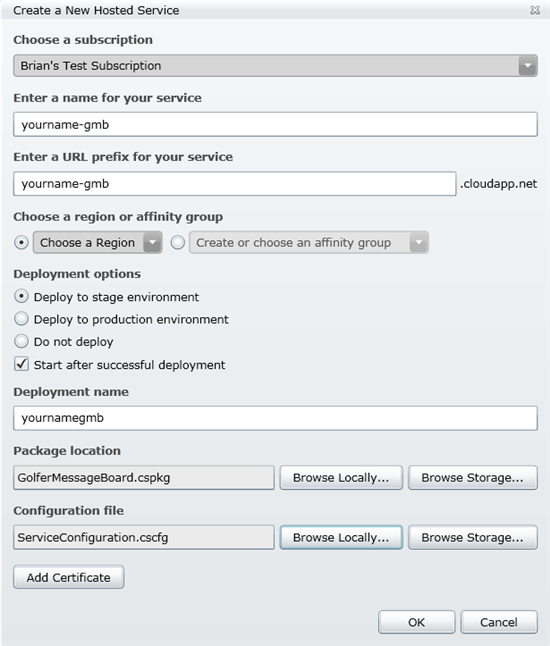
2. Return to the Windows Azure portal and click on New Hosted Service. In the resulting dialog, do the following:
a. Choose a subscription.
b. Enter a name for your service.
c. Enter a unique URL for your service.
d. Select Choose a region. Choose the region closest to you.
e. Select Deploy to stage environment.
f. Make sure that Start after successful deployment is checked.
g. Enter a deployment name.
h. For Package location, browse to the GolferMessageBoard.cspgk file that you created in the previous step.
i. For Configuration file, browse to the ServiceConfiguration.cscfg file that you created in the previous step.
j. Click OK.
It will take several minutes for your application to upload, deploy, and start. When the portal indicates that your application is in the ready state, you can access it at the URL provided in the DNS name property for the deployment (on the right hand column of the portal).
Deploying to the Windows Azure Production Environment
To promote the application to production…
- From the portal, in the left pane, click Hosted Services.
- In the middle pane, expand GolferMessageBoard, and then click v1.0.0.0.
- From the top menu, click Swap VIP.
- In Swap VIPs, click OK. Wait until the Status for the deployment changes to Ready.
- In the Properties pane, click the URL in the DNS name box. The application is opened in a new browser tab or a new browser window depending on your browser configuration.
Note: Some DNS services take longer to replicate the records. If you get a page not found error, you might need to try browsing to the URL again in a few minutes.
Congratulations! You have completed the **Using the Windows Azure Web Role and Windows Azure Table Service with PHP **tutorial.
