Ping for Beginners
Introduction
Ping is probably the most used command in Windows. It helps Systems and Network Engineers to verify the connectivity of their Windows with other systems and reports back the results. It is one of the fundamental commands that you should know in Windows.
This Wiki article explains how to use Ping for Beginners by providing most of the available options and real usage examples.
Getting Started
Let’s start with doing your first Ping query.
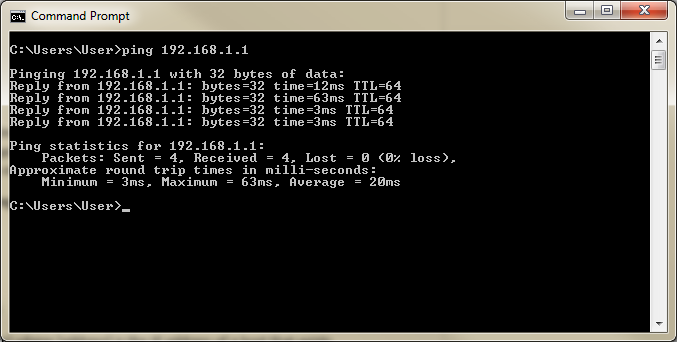
To do that, you can proceed like the following:
- Open CMD and then type ping [address] where [address] is the IP address of a host that exists on your network (Example: ping 192.168.1.1.1).
At this step, we would like to congratulate you for your first Ping command. Bravo!
You should be able to see, at the end of the results, the Ping statistics for the host you were trying to ping. It gives a good view on the Packets sent, received and lost with approximate round trip times in milliseconds.
Destination Host
Destination Host represents the IP address, DNS Name or NetBIOS name of the remote host to Ping. If you specify a DNS Name or NetBIOS name then a name resolution to IP will be done before sending the Ping Requests.
Let take the example where we would like to Ping bing.com. We will to run ping bing.com command as mentioned below:
As you can see, a name resolution of bing.com to 204.79.197.200 was done and then Ping requests were sent and the statistics were displayed.
Time To Live
Time To Live tells the recipients how long to hold or use the packet or any of its included data before expiring and discarding the packet or data. By default, it is set to 120 milliseconds but can be adjusted.
You can use –i switch to specify your TTL value in milliseconds.
Example: ping bing.com –i 60
Type of Service
Type of Service for Ping is described here: http://en.wikipedia.org/wiki/Type_of_service
You can use –v switch to specify the type of Service.
Resolution of addresses to hostnames
Ping has the capability of resolves addresses to hostnames before sending Ping Requests.
Let’s take the example where you would like to check the connectivity of 204.79.197.200 IP address and do a reverse name resolution before sending Ping requests. In this case, you can use –a switch which tells Ping to do the reverse name resolution and display it as part of the results.
Number of Echo Requests
Ping allows you to control the number of Echo Requests to send. This is done by using –n switch.
As an example, if you would like to send 10 Echo Requests to bing.com then use ping bing.com –n 10 command.
Continuous Ping
Ping can be launched to run continuously until being interrupted using –t switch. This helps when you would like to, continuously, do Ping requests and see the Ping statistics after leaving the command running for a long time. You can see the statistics by clicking on Control-Break and you can stop the processing by clicking on Control-C.
Buffer Size
The default buffer size for Ping is 32 bytes. You can customize it using –l switch. You might be asking yourself what is the added value to do it and the answer is that it helps you to identify your MTU (Maximum Transmission Unit).
By using this option and prohibiting the fragmentation (This is the option described in the next section), you will be able to identify the maximum buffer size that you can use to send Ping echo without drops and then add 28 (This value for the various TCP/IP headers) to get your MTU.
As an example, you can try that by pining bing.com. In our case, we have found that the maximum buffer size for Ping is 1452. By having a buffer size that is higher to this value, we are no longer able to successfully ping the host. The MTU is then 1452 + 28 which is equal to 1480.
Fragmentation
By default, Ping requests can be fragmented. However, you can stop the fragmentation using –f option. This is useful to determine the MTU as described previously.
Record Routes and Timestamp for count hops
One of the useful information when troubleshooting routing is to know the hops used to reach or not the destination. Ping has two options for that: -r to record routes for count hops (The value should be between 1 and 9) and –s for the timestamp for count hops (The value should be between 1 and 4). However, using tracert instead remains a better and a recommended option to get this information.
Loose and Strict source route
Loose and Strict Source route: http://en.wikipedia.org/wiki/Loose_Source_Routing
Ping has the capability to do a:
- A Loose Source Routing using –j option where you need to specify the IP addresses for the route delimited by spaces
- A Strict Source Routing using –k option where you need to specify the IP addresses for the route delimited by spaces
Source address to use
In case you would like to specify a specific source address for the Ping request, you can use –S option and specify the source IP address.
Forcing IPv4 or IPv6
You can force IPv4 in Ping by using -4 option and IPv6 by using -6 option.
Timeout
By default, Ping has a timeout which is equal to 4000 milliseconds (4seconds) that is used to identify if the destination in unreachable. This could be changed by using –w switch and specifying a new value for the timeout in milliseconds.
Conclusion
Ping is an amazing tool, provided as part of Windows Systems. It is very helpful for investigating connectivity issues / status. While it is a very basic tool, it has many helpful options. This Wiki have described most of these options and is designated for beginners to help them to have a better understanding of the tool.


