SharePoint 2013: CallOut Pop-up
Introduction
How to create CallOut pop-up in SharePoint 2013. In SharePoint 2013 Microsoft has used Notification or Preview Callout Pop-ups on various pages, Lists and Libraries. These Hover-Over pop-ups can be fully customized using the new Callout pop-up framework.
Implementation
Follow the below steps for CallOut pop-ups:
- 1. There should be a custom “Contact Us” custom list where the query/concerns will be added.
- 2. Take a Script Editor Web Part on a SharePoint 2013 site page where we will add the script.
- 3. Click on Edit link >> click on Insert tab of ribbon >> click on EmbedCode >> paste the below code snippets for CallOut.
<script type="text/javascript">
 SP.SOD.executeFunc("callout.js", "Callout",  function   (){
 var _link = document.getElementById("divContactusLink");
 var listCallout = CalloutManager.createNew({
 launchPoint: _link,
 beakOrientation: "leftRight",
 ID: "CallOut ID",
 title: "Quickly Contact Us",
 content: "<div class=\"ms-soften\" style=\"margin-top:2px; \"><hr/></div>"
 + "<div id='confirmationBLOCK' style=\"margin-top:13px;visibility:hidden;\">Thank you for Contacting Us!</div>"
 + "<div id='textareaLabel' style=\"margin-top:10px;visibility:;color:#000;font-weight:bold;\">Enter your Query here:</div>"
 + "<div class=\"callout-section\" style=\"margin-top:2px;width:95%;Height:200px; \"><textarea id='CommentsArea' style=\"width:100%;height: 100%; -webkit-box-sizing: border-box; -moz-box-sizing: border-box; box-sizing: border-box;\"></textarea></div>"
 + "<span id='spntextareaRequired' style=\"margin-top:;visibility:hidden;color:red;font-weight:normal;\">Text area is required</span>",
 });

 //Creating a Submit Custom Action
 var customAction = new CalloutActionOptions();
 customAction.text = 'Submit';
 customAction.onClickCallback = function(event, action)
 {
 document.getElementById('coCallOut ID_callout-actions').style.visibility='visible';
 var _contactUsTextarea = document.getElementById('CommentsArea');
 var _spntextareaRequired = document.getElementById('spntextareaRequired');

 //Adding the new Contact Us Item in the List.
 if(_contactUsTextarea.value =='')
 {
 _spntextareaRequired.style.visibility='visible';
 }
 else
 {
 AddIteminList(_contactUsTextarea.value);
 _contactUsTextarea.style.visibility='hidden';
 _spntextareaRequired.style.visibility='hidden';
 document.getElementById('coCallOut ID_callout-actions').style.visibility='hidden';
 }
 };

 var _newCustomAction = new CalloutAction(customAction);
 listCallout.addAction(_newCustomAction);
 });

 //Adding the contact us query to the contact us list
 function AddIteminList(_contactUsText)
 {
 var context = new SP.ClientContext.get_current();
 var web = context.get_web();
 var list = web.get_lists().getByTitle('Contact Us');
 var listItemCreationInfo = new SP.ListItemCreationInformation();
 var newItem = list.addItem(listItemCreationInfo);
 newItem.set_item('Contact_x0020_Us', _contactUsText);
 newItem.update();
 context.executeQueryAsync(Function.createDelegate(this, this.success), Function.createDelegate(this, this.failed));
 }

 function success() {

 var _confirmationblock = document.getElementById('confirmationBLOCK');
 _confirmationblock.style.visibility='visible';

 var _textareaLabel = document.getElementById('textareaLabel');
 _textareaLabel.style.visibility='hidden';

 }

 function failed(sender, args) { alert('failed to add a List Item:' + args.get_message()); }
</script>

<style>
 /* unvisited link */
 .clickMeNKT {
 color: #0000FF;
 text-decoration:underline;
 text-align:left;
  18px;}

 /* mouse over link */
 .clickMeNKT:hover {
 color: red;
 cursor:pointer;
 text-decoration:none;}

 /* selected link */
 .clickMeNKT:active {
 color: green;}
</style>


<div id="divContactusLink" style="width:38%;20px;">If you have any question or Concerns, please feel free to <span class='clickMeNKT'>Contact Us</span></div>
4. Once done, click on Save link to save the page.
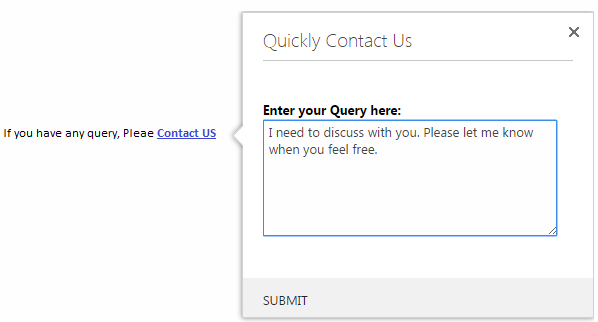
5. Now when you click on the Contact Us link. The following CallOut will be displayed where you can put your questions/concerns as follows:
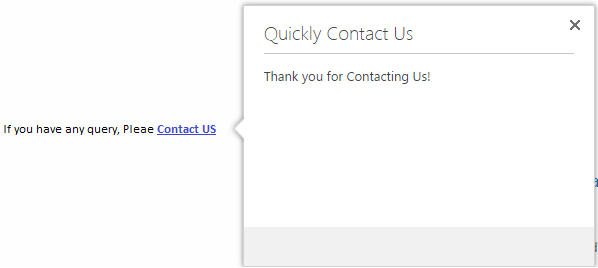
6. When you click the SUBMIT button you will get the confirmation about your query as follows:
7. And then you will find your query/concerns will be saved into the below SharePoint custom list as follows:


