Azure SQL: How to Enable Change Tracking
Introduction
Many customers have a need to efficiently track what has changed in their SQL Azure database from one point in time to another. They might need to use this method to efficiently download the latest set of products to their mobile user’s smartphones, or they may want to import data on-premises to do reporting and analysis on the current day’s data.
The biggest problem is that unlike SQL Server 2008’s which has Integrated Change Tracking and Change Data Capture, SQL Azure does not currently provide a method of change tracking data. This is unfortunate, because the alternative requires the addition of complex triggers to track the changes. It also requires the addition of tracking columns to track rows that were changed. Luckily, the method I am going to explain can greatly simplify the process and also reduce the potential that the schema changes would impact your existing applications. However, I do suggest that you try this method on a test database before applying it to a production system, just in case. J I also will point out that this mechanism will work just as well with SQL Server, but you will likely prefer to use something like Integrated Change Tracking.
Prerequisites
To get started, you will need:
- SQL Azure Database: If you do not already have one, I recommend that you look around for a free account. As of the time of writing you can register on the Windows Azure Platform site for a free 30 day account using the promo code: TBBLIF.
- Visual Studio 2008 or 2010: If you do not have this, you can download one of the Express editions for free.
- SQL Server Management Studio 2008 R2 (or higher): We will use this to connect to SQL Azure and manage the database for this sample. If you do not have this, you can also use the Windows Azure Portal to accomplish most of the task but you will need to have the SQL Client libraries installed.
- Sample Database: Feel free to use any database you wish, but for this sample we will be using the NorthWind database provided above.
- NorthWind Install Script: Download and install this Northwind script for SQL Azure into your SQL Azure database
Assume that you have some knowledge of SQL Azure and how to create a database. If that is not the case, please take a look here for more details on how to get started.
The only caveat to this is that the tables you want to add change tracking need to have Primary Keys.
The magic of the change tracking is a Template within Visual Studio called “Local Data Cache”. The purpose of this template is really to jump start the creation of an offline application, but the real benefit is how it helps to generate change tracking in SQL Server or SQL Azure.
Getting Started:
To get started:
- Open Visual Studio and choose File | New Project
- Expand Visual C# and choose |Windows |Windows Form Application
It actually doesn’t really matter what type Project you choose as we will just be using the Template and need a blank project to launch them.
- Press “OK”

- In the Solution Explorer, right click on the Project and choose Add | New Item.
![]()
This will bring up the Installed Templates.
- Locate and choose the Template titled: “Local Data Cache” and choose “Add”.
If you happen to get an error, it is likely due to the fact that you did not install “Microsoft Sync Framework 1.0 SDK” with Visual Studio. If this is the case you can find the install for this in the Microsoft Download Center.
At this point a configuration tool will launch and walk you through the steps for enabling change tracking.

At this point, I am assuming you have created a SQL Azure database. If that is not the case, please go ahead and create the database.
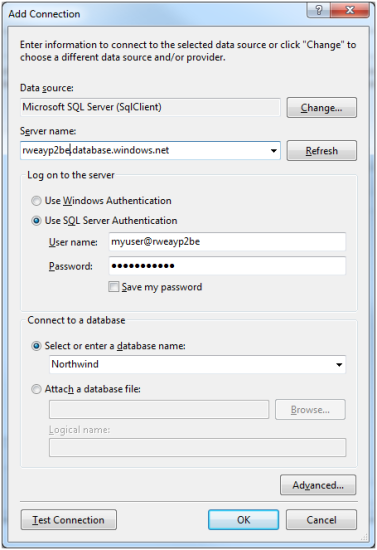
First we need to create a connection to SQL Azure. To do so:
- Press: “New…”
- In the Server Name, enter your SQL Azure server name. This will end with something “database.windows.net”
- Choose: “Use SQL Server Authentication”
- Enter your SQL Azure User Name
- Enter your SQL Azure Password
- Under “Select or enter a database name”, enter the SQL Azure database you want to change track
- Press “OK”

This will bring you back to the original configuration page, but will populate your server connection in the pull down. It will also configure a default Client connection but you can ignore this.
The next step will be to choose the tables you want to add change tracking to. To do this:
- Choose “Add” located in the bottom left of the page
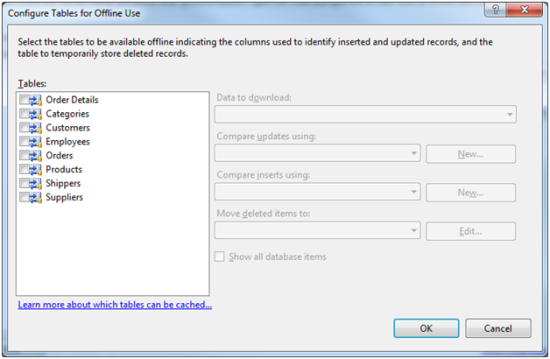
You should see a list of tables from your database (as follows).

For this demo, I am just going to choose two tables for change tracking.
- Select the tables “Orders” and “Customers”
If you highlight one of the selected tables, you will see some new options enabled to the right.
![]()
This is useful because it allows you to choose what you want to track. For example, if you did not have a need to track deletes. You could deselect this option. If you were to choose the “Edit” button you can also see how to change the default name used to create the separate tracking table. For now, we will just leave all the defaults:
- Press “OK”
This brings us back to the original configuration page and now lists the two tables we are going to track. Once again:
- Press “OK”
On the resulting page you will see an option to either apply the changes immediately to your database or create scripts (the default is to do both).
- Press “OK”
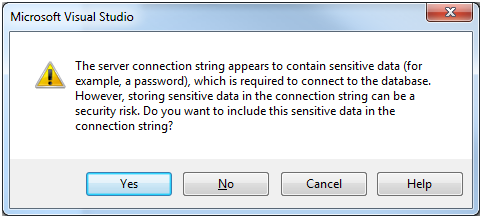
If you get this page, just choose “Yes”.

We will skip the Database Model creation:
- Press “Cancel”
At this point you are done with the configuration. If you view your database in SQL Server Management Studio it should look like this:

Notice the two new “_Tombstone” tables that were created.
If you expand either the Customers or Orders table, you should also notice the addition of “LastEditData” and “CreationDate” which tells when this row was last edited and when it was originally created (Inserted).
Test for Data Changes
Finally let’s do a few queries to see how all of this work.
- Open a “New Query” to this database
- Execute: insert into Customers (CustomerID, CompanyName, ContactName) values ('NEWID', 'Change Test', 'My Name')
- Execute: select * from Customers where CustomerID = 'NEWID'
Notice how the LastEditDate and CreationDate are both set to the current datetime for this inserted row.
- Execute: update customers set Address = '123 New St' where CustomerID = 'ANATR'
- Execute: select * from Customers where CustomerID = 'ANATR'
Notice this time that only the LastEditDate column is updated to reflect that the time this row was last changed.
Finally let’s execute a delete:
- Execute: delete customers where CustomerID = 'PARIS'
- Execute: select * from Customers_Tombstone
Notice this time, we did a select from the tombstone table. Why did we have to do this? Well if the row was deleted from the original table, how would we be able to tell it was deleted? If we move the Primary Key of the row to a separate tracking table and include the time it was deleted we can very efficiently tell what has changed.
Bringing it all together
Hopefully at this point you have it pretty much figured out. Using any of the above queries you can tell when a row was last changed. The only thing you need to do is store the timestamp the client last retrieved the data and use it in your queries.
For example:
- Step 1: Get the current date time of the SQL Server to be stored:
- select GetDate()
- Let’s say this is '2011-04-21 21:36:06.207'
- Step 2: Select all the data from the customers table and store it locally
- select * from Customers
- (at this point you may want to make some changes in your database)
- Step 3: Get the current date time of the SQL Server to be stored:
- select GetDate()
- Step 4: Retrieve the deletes since the last timestamp retrieved in Step 1.
- select * from Customers_Tombstone where DeletionDate >= '2011-04-21 21:36:06.207'
- Step 5: Retrieve the inserts since the last timestamp retrieved in Step 1.
- select * from Customers where CreationDate >= '2011-04-21 21:36:06.207'
- Step 5: Retrieve the updates since the last timestamp retrieved in Step 1.
- select * from Customers where LastEditDate >= '2011-04-21 21:36:06.207'
After that you simply repeat the steps to get the incremental changes. You can hopefully imagine how you could embed these types of queries into a REST, [[OData]] or ADO.NET application.
Final Thoughts...
- The change columns do not currently have indexes. You will most likely want an index to allow you to efficiently select your changes.
- Every once in a while you will want to clean up your tombstone tables. It is pretty simple to create a stored procedure that would do this. Just make sure to only delete rows that you are pretty sure your clients already have. If you would like to scheduled the execution of these 'clean up' stored procedures, you may want to try our service.
- Make sure that when you store the time the user last checked, you use the timestamp from the SQL Azure database as opposed to the client timestamp. It is very likely your client app has a slightly different time which can really affect your changes.
- If you ever need to refresh the data, simple wipe the local database, re-download the data and reset the time for which you retrieved the data.
About the Author
John has been building cloud based services on Windows Azure since its inception. His specialty is in working with databases such as SQL Azure. John is working at Cotega a SQL Performance Monitoring service that provides database notification and alert services for cloud hosted SQL Server and SQL Azure database.