Note
Access to this page requires authorization. You can try signing in or changing directories.
Access to this page requires authorization. You can try changing directories.
Introduction
A common requirement is to limit what a user or group of users can see in Active Directory. One possible solution is to deny “List Contents” on OUs or the root of the domain itself to stop users from displaying possible sensitive information (see Controlling Object Visibility – Deny List Content). Keep in mind that this option is going to be an explicit deny, accounts that need access to or that need the ability to look-up other objects in the domain could be blocked from doing so.
An alternate solution to denying "List Contents" is to enable "List Object Mode". This alternate, list object mode, solution doesn't immediately have the same affect or ramifications as an explicit deny might, but it does require modifications to the schema and permissions need to be removed from the AD DS implementations current OU structure.
The test cases below are derived from the article found above, Controlling Object Visibility – Deny List Content. Rather than create separate test cases for this solution, these cases closely resemble the test cases from the previous article so readers can have a closer comparison and make a more informed choice when picking the solution, or solutions, that best fits they organizational needs. These cases have been modified slightly and precede the original test case from the "Controlling Object visibility – Deny List Content" WIKI article.
The reason these comparisons are made is so the reader can see and understand the verbiage differences between the test cases from each article/solution. The methods for controlling object visibility in Active Directory by using "Deny List Contents" vs. "List Object Mode" can give administrators two separate outcomes when limiting what users can see. Those situations and their differences will be differentiated in this article so that the differences between each solution are clear.
As with any solution, make sure you test the solution's scope to determine what may be affected when you move this from a development implementation to a production implementation.
Current Setup
3x Windows Server 2012 R2 Servers
- 2x Lab.local
- 1x Lab-Forest-2.local
2x Windows 7 SP 1 Workstations
- 1x Lab.local
- 1x Lab-Forest-2.local
2x Active Directory Forest
- Lab.local – Windows 2012 R2 FFL, DFL
- Lab-Forest-2.local – Windows 2012 R2 FFL, DFL
Forum Question
Below is a link to a Directory Services forum post on TechNet, a user asked a question that revolved around the need to limit access to Organizational Units. This second WIKI article aims to help by showing, in detailed step-by-step instruction, an alternative solution to denying list contents and how this can be accomplished by enabling "List Object Mode" in Active Directory. This is an alternative solution that some administrators may find useful.
Alternative Solution
As mentioned in the Introduction to the article, an alternative solution to "List Object Mode" would be deny list content and is the original WIKI article in response to the users forum question, it is detailed at Controlling Object Visibility – Deny List Content
Test Cases
Case 1
Betty A. Boop, who resides in the Lab.Local domain, needs access limited so that she is not able to view sensitive OUs within the domain structure. The sensitive OU is the Users OU which is nested under Accounts > !HighTouch > Lab.Local
Original Test Case 1 from Controlling Object Visibility – Deny List Content:
Betty A. Boop, who resides in the Lab.Local domain, needs to be denied access to view the contents of an OU which holds sensitive accounts within her domain. The sensitive OU is the Users OU which is nested under Accounts > !HighTouch > Lab.Local

Case 2
Domain Administrators from the Lab-Forest-2.Local domain need their access restricted so that they are not able to view the structure of the Lab.Local forest.
Original Test Case 2 from Controlling Object Visibility – Deny List Content:
Domain Administrators from the Lab-Forest-2.Local domain need to be denied access to view all the contents of Lab.Local.

Warning, Consequences, Etc.
 WARNING
When you make changes to the schema and ACLs in Active Directory, you run the risk of doing serious damage to your AD DS implementation and applications that depend upon AD DS to access the information and objects contained within. I warn you from experience and it is in no way meant to stop you from undertaking the changes outlined here. Any change to Active Directory, done correctly, can provide you and your organization with added benefits. Always, always, always make these changes in a development environment where you can test as many aspects as you can before making them in a production AD implementation.
 Note: To register the Schema snap-in and to make changes to the Schema will require elevated rights. Domain Admin rights will be needed to register the schema dll and Schema Admin rights will be needed to modify the schema. Check the account being used to ensure it is a member of the aforementioned groups so that the account will have the appropriate rights to complete the steps outlined below.
Authenticated Users Group Nesting
By default, the Authenticated Users group is a member of the Pre-Windows 2000 Compatible Access group, because of this it will need to be removed. The Pre-Windows 2000 Compatible Access group is meant for, and left around for, NT 4 compatibility and the days of Active Directory in Windows 2000 and 2003 when more NT systems were still in use. You remove this group just like you would any other user or nested group.
- Open Active Directory Users and Computers
- Select the Builtin container
- Select Pre-Windows 2000 Compatible Access
- Right-click the group and select Properties
- Select the Members tab
As you can see from the image below, Authenticated Users is nested in Pre-Windows 2000 Compatible Access.

- Select the Authenticated Users group
- Select Remove
- On the Active Directory Domain Services dialog box click Yes to confirm that the group should be removed
See the image below.

- Click Apply
- Last, click OK

That successfully completes this step in removing the Authenticated Users group from the Pre-Windows 2000 Compatible Access group.
Schema Modification - DS-Heuristics
Stop: Making modifications in or to the schema can cause serious or fatal problems to your AD DS implementation. Make sure you have a current backup of your AD DS environment, as well as documented and tested restore plans/procedures. As always, before making any change to a production environment, make sure you've fully tested and understand the actions you are about to take. Test these actions in a controlled development environment before making them in production.
The DS-Heuristics attribute in AD DS can be used to make global changes to the behavior of Active Directory and Active Directory controllers throughout the entire Active Directory forest. Making this change is a forest wide change.
Enable List Object Mode
The first step to putting Active Directory into "List Object Mode", is to modify the dSHeuristics attribute and set the third character to 1. This is done through ADSI Edit by connecting to the Configuration context.
Modifying dSHeuristics - ASDI Edit
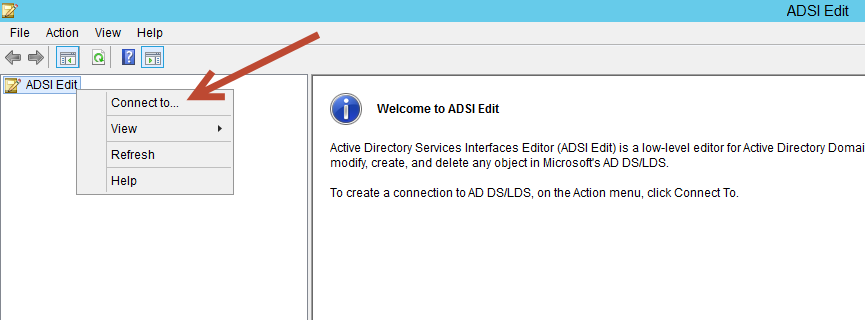
Open ADSI Edit from either Administrative Tools, a new MMC, or by typing adsiedit.msc and pressing ENTER at a command or PowerShell prompt.
Once open, right-click ADSI Edit in the left column and select "Connect to..." as shown below.
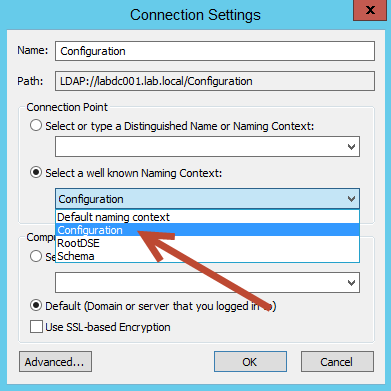
After selecting "Connect to...", the Connection Settings dialog box will appear. In this dialog box, select Configuration from "Select a well known Naming Context" and then click OK. See the image below as reference.
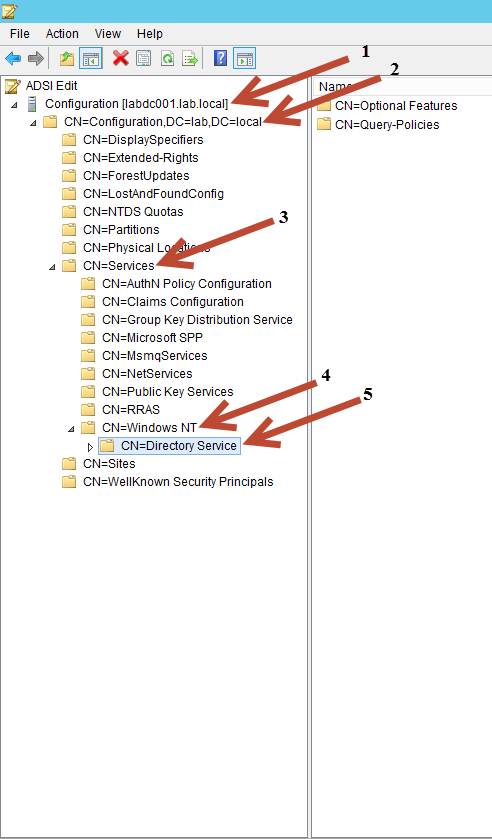
After you've connected to the Configuration context:
- Expand Configuration
- Expand CN=Configuration,DC=yourdomainname,DC=com
- Expand CN=Services
- Expand CN=Windows NT
- Select then right-click CN=Directory Services and click Properties
See the image below for details on the steps above.
After completing the steps above, the CN=Directory Services Properties dialog box will appear as can be seen in the image below.

After the CN=Directory Services Properties dialog box appears:
- Find and double-click the dSHeuristics attribute
- The dSHeuristics attribute editor will open, click Clear
- Type 001
- Click OK
![]()
To finish enabling "List Object Mode"
- Click Apply
- Click OK

After this short list bit of work has been completed you can close ADSI Edit, you've know enabled "List Object Mode" and are ready to proceed.
Enable List Object Mode - Verify
To verify that List Object Mode has been enabled:
- Open Active Directory Users and Computers
- Click View
- Click Advanced Features (if it is not already selected)
- Select the Users container
- Select Domain Admins
- Right-click Domain Admins
- Select Properties
- Select the Security tab
- Click Advanced
- Select Authenticated Users
- Click Edit
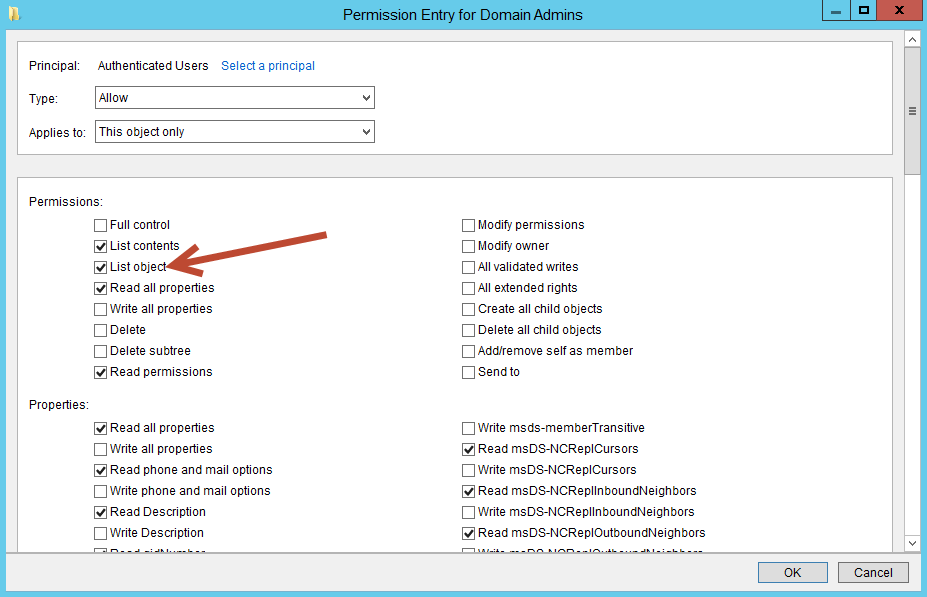
This will open the "Permission Entry for Domain Admins" dialog box and the Principal should be Authenticated Users (upper left corner), under Permissions you should see the newly listed permission "List object".
See the image below for details.
Modifying the Parent OU
To keep in line with Test Case 1 and hiding the Users OU, which is nested under Accounts -> !HighTouch -> Lab.local, we need to first remove the "List content" permission for Authenticated Users on the Accounts OU.
Removing List Content
Open Active Directory Users and Computers and find, then select and right-click the parent OU you wish to modify (in this case, the Accounts OU).
- Click Properties
- In the Properties dialog box of the OU click the Security tab
- Click Advanced

When the Advanced Security Settings dialog box opens:
- Find and select Authenticated Users
- Click Edit

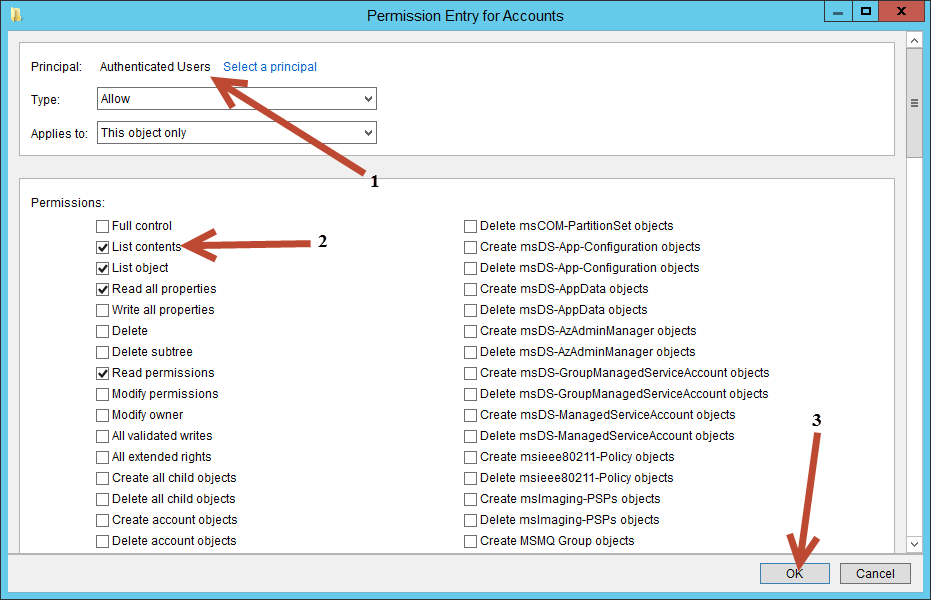
Once this is completed the Permission Entry of Accounts dialog will appear.
- Verify that the principle is Authenticated Users
- Uncheck List contents
- Click OK
When this step is completed, the Permission Entry for Accounts (or the OU select in your environment) dialog will close and the system will bring you to the Advanced Security Settings for Accounts dialog.
In this dialog,
- Verify that Authenticated Users now has Special in the Access column
- Click Apply
- Last, click OK

After verifying, clicking Apply and then clicking OK, the dialog box will close and you will be left with the Properties dialog box for the OU you are modifying. Click OK to close this last dialog box and you will have successfully completed this step.
Verifying the Presence of the Users OU
On a Windows 7 machine I have RSAT installed and have opened Active Directory Users and Computers to verify that I can still see the Users OU and the objects it contains.
Modifying the Child OU
After completing the previous steps and having removed the "List contents" permission from Authenticated Users on the parent OU (in this case, the Accounts OU), we can now move ahead and remove the "List object" permission from Authenticated Users group on the child OU. This is the OU Betty Boop and other users within the organization should not have access to see.
Removing List Object
Open Active Directory Users and Computers and find, then select and right-click the child OU you wish to modify (in this case, the Users OU).
- Click Properties
- In the Properties dialog box of the OU, click the Security tab
- Click Advanced

When the Advanced Security Settings dialog box appears:
- Find and select the Authenticated Users group
- Then click Edit
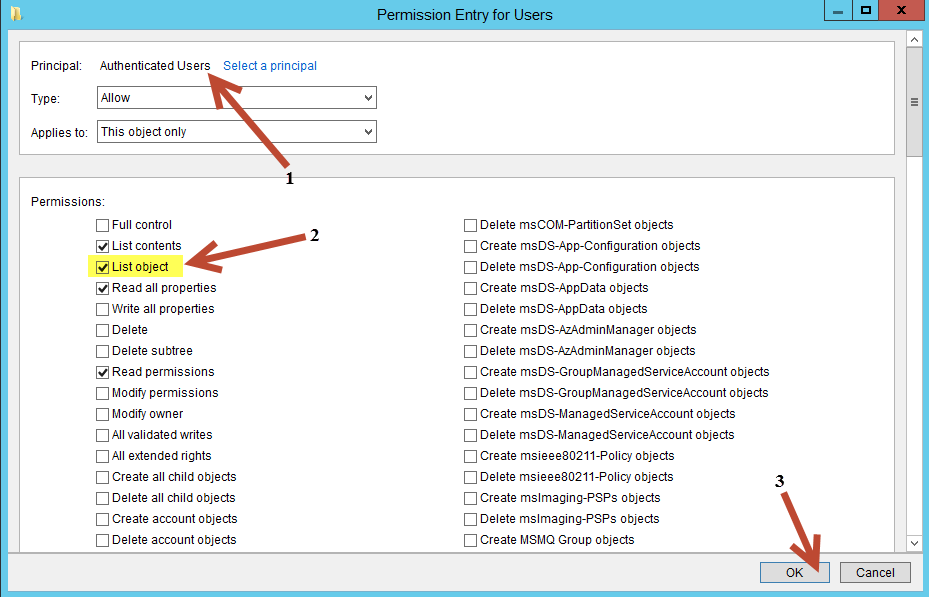
Once this is completed the Permission Entry of Accounts dialog will appear.
- Verify that the principle is Authenticated Users
- Uncheck List object (not List Contents as was done for the parent OU)
- Click OK
When this step is completed, the Permission Entry of Accounts dialog will close and the system will bring you to the Advanced Security Settings for Accounts dialog.
In this dialog,
- Verify that Authenticated Users now has Special in the Access column
- Click Apply
- Last, click OK
After verifying, clicking Apply and then clicking OK, the dialog box will close and you will be left with the Properties dialog box for the OU. Click OK to close this last dialog box and you will have successfully completed this step.
When this is completed, these steps will have hidden the child OU.
Verifying the Disappearance of the Users OU
Going back to the Windows 7 machine with RSAT installed, in Active Directory Users and Computers select the parent OU (in this case, the Accounts OU) and PRESS the F5 key to refresh the contents of the OU. After refreshing the contents of the parent OU verify that the child OU, the Users OU, is NOT visible.

If everything worked as planned, the child OU should NOT be visible to regular Authenticated Users as the image above shows.
Differences: List Object Mode vs. Denying List Content
So you're probably thinking this is awesome, now regular users cannot see the OU structure of the organization. This is a true statement... However, under the current settings, in this situation as it is currently, the Authenticated Users group has had the ability to view the child OU in Active Directory Users and Computers removed. This does not stop Authenticated Users from still finding those sensitive users in your environment.
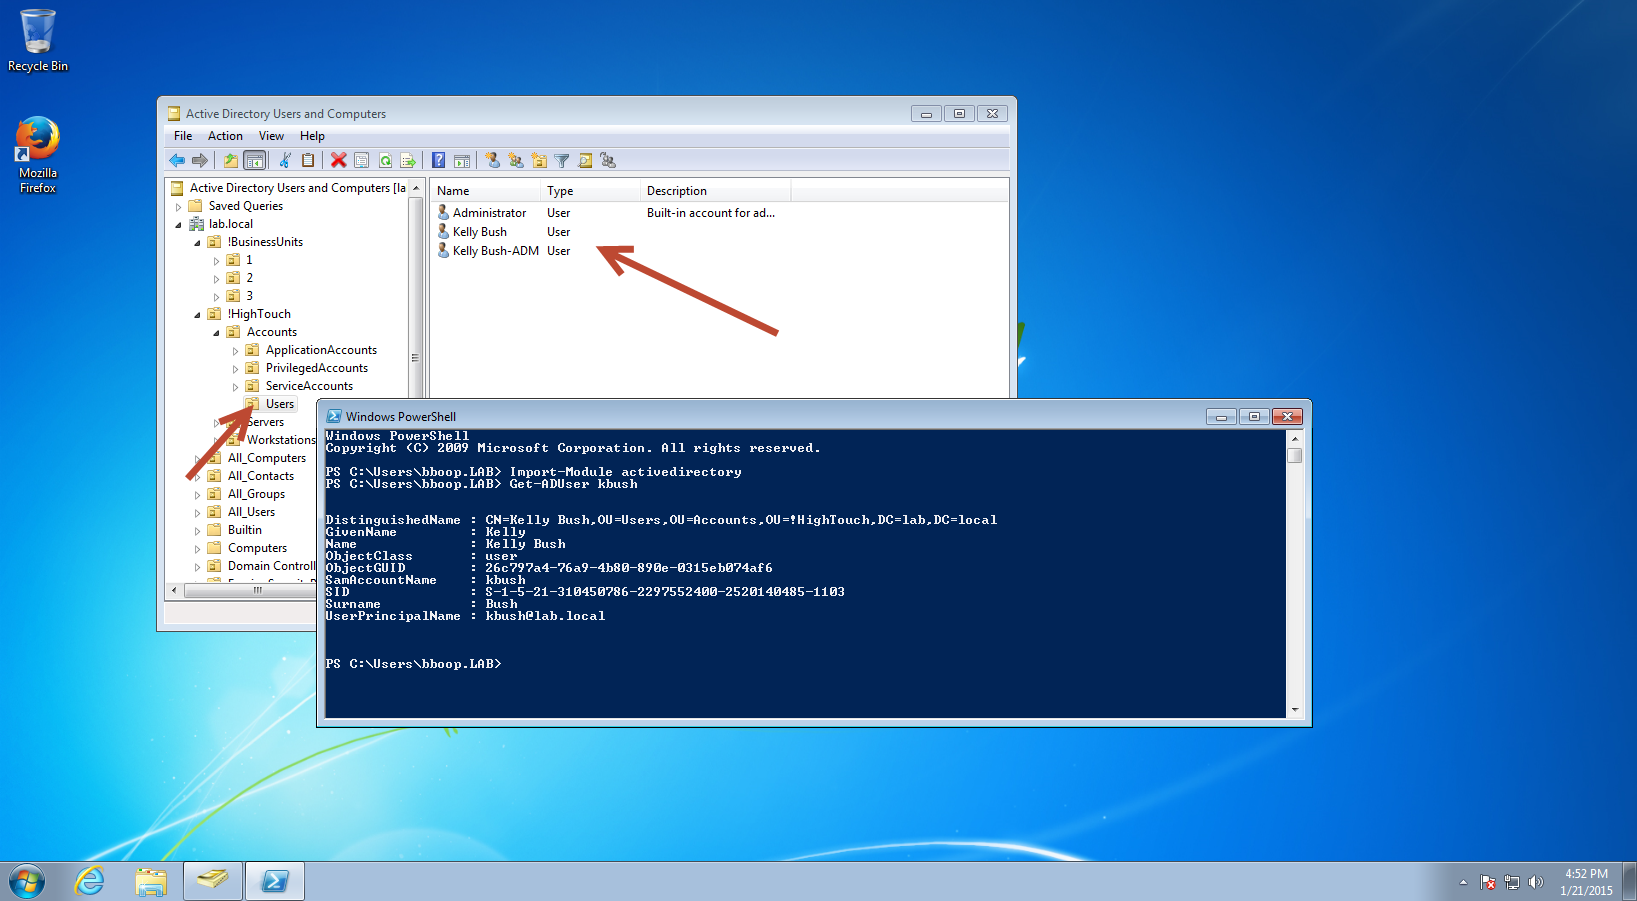
In the image below, notice that in Active Directory Users and Computers the Users OU is not visible. However, if you look at Find Users, Contacts, and Groups as well as PowerShell, both places allow Betty Boop (Authenticated Users) to search and find the user accounts that were in the hidden by hiding the child OU.

To take this a step further, you have to remove the List Content permissions from the child OU as well.
Removing List Content & List Object
If you were wondering why I didn't include this as part of the steps in previous sections, here is the reason. If you remove "List Content" from the parent OU and then remove both "List object" and "List contents" from the child OU, you will not be able to look up the users with Find or PowerShell. By removing both "List object" and "List contents", you have essentially created the same thing that deny "List contents" had done.
In the image below, Arrow 1 points to the PowerShell Get-ADUser command before "List contents" was removed from the child OU and Arrow 2 points to the same command after "List contents" was removed from the child OU.
To recap, if both "List object" and "List contents" are removed from a child OU whose parent OU has "List contents" removed, you run the risk of denying applications, that rely on user accounts in an AD DS environment, the ability to look-up information in the domain.

Test Case 2 & List Object Mode
For Test Case 2 we run into a problem based on the work we did above. With the current setup the two domain trust each other by a 2-way trust and have Forest-wide authentication. Because of this Forest-wide authentication, you would have to modify the root of the domain and take away "List contents" for the Authenticated Users group. After that, you would have to take away "List Object" on all first level OUs and containers. This works but what if you have an OU structure where the parent OU has "List content" removed? This would cause all Authenticated Users to be denied access to the objects in that OU, it's the same outcome as removing list content and list object from the section above.
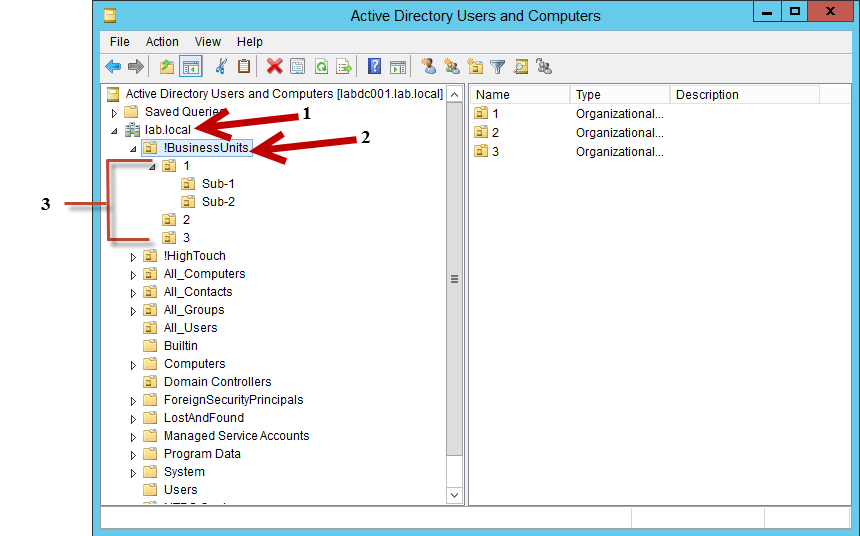
This list and image below details the scenario:
- List contents is removed from the root of the domain
- List contents and list object is removed from a top level OU, in this case !BusinessUnits
- List object is removed from child OUs 1, 2, and 3 because a new OU 4 is to be created and we don't want the users in OU 4 to see OUs 1, 2, and 3
The net outcome - All users will be denied access to the objects below the parent OU !BusinessUnits
Other Resources
- WIKI: Active Directory: Ultimate Reading Collection: http://social.technet.microsoft.com/wiki/contents/articles/20964.active-directory-ultimate-reading-collection.aspx
- MSDN: DS-Heuristics attribute: http://msdn.microsoft.com/en-us/library/ms675656%28v=vs.85%29.aspx#win_8_server
- MSDN: Controlling Object Visibility: http://msdn.microsoft.com/en-us/library/ms675746%28v=vs.85%29.aspx
- MSDN: 6.1.1.2.4.1.2 dSHeuristics: http://msdn.microsoft.com/en-us/library/cc223560.aspx
- Forums: Pre-Windows 2000 Compatible Access Group: https://social.technet.microsoft.com/Forums/windowsserver/en-US/e8dfacba-985f-4042-abeb-f341bf37522f/prewindows-2000-compatible-access-group
- Use Manual Steps to Set Active Directory to List Object Mode: https://technet.microsoft.com/en-us/library/cc546864.aspx
Conclusion
Active Directory is very flexible out of the box and you can delegate and manage permissions to fit the needs of your organization. However, to many changes, to quickly, untested, and out of proper change control can cause you hours, days, or an eternity of headaches. Always make changes in a controlled setting and never make changes directly to a production AD DS implementation. Remember, this article walks you through setting up "List Object Mode", this may not be appropriate in all situations as was outlined in Test Case 2 & List Object Mode. For your organization "List Object Mode" maybe useful or the use of a deny rule may be better suited, for your organization it may be a combination of the two. Which ever option works best for you is what is best for your organization.
Bonus: Schema Modification - Authenticated Users Group
Stop: Making modifications in or to the schema can cause serious or fatal problems to your AD DS implementation. Make sure you have a current backup of your AD DS environment, as well as documented and tested restore plans/procedures. As always, before making any change to a production environment, make sure you've fully tested and understand the actions you are about to take. Test these actions in a controlled development environment before making them in production.
Note: This schema modification is NOT a mandatory step or requirement. This step gives you the instructions needed to modify the default permission set of the Organization Unit class. By modifying the default permission set of the Organizational Unit class, you can reduce the steps required when creating new Organizational Units in the future.
By using the steps below to modify the Organizational Unit class, you modify the default permission set for OUs from the current default set to a new default set that does not include "List object" on Authenticated Users. The following steps will show how to install the schema snap-in and modify the OU class step-by-step. Once modified, any newly created OU will have this modified default permission set associated to it. To take full advantage of this step, all newly created OUs would need to be under a parent OU that has the "List content" permission removed for Authenticated users. This option may be best suited for a hosting type environment but could apply to other organizations as well.
See the below for a visual representation and further explanation.

In the image above 1's represent parent OUs and 2's represent child OUs. For the steps in this section to work, for newly created child OUs to be automatically hidden from the users view, the parent OU will need to be modified and the Authenticated Users group will need to have "List Content" removed from the permissions list. In the scenario above, the child OUs, marked as 2, would still be visible to the user community. If under !BusinessUnits a 4th business unit OU was created named 4, it would be automatically hidden from all authenticated users, assuming the parent OU security was modified and the steps below are followed. To modify existing child OUs, the "list object" permission would need to be removed and this step repeated for each OU that needs to be hidden from users.
Install the Active Directory Schema snap-in
The complete Microsoft article for the steps below can be found at http://technet.microsoft.com/en-us/library/cc732110.aspx
Installation Requirements
Membership in Domain Admins is the least required domain membership to complete this task.
Snap-in Installation Steps
Open an elevated command prompt or elevated PowerShell command prompt
Type the following command listed below and then press ENTER:
regsvr32 schmmgmt.dll

Schema snap-in installation error

If you receive the error message above, it is a good chance you either did not open the prompt with administrative privileges or the account being used does not have the appropriate permissions to register the dll. Check the permissions of the account you are using to complete the above step, reopen the prompt of your choice by right-clicking the prompt and selecting "Run as administrator", and run the command again.
Schema snap-in installation success

When the command completes successfully, you'll receive a message stating the schmmgmt.dll successfully registered, see the image above.
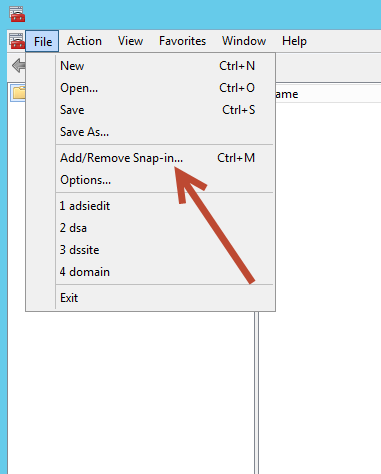
Opening the Schema Snap-in
After you have successfully registered the schema snap-in dll, open a Microsoft Management Console (MMC) and click File, then click Add/Remove Snap-in.
Once the Add or Remove Snap-ins dialog box appears,
- Select Active Directory Schema from Available snap-ins on the left
- Click the Add button between the Available and Selected snap-ins selectors
- Verify the Active Directory Schema snap-in is present in the Selected snap-ins selector column
- Then finish by clicking OK in the bottom right of the dialog window.
See the image below for visual clarification on the previous 4 steps.

Now that the Schema snap-in has been loaded into the MMC you can find and modify the organizationalUnit class.
Finding the Organizational Unit class - organizationalUnit
After the Schema snap-in is open, use the following steps to find the Organizational Unit class.
- Expand Active Directory Schema
- Click on Classes
- Use the scroll bar on the right to locate organizationalUnit by scrolling down the list
- Right-click on organizationalUnit and then click properties
- Next, when the organizationalUnit properties box appears, select Default Security
See the image below for visual clarification on the previous 5 steps.

Modifying the Organizational Unit class
When the organizationalUnit properties have been opened and the Default Security tab selected, the default security rights of Organizational Units will be present.
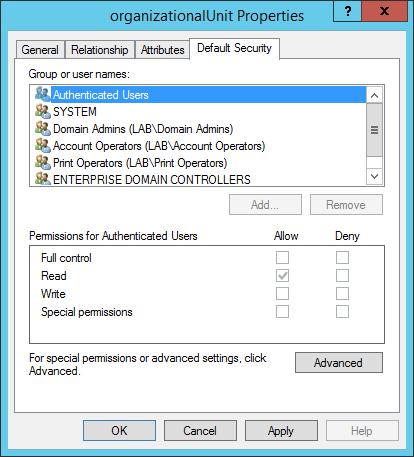
Notice in the picture above that the Authenticated users group, by default, will have Read permissions on every OU that is created.
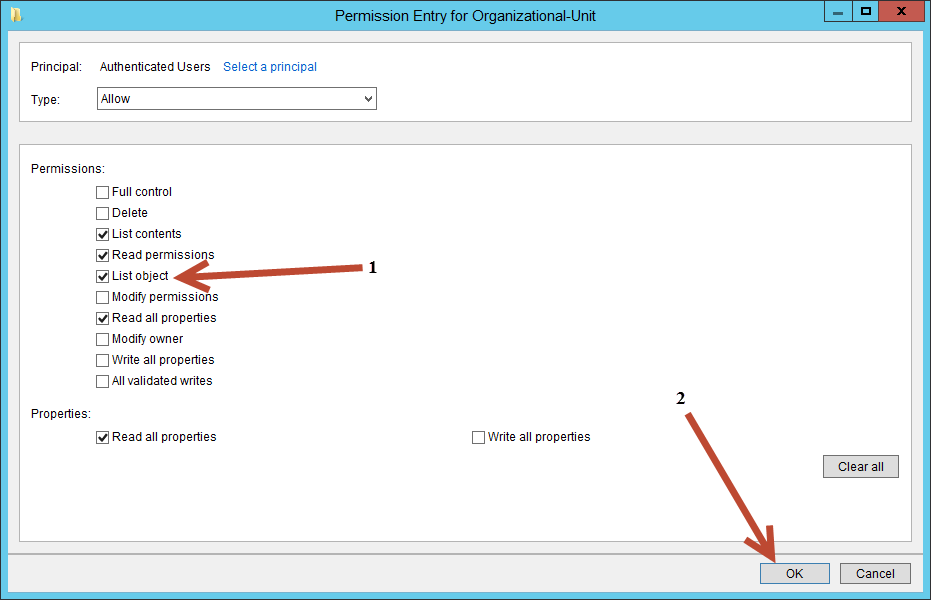
If you were to click on Advanced, select Authenticated Users, and then selected Edit you would see that the permissions Authenticated Users have are:
Permissions:
- List contents
- Read permissions
- List object
- Read all properties
Properties:
- Read all Properties

Modifying Authenticated Users Group Permissions
If you want to create OUs in the future and do not want the task of remembering to modify the Authenticated Users group permissions from each OU then continue on.
To modify the Authenticated Users group simply:
- Uncheck List object
- Click OK
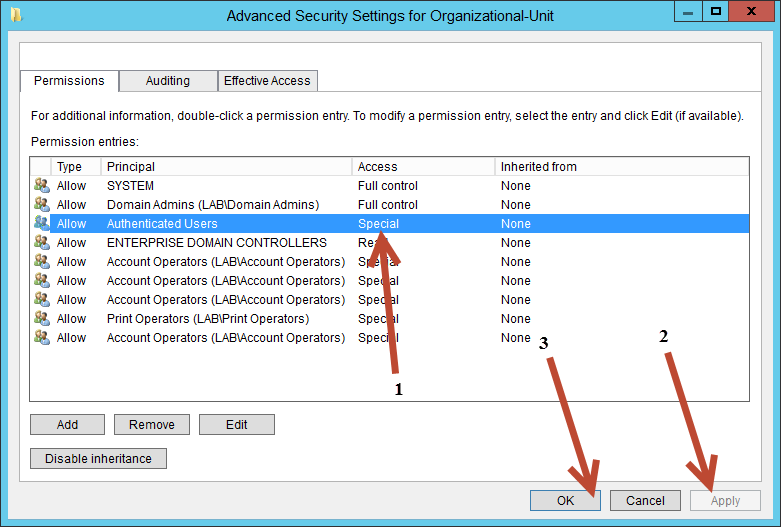
When the Permission Entry for Organizational-Unit closes, after clicking OK:
- Verify that Authenticated Users has Special permissions in the Access column on the Advanced Security Settings for Organizational-Unit dialog box
- Click Apply
- Click OK
On the organizationalUnit Properties dialog box:
- Click Apply
- Click OK

Finally close the Schema console.
Note: In the lab setup I was able to reboot the DC, you may not be able to do this immediately after you make your change.