VMM 2012: How to Improve the Virtual Machine Creation Using a VM Template
Introduction
Automation! This is a word that defines one of the best qualities of System Center Virtual Machine Manager 2012 (VMM Server).
In some places it is normal some policies to be used to provide a server in the production environment such as prerequisites, installation, configuration, and others that are necessary, but it takes too much time to be fulfilled. For a Windows basic installation, including updates, usually we need four hours, but with those policies sometimes take days. Compatibility and hardware requirements, applications, configurations and updates are some examples of the bureaucracy that may exist during a server installation. One of the features of the VMM Server to resolve this dilemma is the creation of virtual machines templates, enabling the automated installation and configuration of servers. So we can dramatically reduce the time to release a server and automate all these processes in a simple and uncomplicated method.
In the example below you will see how to install and configure an SQL Server using one of these models, allowing its installation with a few clicks, in addition to automatically installing and configuring applications and databases.
Configuration
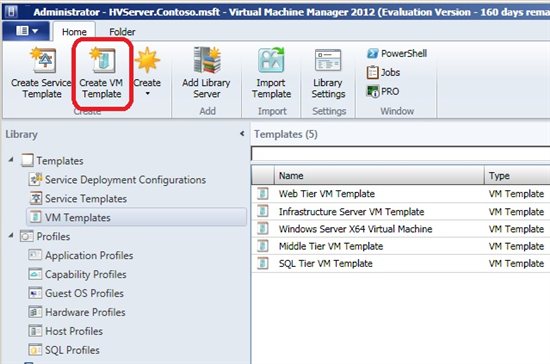
To create a virtual machine (VM) template, open the VMM Server Administration console, click in Library and then Create VM Template. Figure 1 shows this option in detail, and some templates that were previously created.

Figure 1 - VM Template Creation
In the first screen you should select the source for which the template will be created. You can use an existing template, a virtual disk (VHD) with pre-installed operating system or even a virtual machine that is being used in any host. In demonstration of Figure 2 was selected a VHD with the default installation of Windows 2008 R2 and SQL source files copied on it. Select the basis of what is best for your environment and click Next.

Figure 2 - Template Source
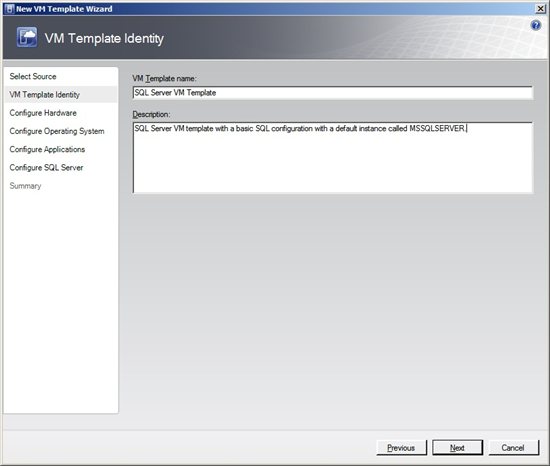
In the identification screen, select the template name and description and click Next.

Figure 3 - Template Identity
In the Configure Hardware screen you must specify the hardware configuration such as disk, network, memory, processor, etc. This configuration is used each time the VM is created using the template. With the new Private Clouds option in VMM2012, we must select in Cloud Compatibility Profile the profile that can be used. If you don’t specify this option will be impossible to use it to install a server that will be hosted in private cloud.

Figure 4 - Hardware Configuration
To assist in the automation when creating a template or even a virtual machine, use the option to save the configuration as a Hardware Profile. Figure 4 shows some profiles that were created earlier.

Figure 5 - Hardware Profile
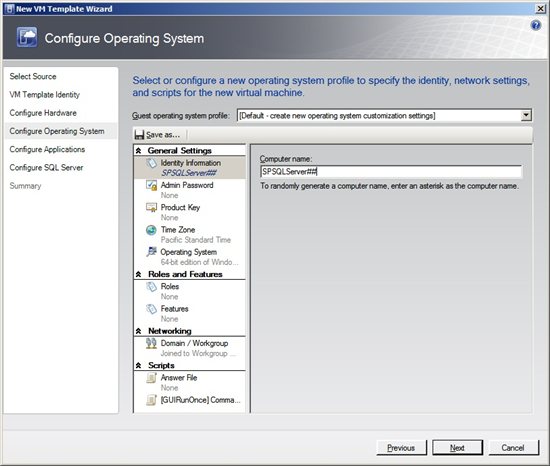
In Configure Operating System you can offer some information for the Windows automated installation, such as computer name, product key, local administrator password, operating system, and others. Notice in Figure 6 that the computer name ends with the symbols "##". With that option the nomenclature will be based with a numeric sequence where the template is used. To create a random name use the "*" symbol.
On this screen you also have the option to save these settings as Guest Operating System Profile. These profiles will help in the VMM daily administration. The list below shows the profiles can be created in VMM 2012:
*• Application Profiles
• Capability Profiles
• Guest OS Profiles
• Hardware Profiles
• Host Profiles
• SQL Profiles
*
Choose the options according to your template and click Next.

Figure 6 - Operating System Settings
In VMM2012 there is a new feature when the template used has Windows 2008 or Windows 2008 R2 as Operating System (OS). During the OS installation the template will automatically install the server Roles and Features. In figure 7 I selected some SQL Server prerequisites as an example.

Figure 7 - Roles and Features
After the OS installation you can install and configure some applications through the Configure Applications screen. By clicking on Add, 5 options are displayed:
*• SQL data tier Application
• Virtual Application
• Web Application
• Application Script
• Script
*
With this new feature, after installing the DNS for example, you can specify a script that uses the dnscmd command to create and configure a zone on the server, create and configure a web application using the Web Application, etc.
For scripts there are four options, offering the possibility to run them before or after the installation or removal of something:
*• Pre-Install
• Post-Install
• Pre-Uninstall
• Post-Uninstall*
Because the template created in this example will be used for a SQL Server, 4 SQL data tier application were added, thus offering several service settings.

Figure 8 – Adding an Application
On the last screen in Configure SQL Server you can also specify the SQL installation information and configuration. Note in figure 9 that the installation options such as name, name and instance ID and other details have been previously configured.

Figure 9 - Installing SQL Server
In figure 10 are displayed other SQL Server settings such as installation path, administrator account, Security mode, etc. Choose the desired options and click Next.

Figure 10 - Configuring SQL Server
Check out the information in the Summary and click Create to finish the process.

Figure 11 - Summary
To use the same options provided for automating the templates creation through PowerShell, click View Script.
Below is a sample script to create the same template:
*# ------------------------------------------------------------------------------
# New VM Template Wizard Script
# ------------------------------------------------------------------------------
# For additional help on cmdlet usage, type get-help <cmdlet name>
# ------------------------------------------------------------------------------*
*New-VirtualDVDDrive -VMMServer HVServer.Contoso.msft -JobGroup 284f7982-b2f1-4514-9cfb-72afeb032315 -Bus 1 -LUN 0
New-SCVirtualNetworkAdapter -VMMServer HVServer.Contoso.msft -JobGroup 284f7982-b2f1-4514-9cfb-72afeb032315 -PhysicalAddressType Dynamic
Set-VirtualCOMPort -NoAttach -VMMServer HVServer.Contoso.msft -GuestPort 1 -JobGroup 284f7982-b2f1-4514-9cfb-72afeb032315
Set-VirtualCOMPort -NoAttach -VMMServer HVServer.Contoso.msft -GuestPort 2 -JobGroup 284f7982-b2f1-4514-9cfb-72afeb032315
Set-VirtualFloppyDrive -RunAsynchronously -VMMServer HVServer.Contoso.msft -NoMedia -JobGroup 284f7982-b2f1-4514-9cfb-72afeb032315
$CPUType = Get-CPUType -VMMServer HVServer.Contoso.msft | where {$_.Name -eq "3.60 GHz Xeon (2 MB L2 cache)"}
New-HardwareProfile -VMMServer HVServer.Contoso.msft -Owner "CONTOSO\Administrator" -CPUType $CPUType -Name "Profileb702d92a-9502-45c3-a1c3-a9b13719ed91" -Description "Profile used to create a VM/Template" -CPUCount 1 -MemoryMB 512 -DynamicMemoryEnabled $true -DynamicMemoryMaximumMB 4056 -DynamicMemoryBufferPercentage 20 -MemoryWeight 5000 -VirtualVideoAdapterEnabled $false -ExpectedCPUUtilization 20 -DiskIO 0 -NetworkUtilization 0 -RelativeWeight 100 -HighlyAvailable $false -NumLock $false -BootOrder "CD", "IdeHardDrive", "PxeBoot", "Floppy" -LimitCPUFunctionality $false -LimitCPUForMigration $false -JobGroup 284f7982-b2f1-4514-9cfb-72afeb032315*
*$profile = Get-SCApplicationProfile -ID "01097427-3f6e-4c6a-97ff-04df3069a6c5"
$sourceProfile = Get-SCApplicationProfile -ID "01097427-3f6e-4c6a-97ff-04df3069a6c5"
$profile = New-SCApplicationProfile -Name "Application Profile ac705e68-5dba-473d-8bc6-5e0b247eead5" -ApplicationProfile $sourceProfile
$profile
$sourceProfile = Get-SCSQLProfile -ID "ed53a278-8c23-4686-aa29-2a2533b32fa3"
$profile = New-SCSQLProfile -Name "SQL Profile b010c8ee-6beb-4d45-86d0-9c7b8ce25401" -SQLProfile $sourceProfile
$profile
$deployment = Get-SCSQLDeployment -SQLProfile $profile -Name "SQL Server"
$saRunAsProfile = Get-SCRunAsProfile -Name "SQLAdminRAP"
$reportingRunAsProfile = Get-SCRunAsProfile -Name "NTSystemRAP"
$agentRunAsProfile = Get-SCRunAsProfile -Name "NTSystemRAP"
$serviceRunAsProfile = Get-SCRunAsProfile -Name "NTSystemRAP"*
Set-SCSQLDeployment -SQLDeployment $deployment -Name "SQL Server" -MediaSource "C:\SQLEVAL" -InstanceID "DEFAULTSQL" -InstanceName "MSSQLSERVER" -DeploymentTimeoutSeconds 3600 -SQLAuthenticationType "SQLServerAuthentication" -EnableNamedPipes $true -EnableTCP $true -SQLSysAdminMemberList @("CONTOSO\Administrator") -ProductKey $null
$VirtualHardDisk = Get-SCVirtualHardDisk -VMMServer HVServer.Contoso.msft | where {$_.Location -eq "\HVServer.Contoso.msft\MSSCVMMLibrary\PetShop Sample Resources\VHD\Windows Server 2008 R2 Enterprise Evaluation.VHD"} | where {$_.HostName -eq "HVServer.Contoso.msft"}
New-VirtualDiskDrive -VMMServer HVServer.Contoso.msft -IDE -Bus 0 -LUN 0 -JobGroup 284f7982-b2f1-4514-9cfb-72afeb032315 -VirtualHardDisk $VirtualHardDisk -VolumeType BootAndSystem
$UserRole = Get-SCUserRole -VMMServer HVServer.Contoso.msft | where {$_.Name -eq "Administrator"}
$HardwareProfile = Get-SCHardwareProfile -VMMServer HVServer.Contoso.msft | where {$_.Name -eq "Profileb702d92a-9502-45c3-a1c3-a9b13719ed91"}
$OperatingSystem = Get-SCOperatingSystem -ID a4959488-a31c-461f-8e9a-5187ef2dfb6b | where {$_.Name -eq "64-bit edition of Windows Server 2008 R2 Enterprise"}
$ApplicationProfile = Get-SCApplicationProfile -VMMServer HVServer.Contoso.msft | where {$_.Name -eq "Application Profile ac705e68-5dba-473d-8bc6-5e0b247eead5"}
$SQLProfile = Get-SCSQLProfile -VMMServer HVServer.Contoso.msft | where {$_.Name -eq "Temporary SQL Profile b010c8ee-6beb-4d45-86d0-9c7b8ce25401"}
New-SCTemplate -Name "SQL Server VM Template" -RunAsynchronously -UserRole $UserRole -Description "SQL Server VM template with a basic SQL configuration with a default instance called MSSQLSERVER." -Owner "CONTOSO\Administrator" -HardwareProfile $HardwareProfile -JobGroup 284f7982-b2f1-4514-9cfb-72afeb032315 -ComputerName "SPSQLServer##" -TimeZone 4 -JoinWorkgroup "WORKGROUP" -AnswerFile $null -OperatingSystem $OperatingSystem -ApplicationProfile $ApplicationProfile -SQLProfile $SQLProfile
Okay, now we can create virtual machines based on the template. Simply click on VMs and Services and then click Create Virtual Machine, as Figure 12.

Figure 12 – Create Virtual Machine Option
On the Wizard, click Browse and a list of templates appears (Figure 13). Select the template that was created, check the options and click Create.
The Windows, SQL and applications installation will be finished without any intervention.

*Figure 13 - Option to select the template when creating the virtual machine
*
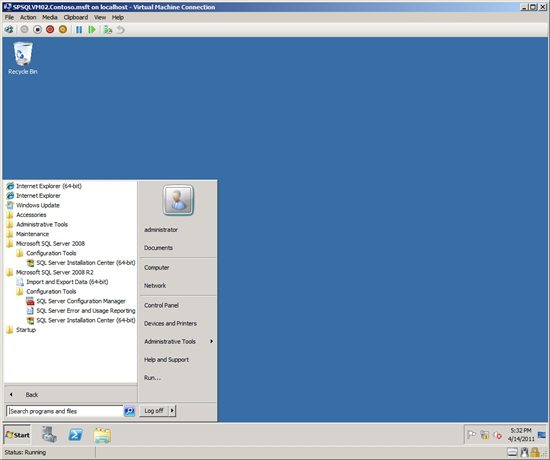
In the next figure is showed the virtual machine running with SQL installed and configured:

Figure 14 - Virtual machine created from the template
**Leandro Carvalho
**MCSA+S+M | MCSE+S | MCTS | MCITP | MCBMSS | MCT | MVP Virtual Machine
MSVirtualization | Wordpress | Winsec.org | LinhadeCodigo | MVP Profile
Twitter: LeandroEduardo | LinkedIn: Leandroesc