Note
Access to this page requires authorization. You can try signing in or changing directories.
Access to this page requires authorization. You can try changing directories.
These instructions will illustrate how to install Windows 10 Technical Preview (or any later version of Windows) to a VHDX as so to have a dual-boot configuration without having to adjust or modify any partitions. These instructions assume the host system is natively installed to a physical disk--can be a virtual machine also--the system only has a single HDD installed, and that Windows 7 Enterprise or Ultimate is installed and running. If your system's configurations differs, then it will be incumbent on the reader to adjust the procedures (mostly the ones dealing with DISKPART) accordingly.
Take appropriate precautions to backup data
Ensure your hard disk has adequate space. Allow at least 20 GB. These instructions will assume 60 GB free.
Restart system and boot with Windows 10 Technical Preview disk, USB drive, or ISO (if in a VM)
Continue on until you see this screen. Select Custom:

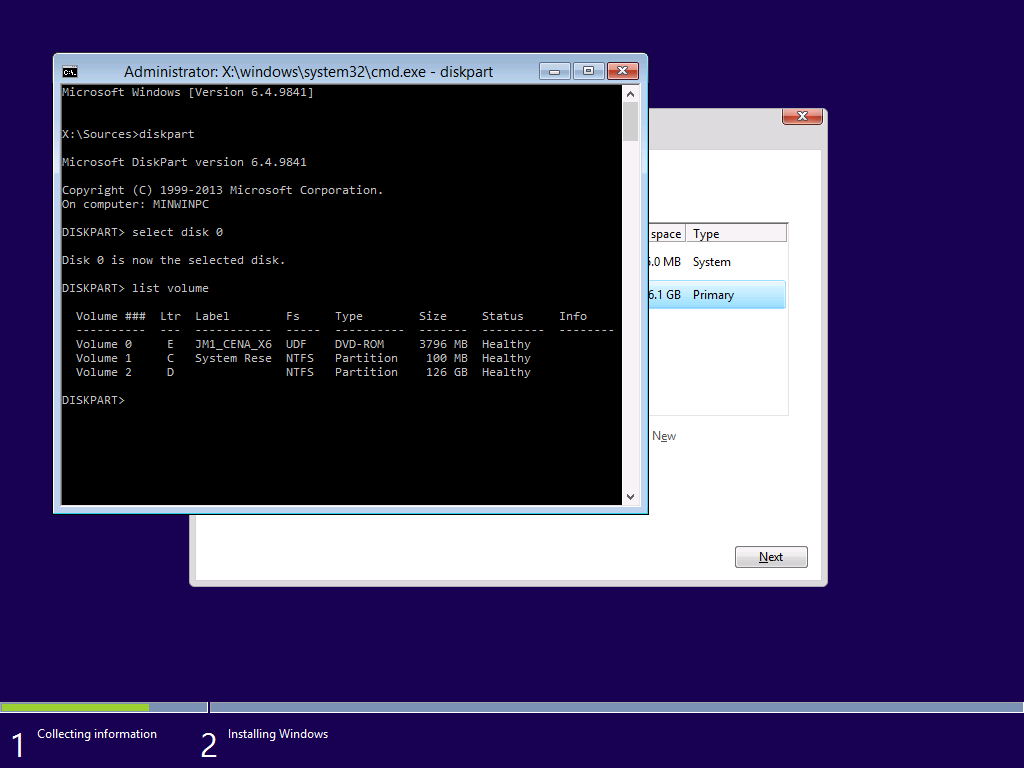
Hit <Shift>+<F10> to bring up command prompt. Type DISKPART. Based on the above assumptions assuming a single disk, type SELECT DISK 0 followed by LIST VOLUME. Take note as to where the data resides. In this case, It's volume "D."
Create a VHDX using the syntax:** CREATE VDISK FILE=D:\WIN10TPENT.VHDX MAXIMUM=50000 TYPE=EXPANDABLE**. Of course feel free to change the name, size, and type. For additional details and options, type HELP CREATE VDISK. Once disk is created, type ATTACH VDISK.

Click back to the GUI and select Refresh. The new VHDX should now appear. Select the disk. Ignore warning about Windows can't be installed--it can.

When the installation of Windows 10 Technical Preview is finished, you will have the choice of booting to either system.

Now, from this point, you can freely boot to either OS. Although I typically use VMs for most testing, there are times in which an OS must be installed native in order to test performance, drivers, hardware, etc. If you want to ensure your hardware is fully compatible with the current, early iteration (keep in mind that Windows 10 will change significantly between now and the RTM release), dual-booting using a VHDX is the way to go.
By default, Windows will make the later version of Windows the default. If you want to change the default back to Windows 7 while still leaving the option to boot into Windows 10 Technical Preview, open MSCONFIG.EXE (yes, this is still here) and select your default OS of choice. The boot screen will change depending on which you choose--the image above is shown when Windows 10 is the default.

So, now let's say you want to remove the dual-boot and go back to booting straight into Windows 7. Boot into Windows 7, open MSCONFIG.EXE. Simply delete the Windows Technical Preview entry. Reboot when prompted. The computer will boot right into Windows 7 as it had before. If you are finished with the Windows 10 Technical Preview VHDX, then simply delete the file you earlier created.