Moving data out of Microsoft Azure SQL Database
The direction today is that everyone is moving their data to the Cloud. As an application grows and accumulates data over the years, the amount of data accumulated in SQL Azure becomes a challenge. With data storage limitations and pricing involved, we need to store just the required data. So there will be a need to move the archive data away.
This article discusses the options that are available to move any data out of SQL Azure Database to an On premise SQL Server Database or to another Microsoft SQL Azure Database. Moving to other types of storage will be discussed in a following post.
There is no direct way in which you can connect to another database from SQL Azure. So we cannot use the traditional approach of connecting to a different database from SQL Azure and to move the data there.
The first thought that comes up with moving data out of SQL Azure would to use the SQL Data Sync. Note however, that this is still in the Preview version and hence it is not being considered.
Sample Data Setup : SampleData is a simple table in SQL Azure with with .1 million records. The size of this table is 8 MB.
Now we will move the data to the target database and delete the data from the source in a single transaction.
Approach I : Using Link Servers
Target : On Premise SQL Database
Add a Windows Azure SQL Database as a Linked Server and then use it with Distributed Queries that span the on-premises and cloud databases. This is for database hybrid solutions spanning on-premises corporate networks and the Windows Azure cloud.
The below is executed from the target SQL Server Database :
EXEC sp_addlinkedserver
@server='AzureLinkServer',
@srvproduct='',
@provider='sqlncli',
@datasrc='xxxx',
@location='',
@provstr='',
@catalog='yyy'
-- Add credentials and options to this linked server
EXEC sp_addlinkedsrvlogin
@rmtsrvname = 'AzureLinkServer',
@useself = 'false',
@rmtuser = 'aaa',
@rmtpassword = 'bbb'
EXEC sp_serveroption 'AzureLinkServer', 'rpc out', true;
INSERT INTO SampleData
SELECT * FROM AzureLinkServer.DBName.dbo.SampleData ; -- 36 seconds
DELETE from AzureLinkServer.DBName.dbo.SampleData -- 12 seconds
Target : Microsoft SQL Azure Database
Now try the same with the target as another Azure DB.
-- Target Server
EXEC sp_addlinkedserver
@server='AzureLinkServerTarget',
@srvproduct='',
@provider='sqlncli',
@datasrc='xxx',
@location='',
@provstr='',
@catalog='yyy'
-- Add credentials and options to this linked server
EXEC sp_addlinkedsrvlogin
@rmtsrvname = 'AzureLinkServerTarget',
@useself = 'false',
@rmtuser = 'aaa',
@rmtpassword = 'bbb'
EXEC sp_serveroption 'AzureLinkServerTarget', 'rpc out', true;
INSERT INTO AzureLinkServerTarget.DBName.dbo.SampleData
SELECT * FROM AzureLinkServer.DBName.dbo.SampleData ; -- > 2 hours
DELETE from AzureLinkServer.DBName.dbo.SampleData -- 12 seconds
Approach II : Using SSIS Package
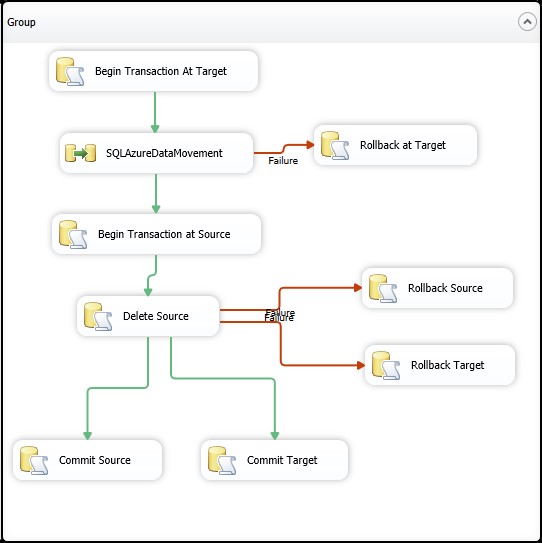
Now let us try to do the above with an SSIS package. SSIS package uses DTC for distributed transactions, however, SQL Azure does not support DTC. So we will have to handle the transactions manually.
Below is the Control flow used. The SQLAzureDataMovement is a simple Data Flow Task to move from the source Azure Database to the on premise database.
When the target is an on premise database, the time taken is 33 seconds and when the target is changed to Azure DB, the time taken is 44 seconds.
Approach III : .NET SQLBulkCopy
Use SQLBulkCopy to move the data from Azure to On premise or to the target Azure Database.
Target : On Premise SQL Database
string sourceConnectionString = "Server=xxx;Database=yyy;User ID=aaa;Password=;Trusted_Connection=False;Encrypt=True;Connection Timeout=30;";
string targetConnectionString = "Server=xxx;database=yyy;Integrated Security=SSPI";
// copy the data from source to target
Stopwatch swMoveData = new Stopwatch();
swMoveData.Start();
using (SqlConnection sourceConnection =
new SqlConnection(sourceConnectionString))
{
SqlCommand myCommand =
new SqlCommand("SELECT * FROM SampleData", sourceConnection);
sourceConnection.Open();
SqlDataReader reader = myCommand.ExecuteReader();
// open the destination data
using (SqlConnection destinationConnection =
new SqlConnection(targetConnectionString))
{
// open the connection
destinationConnection.Open();
using (SqlBulkCopy bulkCopy =
new SqlBulkCopy(destinationConnection))
{
bulkCopy.BatchSize = 10000;
bulkCopy.DestinationTableName = "SampleData";
bulkCopy.WriteToServer(reader);
}
}
reader.Close();
}
// delete the data
using (SqlConnection sourceConnection =
new SqlConnection(sourceConnectionString))
{
SqlCommand myCommand =
new SqlCommand("DELETE FROM SampleData", sourceConnection);
sourceConnection.Open();
myCommand.ExecuteNonQuery();
}
swMoveData.Stop();
Console.WriteLine("RunTime " + swMoveData.ElapsedMilliseconds / 1000);
Console.Read();
The time taken is 31 seconds. Now try the above, changing the target connection string to another SQL Azure Database. Now the time taken is 38 seconds.
Conclusion
Following is the comparison of the above approaches.
Approach |
Target |
|
SQL Server |
SQL Azure |
|
Link Server |
48 seconds |
> 2 hours |
SSIS Package |
33 seconds |
44 seconds |
.NET SQLBulkCopy |
31 seconds |
38 seconds |
You may want to consider other factors while deciding on the best approach : the row size, the conditions on which the data has to picked, the volume of data etc. This article is to provide the different approaches that are available and an idea of the time taken in each approach.
