Hyper-V 2008 R2: How to Increase the VHD Size
Applies to
This article is based on Hyper-2.0, this might not apply to Hyper-V 3.0 (Server 2012)
Summary
This article will show the method to increase the size of a virtual hard disk (vhd) with Hyper-V Windows Server 2008 R2. How to compress and convert a VHD is also explained.
Introduction
When planning the use of disk capacity of the server sometimes does not think of a future growth or misuse of HD at the time of allocation of data. If this occurs in a virtual machine you will see that the process to increase its size is quite simple, as described below.
Procedure
Open the Hyper-V Manager from Start> Administrative Tools> Hyper-V Manager. Click OK in the message of User Account Control to boost his credentials as an administrator.
Click Edit Disk on the right side of the screen, as in Figure 1:
Figure 1 - Option to edit virtual disks
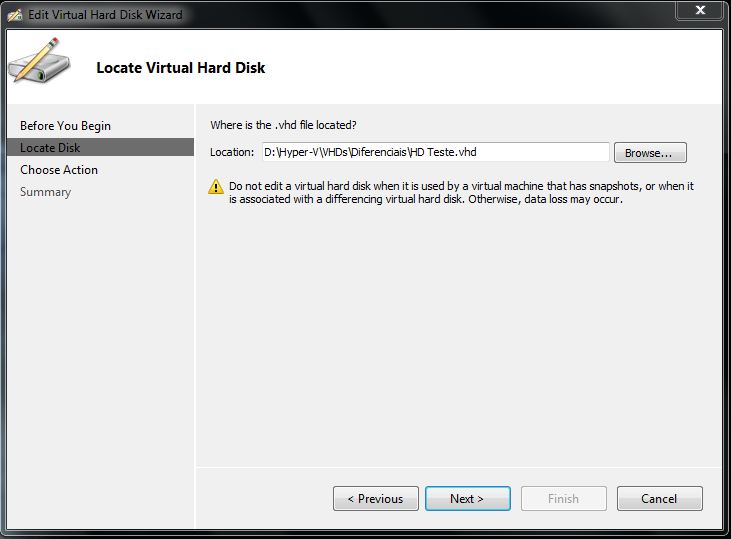
In the Welcome screen click Next and then click on the file path of the virtual HD that you want to increase and then click Next again.
Remember that the virtual machine that is using the HD cannot be turned on and cannot be in Saved status. Is also not advisable for this procedure is done on machines with snapshots. They will not be available after the procedure.
Figure 2 - Path of VHD
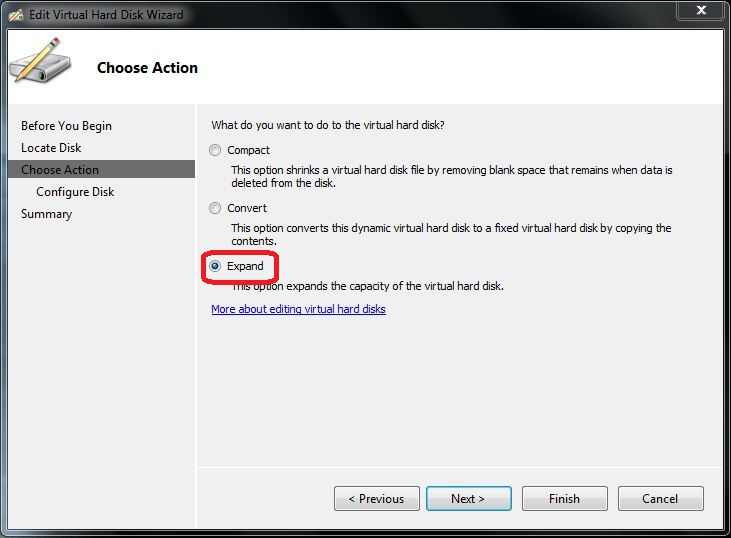
On the Choose Action screen, choose Expand, and then click Next.
To explain the other two options, it is interesting to understand the two types of discs: Dynamical and Fixed. The Convert option converts a dynamic vhd on a fixed disk. In the case of machines that need a lot of I/O disk...
The Compact option decreases the size of the vhd file when a large number of data are excluded from the dynamic HD.
The Dynamic disk vhd file is a small file (2 MB) which increases with the amount of data as it is added to the vhd, interesting in testing environments or when there is not much disk space on the physical machine.
The Fixed disk create a file with the same size that had been configured on the VHD Wizard. For example, if you create a virtual disk of 50 GB, 50 GB file will take up the physical disk**.** The Fixed disk would be the best option because it provides higher performance for the VM compared with the dynamic.
Figure 3 - Option to increase the size of the virtual disk
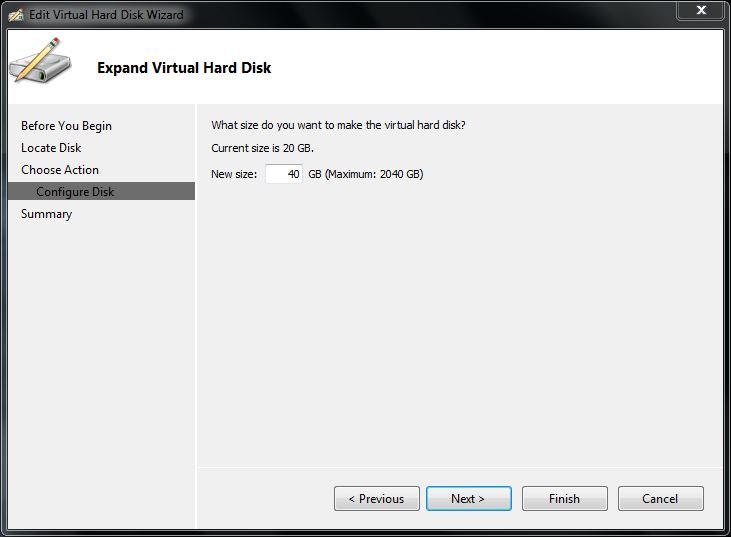
Choose the new size of the virtual disk and click Next. In the example used the vhd had 20 GB will be increased to 40 GB.
Figure 4 - New size of the virtual disk
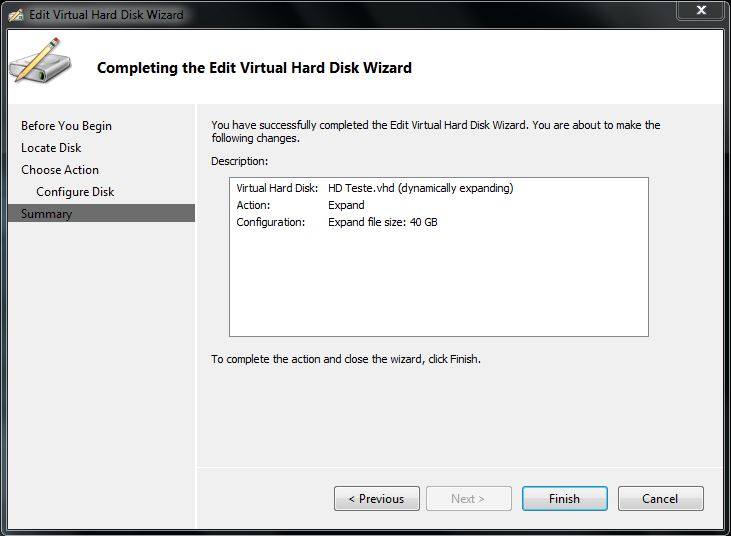
Confirm the options selected and click Finish. After that, you can now connect the virtual machine. In the management of the disk will appear unallocated space of the size that you increased. Then you can create new partitions or extend the existing partition. If you need to extend a partition that is being used as a boot volume or system, you can only do this from the Windows Vista and Windows Server 2008.
Figure 5 - Confirmation
You can use the PowerShell script below if you need to automate this process. Just copy the contents below into a text file with the extension Ps1:
# Expanding a VHD
* *
param(
* [string]$vhdPath = $(throw "D:\Data.vhd"),*
* [string]$vhdSize = $(throw "2000")*
)
* *
# Size in bytes
$MB = [System.UInt64] $vhdSize*1024*1024
* *
$ImageMgtService = get-wmiobject -class "Msvm_ImageManagementService" -namespace "root\virtualization"
* *
# creating a dynamic vhd
$result = $ImageMgtService.ExpandVirtualHardDisk($vhdPath,$MB)
* *
if($result.ReturnValue -eq 4096){
* $job = [wmi]$result.Job*
* # waiting the job*
* * while($job.jobstate -lt 7){$job.get()}
* # Return some error code*
* return $job.ErrorCode*
*} *
return $result.ReturnValue
The first line in red shows the path of the vhd and second the size that you want to increase (in MB).
Conclusion
This article explained how to enhance, convert and compress a vhd to Hyper-V 2008 R2 to help manage, conserve and make the provision of disks in a friendly way.


