Entity Framework Code First - Defining Foreign Keys using Data Annotations and Fluent API
When using Entity Framework Code First approach, there are actually three ways to define foreign keys. In this wiki let’s explore these different ways with some examples (please note, here we are not going to cover the basics of EF, assuming you have some knowledge in Entity Framework.) . Before starting off with the code, first let’s have a quick look at the mentioned three different ways.
The first way is pretty much straight forward. That is when you add a navigation property, EF itself will create a foreign key relationship. The second one is using Data Annotations. The last would be using Fluent API.
Now let's see all these in action. Please consider the following two entity classes.
public class Department
{
public int DepartmentId { get; set; }
public string DepartmentName { get; set; }
}
public class Employee
{
public int EmployeeId { get; set; }
public string FirstName { get; set; }
public string LastName { get; set; }
public Department Department { get; set; }
}
Here we have two classes which are “Department” and “Employee”. In “Employee” class, we have a navigation property named “Department” which is of type “Department”. So here what we say is Employee is belonging to a Department.
We have the following “MyContext” class which inherits from DbContext.
public class MyContext : DbContext
{
public DbSet<Department> Departments { get; set; }
public DbSet<Employee> Employees { get; set; }
protected override void OnModelCreating(DbModelBuilder modelBuilder)
{
modelBuilder.Conventions.Remove<PluralizingTableNameConvention>();
}
}
There in our overridden OnModelCreating method. We are saying that we don’t want to pluralize the table names when tables are created in EF. (You can basically ignore that particular line of code, as it has nothing to with the topic today).
Now in our Main method, let's write the following code to add some data to “Department” table, so the tables will get generated.
static void Main(string[] args)
{
using (MyContext context = new MyContext())
{
context.Departments.Add(new Department() { DepartmentName = "Microsoft Visual Studio" });
context.SaveChanges();
}
}
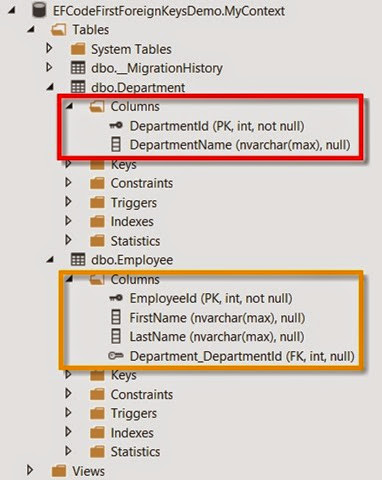
Once we run the code and check the database created, we can see the following.
| http://lh4.ggpht.com/-OGE-3hQ7Cbs/U2pAmgxrR2I/AAAAAAAACXA/uaNoyXf_Yh0/Picture1_thumb%25255B2%25255D.jpg?imgmax=800 |
| Through Navigation Property |
In the “Employee” table, you can see there is a foreign key created named “Department_DepartmentId”. So that is the first way.
Now let’s have a look at defining the foreign key using Data Annotations.
For that, let's modify the “Employee” class as follows.
public class Employee
{
public int EmployeeId { get; set; }
public string FirstName { get; set; }
public string LastName { get; set; }
public int DepartmentId { get; set; }
[ForeignKey("DepartmentId")]
public Department Department { get; set; }
}
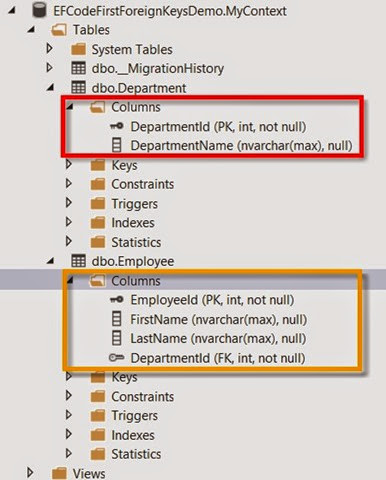
Here we have defined a property of type int named “DepartmentId”. And we have annotated our “Department” property saying the Foreign Key is the newly added “DepartmentId”. Let's delete the previous database and run the program back again. Now we can see the following database structure.
| http://lh6.ggpht.com/-BU-u8FmN_NQ/U2pAoYjWGjI/AAAAAAAACXQ/yGl3L6c4Ycg/Picture2_thumb%25255B2%25255D.jpg?imgmax=800 |
| Through Data Annotations |
Now let’s have a look at the third and final way which is defining the foreign key using Fluent API.
In “MyContext” class let's modify the OnModelCreating() method as follows and we are removing Data Annotations in the "Department" class.
protected override void OnModelCreating(DbModelBuilder modelBuilder)
{
modelBuilder.Conventions.Remove<PluralizingTableNameConvention>();
modelBuilder.Entity<Employee>()
.HasRequired(e => e.Department)
.WithMany()
.HasForeignKey(e => e.DepartmentId);
}
Again let's delete the previous database and run the program back again. When we examine the created the database now, It’s as same as the previous method.
| http://lh4.ggpht.com/-SH_kZ30VAYA/U2pAqeoMTdI/AAAAAAAACXg/EwpjWOlbyjc/Picture2_thumb%25255B5%25255D.jpg?imgmax=800 |
| Through Fluent API |
Hope you find this post helpful. You can find the full sample in MSDN Code Gallery. Do check it out and appreciate your feedback.
Happy Coding.