Test Lab Guide: Install Exchange Server 2013 on the Windows 2012 R2 Base Configuration
This Test Lab Guide (TLG) contains instructions for setting up a Microsoft Exchange Server 2013 test lab using three server computers and one client computer. The resulting Exchange Server 2013 test lab demonstrates Exchange Server 2013 as an intranet email server.
Important The following instructions are for configuring an Exchange Server 2013 test lab using the minimum number of computers. Individual computers are needed to separate the services provided on the network and to clearly show the desired functionality. This configuration is neither designed to reflect best practices nor does it reflect a desired or recommended configuration for a production network. The configuration, including IP addresses and all other configuration parameters, is designed only to work on a separate test lab network.
Attempting to adapt this test lab configuration to a pilot or production deployment can result in configuration or functionality issues. To ensure proper configuration and operation for your pilot or production deployment of Exchange Server 2013, use the information in the Planning and Deployment topics.
Test lab overview
In this test lab, Exchange Server 2013 is deployed with:
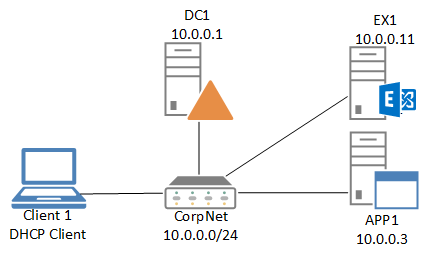
- One computer running Windows Server 2012 R2 Enterprise or Datacenter Edition named DC1 that is configured as an intranet domain controller and Domain Name System (DNS) server.
- One intranet member server running Windows Server 2012 R2 Enterprise or Datacenter Edition named APP1 that is configured as a general application server.
- One intranet member server running Windows Server 2012 R2 Enterprise or Datacenter Edition named EX1 that is configured as the Exchange Server 2013 email server.
- One roaming member client computer named CLIENT1 that is configured with Microsoft Office 2013.
This TLG only requires the Corpnet subnet. See the following figure for the Exchange Server 2013 test lab configuration on an isolated subnet.
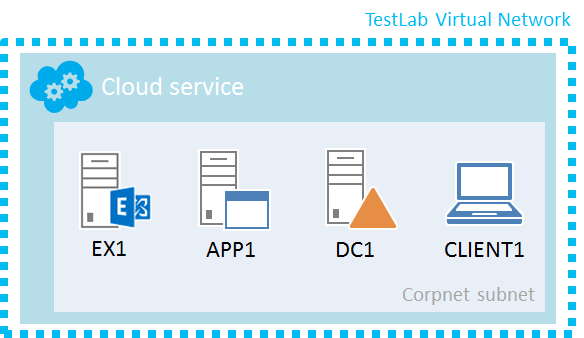
See the following figure for the Exchange Server 2013 test lab configuration in Microsoft Azure infrastructure services.
This Test Lab Guide describes how to install a Microsoft Exchange Server 2013 email server on the Corpnet subnet. You add a new computer named EX1, make it a member of the corp.contoso.com domain, and then install Exchange Server 2013. Lastly, you use Outlook 2013 on CLIENT1 to send email from one mailbox to another.
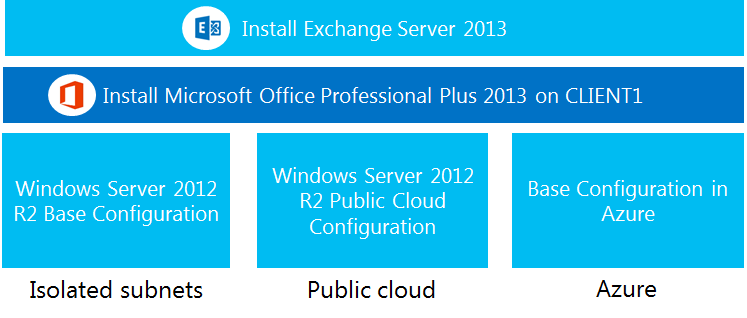
Here is the TLG stack:
You can use this TLG to deploy an Exchange server in the following TLG lab environments:
Hardware and software requirements
The following are required components of this test lab:
- For the isolated subnets and public cloud lab environments, the product disc or files for Windows Server 2012 R2 Enterprise or Datacenter Edition.
- For the isolated subnets and public cloud lab environments, three computers that meet the minimum hardware requirements for Windows Server 2012 R2 Enterprise or Datacenter Edition.
- For the isolated subnets and public cloud lab environments, one computer that meet the minimum hardware requirements for Windows 8.1.
- The setup files for Microsoft Exchange Server 2013. An evaluation version is available from Download Microsoft Exchange Server 2013.
- The setup files for Microsoft Office 2013. An evaluation version is available from Download Microsoft Office Professional Plus 2013.
Steps for Configuring the Exchange Server 2013 Test Lab
There are six major steps to follow when setting up an Exchange Server 2013 test lab.
- Set up the Base Configuration test lab.
- Install Office 2013 on CLIENT1.
- Modify DHCP Scope.
- Install and configure EX1.
- Install Exchange Server 2013 on EX1.
- Demonstrate EX1 as an email server.
The following sections provide the details about how to perform these steps.
Step 1: Set up the Base Configuration test lab
The Exchange Server 2013 test lab requires the Corpnet subnet of the Base Configuration test lab as its starting point.
For the isolated subnets lab environment, create the Corpnet subnet of the base configuration test lab as described in the Test Lab Guide: Windows 2012 R2 Server Base Configuration.
For the public cloud lab environment, create the Corpnet subnet as described in the Windows Server 2012 R2 Base Configuration for Public Cloud.
For the Azure lab environment, create the Corpnet subnet as described in the Base Configuration in Azure.
Step 2: Install Office 2013 on CLIENT1
Install Microsoft Office Professional Plus 2013 on CLIENT1 as described in Test Lab Guide Mini-Module: Installing Microsoft Office Professional Plus 2013 on CLIENT1.
Step 3: Modify DHCP Scope on DC1 (isolated subnets lab environment only)
For the isolated subnets lab environment, modifications to the DHCP Scope are required for Outlook 2013 to function.
Do this step using Windows PowerShell
- On DC1, launch Server Manager
- From the Tools menu in Server Manager, click DHCP.
- Expand dc1.corp.contoso.com > **IPv4 **
- Right Click on Server Options and select Configure Options
- Select 003 Router.
- In the Data Entry section input 10.0.0.1 and click Add
- Ensure that there is a check next to 003 Router and click OK
Step 4: Install and configure EX1
EX1 configuration consists of the following:
- Install the operating system.
- Configure TCP/IP.
- Configure the Windows Firewall.
- Join the computer to the domain.
**Install the operating system on EX1 (isolated subnets and public cloud lab environments only)
**
For the isolated subnets and public cloud lab environments only, EX1 configuration consists of the following:
- Start the installation of Windows Server 2012 R2.
- Follow the instructions to complete the installation, specifying Windows Server 2012 R2 Enterprise or Datacenter Edition (full installation), the computer name EX1, and a strong password for the local Administrator account.
- Log on using the local Administrator account.
- For the isolated subnets lab environment only, connect EX1 to a network that has Internet access and run Windows Update to install the latest updates for the operating system.
- For the isolated subnets lab environment only, connect the EX1 to the Corpnet subnet.
Configure TCP/IP properties on EX1 (isolated subnets and public cloud lab environments only)
For the isolated subnets lab environment only, configure the TCP/IP protocol with a static IP address of 10.0.0.11 and the subnet mask of 255.255.255.0.
Do this step using Windows PowerShell
In Server Manager, click Local Server in the console tree. Click the link next to Ethernet.
The link may not immediately appear. Wait for the network interfaces to be enumerated.
In Network Connections, right-click Ethernet, and then click Properties. Note that the "Ethernet" interface name may be different on your computer.
Click Internet Protocol Version 4 (TCP/IPv4), and then click Properties.
Select Use the following IP address. In IP address, type 10.0.0.11. In Subnet mask, type 255.255.255.0. Select Use the following DNS server addresses. In Preferred DNS server, type 10.0.0.1.
Click OK and then close the Ethernet Properties dialog.
Close the Network Connections window.
For the public lab environment only, configure the TCP/IP protocol with the DNS server IP address of DC1.
Do this step using Windows PowerShell
In Server Manager, click Local Server in the console tree. Click the link next to Ethernet.
The link may not immediately appear. Wait for the network interfaces to be enumerated.
In Network Connections, right-click Ethernet, and then click Properties. Note that the "Ethernet" interface name may be different on your computer.
Click Internet Protocol Version 4 (TCP/IPv4), and then click Properties.
In Preferred DNS server, type the IP address of DC1.
Click OK and then close the Ethernet Properties dialog.
Close the Network Connections window.
Configure the Windows Firewall
On EX1, run a Windows PowerShell prompt with administrator-level permissions.
To configure the Windows Firewall to allow ICMPv4 ping packets, run the following commands:
New-NetFirewallRule –DisplayName “Allow ICMPv4-In” –Protocol ICMPv4
New-NetFirewallRule –DisplayName “Allow ICMPv4-Out” –Protocol ICMPv4 –Direction Outbound
To check name resolution and network communication between EX1 and DC1, type ping dc1.corp.contoso.com in the Windows PowerShell window and press ENTER.
Verify that there are four replies from 10.0.0.1.
Close the Windows PowerShell window.
| The following Windows PowerShell cmdlet or cmdlets perform the same function as the preceding procedure. Enter each cmdlet on a single line, even though they may appear word-wrapped across several lines here because of formatting constraints. Note that the "Ethernet" interface name may be different on your computer. Use the ipconfig /all command to list all the interfaces. New-NetIPAddress -InterfaceAlias Ethernet -IPAddress 10.0.0.11 -AddressFamily IPv4 -PrefixLength 24 Set-DnsClientServerAddress -InterfaceAlias Ethernet -ServerAddresses 10.0.0.1 New-NetFirewallRule –DisplayName “Allow ICMPv4-In” –Protocol ICMPv4 New-NetFirewallRule –DisplayName “Allow ICMPv4-Out” –Protocol ICMPv4 –Direction Outbound |
Join EX1 to the CORP domain
Do this step using Windows PowerShell
- In Server Manager, click Local Server in the console tree. Click the link next to Computer name in the Properties tile.
- In the System Properties dialog box, click the Computer Name tab. On the Computer Name tab, click Change.
- Under Member of, click Domain, and then type corp.contoso.com.
- Click OK.
- When you are prompted for a user name and password, type User1 and its password, and then click OK.
- When you see a dialog box welcoming you to the corp.contoso.com domain, click OK.
- When you are prompted that you must restart the computer, click OK.
- On the System Properties dialog box, click Close.
- When you are prompted to restart the computer, click Restart Now.
- After the computer restarts, click the Switch User arrow icon, then click Other User and log on to the CORP domain with the User1 account name and password.
| The following Windows PowerShell cmdlet or cmdlets perform the same function as the preceding procedure. Enter each cmdlet on a single line, even though they may appear word-wrapped across several lines here because of formatting constraints. Note that you must supply domain credentials after entering the Add-Computer command below. Add-Computer -DomainName corp.contoso.com Restart-Computer |
Step 5: Install Exchange Server 2013 on EX1
Prepare for the installation of Exchange Server 2013 on EX1.
Do this step using Windows PowerShell
Prepare User1 to install EX1:
- On DC1, log on using the CORP\User1 account.
- From the Start screen, type active directory, and then click Active Directory Users and Computers.
- In the tree pane, open corp.contoso.com\Users, right-click the User1 account, and then click Add to a group.
- In the Select Groups dialog box, type Schema Admins, click Check Names, and then click OK.
|
The following Windows PowerShell cmdlet or cmdlets perform the same function as the preceding procedure. Enter each cmdlet on a single line, even though they may appear word-wrapped across several lines here because of formatting constraints. Note that you must supply domain credentials after entering the Add-Computer command below.
Add-ADPrincipalGroupMembership -Identity "CN=User1,CN=Users,DC=corp,DC=contoso,DC=com" -MemberOf "CN=Schema Admins,CN=Users,DC=corp,DC=contoso,DC=com" |
Next, install the prerequisite software components for Exchange Server 2013 on EX1.
For the latest information about Exchange Server 2013 prerequisites, see Exchange 2013 Prerequisites.
On EX1, log on using the CORP\User1 account.
Open Windows PowerShell with administrator-level permissions.
Run the following commands to install the required Windows components.
 Note
NoteThe first command is only needed because of the method of installation we are going to do for the LAB. Normally you would prepare the schema and AD prior to installing Exchange 2013. But if you do not the exchange 2013 setup will do for you as long as the account you are using has the appropriate permissions as well as the RSAT ADDS features are installed on the system. You could add this onto the command below but I wanted to call out why this feature is being installed as it is not technically required to run Exchange 2013.
Install-WindowsFeature RSAT-ADDS
** **
Install-WindowsFeature AS-HTTP-Activation, Desktop-Experience, NET-Framework-45-Features, RPC-over-HTTP-proxy, RSAT-Clustering, RSAT-Clustering-CmdInterface, RSAT-Clustering-Mgmt, RSAT-Clustering-PowerShell, Web-Mgmt-Console, WAS-Process-Model, Web-Asp-Net45, Web-Basic-Auth, Web-Client-Auth, Web-Digest-Auth, Web-Dir-Browsing, Web-Dyn-Compression, Web-Http-Errors, Web-Http-Logging, Web-Http-Redirect, Web-Http-Tracing, Web-ISAPI-Ext, Web-ISAPI-Filter, Web-Lgcy-Mgmt-Console, Web-Metabase, Web-Mgmt-Console, Web-Mgmt-Service, Web-Net-Ext45, Web-Request-Monitor, Web-Server, Web-Stat-Compression, Web-Static-Content, Web-Windows-Auth, Web-WMI, Windows-Identity-Foundation
A restart is required after the roles and features have finished installing.
For the isolated subnets lab environment, connect EX1 to a network with Internet access, modifying its TCP/IP configuration as needed.
Install the Unified Communications Managed API 4.0 Runtime.
Install the Microsoft Office 2010 Filter Pack 64 bit.
Install the Microsoft Office 2010 Filter Pack SP1 64 bit.
 Note
Note
** ** Microsoft Office 2010 Filter Pack is not needed for a Client Access Server Role only server. It is required for the Mailbox Server role.
Next, you download the evaluation version of Exchange Server 2013 and install it.
- On EX1, create the C:\EX2013DL folder.
- Download the evaluation version of Microsoft Exchange Server 2013 from http://technet.microsoft.com/en-US/evalcenter/hh973395 and store the Exchange-x64.exe file in C:\EX2013DL.
- In the EX2013DL folder, double-click the Exchange-x64.exe file.
- When prompted for a folder to store the extracted files, specify the C:\EX2013DL folder, and then click OK.
- Click OK when the extraction is complete. Leave the C:\EX2013DL folder window open.
- For the isolated subnets lab environment, reconnect EX1 to the Corpnet subnet and change its TCP/IP configuration as specified in the "Configure TCP/IP properties on EX1" section of this guide.
- From the start screen, type command, right-click Command Prompt, and then click Run as administrator.
- In the Command Prompt window, enter the following commands:
cd \ex2013dl
setup /mode:Install /roles:C,M /ON:Contoso /InstallWindowsComponents /IAcceptExchangeServerLicenseTerms
Restart EX1 after Setup has completed successfully.
 Note
Note
If you get an error and Exchange Setup cannot complete, from the C:\EX2013DL folder window, right-click Setup.exe, and then click Run as Administrator. On the Incomplete Installation Detected page, click Next to have Exchange Setup correct the problem and complete the installation.
Next, you verify the installation of Exchange Server 2013.
On EX1, from the start screen, type exchange, and then click Exchange Management Shell.
At the Windows PowerShell command prompt, enter the following command:
Get-ExchangeServer
You should see a display of information about the Exchange server, starting with EX1 under Name. Leave the Exchange Management Shell window for the following procedure.
From the start screen, type https://ex1/ecp, and then press ENTER.
On the login screen, type CORP\user1 in User name and the User1 account password in Password, and then click sign in.
When prompted for a language and time zone, change as needed, and then click Save.
You should see the Exchange admin center.
Step 6: Demonstrate EX1 as an email server
Create new Active Directory Domain Services (AD DS) accounts and their mailboxes on the EX1 Exchange server.
At the Windows PowerShell command prompt of the Exchange Management Shell, enter the following command:
Get-MailboxDatabase
This command displays the list of databases on this Exchange server. There should be only one. Note the name for the commands in step 3.
At the Windows PowerShell command prompt, enter the following command: $password = Read-Host "Enter password" –AsSecureString When prompted with “Enter Password”, type a strong password string. Note the string for future reference.
At the Windows PowerShell command prompt, enter the following commands: New-Mailbox -UserPrincipalName chris@corp.contoso.com -Alias chris -Database "<mailbox database name from step 1>" -Name ChrisAshton -OrganizationalUnit Users –Password $password -FirstName Chris -LastName Ashton -DisplayName "Chris Ashton" ** ** New-Mailbox -UserPrincipalName janet@corp.contoso.com -Alias janet -Database "<mailbox database name from step 1>" -Name JanetSchorr -OrganizationalUnit Users –Password $password -FirstName Janet -LastName Schorr -DisplayName "Janet Schorr"
Next, you send an email message from Chris Ashton to Janet Schorr.
- If needed, connect CLIENT1 to the Corpnet subnet.
- On CLIENT1, log off as User1 and then log on with CORP\chris and the strong password.
- From the start screen, type outlook, and then click Outlook 2013.
- On the Welcome to Outlook 2013 page, click Next.
- On the Add an Email Account page, click Next.
- On the Auto Account Setup page, click Next.
- On the Searching for your mail server settings page, click Finish.
- On the First things first page, click Use recommended settings, and then click Accept.
- In Outlook, click New Email.
- In the new email window, on the To line, type Janet Schorr, and then click Check Names.
- On the Subject line, type Test message to Janet, and then click Send.
Next, you verify that the email message from Chris Ashton was received.
- On CLIENT1, log off as Chris and then log on with CORP\janet and the strong password.
- From the start screen, type outlook, and then click Outlook 2013.
- On the Welcome to Outlook 2013 page, click Next.
- On the Add an Email Account page, click Next.
- On the Auto Account Setup page, click Next.
- On the Searching for your mail server settings page, click Finish.
- On the First things first page, click Use recommended settings, and then click Accept.
- In Outlook, you should see the email Test message to Janet from Chris Ashton.
Snapshot the Configuration
This completes the Exchange Server 2013 test lab. The result is a test lab environment that contains a working server running Exchange Server 2013 that is configured as an intranet email server. You can now begin building out and experimenting with Exchange Server 2013 scenarios and solutions.
To save this configuration so that you can quickly return to a working Exchange Server 2013 configuration, do the following:
- On all physical computers or virtual machines in the test lab, close all windows and then perform a graceful shutdown.
- If your lab is based on virtual machines, save a snapshot of each virtual machine and name the snapshots Exchange Server 2013 SP1. If your lab uses physical computers, create disk images to save the Exchange Server 2013 test lab configuration.
Additional Resources
For additional information about Exchange Server 2013 see Microsoft Exchange Server and Exchange Online .
For additional Test Lab Guide resources, see Test Lab Guides.


