SharePoint 2013: Deploy and apply theme to SharePoint sites with PowerShell
Introduction
From the beginning Theme in SharePoint is an interesting feature for developer and UI designer. In WSS3.0 and MOSS 2007 all themes related files resides under theme folder inside 12 hives. So if you want to create new theme then you have to make new folder under theme and use it. So it was deployment directly on the file system and they could be available to other web applications even though they were not needed. And also after every change you need to deploy it and IIS reset was needed to take complete effect. So to remove those headache of deployment process Microsoft introduces Theme gallery in SharePoint 2010 and .thmx file. It actually was an answer to theme deployment(in 2007) with simple deployment approach in 2010(no need of IIS reset also); and also somehow it took away burden of creating theme from the SharePoint developer. But the problem with .thmx file was the resource needs to be PowerPoint expert to create those thmx files(I am not sure about other tools :)). At last in SharePoint 2013 it makes easy to make and apply theme; it makes clear two roles and their responsibilities: SharePoint UI Designer- he/she has to create the theme and SharePoint Developer/Admin – he/she has to deploy and apply the theme. Deployment process is also simple; you can have preview available to check how your site going to look. So life in SharePoint 2013 is little bit easy for developers :).
Case Statement
As we know all over the world organizations are now transforming their SharePoint platforms to the SharePoint 2013 platform to gain the power of new features. Now as a part of migration you have to migrate the theme which is currently applied to the all sites in your SharePoint 2010 to the new sites in SharePoint 2013 environment. In first look it looks very simple to migrate theme to 2013. But actually the truth is different; you are not migrating theme to 2013 rather you are creating it from the scratch. Now after creating the theme next challenge is how to deploy and apply them to the thousands of sites? Do not get panic, I will explain here how to migrate(actually recreate J) theme to 2013 and apply them with one or two click.
About SharePoint 2013 Theme
Let’s learn SharePoint 2013 theme. As I explained in Introduction section that in 2007 we were using some files as artifacts of the theme, then in 2010 we are using .thmx file to create custom theme. So what inside SharePoint 2013?
So following galleries are important part of the theme:
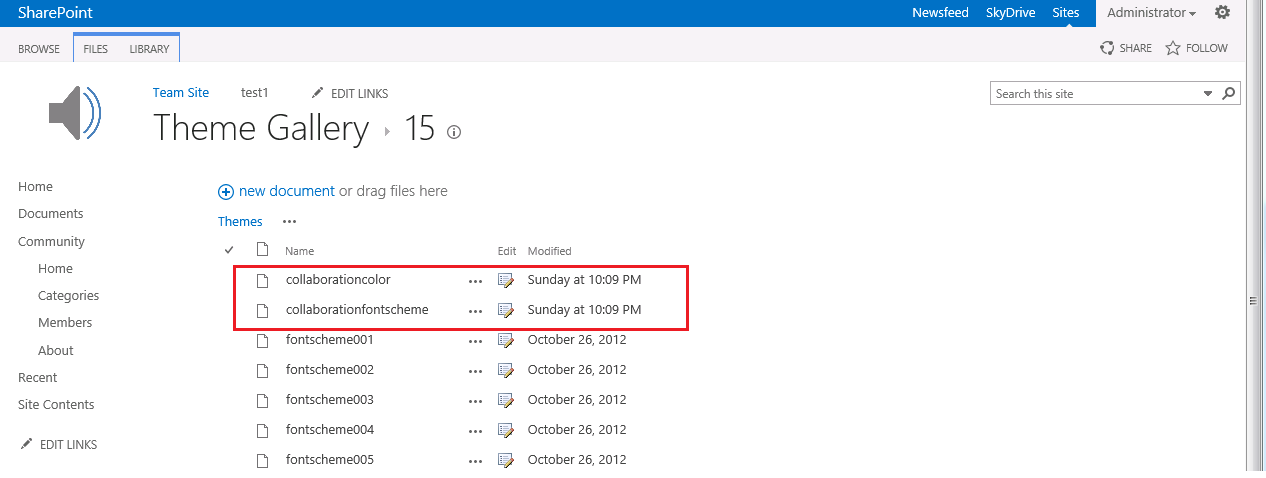
- Theme gallery – you can access this from here: /_catalogs/theme/Forms/AllItems.aspx . This gallery generally resides on the root web level and has theme files – Color palette and font schema inside 15 folder.
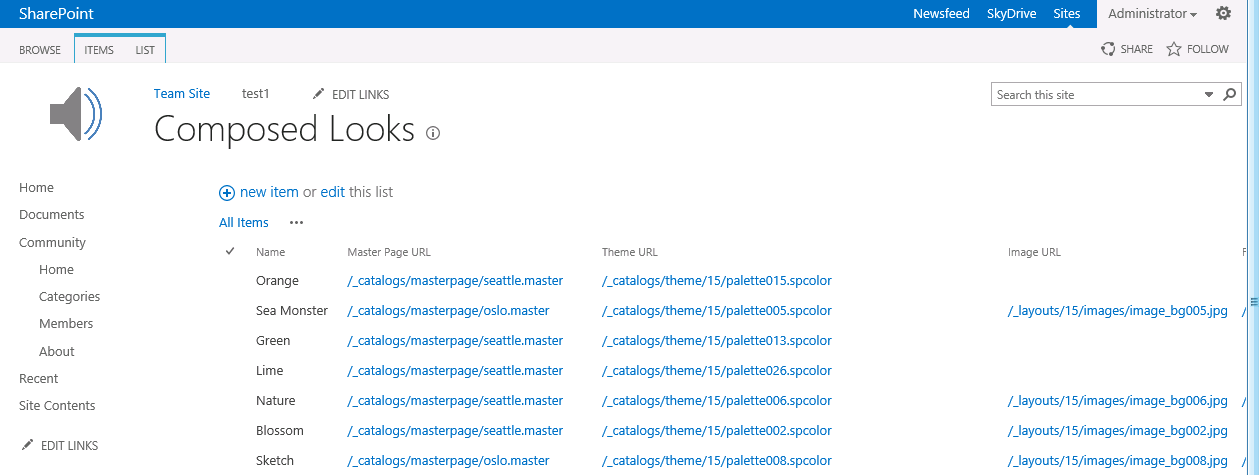
- Composed looks(Web Designer) gallery – As name suggest it has several composition of looks. This library actually contains master page URL, image URL, theme(color palette) URL, Font Scheme URL and Display Order. And all of them together is a theme. So when you are creating a theme you also have to make new entry in this gallery with respective information.
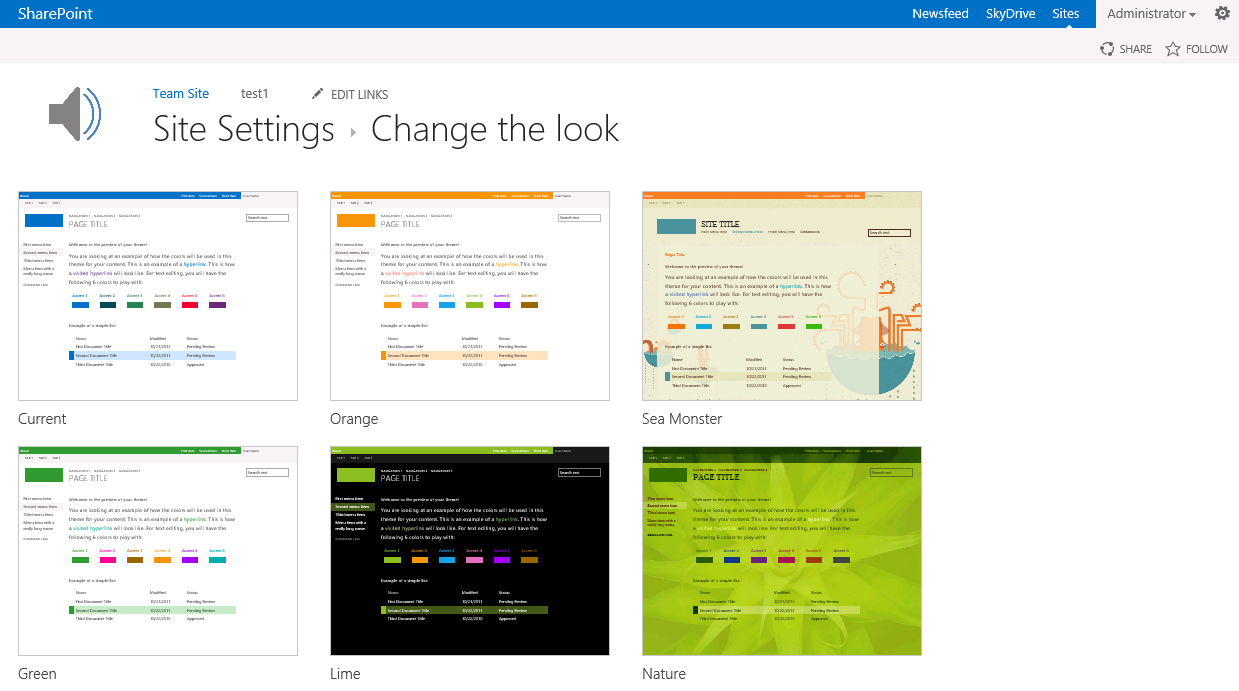
So once you have entry for your theme in this library you can see your composed look/theme available on applying page.
So this is all about the galleries which you must know while working on theme. Now let’s see the files which actually makes the theme:
- Color palette file: this file defines the combination of color which is going to be used in the site. You can define color scheme for your site and modify the look.
- Font scheme file: this file defines the font scheme for your site. SharePoint has provided you slots and according to your requirement you have to apply font to them.
- Background Image: this is image used as the back ground of pages of your site.
- Master page: this is master page which defines the layout and structure of site. We will not focus more on this.
You can learn in detail about theme here: http://msdn.microsoft.com/en-us/library/office/jj927174.aspx
Now you have brief overview about theme. So if you compare SharePoint 2010 theme and SharePoint 2013 theme structure then you will realize that they are different and you have to create theme from the scratch for SharePoint 2013. It is not as-is migration. So whenever got this requirement do not hurry to mark it easy.
So once theme is ready and you want to deploy it then you have to follow some of manual steps:
- Go to the theme gallery and upload the color palette and font scheme file. Here I have created collaboration theme for my team site.
- The next step is creating new composition in Composed looks(Web Designer) gallery . Give the correct URL of master page, theme page and font schema page.
- Now go to the Site Settings page and then click on the ‘Change the look’ link under Look and Feel section. You will see all composition here including new one(if there is no error).
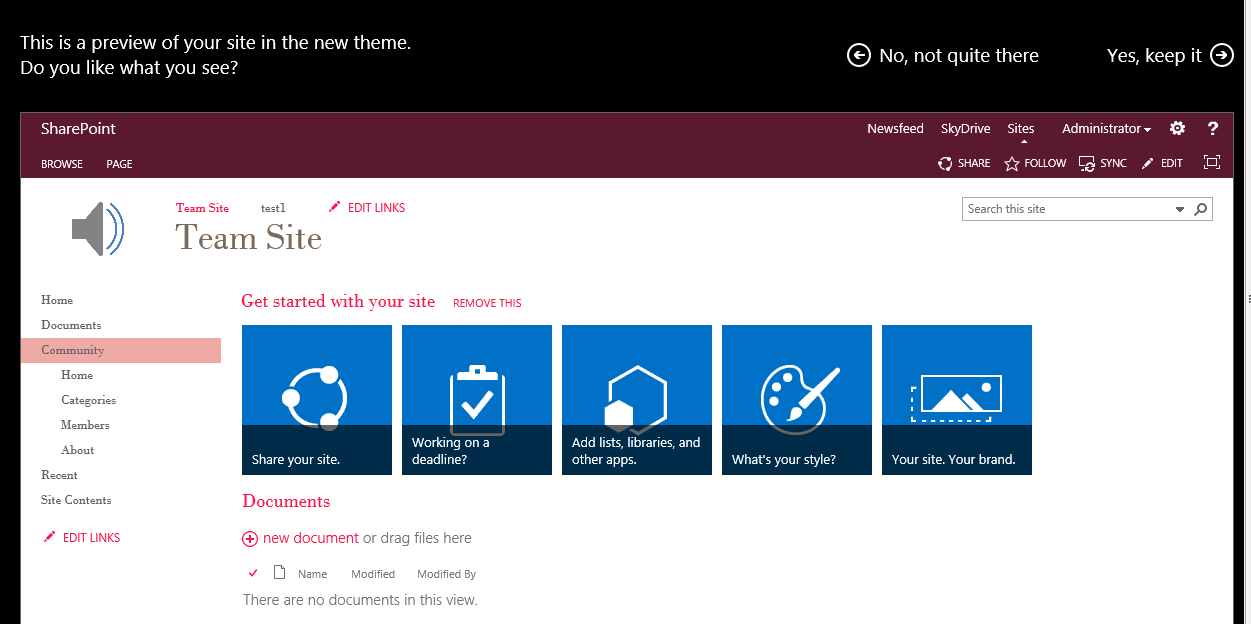
- Now find out new theme(here in my case: Collaboration) and click on it. You will see first preview how site looks with theme.
- Now click on the Try it Out and you will see the final preview of your site. Really very cool feature.
- Now if you are happy with your theme then just click on ‘Yes Keep it’. And theme gets applied to your site.
Hushh. So these are steps to apply theme. Now you have thousands of sites which are migrated and waiting for Theme to get applied. Now??? Got scared of repeating same steps on thousands of sites?? Don’t worry PowerShell is there with its power to help you.
Complete PowerShell Script
This is complete PowerShell snippet which you can use to deploy and apply theme to your environment. I have not tested it for ‘My Sites’ but it should work practically.
Add-PSSnapin "Microsoft.SharePoint.PowerShell" -ErrorAction SilentlyContinue;[xml]$inputfile = Get-Content C:\Data\theme\ThemeScriptInput.xml $ColorFilePartUrl = "/_catalogs/theme/15/";$FontFilePartUrl = "/_catalogs/theme/15/";$MasterPagePartUrl = "/_catalogs/masterpage/"; foreach( $site in $inputfile.SiteCollections.site){ $siteurl = $site.url; $themeName = $site.theme; $colorfile = $site.colorfile; $fontfile = $site.fontfile; $masterpage = $site.masterpage; $colorshemeFilePath = $site.colorFilePath; $colorfontFilePath = $site.fontFilePath; $IsfilesToUpload = $site.filesToUpload; Write-Host "$siteurl + " :: " + $themeName + " :: " + $colorfile + " :: " + $fontfile + " :: " + $masterpage"; $site = Get-SPSite $siteurl; $rootweb = $site.RootWeb; if($IsfilesToUpload -eq "true") { #region Upload theme files to the root web gallery $colorSchemeBytes = [System.IO.File]::ReadAllBytes($colorshemeFilePath); $fontSchemeBytes = [System.IO.File]::ReadAllBytes($colorfontFilePath); $rootweb.allowunsafeupdates = $true; $themeList = $rootweb.GetCatalog([Microsoft.SharePoint.SPListTemplateType]::ThemeCatalog); $folder = $themeList.RootFolder.SubFolders["15"]; $folder.Files.Add($colorfile,$colorSchemeBytes,$true); $folder.Files.Add($fontfile,$fontSchemeBytes, $true); $rootweb.allowunsafeupdates = $false; #endregion } $colorfile=$site.AllWebs[0].GetFile("$siteurl$ColorFilePartUrl$colorfile"); $fontfile=$site.AllWebs[0].GetFile("$siteurl$FontFilePartUrl$fontfile"); foreach ($Web in $site.AllWebs) { Write-Host "processing: " $Web.Title; $Web.allowunsafeupdates = $true; $relativeUrl = $Web.ServerRelativeUrl; $spList = $Web.GetCatalog([Microsoft.SharePoint.SPListTemplateType]::DesignCatalog); #region Add New theme to the Composed Looks gallery $SPQuery1 = New-Object Microsoft.SharePoint.SPQuery; $SPQuery1.Query = "<Where><Eq><FieldRef Name='Name'/><Value Type='Text'>$themeName</Value></Eq></Where>"; $SPQuery1.RowLimit = 1; $SPQuery1.ViewFields = "<FieldRef Name='Name'/>"; $SPQuery1.ViewFieldsOnly = $true; $spListItems1 = $spList.GetItems($SPQuery1); if($spListItems1.Count -eq 0) { $newThemeItem = $spList.AddItem(); $newThemeItem["Name"] = $themeName; $newThemeItem["Title"] = $themeName; $newThemeItem["MasterPageUrl"] = "$relativeUrl$MasterPagePartUrl$masterpage";#$Web.MasterUrl; $newThemeItem["ThemeUrl"] = "$ColorFilePartUrl$colorfile"; $newThemeItem["FontSchemeUrl"] = "$FontFilePartUrl$fontfile"; $newThemeItem["DisplayOrder"] = 121; $newThemeItem.Update(); } #endregion #region Set the theme $theme=[Microsoft.SharePoint.Utilities.SPTheme]::Open($themeName, $colorfile); Write-Host $theme.Name "to" $Web.Title; $theme.ApplyTo($Web, $false); #endregion #region Set applied theme as current theme $SPQuery = New-Object Microsoft.SharePoint.SPQuery; $SPQuery.Query = "<Where><Eq><FieldRef Name='DisplayOrder'/><Value Type='Number'>0</Value></Eq></Where>"; $SPQuery.RowLimit = 1; $SPQuery.ViewFields = "<FieldRef Name='DisplayOrder'/>"; $SPQuery.ViewFieldsOnly = $true; $spListItems = $spList.GetItems($SPQuery); if($spListItems.Count -eq 1) { $spListItems[0].Delete(); } $currentThemeItem = $spList.AddItem(); $currentThemeItem["Name"] = [Microsoft.SharePoint.SPResource]::GetString([System.Threading.Thread]::CurrentThread.CurrentUICulture, [Microsoft.SharePoint.Strings]::DesignGalleryCurrentItemName); $currentThemeItem["Title"] = [Microsoft.SharePoint.SPResource]::GetString([System.Threading.Thread]::CurrentThread.CurrentUICulture,[Microsoft.SharePoint.Strings]::DesignGalleryCurrentItemName); $currentThemeItem["MasterPageUrl"] = "$relativeUrl$MasterPagePartUrl$masterpage";#$Web.MasterUrl; $currentThemeItem["ThemeUrl"] = "$ColorFilePartUrl$colorfile"; $currentThemeItem["FontSchemeUrl"] = "$FontFilePartUrl$fontfile"; $currentThemeItem["DisplayOrder"] = 0; $currentThemeItem.Update(); #endregion $Web.allowunsafeupdates = $false; Write-Host "Set" $theme.Name "theme to :" $Web.Title "(" $Web.Url ")" ; } }
Input File
<SiteCollections>
  <site>
    <url>http://local/sites/MyBlog<;/url>
    <theme>Collaboration</theme>
   <filesToUpload>false</filesToUpload>
    <colorFilePath>C:\theme\collaborationcolor.spcolor</colorFilePath>
    <fontFilePath>C:\theme\collaborationfontscheme.spfont</fontFilePath>
    <colorfile>collaborationcolor.spcolor</colorfile>
   <fontfile>collaborationfontscheme.spfont</fontfile>
    <masterpage>seattle.master</masterpage>
  </site>
  <site>
    <url>http://local<;/url>
    <theme>Collaboration</theme>
    <filesToUpload>true</filesToUpload>
    <colorFilePath>C:\theme\collaborationcolor.spcolor</colorFilePath>
    <fontFilePath>C:\theme\collaborationfontscheme.spfont</fontFilePath>
    <colorfile>collaborationcolor.spcolor</colorfile>
    <fontfile>collaborationfontscheme.spfont</fontfile>
    <masterpage>seattle.master</masterpage>
  </site>
</SiteCollections>
PowerShell Script walk through
Now let’s go through the code snippet and understand it.
Add-PSSnapin "Microsoft.SharePoint.PowerShell" -ErrorAction SilentlyContinue;
Above command adds the SharePoint snap in to the PowerShell console.
[xml]$inputfile = Get-Content C:\Data\theme\ThemeScriptInput.xml
Above command will load the input xml file in context.
foreach( $site in $inputfile.SiteCollections.site)
Above foreach loop will traverse through all site collections provided in xml file.
Now once we have all input ready then first task is: upload the color palette and font scheme files to the theme gallery of site collection. We need to upload those two files to root web and then you can reuse them in all sub sites. Region “Upload theme files to the root web gallery ” has complete snippet which reads file from provided file location and uploads to theme library.
Now once file gets uploaded get their references which are required while applying theme. Following lines gives you files from the theme gallery:
$colorfile=$site.AllWebs[0].GetFile("$siteurl$ColorFilePartUrl$colorfile");
$fontfile=$site.AllWebs[0].GetFile("$siteurl$FontFilePartUrl$fontfile");
Next foreach loop traverse through the all sub sites of the site collection and applies themes. First of all it gets the web design gallery/list with following command:
$spList = $Web.GetCatalog([Microsoft.SharePoint.SPListTemplateType]::DesignCatalog);
Now once design gallery is available script will add new composition/theme in the gallery/list. It first checks whether same composition is present or not, if it is present then it skips the creation. Region “Add New theme to the Composed Looks gallery ” adds new composition/theme.
Once composition/theme gets added successfully next step is to apply it. And region “Set the theme ” has code snippet to apply theme. Following are important command lines:
$theme=[Microsoft.SharePoint.Utilities.SPTheme]::Open($themeName, $colorfile);
Write-Host $theme.Name "to" $Web.Title;
$theme.ApplyTo($Web, $false);
‘ApplyTo’ method is important here which actually applies theme to the site. Before that you have to get the reference of theme as shown in above snippet.
The last step is once you apply theme successfully you have to make it current theme in design gallery. If you check the manual steps does same then we also have to do it in our script. And our region “region Set applied theme as current theme ” does the same. It first deletes the old current theme and add new entry with our theme parameter as current theme.
Input File Walk through
The description of each node is as follow:
SiteCollections – this is parent node which can have multiple ‘site’ nodes. It means you can put ‘n’ numbers sites here.
Site – this node contains all required parameter for that specific site.
url – this is URL of site collection. Do not add ‘/’ at the end.
Theme – this is name of theme by which your theme will be known in SharePoint.
filesToUpload – this is flag which decides whether file upload is needed or not. true- files needs to upload, false- no need to upload file.
colorFilePath – this is the file location of ‘.spcolor’ file which needs to upload to theme gallery.
fontFilePath – this is the file location of ‘.spfont’ file which needs to upload to theme gallery.
Colorfile – it contains name of the color or .spcolor file.
fontfile – it contains name of the font or .spfont file.
masterpage – it contains name of the master page file.
Generate input xml file carefully and enjoy the painless deployment.
So this is all about the SharePoint theme and deployment script.

