Hyper-V 2008 R2: Delegate Access Control and Management
Note: This article is based on Hyper-V 2.0, this might not apply to Hyper-V 3.0 (Server 2012)
Overview
Delegating access control and management in Hyper-V.
Concept
When implementing a virtualized environment Hyper is necessary to control access by user groups to virtual machines (VMs) as administrators, help desk, Developers, etc, each one with their specific access. For example, one should have total control; another group cannot turn off or create new VMs and another without access to take the snapshot. For those working in large environments with various administrative levels is very important delegation of administration lest any unforeseen or even an improper access. **
**
Authorization Manager (azman)
Before we begin the procedure is important to know that the Hyper-V services controlled with the Authorization Manager (azman), where you can grant permission via Access Control Lists (ACL). In the same way you control access to a folder or
file permissions, Azman controls access to applications or services. In this case the Hyper-V.
To open the AzMan, log on as administrator on the Hyper-V server and run the command azman.msc on the Start menu. After that, right-click Authorization Manager and then, after the Authorization Store opens, enter the path C:\ProgramData\Microsoft\Windows\Hyper-V\InitialStore.xml, as in figure 1. **
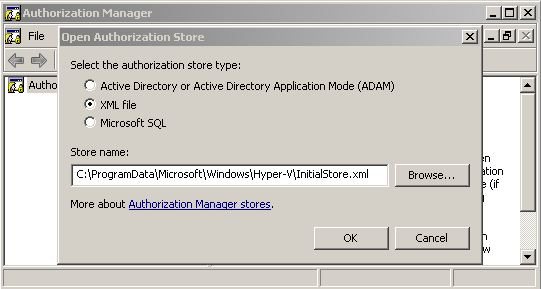
**Figure 1 - Open the Authorization Manager to manage the permissions on Hyper-V
Expand Hyper-V Services and click on Definitions.
Role Definitions are used to create groups to control access to Hyper-V;
Task Definitions are used to centralize the permissions settings of the VMs to shut down, visualize, monitor, etc.
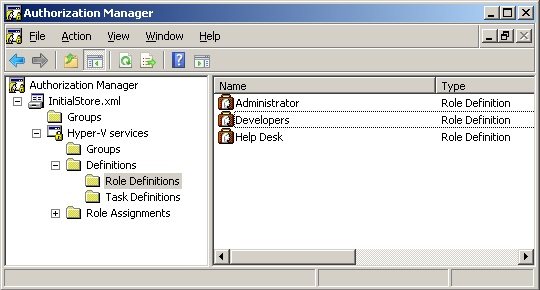
In this example scenario we have three groups which will be defined in Role Definitions: Administrators (this already exists by default), Developers and Help Desk. To create them right-click Role Definitions and then click New Role Definition. The groups will be listed on the right of the screen, as Figure 2:
** **
**
Figure 2 - Definitions Roles
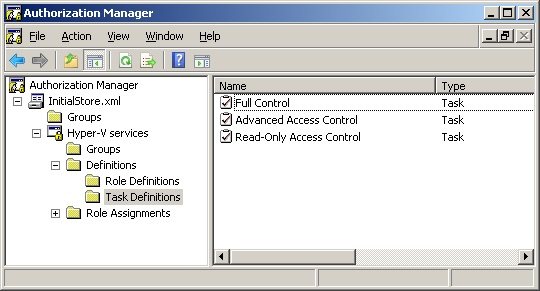
Then I’m creating 3 Task Definitions to facilitate the administration of access to groups with the names Full Control, Advanced Access Control and Read-Only Access Control. To create them, right click on Task Definitions and then New Task Definitions. You'll see later that it is not necessary the creation of these task definitions, but will greatly assist in facilitating change in time to control access to any group.**
 **
**
Figure 3 - Task Definitions List
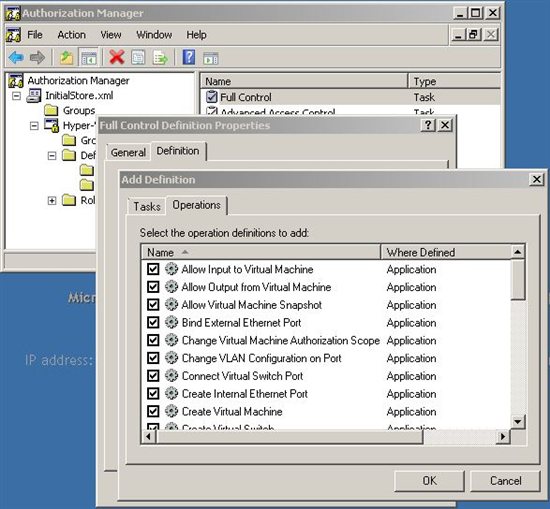
The next step will give access to each Task Definitions by right clicking the mouse button and then clicking in Properties on the task you want to track and then select the tab Definitions, click Add and then click Operations. A window with all the access rights for the service of Hyper-V will appear. In Figure 4 has been granted all permissions to Full Control Task Definitions.**
 **
**
Figure 4 - Access rights for Hyper-V.
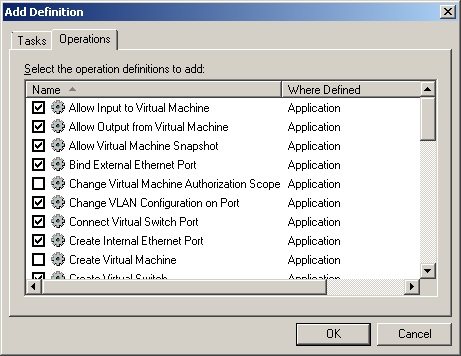
In the Advanced Access Control Task were granted access to certain settings with certain restrictions such as not to create virtual machines, do not change the scope of authorization, etc. The group Read-Only Access Control was given only the display settings and connection to the VMs, without access to take snapshots, creations, deletions, and others. **
 **
**
Figure 5 - Advanced Access Control Settings
Now, back on Role Definitions, right click on the specific group and click Properties. Click the Definition tab, then click Add. In the Task tab, select the Task Definitions appropriate to the selected group and then click OK.
Notice in Figure 6, where it is given permission to the group Advanced Access Control Developers, Is possible to add the definitions directly to the group without a Task Definitions however, when using a task for many groups will be easier to change all at the same time. After that the group will have access according to its Task Definition. **
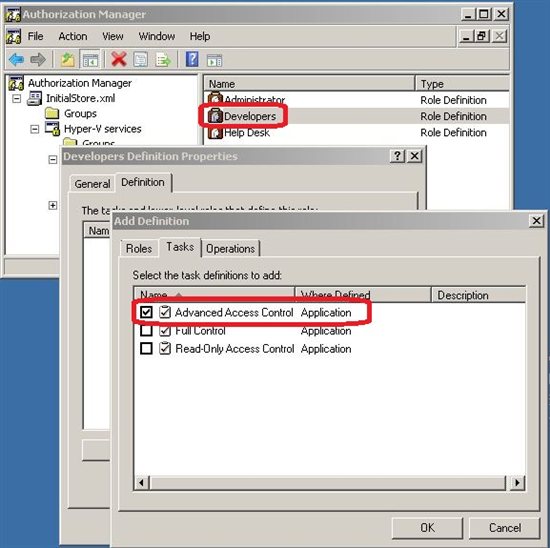
**Figure 6 - Advanced Access Control to the Developers group
To finalize the permit process is necessary to add the local or the Active Directory group to Roles Definitions that were created. To do that, right click on Role Assignments and then New Roles Assignments. Select the Roles Definitions and click OK. They are displayed, as shown in Figure 7.
** 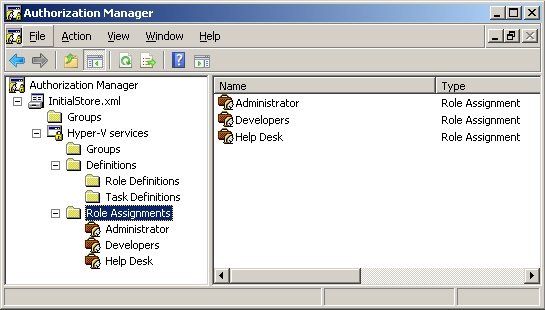
**Figure 7 - Role Assignments added
Then, click on the group and click on Assign Users and Groups and click From Windows and Active Directory. Select
the group and click OK. It will appear on the screen to the right of Authorization Manager, as shown in Figure 8. **
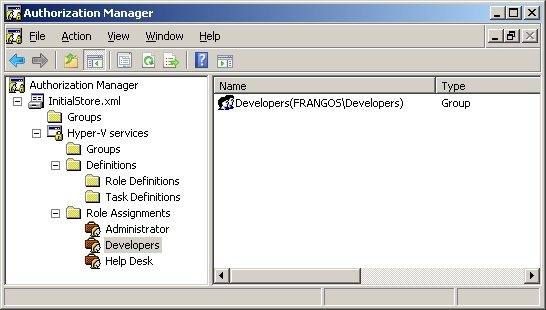
**Figure 8 - Group added in the Role Definition
Now just add the users to their groups and is already working.
Remember that this procedure can also be used in Windows Server 2008, but without the definition of Snapshots. **
**
Leandro Carvalho
MCSA+S+M | MCSE+S | MCTS | MCITP | MCBMSS | MCT | MVP Virtual Machine
MSVirtualization | Wordpress | Winsec.org | LinhadeCodigo | MVP Profile
Twitter: LeandroEduardo | LinkedIn: Leandroesc