BizTalk Server EDI Scenario: Send an X12 Message Over AS2 and Receive an Asynchronous MDN
The instructions in this article are targeted for a two-machine scenario where both trading partners involved in a B2B scenario have their BizTalk Server setup. If you are looking for a single-machine scenario, see Walkthrough: Sending EDI over AS2 with an Asynchronous MDN.
This article applies to BizTalk Server 2006 R2 and BizTalk Server 2009. For information on how to set up B2B messaging between two trading partners using BizTalk Server 2010, see Developing and Configuring BizTalk Server AS2 Solutions.
Note:To view a complete list of BizTalk Server articles that are available on the TechNet wiki, see BizTalk Server Resources on the TechNet Wiki.
Acknowledgements
We in the BizTalk Server CCxG team gratefully acknowledge the contributions of the following individuals for providing their valuable inputs for setting up the end-to-end scenario used in this article:
- Chibi Chakaravarthi. V., BizTalk Server Product Team
- Farida Bharmal, BizTalk Server PSS
Contents
- EDI Basics
- AS2 Basics
- EDI/AS2 Support in BizTalk Server
- Set up the Scenario
- Test the Scenario
- Understand the Message Flow
- Common Errors and Troubleshooting Steps
- Download Content Related to this Article
EDI Basics
Note: If you are a new entrant into the world of EDI messaging, you might first want to familiarize yourself with some of the terms that you will read/hear when working with EDI messages. Most of these terms are related to the structure of an EDI message, such as interchange, transaction set, etc. A good place to start reading about these terms would be EDI Messaging.
Electronic Data Interchange (EDI) is the single most commonly used means by which business trading partners exchange data electronically. EDI is largely messaging-oriented. Documents are implemented as flat files that can include batched transaction sets. Batched interchanges can contain multiple groups, each of which can contain multiple transaction sets or messages.
EDI consists of specific data interchange methods agreed upon by standards bodies. The primary EDI standards are X12 (standardized by ANSI and used primarily in North America) and EDIFACT (standardized by the United Nations and used primarily outside the U.S.). Other standards are derived from these, for example, HIPAA from X12 and KEDIFACT in Korea from EDIFACT. The standards are closely parallel in message structure and acknowledgment schemes, but have distinct differences.
The EDI standards prescribe the following:
- The formats, character sets, and data elements used in the exchange of documents
- The envelopes used in EDI transaction
- The acknowledgments required to verify delivery
- How to provide guaranteed, exactly-once delivery, and automatic detection and reporting of corrupted or incorrect data.
While the EDI standards establish the rules for the structure of the document, trading partners exchanging EDI messages must agree on the specific information to be transmitted and how it should be used. For example, the partners must agree on details like:
- Who will be the sender of the message and who will be the receiver of the message
- Whether the message sender expects an acknowledgment
- What delimiter to use as a separator for elements in the EDI message
- Etc.
In the context of BizTalk Server, the process of defining these parameters of EDI message exchange is achieved by creating a "party" in the BizTalk Server Administration console and then setting the parameters as properties for the party. For more information, see EDI Support in BizTalk Server.
EDI messages are distinguished from their transport. The EDI standards do not prescribe message transport, and EDI messages can be sent by a variety of different means. One such medium is using AS2.
AS2 Basics
One of the most common ways of transferring EDI messages over the Internet is EDIINT-AS2 (EDI over the Internet - Applicability Statement 2), simply called AS2. AS2 uses the HTTP POST operation to send EDI, XML, or other business data. AS2 is not restricted to sending EDI data. In response to an AS2 message, a message disposition notification (MDN) is returned as an acknowledgment, provided the sender of the AS2 messages expects an MDN. Here are some quick bytes about AS2 transport:
- AS2 messages are always sent using HTTP protocol
- The basic structure of an AS2 message consists of MIME format inside an HTTP message with additional AS2-specific headers.
- Optionally the messages can be signed and encrypted.
For more information about AS2 messages, see AS2 Messaging.
EDI/AS2 Support in BizTalk Server
Before we start discussing how BizTalk Server supports EDI messaging over AS2, let us understand a couple of terms:
- A "home organization" is an organization that hosts BizTalk Server and trades with other business partners.
- A "partner organization" is a business partner for the home organization. A partner organization may or may not have BizTalk Server.
One can use BizTalk Server in either of the following ways to set up EDI/AS2 messaging between trading partners:
- Only one of the trading partners have a BizTalk Server set up. In such a case, the partner that hosts BizTalk Server in-house creates a party for its trading organization. For example, if Company A and Company B are business partners and Company A has a BizTalk Server set up, Company A will create a party for Company B and then set the properties for the party.
Note: A home organization does not have to define itself as a party.
- Both trading partners have a BizTalk Server set up. In such a case, both the trading partners will create a party for the other trading partner in their BizTalk Server set up. To continue with the previous example, Company A will create a party for Company B in its BizTalk Server setup and Company B will create a party for Company A. Both will then set properties for the parties such that the configurations are compatible. For example, if Company A is expecting an acknowledgement from Company B, Company B must be configured to send an acknowledgement.
- Neither of the trading partners have a BizTalk Server set up. In such a case, a third entity, also called the broker organization sets up parties for both Company A and Company B, and then defines the properties as agreed upon by the trading partners.
This article covers the second scenario where both the business partners have a BizTalk Server environment.
Now that we have defined the difference between a home organization and a partner organization, and who will create a party for whom, the next thing to understand is what properties are set for a party. You can set the following properties for a party:
- General party properties such as name, contact information, send ports associated with the party, etc.
- EDI properties that define how BizTalk Server will process an incoming message from the party and how it will generate an outgoing message bound to the party.
- AS2 properties that define how BizTalk Server will perform AS2 communications, both incoming and outgoing. These properties affect EDI communications only when an EDI message is sent over AS2. AS2 properties are used to configure settings such as:
- Whether BizTalk Server checks for duplicate messages
- Whether MDN is returned synchronously or asynchronously. A synchronous MDN is sent over the same communication channel over which the AS2 message was received. An asynchronous MDN is returned over a different communication channel.
- Whether MDN is sent even if the message sender does not expect an MDN back.
- Whether AS2 status reporting is used to track message exchange.
- Etc.
Note: Configuring general and EDI properties are mandatory for setting up EDI message exchange. AS2 properties are required only if the trading partners are using AS2 transport to exchange messages. Messages can also be exchanged using other means such as using a file adapter, etc.
Set up the Scenario
Now that we have covered some basics of EDI messaging and how BizTalk Server supports EDI, let us go over the scenario we will use in this article to demonstrate how you can use BizTalk Server to process EDI messages over AS2.
- The scenario involves sending an EDI X12 purchase order message (850) over AS2 from one trading partner, Fabrikam, to another trading partner, Contoso.
Note: The message is neither signed nor encrypted.
After Contoso receives the message, it sends back an MDN "asynchronously" to Fabrikam. Contoso also sends EDI acknowledgements 997 and TA1 back to Fabrikam.
Both the trading partners have BizTalk Server configured at their end.
Let us assume that the message that will be transferred is SamplePO.txt. This sample message is available with your BizTalk Server installation under <install drive>:\Program Files\Microsoft BizTalk Server 2006\SDK\EDI Interface Developer Tutorial. Here's the message to be transferred:
ISA*00* *00* *ZZ*THEM *ZZ*US *991221*1226*U*00401*000000025*0*T*>
GS*PO*THEM*US*19991221*1226*1*X*004010
ST*850*0001
BEG*00*NE*3859199838**950727***IBM
PER*AA*Andrew Carlson*TE*(708) 555-2930
DTM*002*970523
PO1*1*93*BX*145.39**CB*KOW-20392-10
PID*F****Uninterruptible Power System
PER*AA*Camilla Anderson*TE*(708) 555-2011
PO1*2*25*EA*35.68**CB*1093-4927-001
PID*F****High Volume Printer Stand
PER*AA*Miranda Cappelan*TE*(708) 555-1111
PO1*3*4*PC*2002.91**CB*ABX-2001
PID*F****Electronics Cabinet Package (56" High)
CTT*3
SE*14*0001
GE*1*1
IEA*1*000000025
Let us now see how both the trading partners will configure this scenario in their respective BizTalk Server environments.
Prerequisites
To set up this scenario, you must have the following:
A computer with BizTalk Server installed and configured (including EDI/AS2 configuration). This machine will represent the FABRIKAM trading partner. We will call this computer FABKAM-BIZTALK
Note: Using a computer name like FABRIKAM-BIZTALK was not possible because that would have been more than 15 characters long.
A computer with BizTalk Server installed and configured (including EDI/AS2 configuration). This machine will represent the CONTOSO trading partner. We will call this computer CONTOSO-BIZTALK.
At Fabrikam
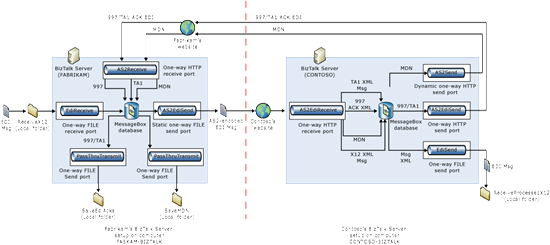
The main requirement at the Fabrikam side would be to simply send the message to Contoso using BizTalk Server and then receive an MDN. To achieve that, Fabrikam's BizTalk Server setup must have:
- A website to receive MDN sent over AS2 transport (HTTP).
- Following file folders:
- A local folder from where the FILE receive port will pick the X12 message to be sent to Contoso.
- A local folder where the MDNs from Contoso will be saved.
- A local folder where the 997 and TA1 acknowledgements from Contoso will be saved.
- A FILE receive port with an EdiReceive pipeline to consume the X12 message and move it to the BizTalk Server message box.
- An HTTP send port with AS2EdiSend pipeline that subscribes to the X12 message in the message box and sends it using AS2 transport to a website configured at Contoso's end.
- An HTTP receive port with AS2Receive pipeline that consumes the MDN and acknowledgements received by Fabrikam's website and moves it to the BizTalk Server message box.
- A FILE sends port with a PassThruTransmit pipeline that subscribes to the MDN in the message box and copies it over to a file folder.
- A FILE sends port with a PassThruTransmit pipeline that subscribes to the 997 and TA1 acks in the message box and copies it over to a file folder.
- A party for Contoso that has the relevant EDI and AS2 properties set.
- The schema of the EDI message to be transferred must be deployed in BizTalk Server.
At Contoso
Most of the tasks related to the scenario such as processing the X12 message, generating the MDN and acknowledgements, sending the MDN and acknowledgements to Fabrikam, etc. happen in the Contoso's BizTalk Server setup. To achieve that, Contoso's BizTalk Server setup must have:
- A website to receive the X12 message over AS2 transport (HTTP).
- Following file folders:
- A local folder to which the X12 message will be copied after being processed by Contoso's BizTalk Server setup.
- An HTTP receive port with an AS2EdiReceive pipeline that consumes the X12/AS2 message that has been received by Contoso's website and moves it to the BizTalk Server message box.
- A FILE send port with an EdiSend pipeline that subscribes to the X12 message in the message box and sends it over to a file folder created locally.
- A dynamic send port with AS2Send pipeline that subscribes to the MDN in the message box and sends it over to the Fabrikam's website.
- An HTTP send port with AS2EdiSend pipeline that subscribes to the 997 and TA1 acknowledgements in the message box and sends it over to the Fabrikam's website.
Note: If you are wondering how the MDN, 997, and TA1 appear in the message box, here's some quick information. When the AS2EdiReceive pipeline processes an X12 message, it stores the X12 message in the message box as XML and in parallel also creates MDN, 997, and TA1 also stores them in the message box. We'll discuss more about this when we get to the point where we create these ports.
- A party for Fabrikam that has the relevant EDI and AS2 properties set.
- The schema of the EDI message to be received must be deployed in BizTalk Server.
The following illustration depicts how the scenario is set up for Fabrikam and Contoso.
Let us now start setting up the BizTalk Server environment for Fabrikam to send the X12/AS2 message to Contoso.
Set up the Scenario at Fabrikam
In this section, we will perform the tasks required at Fabrikam to set up the scenario we discussed above.
Create a Website for Fabrikam
In this step, you will create a website for Fabrikam that will receive the MDNs and EDI acknowledgements sent from Contoso. Before we start creating the website, let us understand a few concepts. BizTalk Server ships a BTSHttpReceive.dll that is used to receive messages sent to a website. To use this DLL, it should be added to the IIS as web service extension, also called Internet Server API (ISAPI) extensions. ISAPI extensions extend the ability of your website which, by default, might only serve static content to reduce cyber threats. Now coming back to our scenario, this is what we need to do:
- Add BTSHttpReceive.dll as an ISAPI extension.
- Create an application pool under which your website will run.
- Create a website for Fabrikam and assign it to the application pool.
Let's start.
- Add ISAPI extension for BTSHttpReceive.dll, if not already added.
By default, BTSHttpReceive.dll is already added as an extension. To verify, open IIS Manager and click Web Service Extensions. In the right pane, check for HwsMessages HttpReceive entry and verify if the status is set to Allowed. Also, open the properties for the HwsMessages HttpReceive entry, and on the Required Files tab, verify that the file name is set to C:\Program Files\Microsoft BizTalk Server 2006\HttpReceive\BTSHttpReceive.dll.
If the extension does not already exist, create one. In the IIS Manager dialog box, right-click Web Service Extensions, and then click Add a new Web service extension.
In the New Web Service Extension dialog box, enter BTS Http Receive ISAPI Filter as the extension name.
Click Add.
In the Add file dialog box, browse to drive:\Program Files\Microsoft BizTalk Server 2006\HttpReceive. Select BTSHTTPReceive.dll, and then click Open.
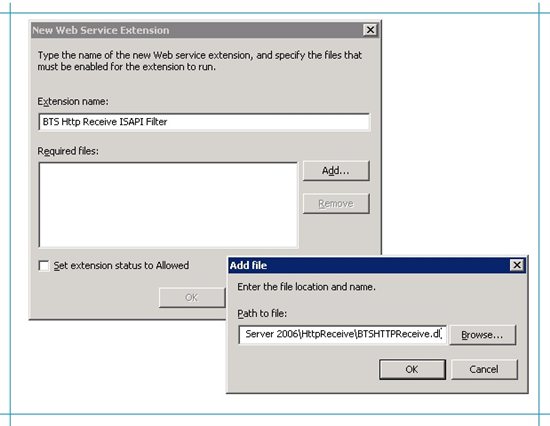
Select the check box for Set extension status to Allowed.
In the New Web Service Extension dialog box, click OK.
- Create an application pool.
In IIS Manager, right-click Application Pools, point to New, and then click Application Pools.
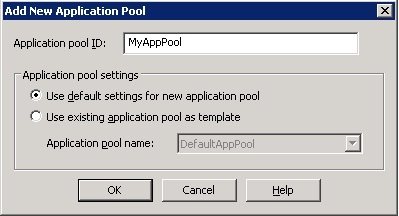
In the Add New Application Pool dialog box, give the application pool ID as MyAppPool. Select the option to Use default settings for new application pool, and click OK.
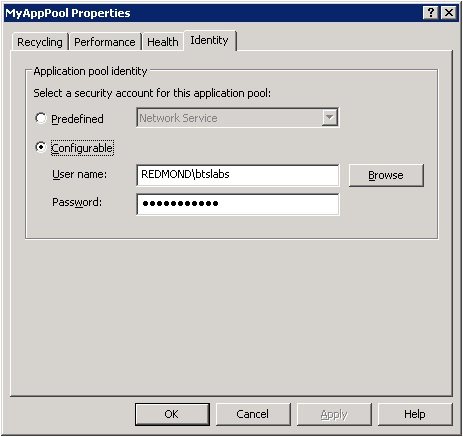
In the console tree, under Application Pools, right-click MyAppPool application pool, and in the properties dialog box, click the Identity tab. Make sure the user name listed under Configurable is an administrator on the server. Click OK.
- Create a website for Fabrikam.
In IIS Manager, click Web Sites, right-click Default Web Site, point to New, and then click Virtual Directory.
In the Welcome to the Virtual Directory Creation Wizard page, click Next.
On the Virtual Directory Alias page, enter Fabrikam as the Alias, and then click Next.
On the Web Site Content Directory page, browse to drive:\Program Files\Microsoft BizTalk Server 2006\HttpReceive for the Path. Click Next.
On the Virtual Directory Access Permissions page, select Execute (such as ISAPI applications or CGI). Leave Read selected. Click Next and then click Finish.
In IIS Manager, right-click the Fabrikam virtual directory, click Properties, and on the Virtual Directory tab, for Application Pool, select MyAppPool.
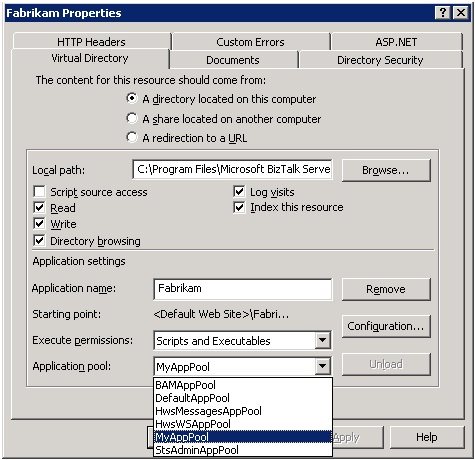
Click OK to close the Fabrikam properties dialog box.
To verify if the website was configured properly, right-click the Fabrikam website and click Browse. You must be able to see BTSHttpReceive.dll listed in the right pane. Clicking the link to the DLL should give the "HTTP 500 Internal Error".
Create File Folders
On the FABKAM-BIZTALK computer, under C: drive, create a folder called Messages.
Within the Messages directory, create the following folders:
Folder Name Folder Access Remarks ReceiveX12 Local access Will be used to drop the request message ReceiveMDN Local access Will be used to save the MDN ReceiveEdiAcks Local access Will be used to save the 997 and TA1 acknowledgements
Create a FILE receive port to receive the X12 message
You must create a FILE receive port to get the X12 message into the BizTalk Server message box.
In BizTalk Server Administration console, under BizTalk Application 1, right-click Receive Ports, point to New, and then select One-way Receive Port.
Name the receive port as ReceiveX12, and then click Receive Locations in the left pane.
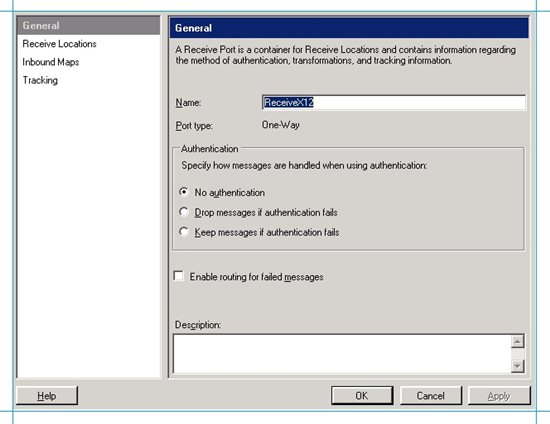
In the right pane, click New and provide a name for the receive location, such as ReceiveX12_Location.
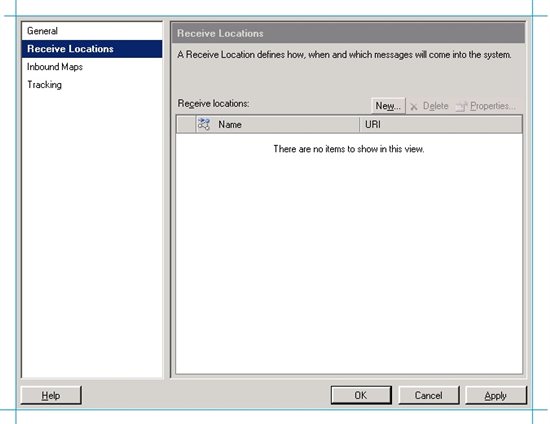
Set the transport type to FILE and click Configure.
For the Receive folder text box, specify C:\Messages\ReceiveX12.
For the File mask text box, specify *.txt. This is because the X12 message that we will use in this scenario is in a .txt file. Depending on the file extension of your X12 message, you can set the file mask accordingly.
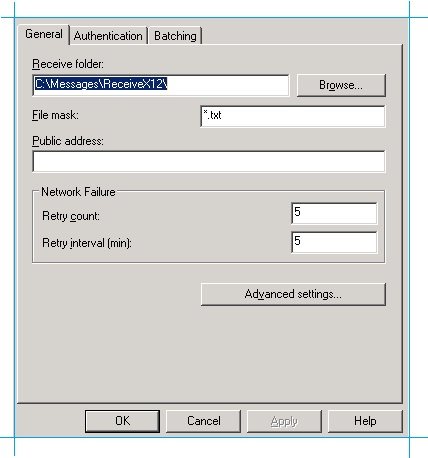
Click OK.
In the Receive Location Properties dialog box, select BizTalkServerApplication as the receive handler and then select the EdiReceive as the receive pipeline.
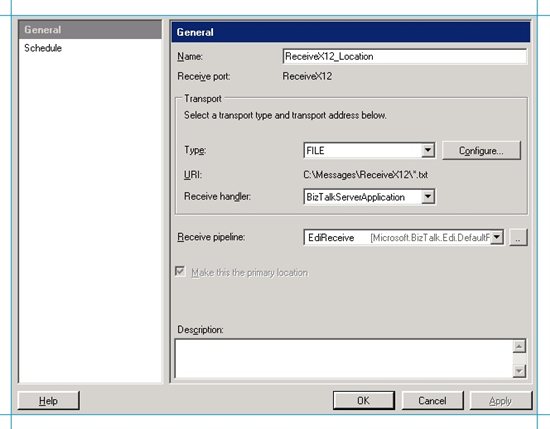
Note: Even though we just need to route the message to the shared folder on Contoso, we use the EdiReceive pipeline because the EdiReceive pipeline will convert the message to XML and then dump to the BizTalk Server message box database. We will then be able to use AS2EdiSend pipeline on the send port that sends the message to Contoso because AS2EdiSend pipeline takes and XML message. If we use a PassThruReceive pipeline here, the message in the message box will be in X12 format and so we would have to use a PassThruTransmit pipeline on the send port as well.
Click OK on the Receive Location Properties dialog box, and then click OK on the Receive Port Properties dialog box.
Create an HTTP send port to send the X12 message using AS2
You must create an HTTP send port that will subscribe to the X12 message stored in the BizTalk Server message box and send it over to Contoso's website using the AS2 transport.
Verify whether Contoso has created a website. The website must be accessible at http://Contoso-BizTalk/Contoso/BTSHttpReceive.dll.
In BizTalk Server Administration console, under BizTalk Application 1, right-click Send Ports, point to New, and then select Static One-way Send Port.
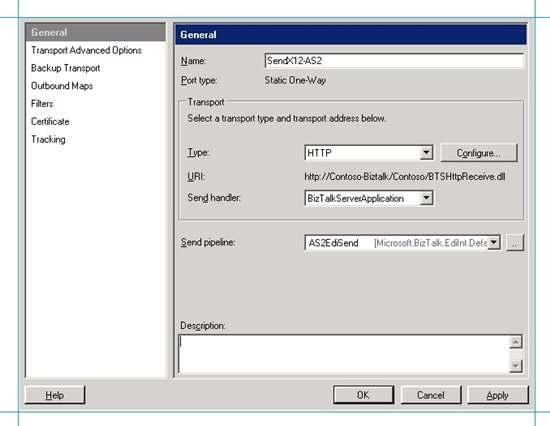
Name the send port as SendX12-AS2, select the transport type as HTTP, and then click Configure.
In the HTTP Transport Properties dialog box, for Destination URL, enter http://Contoso-BizTalk/Contoso/BTSHttpReceive.dll and then click OK.
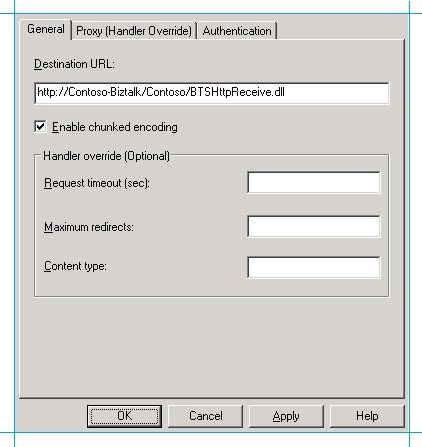
For Send pipeline, select AS2EdiSend. You use the AS2EdiSend pipeline because the message in the BizTalk message box is an XML message (after being processed by the EdiReceive pipeline) and that has to be passed to the Contoso website over AS2 in an X12 format
In the left pane, click Filters, and enter a filter expression that will be used by the send port to subscribe to the message. For example, you could use the receive location name that will receive the original test message as a filter expression. To do so, for Property, enter BTS.ReceivePortName; for Operator, enter ==; and for Value enter the name of the receive port (ReceiveX12) that you created to receive the X12 message.
Why do we need a filter at all? All the message transfer in BizTalk Server happens via the BizTalk Server message box database, which means there are numerous messages stored there waiting to be consumed. So, how do you figure out which message to pick? That is where filters come in. When you set a filter, you tell BizTalk Server to route only that message to the send port that satisfies the filter criteria.
One such filter is BTS.ReceivePortName, which is used to route the message based on the name of the receive port that initially dumped the message to the BizTalk Server message box. When a message is processed by the receive port, it also promotes the BTS.ReceivePortName on the message and sets it to the name of the receive port. So, in this scenario we can set BTS.ReceivePortName == ReceiveX12.
The next obvious question you might have is, there could be so many more messages coming through the same receive port, each having this property set, how would you then ensure that the correct messages are routed? In that case, we would have to have more filters set. For example, the other filter could be on the type of message. In this scenario, an 850 (purchase order) message will be transferred. The message type of an 850 message is http://schemas.microsoft.com/BizTalk/Edi/X12/2006#X12_00401_850.
So, to route the message based on the message type, I would add another filter. To do so, for Property, enter BTS.MessageType; for Operator, enter ==; and for Value enter http://schemas.microsoft.com/BizTalk/Edi/X12/2006#X12_00401_850. Make sure you group both these filters using the And operator.

Click OK to close the send port properties dialog box.
Create an HTTP Receive Port to consume the MDN and EDI acknowledgements received from Contoso
The MDN and EDI acknowledgements from Contoso will be sent to Fabrikam using AS2 and will be received by the Fabrikam's website. We need to have these messages moved to the BizTalk Server message box so that these can be routed to file folders, etc. To enable this, we need to create a receive port that will move the messages from the website to the BizTalk Server message box.
In BizTalk Server Administration console, under BizTalk Application 1, right-click Receive Ports, point to New, and then select One-way Receive Port.
Name the receive port as RecvAcksFromWebsite, and then click Receive Locations in the left pane.
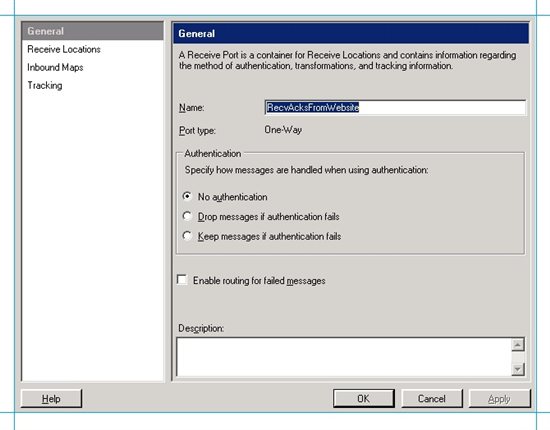
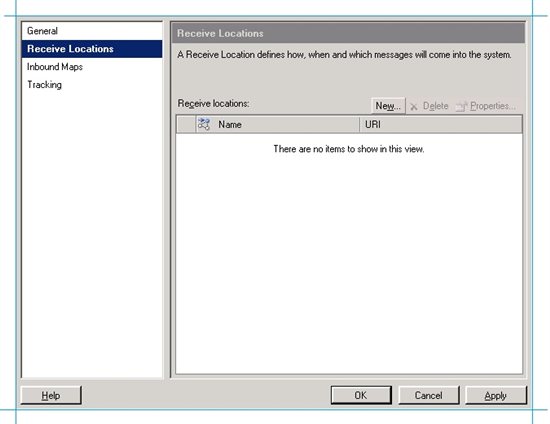
In the right pane, click New and provide a name for the receive location, such as RecvAcksFromWebsite_Location.
Set the transport type to HTTP and click Configure.
In the HTTP Transport Properties dialog box, for Virtual directory plus ISAPI extension, enter /Fabrikam/BTSHttpReceive.dll.
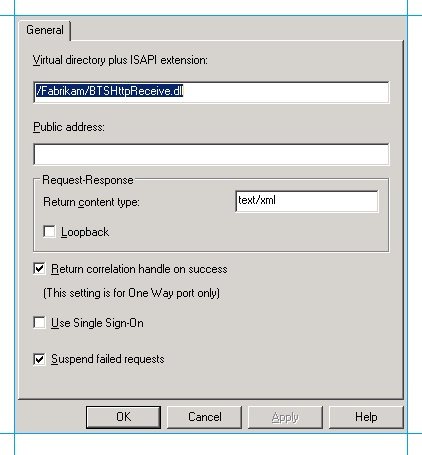
Select check boxes for Return correlation handle on success and Suspend failed requests. Click OK.
Note: Selecting the Suspend failed requests checkbox ensures that BizTalk will record an error if there is a problem with a received message. If BizTalk Server fails to record the error, IIS might crash as it will continuously try resending the failed messages.
Click OK.
In the Receive Location Properties dialog box, select BizTalkServerIsolatedHost as the receive handler and then select the AS2Receive as the receive pipeline.
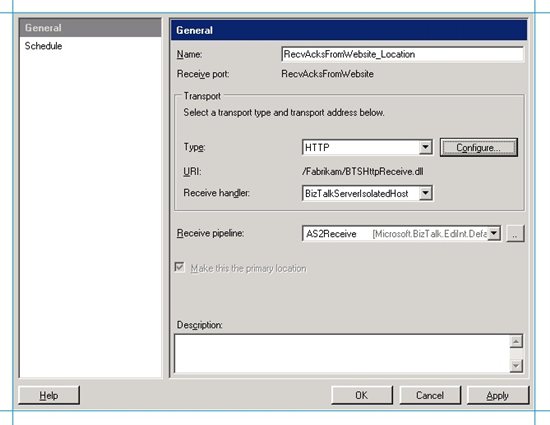
Click OK on the Receive Location Properties dialog box and then click OK on the Receive Port Properties dialog box.
Create a FILE Send Port to Save the MDN to a Local folder
After the MDNs and EDI acknowledgements are stored in the message box database, you can create send ports that will subscribe to these messages and route them to file folders. In this step, we create a send port for routing MDNs. In the next step, we'll create a send port for routing EDI 997 and TA1 acknowledgements.
In BizTalk Server Administration console, under BizTalk Application 1, right-click Send Ports, point to New, and then select Static One-way Send Port.
Name the send port as SaveMDN, select the transport type as FILE, and then click Configure.
For Destination folder, specify C:\Messages\ReceiveMDN.
Specify the file name as %MessageID%.txt so that the MDN is saved in a .txt format.
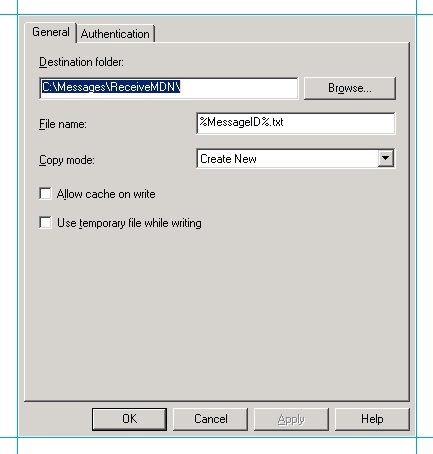
Click OK.
In the Send Port Properties dialog box, select BizTalkServerApplication as the send handler and then select the PassThruTransmit as the send pipeline.
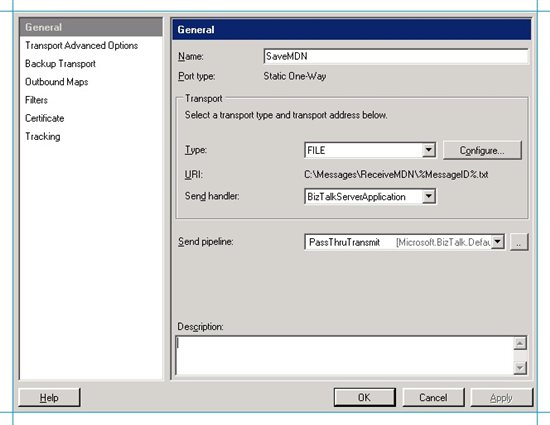
In the left pane, click Filters, and enter a filter expression that will be used by the send port to subscribe to the message. When the MDN sent to the Fabrikam website is processed by the AS2Receive pipeline of the RecvAcksFromWebsite receive location, it promotes the context party IsAS2MdnResponseMessage on the message and sets it to true. This property denotes that the message is an MDN message. So, we can use this property to set a filter so that the send port only subscribes to the MDNs.
So, for Property, enter EdiIntAS.IsAS2MdnResponseMessage; for Operator, enter ==; and for Value, enter true.
This property on the filter will ensure that the EDI 997 and TA1 acknowledgements are not picked by this send port because they won't have this property set to true.

Click OK to close the send port properties dialog box.
Create a FILE send port to save the 997 and TA1 acknowledgements to a local folder
In this step you will create a send port that will route the EDI 997 and TA1 acknowledgements to a file folder.
In BizTalk Server Administration console, under BizTalk Application 1, right-click Send Ports, point to New, and then select Static One-way Send Port.
Name the send port as SaveEDIAcks, select the transport type as FILE, and then click Configure.
For Destination folder, specify C:\Messages\ReceiveEdiAcks.
Specify the file name as %MessageID%.txt so that the acknowledgements are saved in a .txt format.
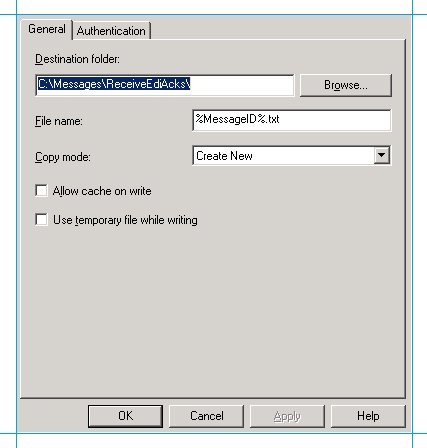
Click OK.
In the Send Port Properties dialog box, select BizTalkServerApplication as the send handler, and then select the PassThruTransmit as the send pipeline.
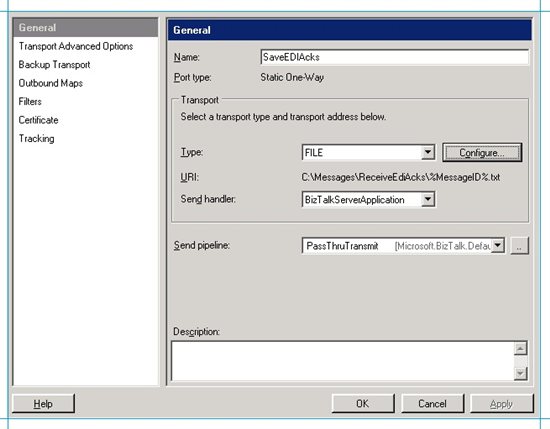
In the left pane, click Filters, and enter a filter expression that will be used by the send port to subscribe to the message. To subscribe only to the EDI acknowledgements (997 and TA1), we again use the property IsAS2MdnResponseMessage. Because the 997 and TA1 are not an MDN message, this property is set to false on the messages by the AS2Receive pipeline that originally stored the messages in the message box.
So, for Property, enter EdiIntAS.IsAS2MdnResponseMessage; for Operator, enter ==; and for Value, enter false.

Note: To be doubly sure that the 997 and TA1s are coming from the partner you intended to, you can also set a filter on the receive port name, as shown in the preceding screenshot.
Click OK to close the send port properties dialog box.
Create a Party for Contoso
Like mentioned previously, in the Fabrikam's BizTalk Server setup, you must create a party for the trading partner, i.e. Contoso, and then set the EDI properties on that party.
Right-click the Parties node in the BizTalk Server Administration Console, point to New, and then click Party.
Enter a name for the party. Because Contoso is receiving the message, let us name the party as Receiver.
In the Aliases list, for Name enter EDIINT-AS2 From Value, for Qualifier enter AS2-From, and for Value enter Receiver. Add another row with the same values, but this time for Name enter EDIINT-AS2 To Value and for Qualifier, enter AS2-To, as shown in the following screenshot.
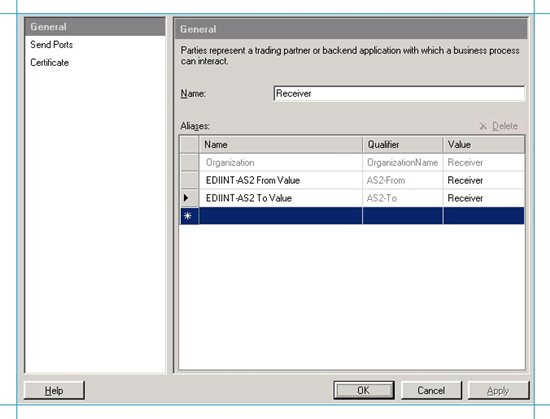
Note: BizTalk Server determines which party properties to be used for AS2 processing by matching the AS2-To context property on the message with the EDIINT AS2-To Value in the aliases list for the party. For more information about how BizTalk Server determines a party for outgoing AS2 messages, see Party Resolution for Outgoing AS2 Messages.
Click Send Ports, and from the Send ports grid, under the Name column, select the send port that you created that will send the interchange to Contoso, and then click OK.
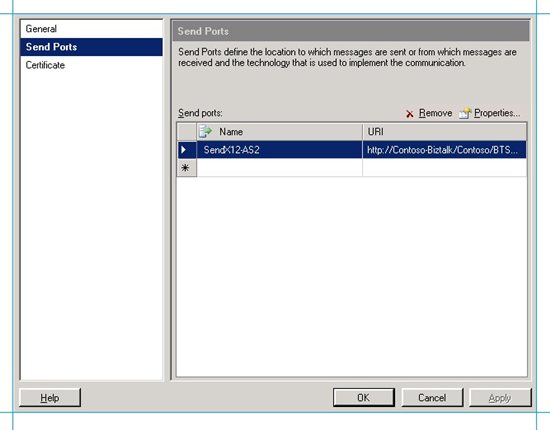
Note: BizTalk Server uses this send port association to determine the party receiving the interchange. After the party is determined, it uses the EDI properties set on the party to process the outgoing interchange.
Set the properties for processing the EDI interchange.
Right-click the party in the Parties pane of the BizTalk Server Administration Console, and then select EDI Properties.
In the General page, click Activate EDI Reporting and click Store transaction set/payload for reporting.
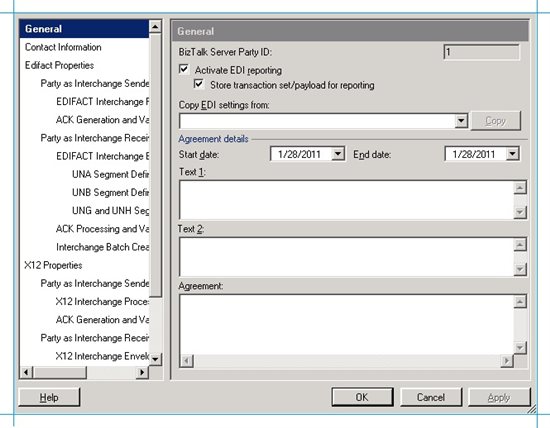
The Activate EDI Reporting option ensures that all interchange-related details for a party are tracked in the status report user interface. The Store transaction set/payload for reporting option ensures that the transaction set details and message content are available to view through the status report interface.
In the left pane, under X12 properties, under Party as Interchange Receiver, click ISA Segment Definition. In this interface you must enter the values for ISA5 to ISA8. The values you enter here will be used by the EdiSend pipeline to create the ISA header for the interchange that will be sent to Contoso. Going by the message (SamplePO.txt), enter the following values:
Use this To do this ISA5 ZZ-Mutually Defined ISA6 THEM ISA7 ZZ-Mutually Defined ISA8 US But, why do we need to add these headers when they are already present in the message that is sent to BizTalk Server? When the EdiReceive pipeline (of the ReceiveX12 receive port) processes the message, it rips of the ISA and GS headers from the message, converts it to XML, and then dumps it to the message box database. Now, when that message is picked up from the message box, before sending it to the desired party, the ISA and GS headers have to be added again to the message. In this step, we provided the information to add the ISA header. In the next steps, we provide the information to add the GS headers.
For more information about how these values are used, see How the EDI Assembler Works.
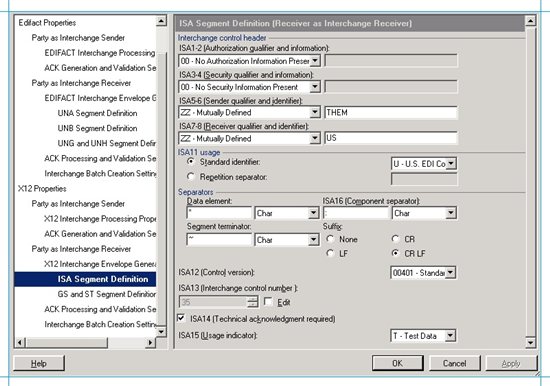
Another thing to question here would be why are these properties being set under Party as Interchange Receiver. That is because the party we created (Receiver) is representing Contoso in Fabrikam's BizTalk Server environment. Because Contoso is "receiving" the interchange, the properties are set under "Party as Interchange Receiver" section.
Under Party as Interchange Receiver, under Separators section, set Suffix to CR LF.
Under Party as Interchange Receiver again, select the check box for ISA14 (Technical acknowledgement required). By setting this property, you specify that you want the receiving party to generate a TA1 acknowledgement and send it back to the sender party.
Note: The sender party cannot set a similar property for requesting a 997 acknowledgement. Generating a 997 is solely governed by the party settings at the receiving trading partner's end.
In the left pane, under X12 properties, under Party as Interchange Receiver, click GS and ST Segment Definition. In this interface you must enter the values that will be used by the AS2EdiSend pipeline to create the GS headers for the outgoing interchange being sent to Contoso.
Use this To do this Default Select the checkbox. For ST1 Select the message type of your test message. In this scenario, because we are sending a purchase order message, select 850 - Purchase Order. Version/Release Specify the EDI version, 00401. Target Namespace Select http://schemas.microsoft.com/BizTalk/Edi/X12/2006. GS1 Verify that the message type of the test message is selected, for example, PO - Purchase Order (850).
GS2 Enter a value for the interchange sender. Let us enter "THEM". GS3 Enter a value for the interchange receiver. Let us enter "US". GS4 Select the date format as CCYYMMDD. GS5 Select the data format as HHMMSS. GS7 Select X - Accredited Standards Committee X12.
GS8 Verify that the EDI version has been entered, for example, 00401.
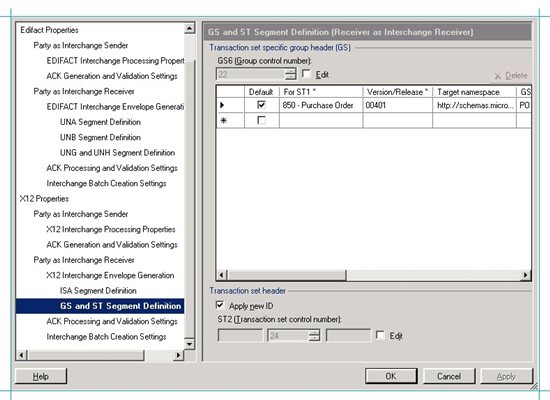
This is how the values in this grid are used by the AS2EdiSend pipeline: BizTalk Server matches the values for ST1, version, and target namespace in the grid with that on the message in the message box database. If there's a match, it uses the other values in the grid to set the values in the GS header for the outgoing interchange. When you select the row as the default, the GS* values are used even if the values for ST1, version, and target namespace are not a match for the message.
For more information about how these values are used, see How the EDI Assembler Works.
In the ACK Processing and Validation Settings page, select the check boxes for EDI type and Extended validation to make sure these validations are performed.
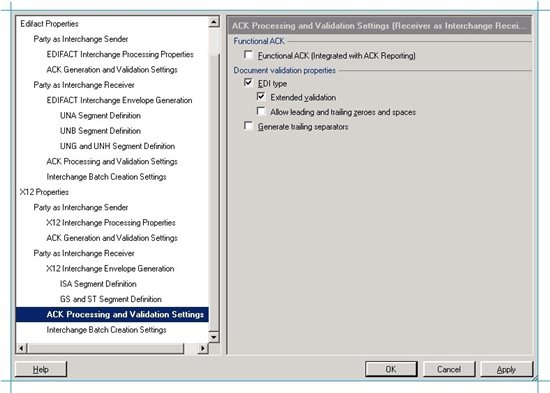
Note: The Functional ACK check box on this page does not govern generation of a functional acknowledgement. It only specifies whether the acknowledgement status is integrated with the interchange status on the status reporting page.
Click OK.
Set the AS2 properties on the party.
Right-click the party in the Parties pane of the BizTalk Server Administration Console, and then select AS2 Properties.
In the General page, select Activate AS2 reporting to enable AS2 status reporting.
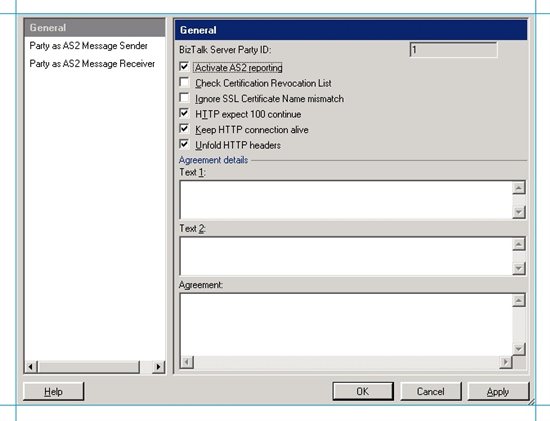
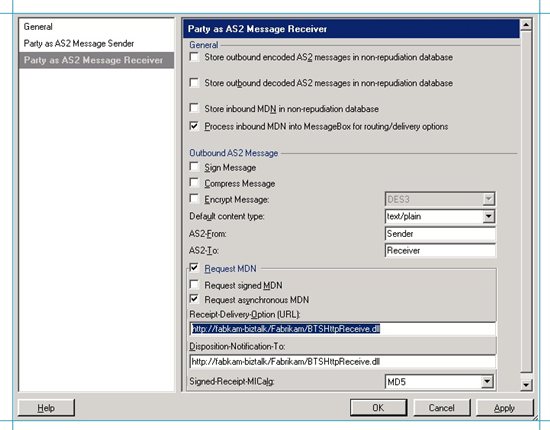
In the Party as AS2 Message Receiver page, do the following:
Select the checkbox for Process inbound MDN into MessageBox for routing/delivery options. When you select this checkbox, BizTalk Server will route the MDN into the message box so that you can create a send port to subscribe to the MDN and then route it to a file folder so that you can verify the AS2 transmission and see the MDN. In real-life scenarios, this option is typically not used and AS2 transmission is verified by looking for "MDN Status" as "Processed" in the AS2 report.
Set AS2-From to Sender. AS2-To should already be set to the name of the receiver party, which in this scenario is Receiver. These values are used to set the AS2-From and AS2-To headers on the AS2 message that is sent to Contoso.
Select the checkbox for Request MDN and then select Request Asynchronous MDN. This ensures that the Contoso party, after receiving the AS2 message, will send an asynchronous MDN back to Fabrikam.
Because Fabrikam expects an asynchronous MDN, specify the location where Contoso must send the MDN. You can specify that in the Receipt-Delivery-Option (URL) text box. In this scenario, Fabrikam will receive the MDN through its website, so enter http://fabkam-biztalk/Fabrikam/BTSHttpReceive.dll in the text box.
Click OK.
Deploy The Schema for Purchase Order Message
In Visual Studio, create a BizTalk Server project
Right-click the project, point to Add, and then click Existing Item. Move to the folder that your schema is in <drive>:\Program Files\Microsoft BizTalk Server 2006\XSD_Schema\EDI, and then double-click your schema. If the EDI schemas have not been unzipped into the \XSD_Schema\EDI folders, execute the MicrosoftEdiXSDTemplates.exe file in the \XSD_Schema\EDI folder to unzip the schemas into the default folder.
**
Important**: In this article, we will use the SamplePO.txt test message. So, you must use the X12_00401_850.xsd schema that is shipped in the <drive>:\Program Files\Microsoft BizTalk Server 2006\SDK\EDI Interface Developer Tutorial\ folder. You must not use the X12 850 schema in the <drive>:\Program Files\Microsoft BizTalk Server 2006\XSD_Schema folder.Set the assembly key file, and then build and deploy the assembly. This would deploy the assembly under the default, BizTalk Application 1, application.
Make sure that BizTalk Application 1 has a reference to BizTalk EDI Application. This is required because all the schemas, pipelines, etc., required to process an EDI message are available under the BizTalk EDI Application. This application is created when you configure EDI/AS2 as part of the BizTalk Server configuration. For instructions on adding a reference, see How to Add a Reference to the BizTalk Server EDI Application.
You are now done with setting up the BizTalk Server environment and all the other requisites at Fabrikam's end.
Set up the Scenario at Contoso
In this section, we will perform the tasks required at Contoso to set up the scenario we discussed above.
Create a Website for Contoso
In this step, you will create a website for Contoso that will receive the AS2-encoded X12 message from Fabrikam. So, similar to what you did in the Fabirkam's setup, creating a website for Contoso involves the following steps:
- Add BTSHttpReceive.dll as an ISAPI extension.
- Create an application pool under which your website will run.
- Create a website for Contoso and assign it to the application pool.
Let's start.
- Add ISAPI extension for BTSHttpReceive.dll, if not already added.
By default, BTSHttpReceive.dll is already added as an extension. To verify, open IIS Manager and click Web Service Extensions. In the right pane, check for HwsMessages HttpReceive entry and verify if the status is set to Allowed. Also, open the properties for the HwsMessages HttpReceive entry, and on the Required Files tab, verify that the file name is set to C:\Program Files\Microsoft BizTalk Server 2006\HttpReceive\BTSHttpReceive.dll.
If the extension does not already exist, create one. In the IIS Manager dialog box, right-click Web Service Extensions, and then click Add a new Web service extension.
In the New Web Service Extension dialog box, enter BTS Http Receive ISAPI Filter as the extension name.
Click Add.
In the Add file dialog box, browse to drive:\Program Files\Microsoft BizTalk Server 2006\HttpReceive. Select BTSHTTPReceive.dll, and then click Open.
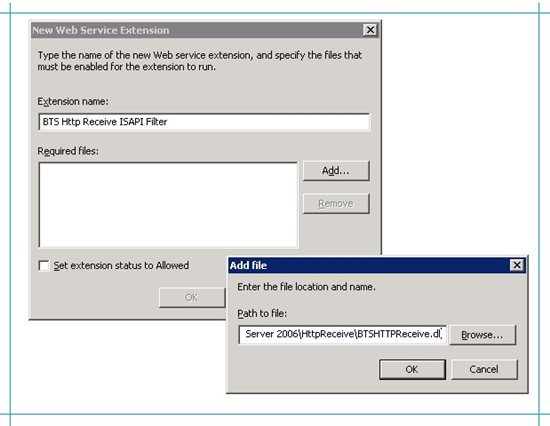
Select the check box for Set extension status to Allowed.
In the New Web Service Extension dialog box, click OK.
- Create an application pool.
In IIS Manager, right-click Application Pools, point to New, and then click Application Pools.
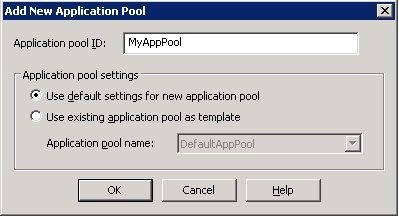
In the Add New Application Pool dialog box, give the application pool ID as MyAppPool. Select the option to Use default settings for new application pool, and click OK.
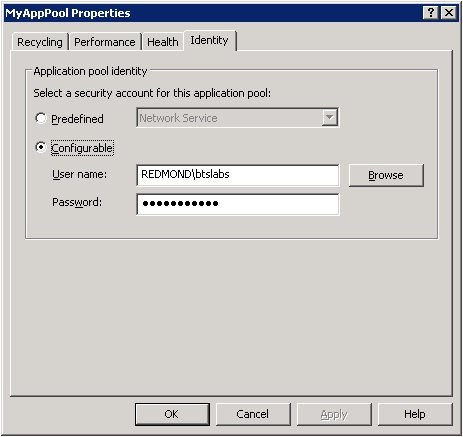
In the console tree, under Application Pools, right-click MyAppPool application pool, and in the properties dialog box, click the Identity tab. Make sure the user name listed under Configurable is an administrator on the server. Click OK.
- Create a website for Contoso.
In IIS Manager, click Web Sites, right-click Default Web Site, point to New, and then click Virtual Directory.
In the Welcome to the Virtual Directory Creation Wizard page, click Next.
On the Virtual Directory Alias page, enter Contoso as the Alias, and then click Next.
On the Web Site Content Directory page, browse to drive:\Program Files\Microsoft BizTalk Server 2006\HttpReceive for the Path. Click Next.
On the Virtual Directory Access Permissions page, select Execute (such as ISAPI applications or CGI). Leave Read selected. Click Next and then click Finish.
In IIS Manager, right-click the Fabrikam virtual directory, click Properties, and on the Virtual Directory tab, for Application Pool, select MyAppPool.
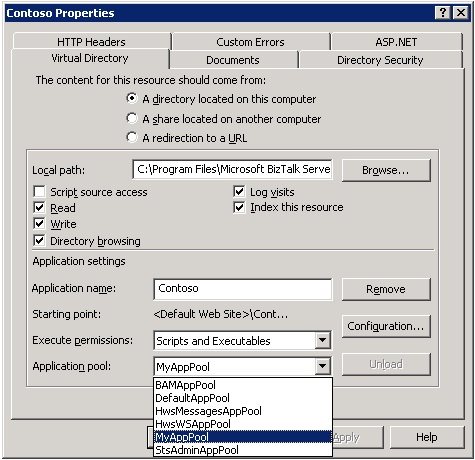
Click OK to close the Contoso properties dialog box.
To verify if the website was configured properly, right-click the Fabrikam website and click Browse. You must be able to see BTSHttpReceive.dll listed in the right pane. Clicking the link to the DLL should give the "HTTP 500 Internal Error".
Create File Folders
On the CONTOSO-BIZTALK computer, under C: drive, create a folder called Messages.
Within the Messages directory, create the following folder:
Folder Name Folder Access Remarks ReceiveProcessedX12 Local access Will be used to receive the X12 after being processed through BizTalk Server
Create an HTTP receive port to receive the AS2-encoded X12 message from Fabrikam
After Fabrikam sends the AS2-encoded X12 message to Contoso's website, an HTTP receive port will move that message from the site's virtual directory into the BizTalk Server message box database. You create that HTTP receive port in this step.
In BizTalk Server Administration console, under BizTalk Application 1, right-click Receive Ports, point to New, and then select One-way Receive Port.
Name the receive port as RecvFromWebsite, and then click Receive Locations in the left pane.

In the right pane, click New and provide a name for the receive location, such as RecvFromWebsite_Loc.
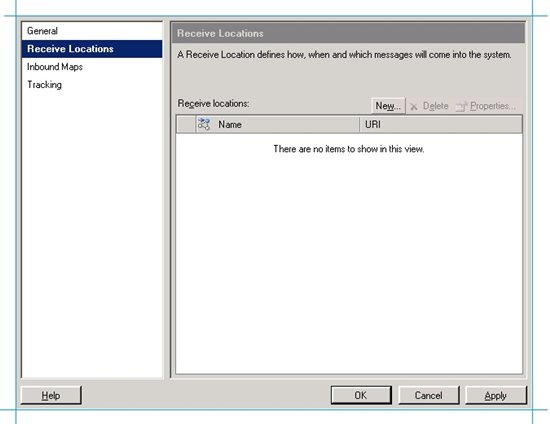
Set the transport type to HTTP and click Configure.
In the HTTP Transport Properties dialog box, for Virtual directory plus ISAPI extension, enter /Contoso/BTSHttpReceive.dll.
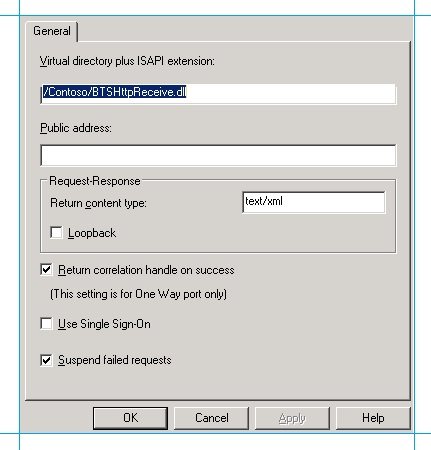
Select check boxes for Return correlation handle on success and Suspend failed requests. Click OK.
Note: Selecting the Suspend failed requests checkbox ensures that BizTalk will record an error if there is a problem with a received message. If BizTalk Server fails to record the error, IIS might crash as it will continuously try resending the failed messages.
Click OK.
In the Receive Location Properties dialog box, select BizTalkServerIsolatedHost as the receive handler, and then select the AS2EdiReceive as the receive pipeline.
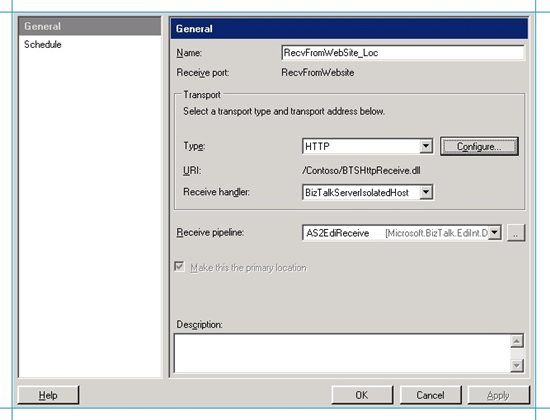
Click OK on the Receive Location Properties dialog box, and then click OK on the Receive Port Properties dialog box.
You have now created a receive port with the AS2EdiReceive pipeline that will process the AS2-encoded X12 message. As part of that, the receive pipeline will convert the X12 message to XML, generate the MDN, create the 997 and TA1 acknowledgements, and dump all of these into the message box.
We will now create the send ports that will pick these messages from the message box, route the X12 to a local folder, and send the MDN and acknowledgements back to Fabrikam.
Create a FILE send port to send the X12 message
You must create a FILE send port that will subscribe to the X12 message stored in the BizTalk Server message box.
In BizTalk Server Administration console, under BizTalk Application 1, right-click Send Ports, point to New, and then select Static One-way Send Port.
Name the send port as SendX12, select the transport type as FILE, and then click Configure.
For Destination folder, specify C:\Messages\ReceiveProcessedX12.
Specify the file name as %MessageID%.txt so that the file received by Contoso is of .txt format, which is the same format in which the file is being sent from Fabrikam.
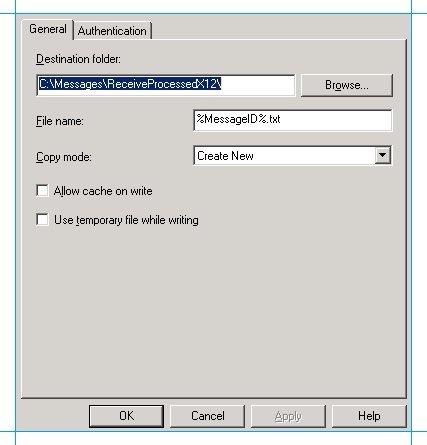
Click OK.
In the Send Port Properties dialog box, select BizTalkServerApplication as the send handler and then select the EdiSend as the send pipeline.
Note: You use the EdiSend pipeline because the message in the BizTalk message box is an XML message (after being processed by the EdiReceive pipeline) and that has to be passed to the shared folder in the Contoso setup in an X12 format.
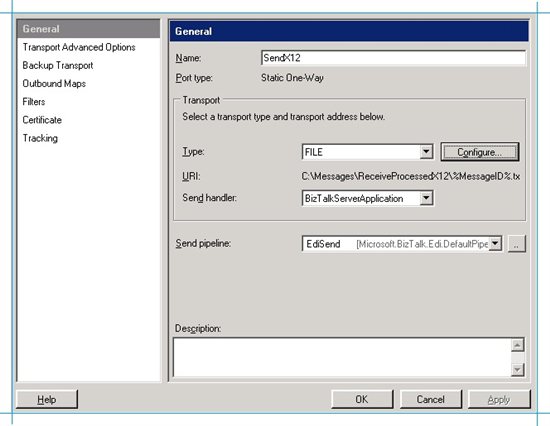
In the left pane, click Filters, and enter a filter expression that will be used by the send port to subscribe to the message. You can set the following filters on this send port.
For Property, enter BTS.MessageType; for Operator, enter ==; and for Value enter http://schemas.microsoft.com/BizTalk/Edi/X12/2006#X12_00401_850. This ensures that only purchase order messages are picked up by the send port because only the purchase order message has message type http://schemas.microsoft.com/BizTalk/Edi/X12/2006#X12_00401_850.
For Property, enter BTS.ReceivePortName; for Operator, enter ==; and for Value enter RecvFromWebsite. This ensures that only purchase order messages that are processed by the RecvFromWebsite receive port are picked by the send port.
For Property, enter EdiIntAs.IsAS2PayloadMessage; for Operator, enter ==; and for Value enter true. This again ensures that only the payload of the AS2 message is picked by the send port. In this scenario, the payload of the AS2 message is the purchase order X12 message.

Click OK to close the send port properties dialog box.
Create a Dynamic send port to send the MDN back to Fabrikam
The HTTP address where the MDN is to be sent to is present in header of the AS2 message that is received. You had set this HTTP address for the Request-Deliver-Option (URL) property, in the Party as AS2 Message Receiver page, when you set the AS2 properties for the Receiver party on the Fabrikam side. Because the HTTP address is already known, you only need to configure a dynamic send port.
In BizTalk Server Administration console, under BizTalk Application 1, right-click Send Ports, point to New, and then select Dynamic One-way Send Port.
Name the send port as SendMDN and select the AS2Send send pipeline.
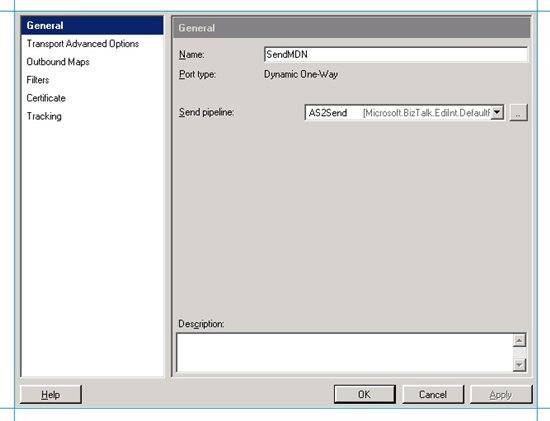
In the left pane, click Filters, and enter a filter expression that will be used by the send port to subscribe to the MDN. Because it is an asynchronous MDN, you can use the IsAS2AsynchronousMdn property. To set this, for Property, enter EdiIntAS.IsAS2AsynchronousMdn; for Operator, enter ==; and for Value enter true.

Click OK to close the send port properties dialog box.
Create an HTTP send port to send the 997 and TA1 acknowledgements back to Fabrikam
You must create an HTTP send port that will subscribe to the 997 and TA1 acknowledgements stored in the BizTalk Server message box. This HTTP send port will send the acknowledgements back to the Fabrikam website.
In BizTalk Server Administration console, under BizTalk Application 1, right-click Send Ports, point to New, and then select Static One-way Send Port.
Name the send port as SendEdiAcks, select the transport type as HTTP, and then click Configure.
In the HTTP Transport Properties dialog box, for Destination URL, enter http://Fabkam-BizTalk/Fabrikam/BTSHttpReceive.dll and then click OK.
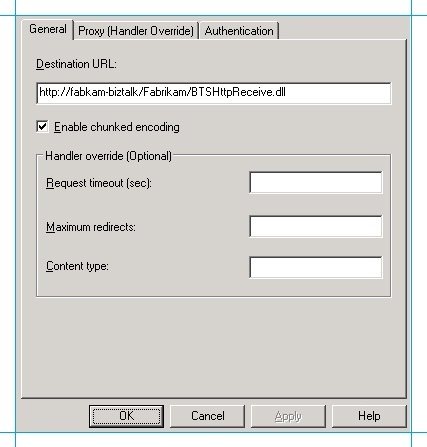
For Send pipeline, select AS2EdiSend. You use the AS2EdiSend pipeline because the message in the BizTalk message box is an XML message (after being processed by the AS2EdiReceive pipeline) and that has to be passed to the Fabrikam website over AS2 in an X12 format.
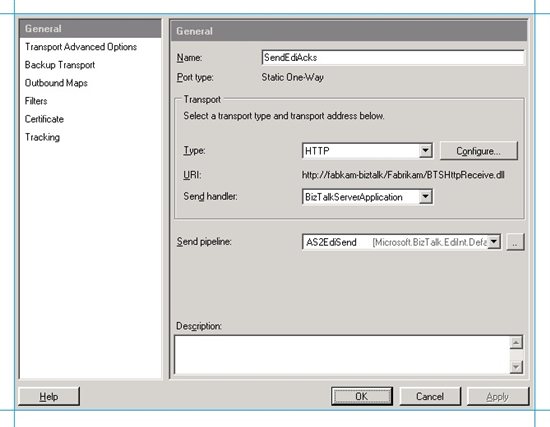
In the left pane, click Filters, and enter a filter expression that will be used by the send port to subscribe to the message. You can set the following filters on this send port.
For Property, enter EdiIntAs.IsAS2MdnResponseMessage; for Operator, enter ==; and for Value enter false. The 997 and TA1 acknowledgements have the IsAS2MdnResponseMessage set to false, obviously because they are not MDNs. So, setting this property ensures that the MDN is not picked up by this send port.
For Property, enter BTS.MessageType; for Operator, enter ==; and for Value enter http://schemas.microsoft.com/BizTalk/Edi/X12/2006#X12_997_Root. This ensures that the 997 acknowledgement is picked up by the send port because it has message type http://schemas.microsoft.com/BizTalk/Edi/X12/2006#X12_997_Root.
For Property, enter BTS.MessageType; for Operator, enter ==; and for Value enter http://schemas.microsoft.com/BizTalk/Edi/X12/2006#X12_TA1_Root. This ensures that the TA1 acknowledgement is picked up by the send port because it has message type *http://schemas.microsoft.com/BizTalk/Edi/X12/2006#X12_TA1_Root.
*
Click OK to close the send port properties dialog box.
Create a Party for Fabrikam
In this section you create a party for Fabrikam in Contoso's BizTalk Server setupand then set the EDI properties on that party.
Right-click the Parties node in the BizTalk Server Administration Console, point to New, and then click Party.
Enter a name for the party. Because Fabrikam is sending the message, let us name the party as Sender.
In the Aliases list, for Name enter EDIINT-AS2 From Value, for Qualifier enter AS2-From, and for Value enter Receiver. Add another row with the same values, but this time for Name enter EDIINT-AS2 To Value and for Qualifier, enter AS2-To, as shown in the following screenshot.
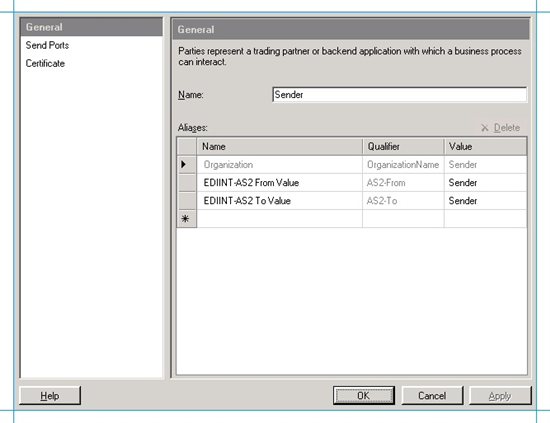
Note: BizTalk Server determines which party properties to be used for AS2 processing by matching the AS2-From and AS2-To context properties on the message with the EDIINT AS2-From Value and EDIINT AS2-To Value in the aliases list for the party. For more information about how BizTalk Server determines a party for outgoing AS2 messages, see Party Resolution for Outgoing AS2 Messages. For more information about how BizTalk Server determines the party for incoming AS2 messages, see Party Resolution for Incoming AS2 Messages.
Click Send Ports, and from the Send ports grid, under the Name column, select the send ports that you created that will send the interchange to a local folder on Contoso and send the acknowledgements to Fabrikam, and then click OK.
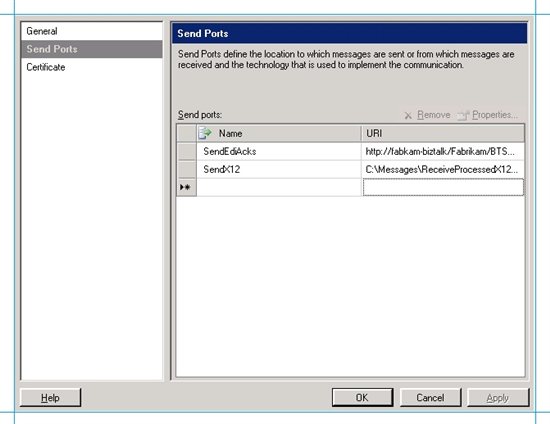
Note: BizTalk Server uses this send port association to determine the party for outgoing EDI messages. After the party is determined, it uses the properties set on the party to process the outgoing interchange and acknowledgements. For more information, see Party Resolution and Schema Determination for Outgoing EDI Messages.
Set the properties for processing the EDI interchange.
Right-click the party in the Parties pane of the BizTalk Server Administration Console, and then select EDI Properties.
In the General page, click Activate EDI Reporting and click Store transaction set/payload for reporting.
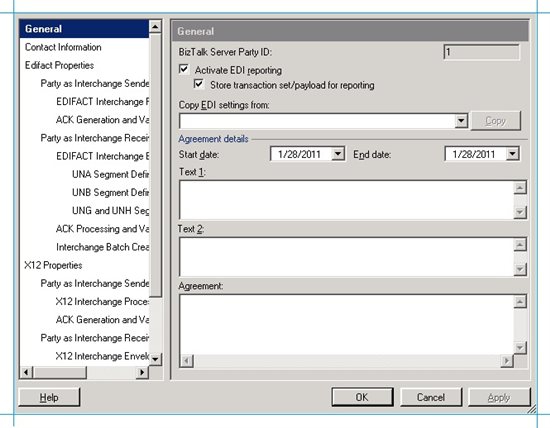
The Activate EDI Reporting option ensures that all interchange-related details for a party are tracked in the status report user interface. The Store transaction set/payload for reporting option ensures that the transaction set details and message content are available to view through the status report interface.
In the left pane, under X12 properties, under Party as Interchange Sender, click X12 Interchange Processing Properties. In this section of the EDI Properties dialog box you will configure the properties using which the BizTalk Server set up at Contoso's end will process the incoming interchange.
Remember that the party you created in Contoso's setup represents Fabrikam (that's why you named it Sender), and because the incoming interchange is 'sent' by Fabrikam, the properties are set under party as interchange 'sender'. The easiest way to understand this is by asking yourself these questions: who is the sender? Fabrikam. Where is Fabrikam's party? At Contoso and is called Sender. Where do I configure properties for Fabrikam, when Fabrikam is sending an interchange? In the EDI properties for the Sender property, under "Party as Interchange Sender".
In this interface (Party as Interchange Sender > X12 Interchange Processing Properties) you must enter the values for ISA5 to ISA8. The values you enter here will be used by the receive pipeline to perform party resolution. When receiving an interchange, it matches the values of ISA05 through ISA08 in the message with those in the definition of the party as an interchange sender.If a match happens, BizTalk Server will use the other EDI properties set on the property to process the message. Going by the message (SamplePO.txt), that will be sent by Fabrikam, enter the following values:
Use this To do this ISA5 ZZ-Mutually Defined ISA6 THEM ISA7 ZZ-Mutually Defined ISA8 US For more information about how BizTalk Server uses these values to determine the party for incoming EDI messages, see Party Resolution, Schema Discovery, and Authorization for Received EDI Messages
In the left pane, under X12 properties, under Party as Interchange Sender, click X12 Interchange Processing Properties again, and specify the properties that BizTalk Server will use to discover the schema for processing the incoming interchange. To do so, enter the following values:
Use this To do this GS2 Enter THEM ST1 Select 850 - Purchase Order
Target Namespace Select http://schemas.microsoft.com/BizTalk/EDI/X12/2006
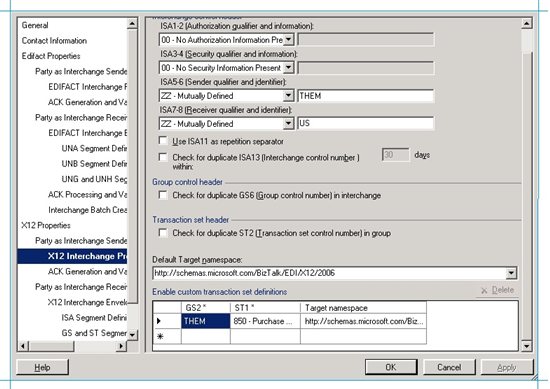
So, how does BizTalk Server use these properties to determine the schema of the incoming interchange? Here's how it happens: BizTalk Server makes a match between the GS2 and ST1 values in the incoming interchange with the GS2 and ST1 you set here, as EDI properties. If a match happens, BizTalk Server determines the target namespace from the grid. If a match does not happen, BizTalk Server uses the default target namespace specified just above the grid.
After the target namespace is discovered, BizTalk Server determines the schema by taking the target namespace and concatenating it with the encoding type (e.g. X12), first five characters for the version/release (this is picked from the value of GS08, e.g. 00401), and the value of ST01 (e.g. 850). So, the schema name becomes X12_00401_850. The schema name finally is http://schemas.microsoft.com/BizTalk/Edi/X12/2006/X12#X12_00401_850.
For more information, see Party Resolution, Schema Discovery, and Authorization for Received EDI Messages.
Under Party as Interchange Sender, click Ack Generation and Validation Settings, and under the X12 ACK section, select Generate TA1 and Generate 997.
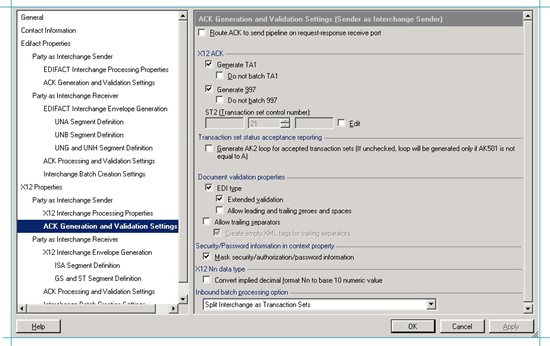
Leave EDI Type and Extended Validation check boxes selected.
In the left pane, under X12 properties, under Party as Interchange Receiver, click ISA Segment Definition. In this section of the EDI Properties dialog box you will configure the properties using which the BizTalk Server set up at Contoso's end will process the acknowledgements to be sent back to Fabrikam. Remember that the party you created in Contoso's setup represents Fabrikam and because the incoming the acknowledgements are received by Fabrikam, the properties are set under party as interchange 'receiver'.
In this interface you must enter the values for ISA5 to ISA8. The values you enter here will be used by the EdiSend pipeline to create the ISA header for the acknowledgements that will be sent to Fabrikam.
Use this To do this ISA5 ZZ-Mutually Defined ISA6 THEM ISA7 ZZ-Mutually Defined ISA8 US 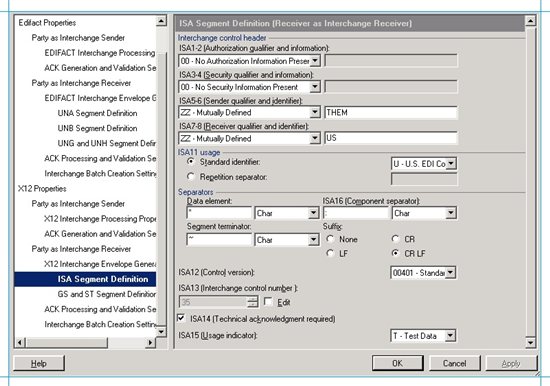
Under Party as Interchange Receiver, under Separators section, set Suffix to CR LF.
In the left pane, under X12 properties, under Party as Interchange Receiver, click GS and ST Segment Definition. In this interface you must enter the values that will be used by the EdiSend pipeline to create the GS headers for the outgoing interchange being sent to Contoso.
Use this To do this Default Select the checkbox. For ST1 Select the message type of your test message. In this scenario, because we are sending a purchase order message, select 850 - Purchase Order. Version/Release Specify the EDI version, 00401. Target Namespace Select http://schemas.microsoft.com/BizTalk/Edi/X12/2006. GS1 Verify that the message type of the test message is selected, for example, PO - Purchase Order (850).
GS2 Enter a value for the interchange sender. Let us enter "THEM". GS3 Enter a value for the interchange receiver. Let us enter "US". GS4 Select the date format as CCYYMMDD. GS5 Select the data format as HHMMSS. GS7 Select X - Accredited Standards Committee X12.
GS8 Verify that the EDI version has been entered, for example, 00401.
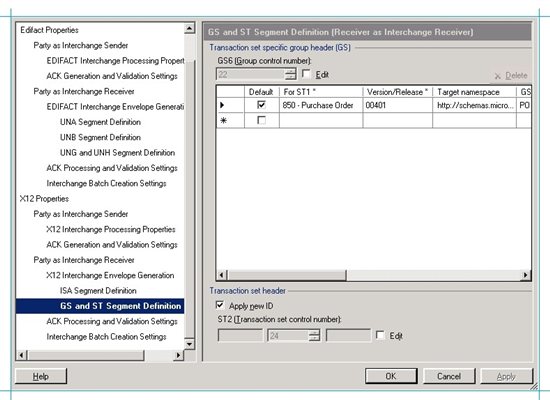
This is how the values in this grid are used by the EdiSend pipeline: BizTalk Server matches the values for ST1, version, and target namespace in the grid with that on the message in the message box database. If there's a match, it uses the other values in the grid to set the values in the GS header for the outgoing interchange. When you select the row as the default, the GS* values are used even if the values for ST1, version, and target namespace are not a match for the message. For more information about how these values are used, see How the EDI Assembler Works.
In the ACK Processing and Validation Settings page, select the check boxes for EDI type and Extended validation to make sure these validations are performed.
Click OK.
Set the AS2 properties on the party.
Right-click the party in the Parties pane of the BizTalk Server Administration Console, and then select AS2 Properties.
In the General page, select Activate AS2 reporting to enable AS2 status reporting.
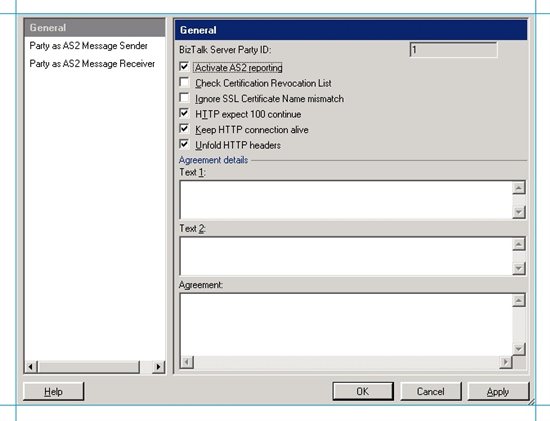
In the Party as AS2 Message Sender page, enter some text in the MDN Text box. For example, you can enter "This is the MDN from Contoso to Fabrikam". Enter a text here is not mandatory. In this step, you enter a text more for an understanding and testing purpose. The text you enter here will be present in the MDN that you finally receive back at the Fabrikam side.
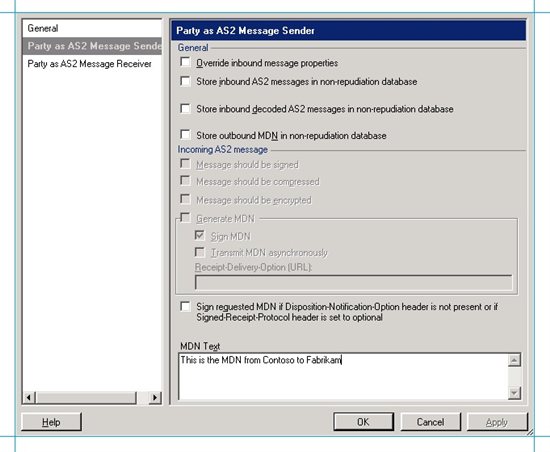
Tip: Even though we have not set the property here, a very important property available on this page is Override inbound message properties. If you select this property, BizTalk Server would use the settings on this page instead of the property values from the incoming message. For example, if the "Override inbound ..." property is selected, the receiver party can opt to generate an MDN even if the header of the incoming AS2 message does not call for one. Additionally, the receiver party can opt to send MDN asynchronously to a different address even if the AS2 header specifies a synchronous MDN.
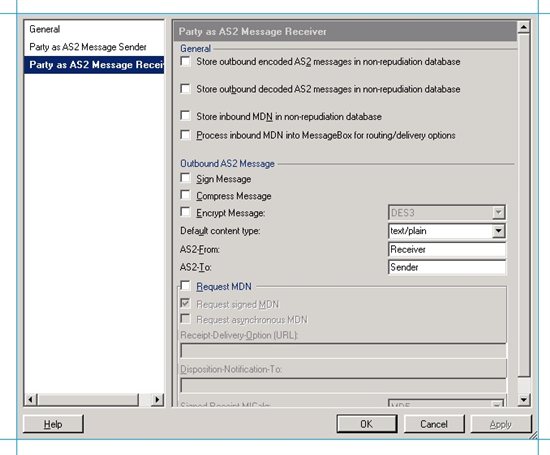
In the Party as AS2 Message Receiver page, do the following:
Set AS2-From to Receiver. AS2-To should already be set to the name of the sender party, which in this scenario is Sender. These values are used to set the AS2-From and AS2-To headers on the AS2 message that is sent to Fabrikam.
Click OK.
Deploy The Schema for Purchase Order Message
In Visual Studio, create a BizTalk Server project.
Right-click the project, point to Add, and then click Existing Item. Move to the folder that your schema is in <drive>:\Program Files\Microsoft BizTalk Server 2006\XSD_Schema\EDI, and then double-click your schema. If the EDI schemas have not been unzipped into the \XSD_Schema\EDI folders, execute the MicrosoftEdiXSDTemplates.exe file in the \XSD_Schema\EDI folder to unzip the schemas into the default folder.
**
Important**: In this article, we will use the SamplePO.txt test message. So, you must use the X12_00401_850.xsd schema that is shipped in the <drive>:\Program Files\Microsoft BizTalk Server 2006\SDK\EDI Interface Developer Tutorial\ folder. You must not use the X12 850 schema in the <drive>:\Program Files\Microsoft BizTalk Server 2006\XSD_Schema folder.Set the assembly key file, and then build and deploy the assembly. This would deploy the assembly under the default, BizTalk Application 1, application.
Make sure that BizTalk Application 1 has a reference to BizTalk EDI Application. This is required because all the schemas, pipelines, etc. required to process an EDI message are available under the BizTalk EDI Application. This application is created when you configure EDI/AS2 as part of the BizTalk Server configuration. For instructions on adding a reference, see How to Add a Reference to the BizTalk Server EDI Application.
You are now done with setting up the BizTalk Server environment and all the other requisites at Contoso's end.
Test the Scenario
We are now done with setting up BizTalk Server for AS2-encoded EDI messaging both at Fabrikam's and Contoso's end. Let us now run a quick test to verify the setup.
To start with make sure that the all the send and receive ports that we configured are up and running. To do so, log on to the BizTalk Server setup for Fabrikam (on the computer FABKAM-BIZTALK), and on the BizTalk Server Administration console, right-click BizTalk Application 1, and then click Start. This will start all the send and receive ports configured in that application. Also, click on Host Instances under Platform Settings, and verify that the default host instance (BizTalkServerApplication) is running. Perform the same step in Contoso's BizTalk Server setup on the CONTOSO-BIZTALK computer.
On the computer FABKAM-BIZTALK, navigate to C:\Program Files\Microsoft BizTalk Server 2006\SDK\EDI Interface Developer Tutorial\ Open the file SamplePO.txt and have a look at it.
ISA*00* *00* *ZZ*THEM *ZZ*US *991221*1226*U*00401*000000025*0*T*>
GS*PO*THEM*US*19991221*1226*1*X*004010
ST*850*0001
BEG*00*NE*3859199838**950727***IBM
PER*AA*Andrew Carlson*TE*(708) 555-2930
DTM*002*970523
PO1*1*93*BX*145.39**CB*KOW-20392-10
PID*F****Uninterruptible Power System
PER*AA*Camilla Anderson*TE*(708) 555-2011
PO1*2*25*EA*35.68**CB*1093-4927-001
PID*F****High Volume Printer Stand
PER*AA*Miranda Cappelan*TE*(708) 555-1111
PO1*3*4*PC*2002.91**CB*ABX-2001
PID*F****Electronics Cabinet Package (56" High)
CTT*3
SE*14*0001
GE*1*1
IEA*1*000000025
Copy the file SamplePO.txt. Paste this file to C:\Messages\ReceiveX12. Wait for the file to disappear. At this stage, go the BizTalk Server Group Hub page (click BizTalk Group in the BizTalk Server Administration console), and click AS2 Message and Correlated MDN Status. In the AS2/MDN Status tab, click Run Query until you see an entry on the page similar to the following:
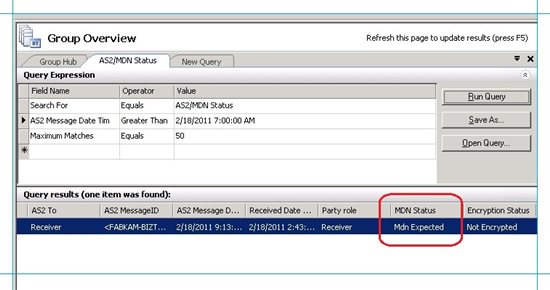
Notice the status of MDN set to Mdn Expected.
Now go back to the computer CONTOSO-BIZTALK and navigate to C:\Messages\ReceiveProcessedX12. Verify whether the folder contains the X12 interchange that Fabrikam sent. The filename would be in the form of <GUID>.txt. Open the file and verify whether the values set for the message like ISA5, ISA6, ISA7, ISA8 are the ones you specified in the Sender party. Notice that the segment terminator is different in the X12 message that is received by Contoso. That is because the segment terminator that is defined as part of the EDI properties for Sender party is tilde (~). If you want to play around with this, change the values of segment terminator, data element separator, etc. and see how the output message changes accordingly. You define these values under ISA Segment Definition section, under Party as Interchange Receiver.
ISA*00* *00* *ZZ*THEM *ZZ*US *110206*1821*U*00401*000000069*0*T*:~
GS*PO*THEM*US*20110206*182120*45*X*00401~
ST*850*0045~
BEG*00*NE*3859199838**950727***IBM~
PER*AA*Andrew Carlson*TE*(708) 555-2930~
DTM*002*970523~
PO1*1*93*BX*145.39**CB*KOW-20392-10~
PID*F****Uninterruptible Power System~
PER*AA*Camilla Anderson*TE*(708) 555-2011~
PO1*2*25*EA*35.68**CB*1093-4927-001~
PID*F****High Volume Printer Stand~
PER*AA*Miranda Cappelan*TE*(708) 555-1111~
PO1*3*4*PC*2002.91**CB*ABX-2001~
PID*F****Electronics Cabinet Package (56" High)~
CTT*3~
SE*14*0045~
GE*1*45~
IEA*1*000000069~
Now go back to the computer FABKAM-BIZTALK and open the AS2/MDN status report again. Click Run Query again. The MDN Status should now be displayed as Processed.
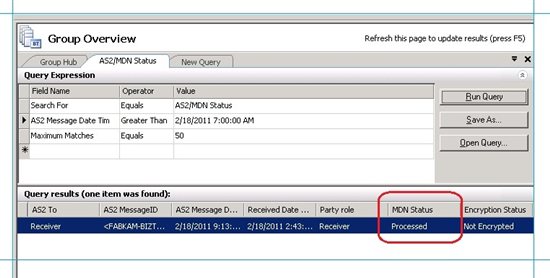
Tip: When you first open the tab for AS2/MDN Status, the Query Expression box towards the top of the page has a field that says Message Status, Not Equals, Processed. If this field is present, you will not see the entry when the MDN gets processed. So, to see the status for a processed MDN, you must delete the field from the query expression. To delete the field, click on the row and press Delete.
On the computer FABKAM-BIZTALK, navigate to C:\Messages\ReceiveMDN. Verify whether the folder contains an MDN in the form of <GUID>.txt. The MDN should resemble the following.
--_02036ECC-C5FA-44CE-99BF-5A82DE051E90_
Content-Type: text/plain
Content-Transfer-Encoding: binary
Content-ID: {4D043AFB-B329-4DC8-8D71-2E585D7D3189}
Content-Description: plain

This is the MDN from Contoso to Fabrikam
--_02036ECC-C5FA-44CE-99BF-5A82DE051E90_
Content-Type: message/disposition-notification
Content-Transfer-Encoding: 7bit
Content-ID: {46EF777B-8E32-42AA-9515-0A874E49F932}
Content-Description: body

Final-Recipient: rfc822; Receiver
Original-Message-ID: <FABKAM-BIZTALK_769747C3-80B9-48DD-9DDF-F0753988CA3C>
Disposition: automatic-action/MDN-sent-automatically; processed

--_02036ECC-C5FA-44CE-99BF-5A82DE051E90_--
Notice the highlighted text. You had entered this text for the MDN Text property on the Party As AS2 Sender page in the party properties in Contoso's BizTalk Server setup.
On the computer FABKAM-BIZTALK navigate to C:\Messages\ReceiveEdiAcks. Verify whether the folder contains the 997 and TA1 acknowledgements sent by Contoso. The 997 acknowledgement would resemble the following.
ISA*00* *00* *ZZ*THEM *ZZ*US *110206*1821*U*00401*000000070*0*T*:~
GS*FA*US*THEM*20110206*1821*46*X*00401~
ST*997*0046~
AK1*PO*28~
AK9*A*1*1*1~
SE*4*0046~
GE*1*46~
IEA*1*000000070~
The TA1 TA1 acknowledgement would resemble the following
ISA*00* *00* *ZZ*THEM *ZZ*US *110206*1821*U*00401*000000071*0*T*:~
TA1*000000028*110206*1821*A*000~
IEA*0*000000071~
If the message contents are as you expected, you have successfully transferred an AS2-encoded X12 message between two trading partners using BizTalk Server and received MDNs as well as acknowledgements.
Understand the Message Flow
Let us now understand how the message flow happens:
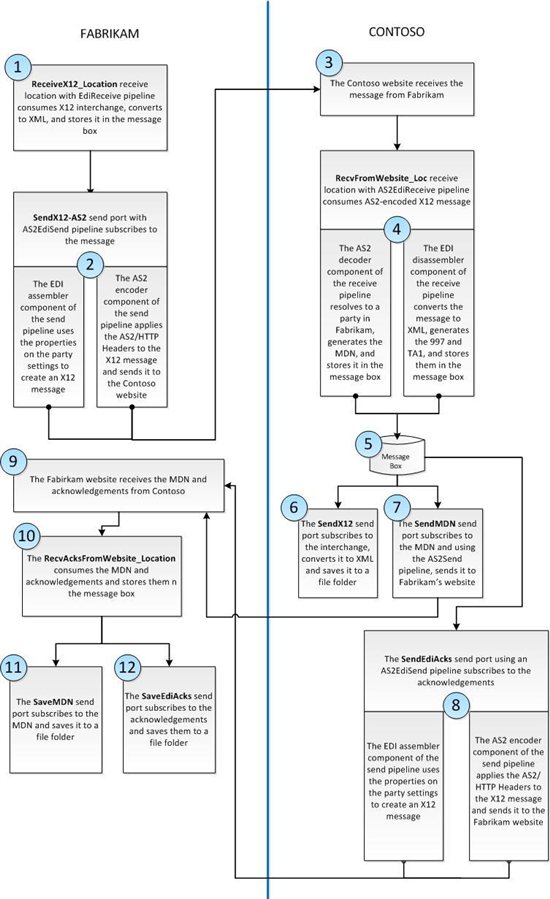
- When you drop the interchange to C:\Messages\ReceiveX12 folder on FABKAM-BIZTALK, the ReceiveX12_Location receive location with the EdiReceive pipeline consumes it, converts it to XML, and stores it in the BizTalk Server message box database in Fabrikam's set up.
- After the interchange is in the message box database, the SendX12-AS2 send port in Fabrikam's setup picks it up based on the filters we set on that. The filters we had set were for the receive port name and message type. Because the SendX12-AS2 send port uses an AS2EdiSend pipeline, it does the following:
- The EDI assembler component of the AS2EdiSend pipeline converts the message back from XML to X12 . Because the SendX12-AS2 send port is associated with the Receiver party created in Fabrikam's setup, the Edi assembler component uses the property settings on the Receiver party (under Party as Interchange Receiver) to create the X12 message.
- The AS2 encoder component of the AS2EdiSend pipeline applies the AS2/HTTP headers to the EDI payload message. The values used to form the AS2 headers are derived from the Party as AS2 Receiver page of the AS2 properties for the party. The party to be used is governed by the send port association. In this scenario, the SendX12-AS2 port is associated with the Receiver party. So, the AS2EdiSend pipeline uses the AS2 properties set on this party.
The AS2 encoder now sends the message to the HTTP adapter to be sent over to the Contoso's website. The message is now transferred to Contoso but is yet to be processed by Contoso's BizTalk Server setup. That is where the message will be validated and MDN/acknowledgements will be generated.
At this stage, the AS2/MDN status report should say MDN Status as MDN Expected.
- Now at Contoso's end, the RecvFromWebSite_Loc receive location with the AS2EdiReceive pipeline consumes the message from the Contoso's website. The AS2EdiReceive pipeline does the following processing on the message:
The AS2 decoder component does the party resolution by matching the AS2-From value in the message header with the AS2-From values in the party alias list. Once the pipeline has determined the party, it will check the setting of the Override inbound message properties property in the Party as AS2 Message Sender page of the AS2 Properties for the party. If that property is checked, the receive pipeline will use the party properties to process the message. If the property is cleared, the receive pipeline will use the values in the AS2 header of the message to process it.
In this scenario, we did not select the "Override inbound..." property. So, the properties on the AS2 header will be used. From the message header, the pipeline determines that an MDN is required, asynchronous in nature, and the URL it must be sent to. The pipeline also generates the MDN now.
The EDI disassembler component does the EDI party resolution based on the values of ISA5, ISA6, ISA7, and ISA8 on the interchange with those specified in the party created at Contoso's end. Because the values for ISA5, ISA6, ISA7, and ISA8 set on the Sender party (under Party as Interchange Sender) match with that of the message, the EdiReceive pipeline uses the settings on the Sender party to process the message and converts it to XML. Because the Sender party settings also indicate to generate a 997 and TA1 acknowledgements, the EdiReceive pipeline generates the 997 and TA1 acknowledgements.
At this stage, the XML message, the 997 acknowledgement in XML, and the TA1 acknowledgement in XML, and an MDN are all stored in the BizTalk Server message box database of Contoso. This is where the interchange gets in to the BizTalk Server setup at Contoso's end.
- Now the three send ports that we configured in Contoso's BizTalk Server setup will pick the messages they have subscribed to and send them out to the respective locations they are configured for.
- The SendX12 send port will subscribe to the EDI payload in the message box based on the filters set on the send port. Because the send port uses an EdiSend pipeline, it converts the XML in the message box back to an X12 message, and copies it over to C:\Messages\ReceiveProcessedX12.
- The SendMDN send port will subscribe to the MDN in the message box based on the filter set on the send port. Because it is an asynchronous MDN, the dynamic send port sends it back to the URL mentioned in the AS2 message header. When the AS2Send pipeline processes an outgoing MDN, it uses the AS2-To value in the message context to obtain the party properties to process the MDN. It does so by matching the AS2-To context property with the AS2-To property in the Party as AS2 Message Receiver page in the BizTalk Server Administration Console. After the party is determined, it checks for the properties on Party as AS2 Sender page and sets the properties on the MDN. For example, in this scenario, it adds the MDN text that you entered earlier, to the MDN.
- The SendEdiAcks send port will subscribe to the 997 and TA1 acknowledgements in the message box. The send port uses an AS2EdiSend pipeline, which uses the send port association to do the party resolution. After the party is governed, the send pipeline uses the EDI and AS2 properties on the party to processing the outgoing message:
- The AS2 encoder appliers AS2 headers on the 997 and TA1 acknowledgements and sends it over to the HTTP adapter, which in turn sends it over the the Fabrikam's website.
- The EDI assembler component of the AS2EdiSend pipeline converts the acknowledgements back from XML to X12. It uses the property settings on the Receiver party (under Party as Interchange Receiver) to create the X12 message.
- At this stage, all the MDNs and acknowledgements are sitting on the Fabrikam's website. The RecvAcksFromWebsite_Location receive location consumes these messages from the website and copies them over to the Fabrikam's message box database. The receive location uses the AS2Receive pipeline.
- After the messages are in the message box, send ports subscribe to these messages and save them to respective folder locations.
- The SaveMDN send port subscribes to the MDN based on the filter, and using a PassThruTransmit send pipeline, savers the message as is in the C:\Messages\ReceiveMDN folder.
- The SaveEdiAcks send port subscribes to the acknowledgements based on the filter, and using a PassThruTransmit send pipeline, saves the message in the C:\Messages\ReceiveEdiAcks folder.
At this stage, the AS2/MDN status report should say MDN Status as Processed.
The following illustration presents a graphical representation of the flow for ease of understanding.
Common Errors and Troubleshooting Steps
For all troubleshooting information related to EDI, see Troubleshooting EDI and AS2 Solutions.
Download Content Related to this Article
If you want to read and print this article using Microsoft Word, you can download it from my blog post here. The document is part of the attachment EDIAS2-Send-Receive-Scenario.zip. The zip also contains the MSIs for the BizTalk Server applications for both the machines. You can importing the MSI on different machines to set up the BizTalk Server environment for Fabrikam and Contoso. Importing the MSI will create/import the ports, parties, schemas, etc. used in this scenario. For instructions about how to import an MSI, see How to Import a BizTalk Application.
After importing the applications you would still need to go and create any of the file locations that will be required for the FILE ports. However, I would strongly discourage you from using the MSIs. It would be a completely different learning experience if you build your application ground-up using the instructions in this article.
See Also
Read suggested related topics:
Another important place to find a huge amount of BizTalk related articles is the TechNet Wiki itself. The best entry point is BizTalk Server Resources on the TechNet Wiki.