Note
Access to this page requires authorization. You can try signing in or changing directories.
Access to this page requires authorization. You can try changing directories.
The instructions in this article are targeted for a two-machine scenario where both trading partners involved in a B2B scenario have their BizTalk Server setup. If you are looking for a single-machine scenario, see Walkthrough: Sending a Non-EDI Message over AS2 (http://go.microsoft.com/fwlink/?LinkID=211816).
This article applies to BizTalk Server 2006 R2 and BizTalk Server 2009. For information on how to set up B2B messaging between two trading partners using BizTalk Server 2010, see Developing and Configuring BizTalk Server AS2 Solutions (http://go.microsoft.com/fwlink/?LinkID=211815).
Note: To view a complete list of BizTalk Server articles that are available on the TechNet wiki, see BizTalk Server Resources on the TechNet Wiki.
Acknowledgements
We in the BizTalk Server CCxG team gratefully acknowledge the contributions of the following individuals for providing their valuable inputs for setting up the end-to-end scenario used in this article:
- Chibi Chakaravarthi. V, BizTalk Server Product Team
- Farida Bharmal, BizTalk Server PSS
Overview
AS2 is a specification or guideline that describes a process for sending data (generally EDI data) that is secure and reliable. The delivery method that it specifies is HTTP or HTTPs (the secure version of HTTP), which are the same transport methods or protocols that you use every day when browsing web pages.
The organizational structure of messages that are sent via AS2 is known as Secure Multipurpose Internet Mail Extension (S/MIME), which is the identical structure to define what an email looks like.
AS2 messages are secure because they are signed and encrypted by using the private/public key pairs of you and your trading partners. In addition, AS2 is reliable because it encourages trading partners to use Message Disposition Notifications (MDNs) or receipts to indicate that your trading partners have received an AS2 message and whether your trading partners have found it to be valid.
Why use AS2?
Organizations use AS2 for 2 reasons:
- The first reason is that, by definition, AS2 ensures that their business data is secure and that it was sent reliably. Because the definition of the AS2 specification mandates the use of MDNs (receipts), companies can know undoubtedly that their trading partner received their data. Similarly, because the specification defines the use of signing and encrypting, companies can rest assured that their data is safe.First Link. Brief description of how reference is useful.
- The second reason that companies use AS2 is that it removes "the middle man." Historically EDI data was sent by using Value Added Networks (VANs). VANs are an added cost that is eliminated when companies are able to send directly to one another. You can use AS2 along with HTTP to connect to your trading partner to send documents directly.
AS2 support in BizTalk Server
BizTalk Server includes native functionality providing support for AS2. This functionality is not an add-in to the product, such as an adapter or an accelerator, but is built into the product. For more information about AS2 functionality, see How AS2 Is Implemented in BizTalk Server (http://go.microsoft.com/fwlink/?LinkID=211812).
Scenario
The scenario discussed in this article describes how to send/receive an unsigned/non-encrypted non-EDI message over AS2 associated with an unsigned asynchronous MDN from a trading partner, Contoso, to another trading partner, Fabrikam. Both the trading partners have their own BizTalk Server setup.
Difference between an asynchronous and synchronous mode
If a non-EDI message is sent over HTTP/HTTPS transport in an asynchronous mode, you must create a send port to return the MDN separately. If it is a dynamic send port, it will use the address in the Receipt-Delivery-Notification line in the header of the message to route the message to the trading partner.
If a non-EDI message is sent over AS2 in a synchronous mode, BizTalk Server will return the MDN over that synchronous connection and then close the connection. The MDN will be generated by the AS2Receive pipeline, routed by that pipeline to the BizTalk Server MessageBox, and then automatically picked up by the AS2Send pipeline that is part of the request - response receive port.
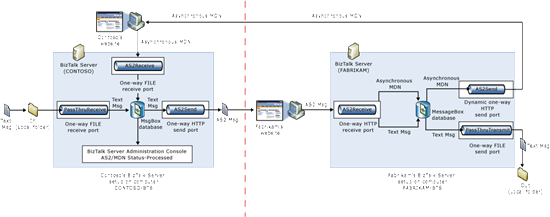
The following diagram will walk you step-by-step through the process of sending and receiving AS2 messages involving fictional trading partners Contoso and Fabrikam.
Contoso |
Fabrikam |
1. A one-way file receive port receives a text message from the local folder (C:\In). 2. Using the PassThruReceive receive pipeline, the receive port consumes the message. The receive port then drops the text message as-is into the BizTalk Server MessageBox. 3. A static one-way HTTP send port picks up the text message, subscribing to all messages that are received by the receive port. Using the AS2Send send pipeline, the send port sends the AS2 message to the Fabrikam website.< 7. A one-way HTTP receive port uses AS2Receive receive pipeline and consumes the MDN received in Contoso’s virtual directory. 8. In the BizTalk Server Administration Console, AS2 reporting is set on the properties of the Contoso party and is made available in the Group Hub page of the BizTalk Server Administration Console. The AS2/MDN status reports activated on Contoso will provide comprehensive status of a document exchange transaction. These reports provide data on receipt, validation and acknowledgment processing of AS2 messages. |
4. A one-way HTTP receive port receives the AS2 message from the Fabrikam virtual directory. The AS2Receive receive pipeline decodes the message from AS2, and drops the processed message and the MDN into the BizTalk Server MessageBox. 5. A static one-way FILE sends port with a PassThruTransmit send pipeline picks up the text message and sends the text message to a local folder (C:\Out). 6. A dynamic one-way HTTP send port returns the asynchronous MDN to the Contoso’s website. |
Prerequisites
To set up this scenario, you must have the following:
- A computer with BizTalk Server installed and configured (including EDI/AS2 configuration). This computer will represent the Contoso trading partner. We will call this computer, CONTOSO-BTS.
- A computer with BizTalk Server installed and configured (including EDI/AS2 configuration). This computer will represent the Fabrikam trading partner. We will call this computer FABRIKAM-BTS.
On the CONTOSO-BTS and FABRIKAM-BTS Servers
The following prerequisites must be met before setting up the scenario:
- Configure the BizTalk Server Internet Server API (ISAPI) extension DLL (BTSHttpReceive.dll).
- Configure the web page.
In this section, you need to configure the BizTalk Server Internet Server API (ISAPI) extension DLL (BTSHttpReceive.dll) in Internet Information Services (IIS) and verify that the status for HwsMessages HttpReceive is Allowed.
To configure the BizTalk ISAPI extension DLL in IIS
- Click Start, point to Administrative Tools, and then click Internet Information Services (IIS) Manager.
- Expand <computer name> (local computer), and then click Web Service Extensions.
- In the Web Service Extension pane, verify that the status for HwsMessages HttpReceive is Allowed. If not, right-click HwsMessages HttpReceive, and then click Allow.
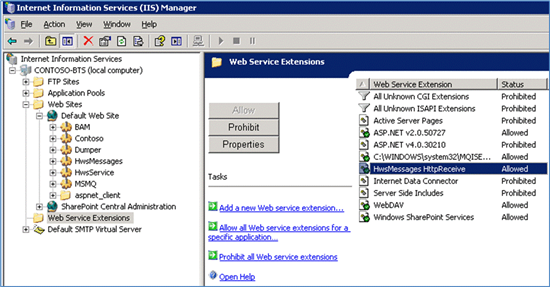
If the HwsMessages HttpReceive web service extension is not configured (it is not included in the Web Service Extensions list in IIS Manager), perform the following procedure.
To configure the BizTalk ISAPI extension DLL in IIS:
- Click Start, point to Administrative Tools, and then click Internet Information Services (IIS) Manager.
- Expand <computer name> (local computer), right-click Web Service Extensions, and then click Add a new Web service extension.
- In the New Web Service Extension dialog box, in the Extension Name box, type BizTalk ISAPI Extension, and then click Add.
- In the Add File dialog box, in the Path to file box, type <drive>:\Program Files\Microsoft BizTalk Server 2006 \HttpReceive\BTSHttpReceive.dll, and then click OK.
- In the New Web Service Extension dialog box, select Set extension status to Allowed, and then click OK.
Configure the web page
In IIS Manager, click Web Sites. Right-click Default Web Site, point to New, and then click Virtual Directory.
In the Welcome to the Virtual Directory Creation Wizard page, click Next.
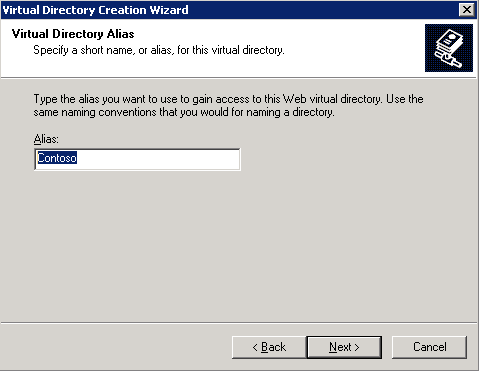
On the Virtual Directory Alias page, enter Contoso as the Alias, and then click Next.
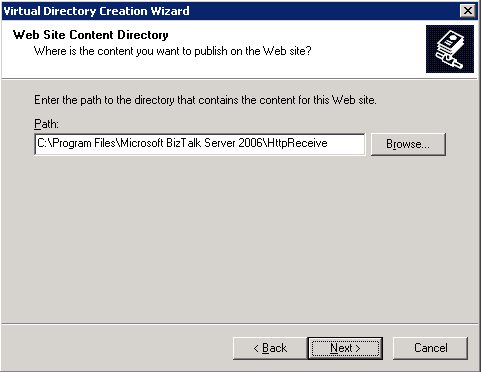
On the Web Site Content Directory page, browse to <drive>:\Program Files\Microsoft BizTalk Server 2006 \HttpReceive for the Path. Click Next.
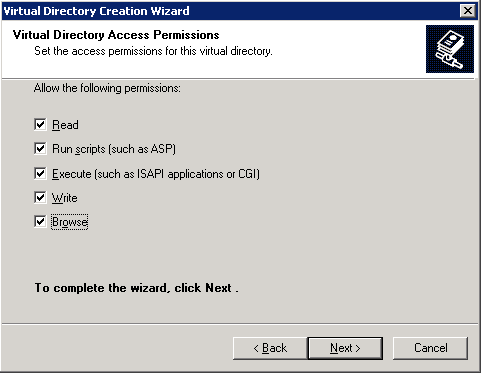
5. On the Virtual Directory Access Permissions page, select all the available options Read, Run scripts (such as ASP), Execute (such as ISAPI applications or CGI), Write and Browse. Click Next.
On the page that indicates successful completion, click Finish.
Create a new application pool.
In IIS Manager, expand the local computer, right-click Application Pools, point to New, and then click Application Pool.
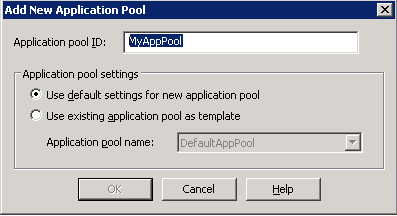
In the Application pool name box, type the name of the new application pool as MyAppPool.
Under the Application Pools node in IIS Manager, right-click the application pool noted in step 2, and then click Properties. In the Properties dialog box, click the Identity tab. Verify that the user name listed under Configurable is an administrator on the server, then click Cancel.
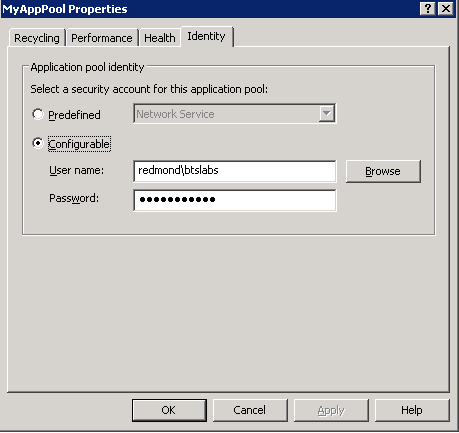
Click OK
Check whether the new application pool (MyAppPool) is running; assign the application pool to the Contoso virtual directory.
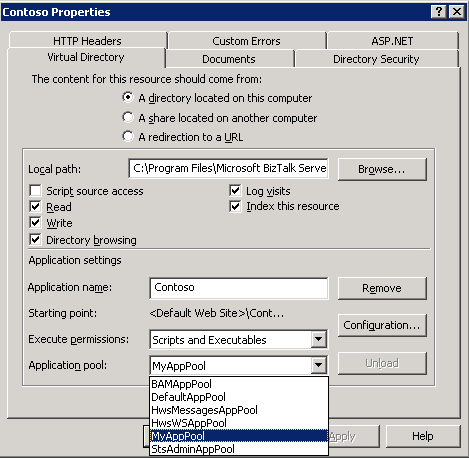
Right-click the Contoso virtual directory and then click Properties. In the Contoso Properties dialog box, under the Virtual Directory tab, in the Application pool list, select the application pool (MyAppPool) to which you want to assign the Contoso website. Now the Contoso website would be running under MyAppPool application pool.
Right-click the Contoso virtual directory and then click Browse. Click the BTSHttpReceive.dll link, you should be receiving an internal server error, 500. This validates the following:
- You have the permissions to access the website.
- The BizTalk BTSHttpReceive.dll is loaded in IIS properly.
Note: After you configure the prerequisites, make sure that both CONTOSO-BTS and FABRIKAM-BTS servers can communicate with one another. Check whether both the servers can communicate with one another by opening the Fabrikam website (http://FABRIKAM-BTS/Fabrikam) from the CONTOSO–BTS server.
Setting up the scenario on the CONTOSO-BTS server
This section provides information about how to set up the BizTalk Server environment on the CONTOSO-BTS server.
Note: If you use BizTalk Application 1, you must add a reference in BizTalk Application 1 to the BizTalk EDI Application so that your application can use its artifacts.
Configure the FILE Receive Location
In this step, you set up a one-way FILE receive port that consumes the text message made available in the local folder (C:\In) and then sends the text message to the BizTalk Server MessageBox.
In Windows Explorer, create a local folder (C:\In) to put the text message that will be consumed by the receive port.
In the BizTalk Server Administration Console, under the BizTalk Application 1 node, right-click Receive Ports, point to New, and then click One-way Receive Port.
Name the receive port ReceiveFromFile.
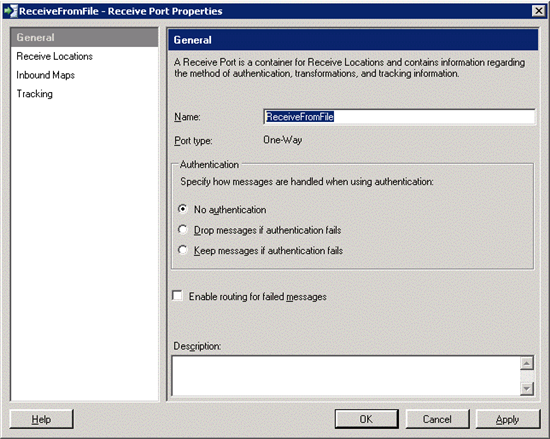
Click Receive Locations in the console tree, and then click New.
In the Receive Location Properties dialog box, name your receive location ReceiveFromFileLoc, select File for Type, and then click Configure.

In the File Transport Properties dialog box, enter the Receive folder location path as C:\In\. Click OK.
Select PassThruReceive for the Receive Pipeline. Click OK.
In the BizTalk Administration Console, click Receive Locations under the BizTalk Application 1 node, right-click ReceiveFromFileLoc, and then click Enable.
Configure the HTTP send port
In this step, you set up a one-way HTTP send port that sends the text message as an AS2 message to the Fabrikam website.
In the BizTalk Server Administration Console, under the BizTalk Application 1 node, right-click Send Ports, point to New, and then click Static One-way Send Port.
In the Send Port Properties dialog box, name the send port SendToFabrikamWebSite. Select HTTP for Type, and then click Configure.
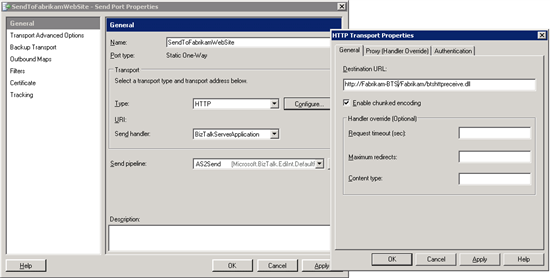
In the HTTP Transport Properties dialog box, enter the Destination URL as http://Fabrikam-BTS/Fabrikam/btshttpreceive.dll. Click OK.
Select AS2Send for Send pipeline.
Click Filters in the console tree. In the Filters pane, select BTS.ReceivePortName for Property, == for Operator and ReceiveFromFile for Value.
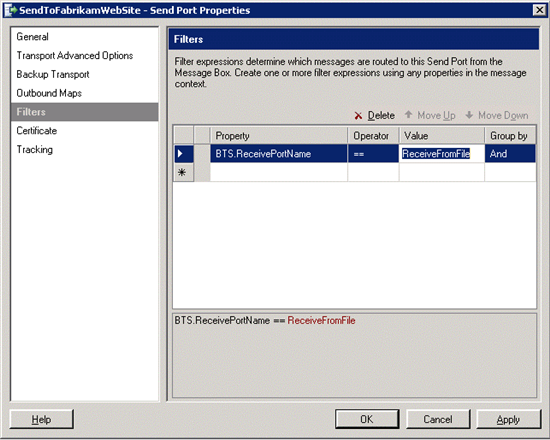
The filter BTS.ReceivePortName routes the message based on the receive port ReceiveFromFile that first dropped the test message to the BizTalk Server MessageBox.
Click OK.
In the Send Ports pane of the BizTalk Administration Console, right-click SendToFabrikamWebSite, and then click Start.
Configure the HTTP receive port to receive the MDN from the party Fabrikam
In this step, you set up a one-way receive port to receive the asynchronous MDN sent from partner, Fabrikam.
In the BizTalk Server Administration Console, under the BizTalk Application 1 node, right-click Receive Ports, point to New, and then click One-way Receive Port.
Name the receive port ReceiveMDNfromWebSite, and then click Receive Locations in the console tree.
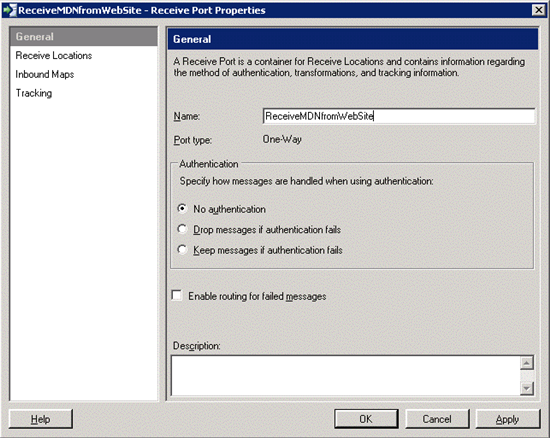
Click New.
In the Receive Location Properties dialog box, name the receive location ReceiveMDNfromWebSite, select HTTP for Type, and then click Configure.
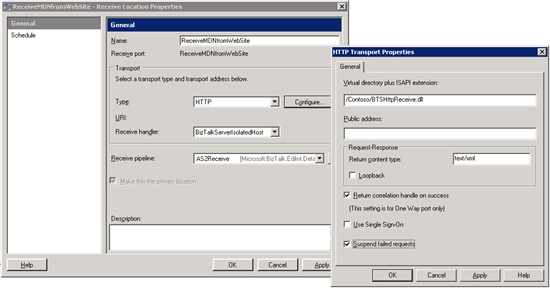
In the HTTP Transport Properties dialog box, enter /Contoso/BTSHttpReceive.dll for Virtual directory plus ISAPI extension. Select Return correlation handle on success and Suspend failed requests check boxes. Click OK. Note: Selecting the Suspend failed requests check box is important otherwise BizTalk will not record an error if there is a problem with a received message. This might also cause IIS to crash as it will continuously try resending the failed messages.
Select AS2Receive for the Receive Pipeline. Click OK.
Click the Receive Locations node, right-click your receive location, and then click Enable.
Configure the partner Fabrikam party
Note: If you use BizTalk Application 1, you must add a reference in BizTalk Application 1 to the BizTalk EDI Application so that your application can use its artifacts.
Create the party Fabrikam
- In BizTalk Server Administration Console, under the Applications node, right-click Parties, point to New, and then click Party.
- With General selected in the console tree, do the following in the details pane:
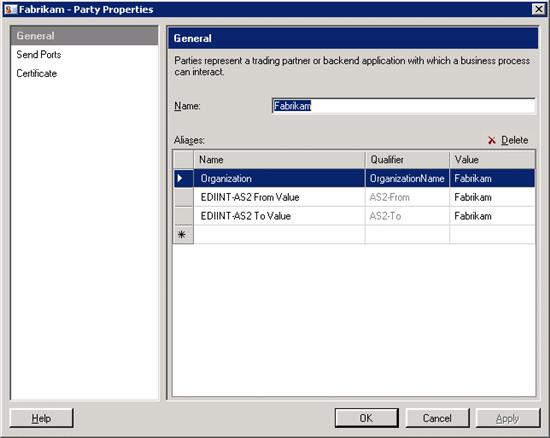
For Name, enter Fabrikam.
In the next row under Aliases, select EDIINT-AS2 From Value for Name, select AS2-From for Qualifier (the default), and enter Fabrikam for Value.
In the next row under Aliases, select EDIINT-AS2 To Value for Name, select AS2-To for Qualifier (the default), and enter Fabrikam for Value. Click OK.
Configure the party Fabrikam as an AS2 message receiver and MDN sender
Right-click Fabrikam in the Parties pane of the BizTalk Server Administration Console, and then select AS2 Properties.
In the console tree of the AS2 Properties dialog box, select Party as AS2 Message Receiver.
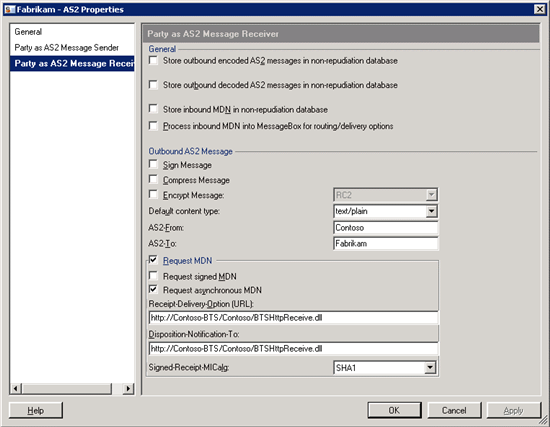
For Default content type, leave the default of text/plain to indicate that the messages are non-EDI messages.
Enter a value for the source party in AS2-From, in this case Contoso.
Check Request MDN.
Clear Request signed MDN.
Check Request asynchronous MDN.
In Disposition-Notification-To, enter http://Contoso-BTS/Contoso/BTSHttpReceive.dll.
In Receipt-Delivery-Option (URL), enter http://Contoso-BTS/Contoso/BTSHttpReceive.dll.
Click OK to accept the configuration settings and close the dialog box.
HTTP send port association with the party Fabrikam
BizTalk Server uses the send port associated with the party to determine that it should use Fabrikam’s party properties to send the AS2 message. To set up send port association:
Right-click the Fabrikam party and select Properties.
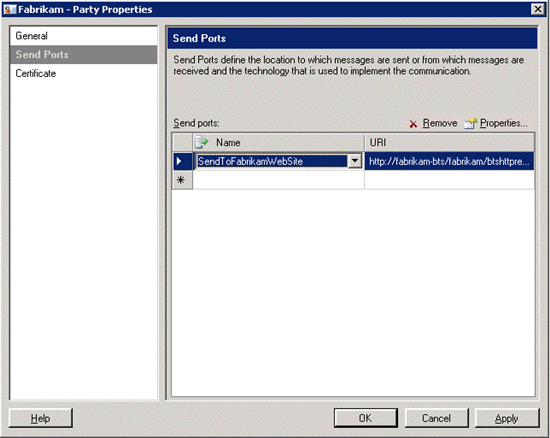
In the Fabrikam-Properties dialog box, click Send Port, and then select SendToFabrikamWebSite from the send port Name list. Click OK.
For reconciliation, enable AS2 Status Reports
In this step, you configure AS2/MDN status reports in the Group Overview page of the BizTalk Server Administration Console.
In the BizTalk Server Administration Console, move to the Parties node under the BizTalk Server 2006 Administration and BizTalk Group nodes.
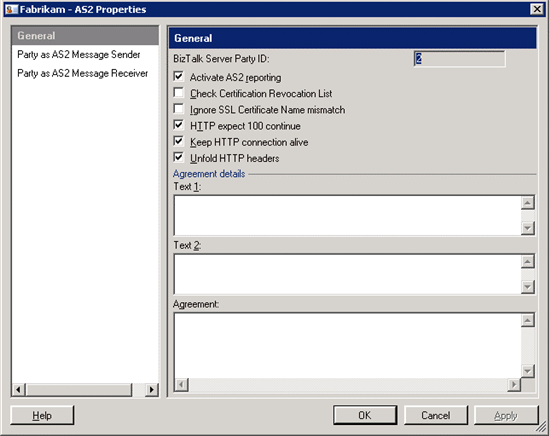
Right-click the Fabrikam party, and then click AS2 Properties.
In the General pane, click Activate AS2 Reporting. Note : This step causes message entries to be entered in the status report UI in the BizTalk Server 2006 Administration Console.
Click OK. Examples of AS2\MDN status:
Setting up the scenario on the FABRIKAM-BTS server
This section provides information about how to set up the BizTalk Server environment on the FARIKAM-BTS server.
Configure the partner Contoso party
Note: If you use BizTalk Application 1, you must add a reference in BizTalk Application 1 to the BizTalk EDI Application so that your application can use its artifacts.
Create the party Contoso
- In BizTalk Server Administration Console, under the Applications node, right-click Parties, point to New, and then click Party.
- With General selected in the console tree, do the following in the details pane:
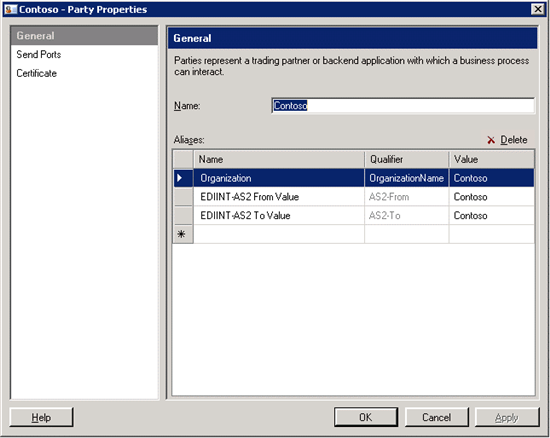
For Name, enter Contoso.
In the next row under Aliases, select EDIINT-AS2 From Value for Name, select AS2-From for Qualifier (the default), and enter Contoso for Value.
In the next row under Aliases, select EDIINT-AS2 To Value for Name, select AS2-To for Qualifier (the default), and enter Contoso for Value. Click OK.
Configure the HTTP receive location
In this step, you set up a one-way receive port to receive the AS2 message from the Fabrikam’s website and drops both the processed message and MDN into the BizTalk Server MessageBox.
In the BizTalk Server Administration Console, under the BizTalk Application 1 node, right-click Receive Ports, point to New, and then click One-way Receive Port.
Name the receive port ReceiveFromWebSite.
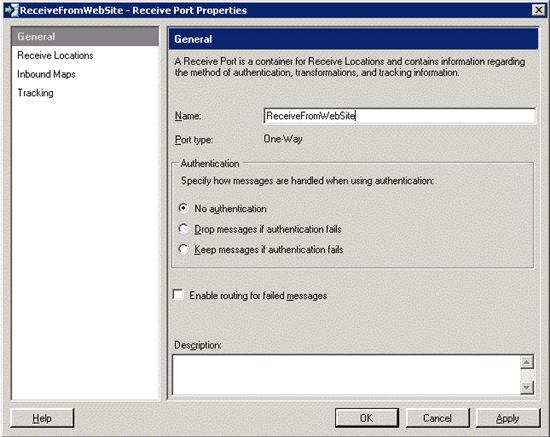
Click Receive Locations in the console tree, and then click New.
In the Receive Location Properties dialog box, name your receive location ReceiveFromWebSiteLoc, select HTTP for Type, and then click Configure.
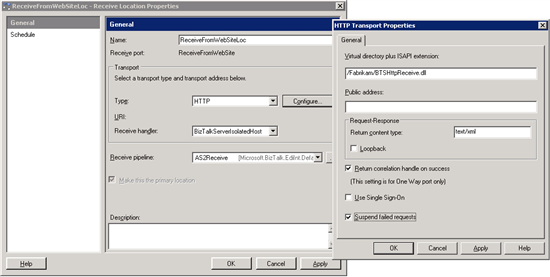
In the HTTP Transport Properties dialog box, enter /Fabrikam/BTSHttpReceive.dll for Virtual directory plus ISAPI extension. Select Return correlation handle on success and Suspend failed requests check boxes. Click OK. Note: Selecting the Suspend failed requests check box is important otherwise BizTalk Server will not record an error if there is a problem with a received message. This might also cause IIS to crash as it will continuously try resending the failed messages.
Select AS2Receive for the Receive Pipeline. Click OK.
In the BizTalk Administration Console, click Receive Locations under the BizTalk Application 1 node, right-click ReceiveFromWebSiteLoc, and then click Enable.
Configure the FILE send port
In this step, you set up a one-way send port that picks up the text message from the BizTalk Server MessageBox and sends the text message to a local folder (C:\Out).
In Windows Explorer, create a local folder (C:\Out).
In the BizTalk Server Administration Console, under the BizTalk Application 1 node, right-click Send Ports, point to New, and then click Static One-way Send Port.
In the Send Port Properties dialog box, name the send port SendToBackend. Select File for Type, and then click Configure.
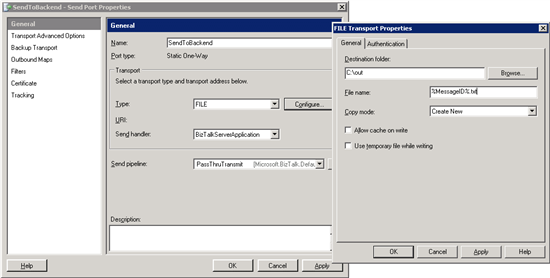
In the Send Port Properties dialog box, name your send port. Select FILE for Type, and then click Configure.
In the FILE Transport Properties dialog box, for Destination folder, enter the local folder path (C:\Out\.
Accept the default of PassThruTransmit for Send Pipeline.
Click Filters in the console tree, and add filter properties for picking up the EDI payload. On the first line, for Property, enter BTS.ReceivePortName; for Operator, enter ==; for Value, enter the name of the receive port that receives the AS2 message as ReceiveFromWebSite; and for Group by, accept And. On the second line, for Property, enter EdiIntAS.IsAS2PayloadMessage; for Operator, enter ==; and for Value, enter True.
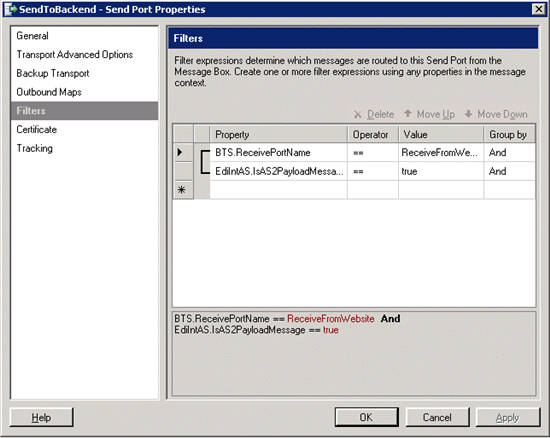
The filter BTS.ReceivePortName routes the message based on the one-way HTTP receive port ReceiveFromWebSite that receives the AS2 message from the Fabrikam virtual directory and drops the message into the BizTalk Server MessageBox.
By default, both the AS2 message and MDN is dropped into the BizTalk Server MessageBox. The filter EdiIntAS.IsAS2PayloadMessage will ensure that only the AS2 message is dropped in to the BizTalk Server MessageBox.Click OK.
Click the Send Ports node, right-click your send port, and then click Start.
Configure the dynamic one-way send port to send the MDN to Contoso website
In this step, you set up a dynamic one-way HTTP send port returns the asynchronous MDN to the Contoso’s website.
In BizTalk Server Administration Console, right-click Send Ports, point to New, and then click Dynamic One-Way Send Port.
In the Send Port Properties dialog box, name the send port SendMDNtoContoso.
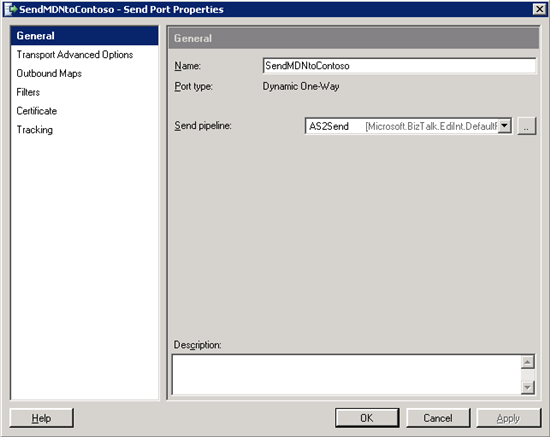
Select AS2Send for Send pipeline.
Click Filters in the console tree. In the Filters pane, select EdiIntAS.IsAS2AsynchronousMdn for Property, == for Operator, and True for Value.
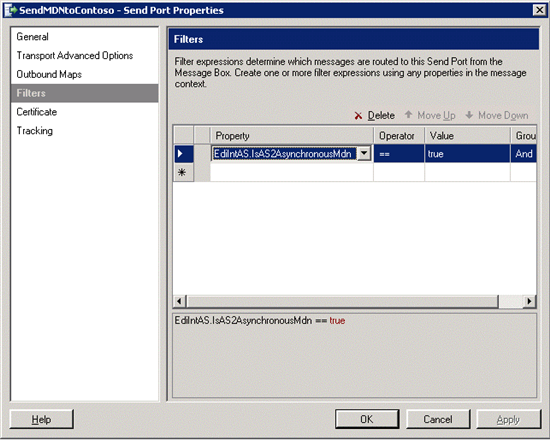
Note: This filter ensures that the dynamic send port only picks up asynchronous MDNs from the BizTalk Server MessageBox.
Click OK.
Test the scenario
In this step, you test the scenario by following these steps:
On the CONTOSO-BTS server, create a sample.txt file and enter some text for example, “This is an AS2 message” and save it to a local folder. Now browse to the folder C: \In and paste the sample.txt. Wait a few seconds for the file to disappear.
Now switch over to the FABRIKAM-BTS server, browse to the local folder C:\Out that you created to receive the text file. Confirm that the folder contains text message. The file name will be in the form of <GUID>.txt. Open the text message, and verify that the file has the same content that was sent from Contoso.
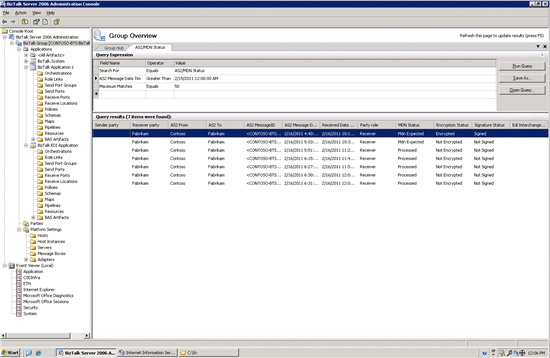
Now to check the AS2/MDN status, go back to the CONTOSO-BTS server. AS2 reporting is set on the properties of the Contoso party and is made available in the Group Hub page of the BizTalk Server Administration Console.
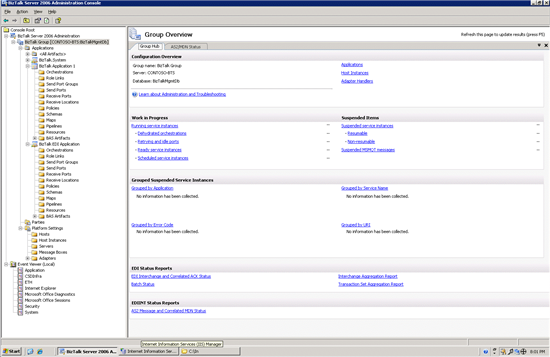
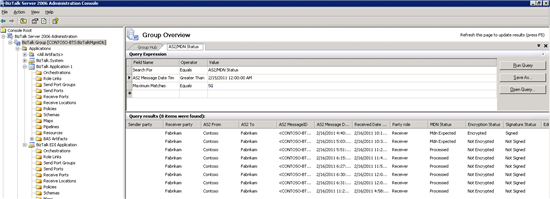
Under EDINT Status Reports, click the AS2 Message and Correlated MDN Status link. In the AS2/MDN Status tab, run the query with the values that are listed in the table:
File name
Operator
Value
Search For Equals AS2/MDN Status AS2 Messages Date Time Greater Than Select <Date and Time> Message Status Equals All Click the Run Query button to return the result set shown here.
Common Errors and Troubleshooting Steps
For all troubleshooting information related to AS2, see Troubleshooting EDI and AS2 Solutions (http://go.microsoft.com/fwlink/?LinkID=211813).
See Also
Another important place to find an extensive amount of BizTalk related articles is the TechNet Wiki itself. The best entry point is BizTalk Server Resources on the TechNet Wiki.