Remove the Last Legacy Exchange Server
**How to Remove the Last Legacy Exchange Server from an Organization in a SBS 2003 to SBS 2011 Migration
**
This is detailed instructions to go along with the migration steps documented on the Microsoft web site.
Complete the following tasks prior to uninstalling Exchange Server 2003. For detailed instructions about how to complete these steps, see How to Remove the Last Legacy Exchange Server from an Organization (http://go.microsoft.com/fwlink/?LinkId=141927 ).
1. Move all mailboxes.
2. Move all contents from the public folders.
3. Move the Offline Address Book Generation Process.
4. Remove the public folder mailbox and stores.
5. Verify that you can send and receive email to and from the Internet.
6. Delete the routing group connectors.
7. Delete or reconfigure the Mailbox Manager policies.
8. Move the public folder hierarchy.
9. Delete the domain Recipient Update Services.
10. Delete the Enterprise Recipient Update Service.
**1. Move all mailboxes. **
At this point in the migration process you should have already moved all mailboxes. But take this time to ensure that ALL mailboxes have been migrated across.
- Go to the SBS 2011 server and launch the Exchange management console.
- Scroll down to the Recipient Configuration, then Mailbox.
- Scroll over on the right hand side view pane and ensure that all receipient type details show that the mailboxes say "User Mailbox" and not Legacy Mailbox.
- If any mailboxes still say legacy, they are still on the old Exchange 2003 and will be left on the 2003 when you remove Exchange.

To move them again, ensure that all completed move requests have been cleared from the Move Request section.
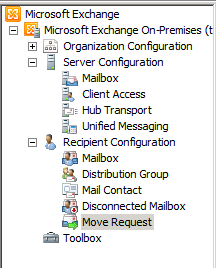
Scroll to the Recipient Configuration, then Move Request, and clear all completed move requests.

Highlight each request and choose clear request.

Now redo a move request for any mailbox that has not moved. Ensure that you allow the move request to skip up to 49 corrupted messages (this ensures that the move will not be stopped by the inability to not move items. Refresh the screen to ensure all items have been moved.
**2. Move all contents from the public folders.
**
Review that all public folder content has been moved to the new server.
- Go to the Source server and drill down to the Public folder store, then to public folder instances.
- Ensure that the Public Folder Instance folder is clear.

If it is not clear, click on any public folder instances and update the replication setting to that the replication is set to URGENT.
- Go into the public folder instances and on each public folder, right mouse click, go to the replication tab and mark it urgent.
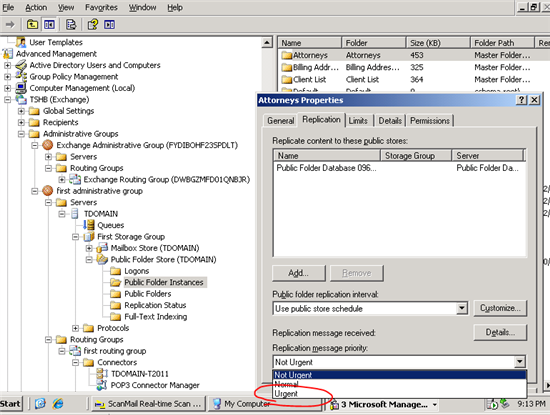
For troubleshooting steps review this blog post.
**3. Move the Offline Address Book Generation Process.
**This step should already have been done as well as part of the normal migration process, so at this step of the migration, we're just doublechecking that it has been done.
- On the SBS 2011 server, go to the Exchange Management Console.
- Then to your Exchange server, then to Organization Configuration, then to Mailbox.
- Click to the Offline Address Book and ensure that it is pointing to the new server, not the original source server.

**4. Remove the public folder mailbox and stores.
**
At this step you are now ready to remove the public folder mailbox and stores.
Go back to the SBS 2003 server, launch the Exchange System Manager.
Expand the server, expand the storage group that contains the public folder store, right-click the public folder store, and then click Delete.
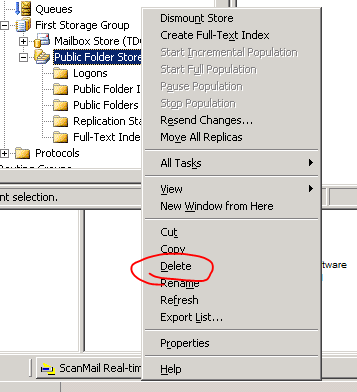
You will be prompted that you need to choose a new public folder location.

Choose the public folder on the new SBS 2011 server.
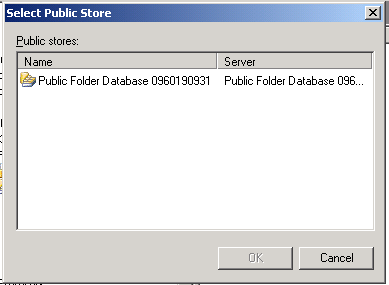
And click OK.
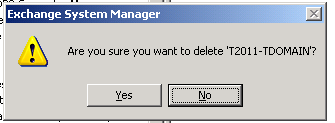
Say yes to "Are you sure"

It will now confirm that it removed the public folder from the Exchange 2003.

5. Verify that you can send and receive email to and from the Internet.
**
**At this point in time, ensure that email is working.
- Ensure that you have each user close and reopen Outlook so that Outlook autorepoints it's Exchange location from Exchange 2003 to Exchange 2010.
- Have each user send a test email.
- If there are any issues, launch Outlook web access and ensure that email can be sent internally, then check to see if you forgot an external mail settings like MX records (if needed), changes to the internal firewall to move port 25 from the old server to the new server and so on.
6. Delete the routing group connectors.
**
**Delete the routing group connectors that connect the Exchange 2003 or Exchange 2000 routing groups and the Exchange 2007 routing group. You can do this from Exchange 2003 or Exchange 2000 System Manager, or you can use the Remove-RoutingGroupConnector cmdlet in the Exchange Management Shell. For more information, see Remove-RoutingGroupConnector.
- Go to the Exchange 2003 server.
- Launch the Exchange System Management.
- Find the connectors that go from the old server to the new server.

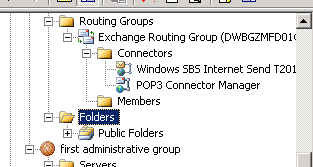
They will be located under Exchange Administrative group, then Routing Groups, the Exchange Routing Group, then Connectors. Look for the connector that goes from the Newserver-Oldserver and delete it.
The second one will be under first administrative group, then under Routing Groups, then under First routing group, then under Connectors. Look for the connector that goes from Oldserver-Newserver and delete it.

**7. Delete or reconfigure the Mailbox Manager policies.
**
In the Exchange 2003 check to see if there are any policies that are only Mailbox Manager policies and do not define e-mail addresses (they do not have an E-mail Addresses (Policy) tab), perform the following steps to delete the policies:
- In Exchange System Manager, expand Recipients, and then select Recipient Policies.
- To verify that a policy is only a Mailbox Manager policy, right-click the policy, and then select Properties. The Properties page must not have an E-Mail Addresses (Policy) tab.
- Only delete them if they do NOT have an email listed there.
If you have Exchange 2003 or Exchange 2000 policies that are both E-mail Addresses and Mailbox Manager policies (they have both the Mailbox Manager Settings (Policy) tab and the E-mail Addresses (Policy) tab), perform the following steps to remove the mailbox manager portion of the policy.
- In Exchange System Manager, expand Recipients, and then select Recipient Policies.
- Right-click the policy, and then select Change property pages
- Clear the Mailbox Manager Settings check box, and then click OK.
In the case of the Windows SBS Email address policy, it is NOT a policy that has Mailbox Manager settings therefore NOTHING needs to be done to it.
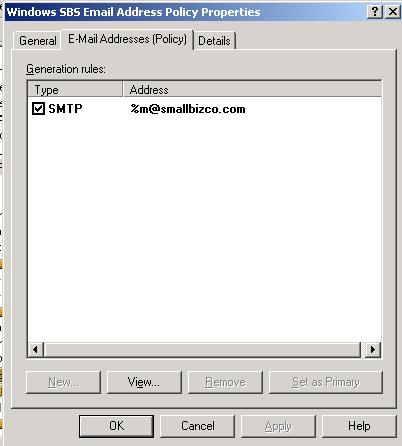
This policy is as it should be. Do nothing to it.
**8. Move the public folder hierarchy.
**
On your Exchange 2003 server, perform the following steps to move the public folder hierarchy from the Exchange 2003 administrative group to the Exchange 2010 administrative group:
In Exchange System Manager, expand Administrative Groups, right-click Exchange Administrative Group (FYDIBOHF23SPDLT), select New, and then select Public Folders Container.

Expand the Exchange 2003 administrative group that contains the public folder tree, expand Folders, and then drag Public Folders to Folders under the Exchange 2010 administrative group.
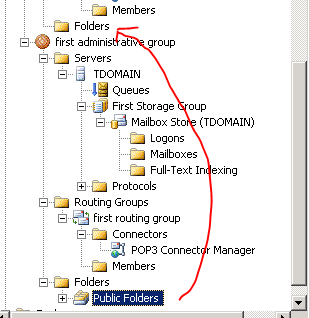
It should now look like this:
**9. Delete the domain Recipient Update Services.
**
Perform the following steps to delete the domain Recipient Update Services:
- In Exchange 2003 System Manager, expand Recipients, and then select Recipient Update Services.
- Right-click each domain Recipient Update Service, and then select Delete.

Click Yes.

**10. Delete the Enterprise Recipient Update Service.
**
You will not be able to delete the Recipient Update Service (Enterprise Configuration) by using Exchange 2003 or Exchange 2000 System Manager. Perform the following steps to delete the Recipient Update Service (Enterprise Configuration) by using ADSI Edit (AdsiEdit.msc):
Open ADSI Edit, expand Configuration, expand CN=Configuration,CN=<domain>, expand CN=Services, expand CN=Microsoft Exchange, expand CN=<Exchange organization name>, expand CN=Address Lists Container, and then select CN=Recipient Update Services.
In the result pane, right-click Recipient Update Service (Enterprise Configuration), click Delete, and then click Yes to confirm the deletion.
Note rather than do this, I just MOVED the Enterprise receipient Update service to the new server.
Right mouse click on the Enterprise Receipient Update Service.
Click on Properties.

You will see the Exchange server and domain are the old ones.
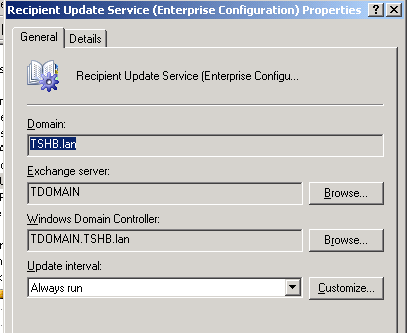
Click browse and choose the new SBS 2011 server.

In the properties tab, browse to the SBS 2011 domain controller and the new Exchange server.
Click Okay.
(for a general Exchange 2003 article review this post on the subject)
Now and ONLY now are you ready to uninstall the Exchange 2003 from the original source server. Have disk 2 of the original SBS media ready for this step.
To remove Exchange Server 2003 from the Source Server, click Windows® Small Business Server 2003 in Add or Remove Programs. If you have an R2 box you are looking for the "non R2" line. Once the installer has brought up the component screen, choose Exchange and then click Remove. Follow the instructions to finish the procedure.

Click on Change/Remove. It will load up the components.

Click next to begin process to remove Exchange.

You can also See -