Creating DAG in MS Exchange 2013 Server
MS Exchange 2013 Configurations
Preparing DAG in between two members
DAG is the highly available model for mailbox database introduced in MS Exchange 2010 that later on continued in the next version of MS Exchange 2013 with some enhancements and improvements. There are some important points those need to be kept in mind while preparing DAG.
1. Operating System requirements
ü MS Windows 2008 Enterprise / Datacenter
ü MS Windows 2008 R2 Enterprise / Datacenter
ü MS Windows 2012 Standard
ü MS Windows 2012 Datacenter
2. Network Cards Requirements
ü Dual Network card is preferable (e.g. One for MAPI communication and One for DAG replication only).
ü In-case of virtualization, we need to define 2 network cards based on 2 different virtual network switches.
ü MAPI Network card must have following items to be configured
- IPv4 / IPv6 (Manually Configured)
- Gateway settings (IP settings)
- Preferred DNS etc
- Option (Register this connection’s address) must be checked
ü DAG Network card must have following settings
- IPv4 / IPv6 (Manually Configured) only.
- Option (Register this connection’s address) must not be checked
- Rest of the options you configured in MAPI Network card must not be configured.
**Note: you can configure single card for replication and MAPI connections but it’s not recommended best practice.
**3. Pre-requisites for DAG
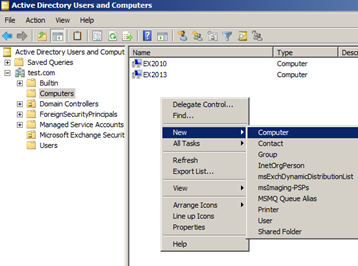
First of all you have to pre-stage DAG account using Active Directory Users and computers. For this you should follow the steps as mentioned below:
- Create a computer account for DAG with a name that you’ll use as a Resource Record (RRs) in DNS snap-in.
- Right-click that computer account you created for DAG and disable it.
- Again, right-click that computer account and go to Properties -> Security
- In the Security tab click Edit and then Add computer accounts of DAG members with full rights
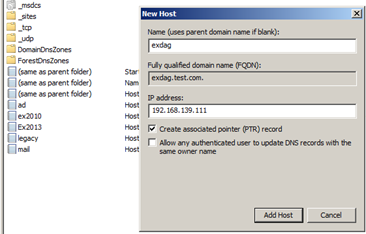
- Open DNS snap-in -> Forward Lookup Zone and Add (A or AAAA) RR with the same name you created in the Computers OU of AD with an IP (Virtual IP for Cluster) as shown in the figure below.
Note: IPs could be multiple as per subnets used for multiple members of DAG.
4. Preparing DAG witness server
As DAG is the feature of Mailbox server role and require a Failover cluster for its highly available model that ships with MS Windows 2008 (R2) Enterprise / MS Windows 2012 (R2) Std at minimum, you require a witness server which shall maintain quorum of the cluster but this witness server must be a member of one security group of MS Exchange “Exchange Trusted Subsystem”. And, its better if you take that witness server that is also playing a counterpart role of MS Exchange 2013 family (i.e. CAS / HUB incase of MS Exchange 2010). In order to prepare DAG witness server, please, follow below steps.
- Create a shared folder with full access rights for member server accounts to that folder
- Open local security group using computer management snap-in and add “Exchange Trusted Subsystem” security group in Local Administrators Group of that DAG witness server.
- File Server role must be installed on that witness server
- That witness server FQDN must be resolved by DNS and DAG members
- DAG members can resolve that UNC what you prepared in the witness server (i.e. \ServerName\ShareName).
Note: you can prepare multiple witness servers for one DAG
5. Preparing DAG using EAC (Exchange Administration Center)
Preparing DAG is very easy but if you have properly followed or configured its pre-requisites. Otherwise, you may have complexities while preparing your first DAG in MS Exchange 2013 environment. Once you have followed pre-requisites properly then you should follow below steps to create first DAG in your Exchange organization.
Step # 1 (Creating DAG)
- Using MS Exchange EAC, simply go to Servers - > Database Availability Group and click on the “+” sign to create a new DAG.
- Then, punch in DAG’s name (exactly the same you created in Computers OU of AD and as an RR of DNS).
- Provide Witness server FQDN (i.e. FS.yourdomain.com)
- Provide simple shared folder path (as a local Address i.e. D:\DAGWitness).
- Click on New button to create DAG.
Step # 2 (Adding Members to DAG)
Once DAG has been created successfully, please, follow the below steps to add DAG members.
- Click on “+” sign to add members of DAG.
- Then click on “Save” button to initiate DAG.
By default, failover clustering feature and preparation of cluster is an automatic process with creation of Network for DAG that will initiate when you click on “Save” button. If everything was properly configured then after a few minutes you’ll be informed that DAG has been created and initiated.

