Note
Access to this page requires authorization. You can try signing in or changing directories.
Access to this page requires authorization. You can try changing directories.
Introduction
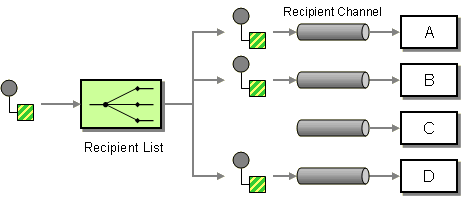
The Recipient List pattern addresses the scenario solution in which a message is routed to one or more recipients.
Figure 1. Recipient List pattern. (For a detailed description of this pattern, see Recipient Liston the Enterprise Integration Patterns site.)
The implementation of this pattern with the ESB Toolkit is a combination of the Microsoft BizTalk ESB Toolkit Itinerary Routing Service and multiple resolvers. Out of the box you can:
- Define the itinerary routing service with a messaging extender to execute in the BizTalk pipeline using Itinerary Designer.
- Define the itinerary routing service with an orchestration extender to execute as an orchestration using Itinerary Designer, which performs routing using BizTalk send ports.
Usually the Recipient List does not modify the message contents but what if recipient A wants to have another message as recipient B, C, and D? In the resolvers you can also configure a map but it will not be executed in the Routing service because only a Transform service can execute a map. You can add a Transform service to the itinerary but then all the messages are modified. So how can you solve this problem? Create a custom RecipientList service and combine the two services!
Steps
The following steps are necessary to create an Orchestration based Routing service that also can transform the message.
1. Create new BizTalk Server project in Visual Studio and add the new RecipientListService orchestration.
2. Add references to the following ESB Toolkit assemblies:
- Microsoft.Practices.ESB.Adapter
- Microsoft.Practices.ESB.ExceptionHandling
- Microsoft.Practices.ESB.ExceptionHandling.Schemas.Faults
- Microsoft.Practices.ESB.Itinerary
- Microsoft.Practices.ESB.Itinerary.Schemas
- Microsoft.Practices.ESB.Resolver
- Microsoft.Practices.ESB.Transform
3. Define a logical direct-bound Receive Port and an activated Receive Shape in the Orchestration.
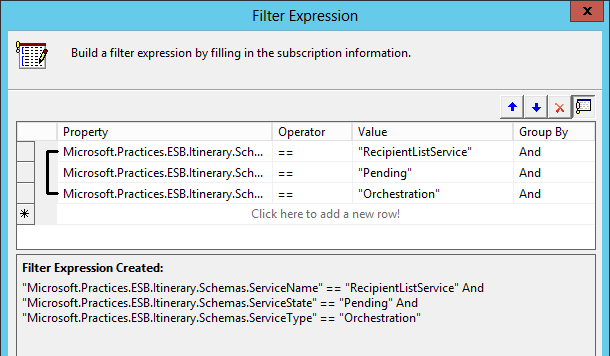
4. Define a subscription filter to the Receive Shape to activate the orchestration from the message itinerary context so that the orchestration executes the RecipientListService step.
Figure 2. Filter Expression.
5. Add an Expression Shape to the orchestration with the following code to retrieve the current itinerary step.
// Retrieve the current itinerary step
itinerary = ``newMicrosoft.Practices.ESB.Itinerary.SerializableItineraryWrapper();
itineraryStep = ``newMicrosoft.Practices.ESB.Itinerary.
SerializableItineraryStepWrapper();
itinerary.Itinerary = Microsoft.Practices.ESB.Itinerary.
ItineraryOMFactory.Create(InboundMessage);
itineraryStep.ItineraryStep = itinerary.Itinerary.GetItineraryStep(InboundMessage);
6. Add an Expression Shape to the orchestration with the following code to retrieve the Resolvers associated with the itinerary.
// Init
resolverDictionary = ``null``;
// Retrieve the Resolvers associated with the itinerary
resolvers = itineraryStep.ItineraryStep.ResolverCollection;
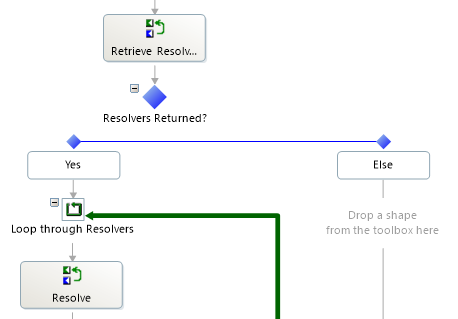
7. Add a Decide shape with the rule “resolvers.Count > 0”.
8. Add a Loop Shape to the orchestration with the expression “resolvers.MoveNext()” to loop through the Resolvers.
Figure 3. Loop through the Resolvers.
9. Add an Expression Shape to the orchestration with the following code to retrieve the Resolver properties.
// Retrieve current resolver
resolver = resolvers.Current;
// Pass the resolver configuration to the Resolver mgr for resolution
resolverDictionary = Microsoft.Practices.ESB.Resolver.
ResolverMgr.Resolve(InboundMessage, resolver);
// Get properties
mapName = resolverDictionary.Item(``"Resolver.TransformType"``);
transportLocation = resolverDictionary.Item(``"Resolver.TransportLocation"``);
transportType = resolverDictionary.Item(``"Resolver.TransportType"``);
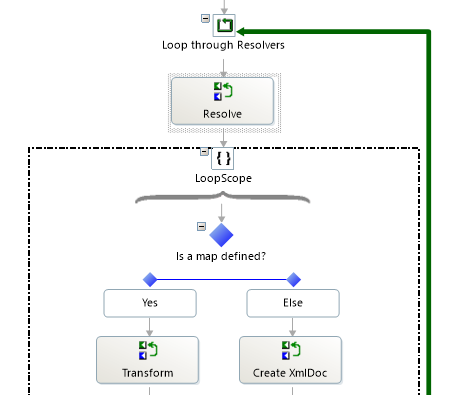
10. Add a Decide shape with the rule “mapName != null && mapName != "
Figure 4. Decide if a map is defined.
11. Add an Expression Shape to the orchestration with the following code to transform the message.
// Transform message
transformedMsgXml = Microsoft.Practices.ESB.Transform.MapHelper.
TransformMessage(InboundMessage.Body.OuterXml, mapName);
// Create XmlDocument
xmlDoc.LoadXml(transformedMsgXml);
12. Add a Message Assignment Shape to the orchestration with the following code to create the ESBRequest message and set the dynamic port properties.
// Create ESB Message
ESBMessage.Body = xmlDoc;
// Call the Adapter Manager to set all necessary properties
Microsoft.Practices.ESB.Adapter.AdapterMgr.SetEndpoint(resolverDictionary,ESBMessage);
// Set delivery port address
DynamicPort(Microsoft.XLANGs.BaseTypes.Address) = transportLocation;
DynamicPort(Microsoft.XLANGs.BaseTypes.TransportType) = transportType;
13. Create a Port with a Dynamic binding and add a Send Shape to the orchestration to send the ESBRequest message to the Recipient.
Figure 5. Send message to the Recipient.
14. Add a Message Assignment Shape to the orchestration with the following code to create the Outbound message and set the dynamic port properties.
// Create message
OutboundMessage.Body = xmlDoc;
OutboundMessage(*) = InboundMessage(*);
// Call the Itinerary helper to advance to the next step
hasMoreSteps = itinerary.Itinerary.HasNextService();
itinerary.Itinerary.Advance(OutboundMessage, itineraryStep.ItineraryStep);
itinerary.Itinerary.Write(OutboundMessage);
15. Add a Decide shape with the rule “hasMoreSteps”.
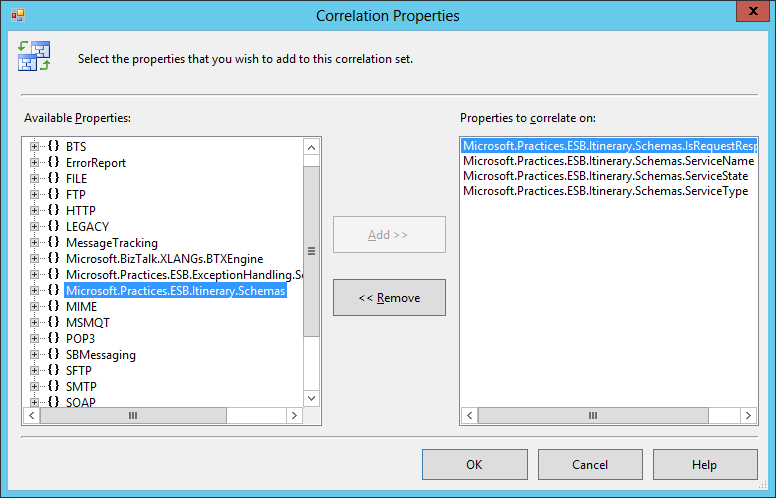
16. Create a Correlation Type and a Correlation Set for the itinerary.
Figure 6. Correlation Properties.
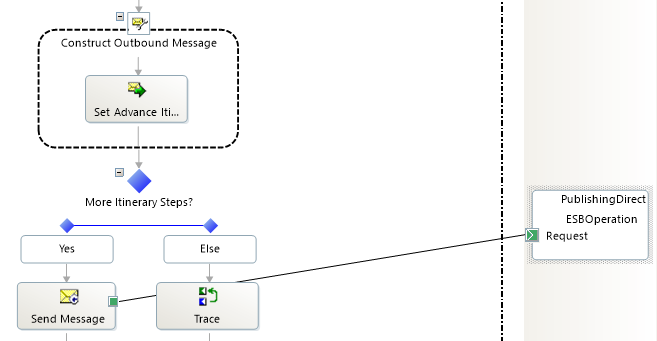
17. Create a Port with a Direct binding and add a Send Shape (with the Correlation Set) to the orchestration to send the Outbound message back to the MessageBox database.
Figure 7. Sent message to MessageBox.
18. Add an Exception handler to the Main scope to catch all the exceptions. (You can also have exception handlers on other scopes).
19. Add a Message Assignment Shape to the Exception handler with the following code to create a Fault Message. You can add multiple messages to the FaultMessage.
// Trace
System.Diagnostics.Trace.WriteLine(``"[RecipientListService] Exception:"+ ex.Message);
// Create FaultMessage
FaultMessage = Microsoft.Practices.ESB.ExceptionHandling.ExceptionMgmt.
CreateFaultMessage();
// Set Fault Message Properties
FaultMessage.Body.FaultCode = ``"2111"``;
FaultMessage.Body.FaultDescription = ``"Exception"``;
FaultMessage.Body.FailureCategory = ``"Routing Failure"``;
FaultMessage.Body.FaultSeverity = Microsoft.Practices.ESB.ExceptionHandling.
FaultSeverity.Critical;
// Add message
Microsoft.Practices.ESB.ExceptionHandling.ExceptionMgmt.AddMessage
(FaultMessage, InboundMessage);
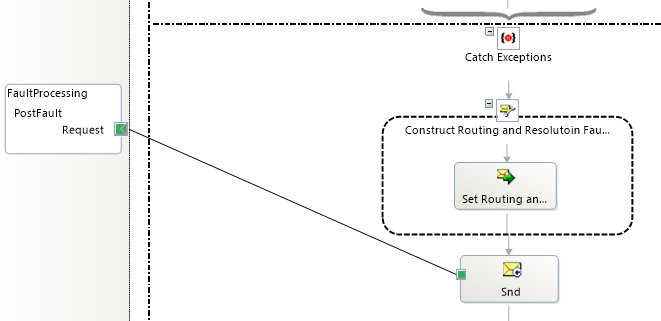
20. Create a Port with a Direct binding and add a Send Shape to the orchestration to send the FaultMessage message back to the MessageBox database.
Figure 8. Send Fault message.
21. Right click on the BizTalk project and click in the Menu on the Properties item. Click on the signing tab to create Strong Name Key.
22. Click on the Deployment tab to configure the Deployment properties and set the Application Name.
23. Right click on the BizTalk project and select Build to create the assembly.
24. Right click on BizTalk project and click on Deploy to deploy the Orchestration.
25. In the BizTalk Administration Console go to the created application and configure the Bindings of the orchestration and start the application.
How a Custom Itinerary Service can be used in an Itinerary
The following steps describe what must be done so that the Custom Itinerary Service can be used in the Itinerary Designer in Visual Studio.
1. Close Visual Studio.
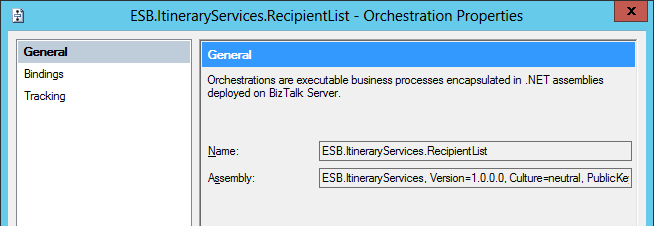
2. In the BizTalk Administration Console double click on the orchestration and copy the name and the assembly properties.
Figure 9. Orchestration Properties.
3. Open the esb.config from the ESB Toolkit as an Administrator.
Location: C:\Program Files (x86)\Microsoft BizTalk ESB Toolkit
4. Add a new itineraryService entry in the itineraryServices section.
<``itineraryServiceid``=``"1000"name``=``"CustomItineraryService"type="ESB.ItineraryServices.
CustomItineraryService, ESB.ItineraryServices, ``Version``=``1``.0.0.0, ``Culture``=``neutral``,
PublicKeyToken``=``05d61ea6aa409780``" ``scope``=``"Orchestration"stage``=``"None"``/>
5. Open Visual Studio as an Administrator and open the ESB solution.
6. Right click on the ESB solution select Add / New Project.
7. In the “Add New Project” PopUp window select BizTalk ESB Itinerary Designer. Give it a name and click on the OK button.
Figure 10. Add New Project.
8. In Solution Explorer, right-click the ItineraryLibrary project, point to Add, and then click New Itinerary.
9. From the Toolbox, drag an Itinerary Service model element to the design surface.
In the Properties select:
- - Itinerary Service Extender: Orchestration|Orchestration Extender
- - Service Name: RecipientListService
Figure 11. Itinerary with custom RecipientList Service.
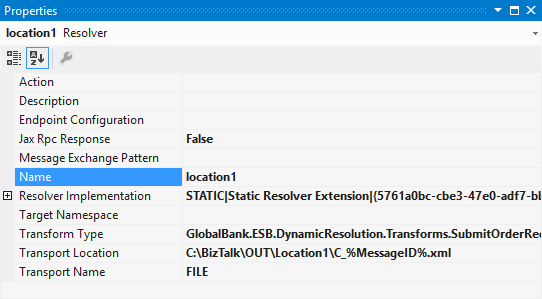
10. Add a Resolver to the Itinerary Service and set the necessary properties. (Location, map, etc.)
Figure 12. Resolver Properties.
11. Connect the Itinerary Service to an OnRamp and validate the itinerary.
Code Samples
You can download the Custom Itinerary Orchestration Service and the sample itinerary in Microsoft Code Gallery:
See Also
Read suggested related topics:
Another important place to find a huge amount of BizTalk related articles is the TechNet Wiki itself. The best entry point is BizTalk Server Resources on the TechNet Wiki.
