BizTalk Server 2013: Creating Custom Adapter Provider in ESB Toolkit SFTP As an Example
Introduction
ESB Toolkit* "is a collection of tools and libraries that extend BizTalk Server capabilities of supporting a loosely coupled and dynamic messaging architecture. It functions as middleware that provides tools for rapid mediation between services and their consumers. Enabling maximum flexibility at run time, the BizTalk ESB Toolkit simplifies loosely coupled composition of service endpoints and management of service interactions."* [MSDN]
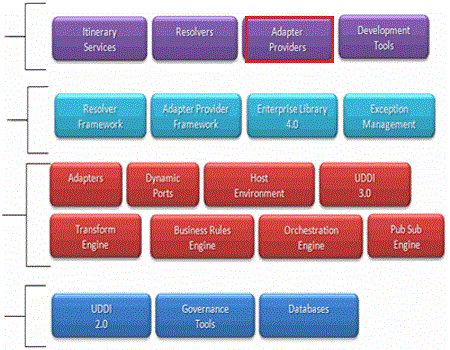
ESB Toolkit Core Engine contains many components, one of the main components is Adapter Provider as shown in figure 1
Figure 1. ESB Toolkit Core Engine Component [MSDN]
"Adapter Providers are used in the BizTalk ESB Toolkit to set properties on outbound adapters. They provide a mapping between BizTalk ESB Toolkit configuration properties and Send Adapter context properties." [Flanders]
SFTP adapter is one of the new adapters added to the out of the box adapters of BizTalk Server 2013.
In this article I am going to explain how to create custom adapter provider using the SFTP adapter as an example.
I supposed that you installed and configured BizTalk 2013, ESB Toolkit 2.2 and prepared SFTP testing environment
Problem
There are a number of Adapter Providers included with the BizTalk ESB Toolkit 2.2 such as:
- WCF-BasicHttp
- WCF-Custom
- WCF-WSHttp
- FTP
- File
- SMTP
- WebSphere MQ
However, how can I extend Adapter Provider Framework and use SFTP adapters?
Solution
The Adapter Provider framework provides a very easy way to extend it to include more BizTalk send adapters that are capable of dynamic configuration. These adapters are defined through the implementation of the IAdapterProvider interface within a .NET Framework assembly.
To create a custom SFTP adapter provider
***"Step 1: *Create an assembly that derives from the BaseAdapterProvider base class and contains a SetEndPoint method that sets the endpoint context properties of the message." [MSDN]
Add a class library project to your solution and give it a name like TechNetWiki.ESB.CommonAdapter.SFTPAdapter
Add a new class item to your class library project and name it AdapterProvider
Add references to the following assemblies
- %BTSINSTALLPATH%\Microsoft.BizTalk.Adapter.Sftp.dll
- %BTSINSTALLPATH%\Microsoft.XLANGs.BaseTypes.dll
- %BTSINSTALLPATH%\Microsoft.BizTalk.Pipeline.dll
- C:\Program Files (x86)\Microsoft BizTalk ESB Toolkit\Bin\Microsoft.Practices.ESB.Adapter.dll
- C:\Windows\assembly\GAC_MSIL\Microsoft.BizTalk.GlobalPropertySchemas\3.0.1.0__31bf3856ad364e35\Microsoft.BizTalk.GlobalPropertySchemas.dll
The created class must implement **BaseAdapterProvider **add override AdapterName property and SetEndpoint method as shown in the below code
01.namespace TechNetWiki.ESB.CommonAdapter.SFTPAdapter
02.{
03.    using Microsoft.Practices.ESB.Adapter;
04.    using Microsoft.XLANGs.BaseTypes;
05.    using System;
06.    using System.Collections.Generic;
07.    using System.Linq;
08.
09.    public class  AdapterProvider : BaseAdapterProvider
10.    {
11.        public override  string AdapterName
12.        {
13.            get
14.            {
15.                return "SFTP";
16.            }
17.        }
18.
19.        public override  void SetEndpoint(Dictionary<string, string> resolverDictionary, XLANGMessage message)
20.        {
21.            if (resolverDictionary == null)
22.                throw new  ArgumentNullException("resolverDictionary");
23.            if (message == null)
24.                throw new  ArgumentNullException("message");
25.
26.            base.SetEndpoint(resolverDictionary, message);
27.
28.            try
29.            {
30.                string transportLocation = resolverDictionary["Resolver.TransportLocation"];
31.                string outboundTransportCLSID = resolverDictionary["Resolver.OutboundTransportCLSID"];
32.                string endpointConfig = resolverDictionary["Resolver.EndpointConfig"];
33.                string transportType = resolverDictionary["Resolver.TransportType"];
34.
35.                message.SetPropertyValue(typeof(BTS.OutboundTransportLocation), transportLocation);
36.                message.SetPropertyValue(typeof(BTS.OutboundTransportType), transportType);
37.                message.SetPropertyValue(typeof(BTS.OutboundTransportCLSID), outboundTransportCLSID);
38.
39.                if (!string.IsNullOrEmpty(endpointConfig))
40.                {
41.                    // parse delimited endpointconfig and set SFTP specific adapter properties
42.                    // endPointConfig data with this format "Key1=Value1;Key2=Value2;...."
43.                    var config =  endpointConfig.Split(';').Select(part => part.Split('='))
44.                           .ToDictionary(split => split[0], split => split[1]);
45.                    // Set the context for the SFTP adapter
46.                    message.SetPropertyValue(typeof(SFTP.UserName), config["UserName"]);
47.                    message.SetPropertyValue(typeof(SFTP.Password), config["Password"]);
48.                    message.SetPropertyValue(typeof(SFTP.AccessAnyServerHostKey), config["AccessAnyServerHostKey"]);
49.                }
50.
51.            }
52.            catch (System.Exception ex)
53.            {
54.                throw;
55.            }
56.        }
57.    }
58.}
Right Click on the project and select **Properties -> **Select Signing Tab-> check Sign the assembly -> Choose a strong name key file <New...> and name it like key.snk -> Build the project
"Step 2: Register the adapter provider by adding it to Esb.config configuration files using an <adapterProvider> element with a name for the adapter as the name attribute, the fully qualified name of the class as the type attribute, the moniker as the moniker attribute (multiple values should be separated by a comma), and optionally the assembly of the actual adapter as the adapterAssembly attribute." [MSDN]
- We need to know the public key token of the created assembly to use it in esb.config file. Open Visual Studio Command Prompt -> Type sn -T <assemblyPath>
- Open file C:\Program Files (x86)\Microsoft BizTalk ESB Toolkit\esb.config
- Add <adapterProvider name="SFTP" type="TechNetWiki.ESB.CommonAdapter.SFTPAdapter.AdapterProvider, TechNetWiki.ESB.CommonAdapter.SFTPAdapter, Version=1.0.0.0, Culture=neutral, PublicKeyToken=PublicKeyInStep1" moniker="SFTP" /> before </adapterProviders> tag and replace PublicKeyInStep1 with the generated public key token in step 1
"Step 3: Register the new assembly in the global assembly cache." [MSDN]
- Open Visual Studio Command Prompt -> Type gacutil -i <assemblyPath>
Step 4: To let the SFTP adapter be visible in Static Resolver Transport Name property
Create a new XML file and rename it SFTPPropertyManifest.xml in this path C:\Program Files (x86)\Microsoft Visual Studio 11.0\Common7\IDE\Extensions\Microsoft.Practices.Services.Itinerary.DslPackage
Add the following script to your manifest file
<?xml version="1.0" encoding="utf-8"? >
<adapterPropertyManifest adapterName="SFTP">
    <aliases>
        <alias name="globalPropertySchemas" value="Microsoft.BizTalk.GlobalPropertySchemas, Version=3.0.1.0, Culture=neutral, PublicKeyToken=31bf3856ad364e35" />
    </aliases>
    <properties>
        <property name="UserName" type="SFTP.UserName" description="The user name for the connection." encrypted="true" assembly="globalPropertySchemas" />
        <property name="Password" type="SFTP.Password" description="The password for the connection." encrypted="true" assembly="globalPropertySchemas" />
        <property name="AccessAnyServerHostKey" type="SFTP.AccessAnyServerHostKey" description="Determines if any SSH public host key fingerprint from the Server should be accepted." assembly="globalPropertySchemas" />
        <property name="EventArgs" type="System.EventArgs" assembly="mscorlib, Version=2.0.0.0, Culture=neutral, PublicKeyToken=b77a5c561934e089"  />
    </properties>
</adapterPropertyManifest>
Close visual studio
Test the solution
Use these steps to test the new custom sftp adapter provider
Open Visual Studio 2012
Create a new Class Library project and name it such as ESB.Itinerary.Library
Right click on ESB.Itinerary.Library project -> Add-> New BizTalk ESB Itinerary Designer -> name it StaticSftp.itinerary
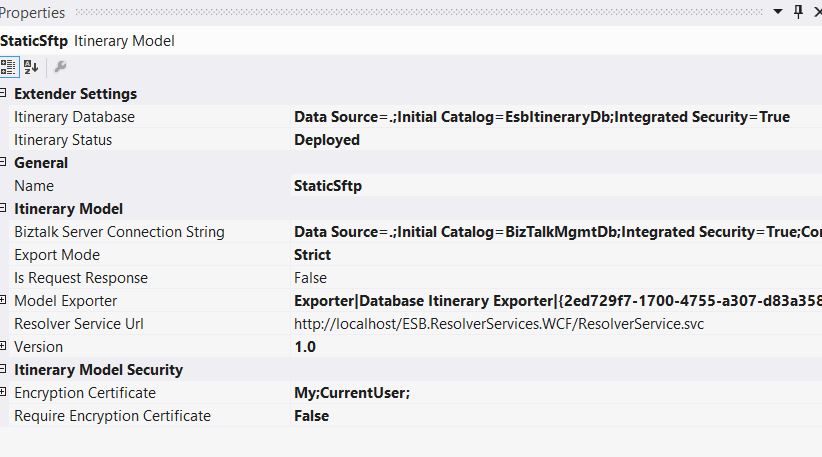
Right click on the surface of Itinerary Designer and set Model Exporter to Database Itinerary Exporter and Require Encryption Certificate to false As shown in figure 2
Figure 2: Itinerary Properties
From the Toolbox, drag an On-Ramp model element to the design surface. In the OnRamp1 Properties window, configure the following properties
- Click the Name property, and then type OnRamp.
- In the Extender drop-down list, click On-Ramp Extender.
- In the BizTalk Application drop-down list, click Microsoft.Practices.ESB.
- In the Receive Port drop-down list, click OnRamp.Itinerary.
as shown in **figure 3 **
Figure 3: OnRamp Properties
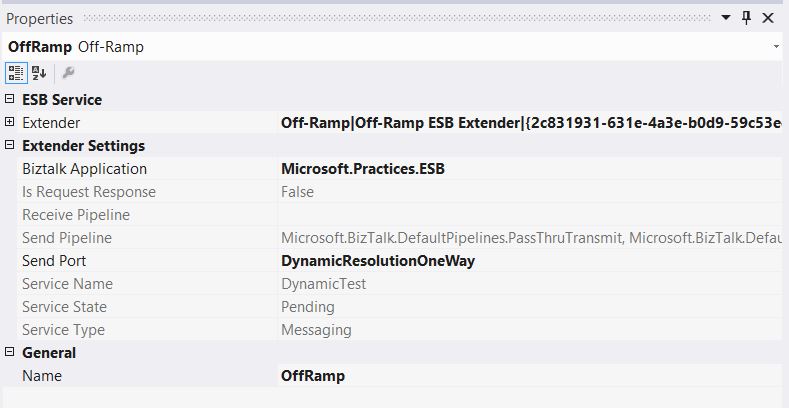
From the Toolbox, drag an Off-Ramp model element to the design surface, and then place it to the right of the On-Ramp model element. In the OffRamp1 Properties window, configure the following properties:
- Click the Name property, and then type OffRamp.
- In the Extender drop-down list, click Off-Ramp ESB Extender.
- In the BizTalk Application drop-down list, click Microsoft.Practices.ESB.
- In the Send Port drop-down list, click DynamicResolutionOneWay.
as shown in figure 4
Figure 4: OffRamp Properties
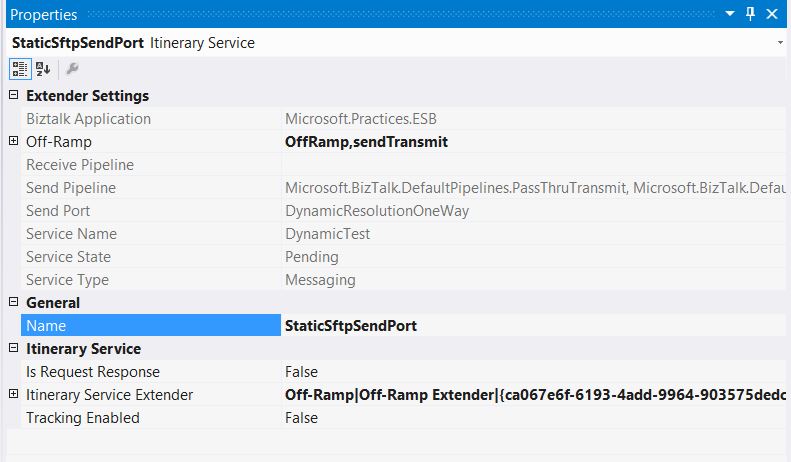
From the Toolbox, drag an Itinerary Service model element to the design surface, and then place it to the right of the On-Ramp model element. In the ItineraryService1 Properties window, configure the following properties:
- Click the Name property, and then type StaticSftpSendPort.
- In the Itinerary Service Extender drop-down list, click Off-Ramp Extender.
- In the **Off-Ramp **drop-down list, select Send Handlers.
as shown in figure 5
Figure 5: StaticSftpSendPort Properties
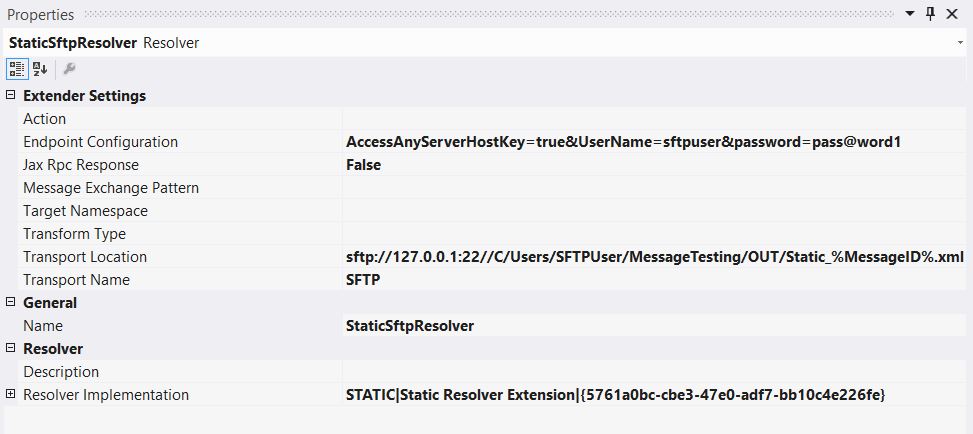
Right-click the Resolver collection of the **StaticSftpSendPort **model element, and then click Add new Resolver. In the Resolver1 Properties window, configure the following properties:
- Click the Name property, and then type StaticSftpResolver.
- In the Resolver Implementation drop-down list, click Static Resolver Extension.
- In the Transport Name drop-down list, click SFTP.
- In the Transport Location set sftp://127.0.0.1:22//C/Users/SFTPUser/MessageTesting/OUT/Static_%MessageID%.xml
- In the Endpoint Configuration set AccessAnyServerHostKey=true&UserName=sftpuser&password=
as shown in figure 6
Note: You cannot update UserName and Password because we set encrypted attribute for both to true. To work around it we set the value directly.Figure 6: StaticSftpResolver Properties
In the Toolbox, click Connector. Drag a connection from the OnRamp model element to the **StaticSftpSendPort **model element.Add another connection from **StaticSftpSendPort **to the OffRamp as show in **figure 7 **
Figure 7: StaticSftp Itinerary diagram Properties
Right click on the surface of the** Itinerary designer, **then click deploy
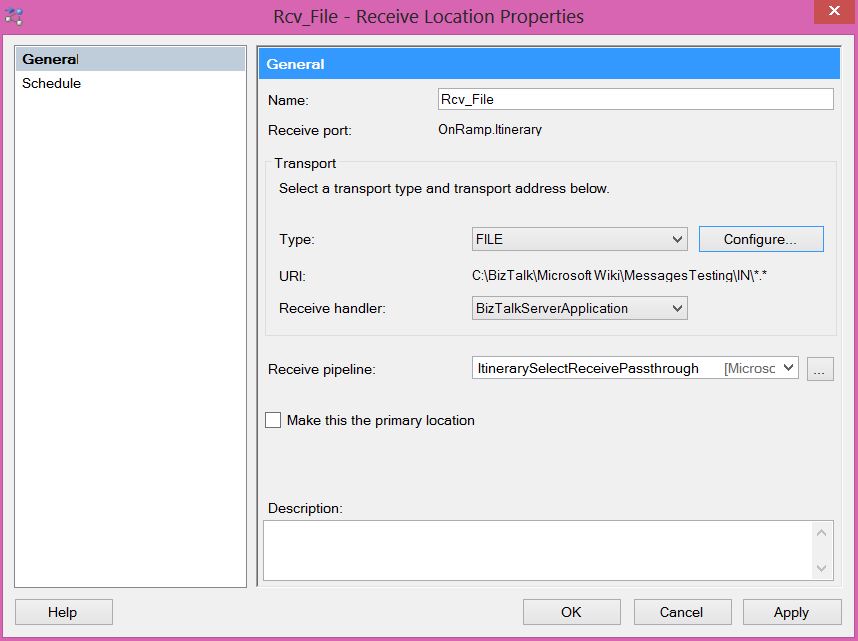
Open BizTalk Administration Console in Microsoft.Practices.ESB application-> Receive Locations->New->One-way Receive Location..->Select OnRamp.Itinerary receive port->Name it **Rcv_File -> Configure ->**Set **Receive Folder **-> Receive Pipeline ItinerarySelectReceivePassthrough as shown in figure 8
Figure 8: Creating Receive Location** **
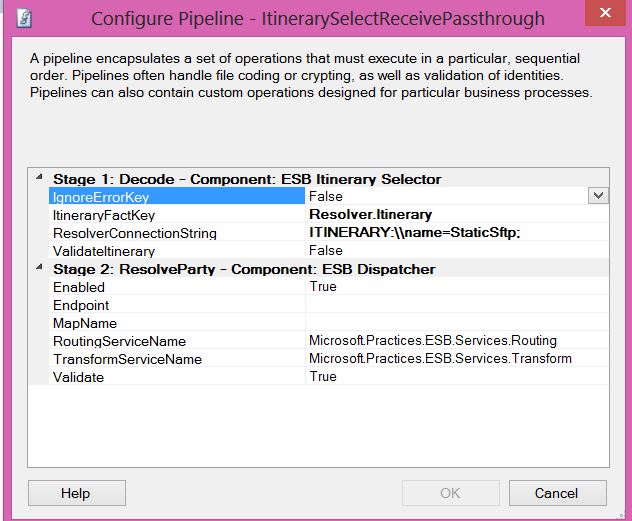
Click on ... of ItinerarySelectReceivePassthrough ->Set ItineraryFactKey Resolver.Itinerary -> set ResolveConnectionString ITINERARY:\name=StaticSftp; as shown in figure 9
Figure 9: Configure ItinerarySelectReceivePassthrough pipeline
Test the solution by adding files to the receive location path and check the sftp folder that configured in step 8
Sample Code
All of this sample can be found and downloaded in Microsoft Code Gallery:
Conclusion
In this article I illustrated how to create a custom adapter provider using the new out of the box SFTP adapter which was added to BizTalk 2013 as an example You can do the same steps for other custom adapters.
See Also
Read suggested related topics:
- BizTalk ESB Toolkit
- Creating a Custom Adapter Provider
- List of other ESB Toolkit Custom Adapter Providers
- BizTalk Server 2013: How to use SFTP Adapter
- BizTalk Server 2013: How to Configure SFTP Send Port Dynamically
- BizTalk Server: ESB Survival Guide
Another important place to find an extensive amount of BizTalk related articles is the TechNet Wiki itself. The best entry point is BizTalk Server Resources on the TechNet Wiki.
