Connect an external database to SharePoint using Business Connectivity Service
Introduction
Fetching the database from the local server is one of the issues that the MOSS was founded to, however; using Business Connectivity Service (BCS) is being much easier with the latest SharePoint designers, which supports many feature wizards in order to get the right required database.
Once the administrator finished the External Content Type setup steps and the BCS authentication wizard, the data table will appear in an external list column, and of course it’s no more than synchronization with the mother data table.
All above talking about fetching data from local database (Microsoft SQL Server) which means all back-end authentications identities are the same, how about if the required database is resident in a standalone server (different identities), what is the right method to fetch the data to the SharePoint server?
The development environments has been built based on an authentications identities, which means, any connection makes upon this environment will required a system authentication to complete it, however, the problem of fetching the data table from an external server is the database server itself has its own identity, and this makes a conflict between the identities and ride to an error.
Most of the users/Developers focus on the connection wizard or connection steps and ignore the systems authentication back-end, this problem will be solved later in this article, but let see what are the authentications type can the BCS deal with.
The pass through
This connection connects to the external systems with the same credential, but this method will get stuck in NTLM due to NTLM does not allow the delegation of identities, that’s why this error will appear on the screen: "Login failed for user 'NT AUTHORITY\ANONYMOUS LOGON".
Fig (1-1) describes what really happened in the pass through authentication.
[
Fig (1-1) Pass through authentication mode
](resources/5518.Topology.jpg)
Secure Store (SSO Windows)
The two steps we discussed in Pass through mode above are completely avoided in this mode by saving the credential in the SharePoint secure store, this would make a secured authentication due to the SharePoint already knows all the stored identities.
One more thing about this mode, the Admin can map each user to a service account, so no need to signing in the users themselves and also this leads to avoid the need to giving the permission to each user to access the data. No worry, while the users don't know the username and the password of the external data, they cannot login to it even they already maps to a service account!!
Revert to self
To avoid all above, it is required to use IIS application pool, because the application pool of the SharePoint farm is very highly privileged account, this will grant a great permission to access the external data without blocks.
In an another view, this mode allows all users making a change (New or edit) in the SharePoint connection, however, in the last Vers of MOSS, this mode is fine due to all users are administrators, but with a new lower rank of users such as designers, this mode had been disabled by default in the new Vers of SharePoint designer, and you will face an error if you try to fetch a data using this mode.
Connect an external database to SP list using BCS:
"Login failed for user 'NT AUTHORITY\ANONYMOUS LOGON", is the appeared error when the user try to connect the external database to a SP list using the tradition way. I’ll show now how to fetch a data from an external database system to an external SharePoint list using the secure store mode.
The environment we need is:
- Microsoft SharePoint 2013
- SharePoint Designer
- SQL server (any Ver) installed on external server.
Firstly, let’s setup a secure store service:
- Active SharePoint 2013 central administration > Application Management >Manage service application.
- Roll down to secure store service as shown in Fig (2-1)
Fig (2-1) Secure Store Service
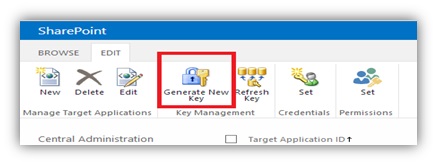
- In the new window, firstly you need to generate a new Key as shown in Fig (2-2), try to write a password which is recommended by Microsoft rules.
- Click on ‘New’ to create a new secure store target application.
- As shown in Fig (2-3), fill all the required fields with the right info about the application.

Fig (2-3) Create a new target application
- While finishing the wizard steps, you will ask to write down the users who allowed using this application, it is mandatory to write at least one user.
- As Shown in Fig (2-4), the application is ready for the next step.
Fig (2-4)
Now, it’s the time to create an external content type using SP2013 designer
- Open SP2013 designer, navigate to ‘External content types’ and click on the ‘External content types’ button in the left upper corner to create a new one.
- After rename the ExContentype with a unique name, it is required to setup a database connection as shown in Fig (2-5), the content type name in our example is EXContentAttendees.
- In the new dialog box, click on ‘Add Connection’ button, then select target connection type (in our example it’s an SQL server), then click ‘OK’.
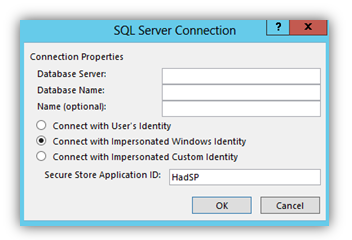
- As shown in Fig (2-6), write the server IP, database name and select ‘connect with impersonated windows identity’, it’s the secure store target application we used to create back in Fig (2-3).
- Few seconds and the database will appear in the SP2013 local server, navigate to your target table, right click on it and select the required operation you need depends on the external list uses and the server permissions. Note: the operations list for each table must has ‘Read item operation’ and ‘Read list operation’ beside any operation you looking for. In our example I’ll choose ‘Create all operations’.
- Select the columns you want to show in the external list and click finish.
- From the upper ribbon in SharePoint designer, click ‘Create Lists&Forms’ as shown in Fig (2-7).
- Rename the new list to ‘Employee’ then click finish.
- Now go to your SP2013 site, click into list ‘Employee’ to see the records in the new external list.
Mohammad Masadeh
SharePoint Developer


