SQL Data Sync - Best Practices

This article is for anyone who is planning to use SQL Data Sync, especially those who are in the planning and design phase. Topics covered include selecting a location for your SQL Database, ensuring that when you create your SQL Database it is large enough to work with your data and SQL Data Sync, selecting which tables to include in a particular synchronization group, and more.
SQL Data Sync service enables bi-directional synchronization of data between two or more geographically distributed SQL Database and SQL Server databases.
The SQL Databases may exist in any of the Windows Azure data centers around the world.
The SQL Server databases may also be geographically distributed.
You must have at least one SQL Database that SQL Data Sync uses as the hub for synchronizations.
| Important! This wiki topic may be obsolete. This wiki topic is no longer updated by Microsoft. We moved the content to the MSDN Library where we keep it current. To find the latest version of this topic on MSDN click here. |
Where to Locate Your SQL Databases
Where you locate your SQL Databases can impact both efficiency and cost of your synchronizations, even if you have only one SQL Database. The following issues can impact how efficiently your synchronizations work.
-
- Latency
The proximity of the data center hosting your SQL Database "hub" database to your "member" databases impacts latency. In order to minimize latency it is a good idea to locate your SQL Databases in data centers as close to your SQL Server databases as possible. - Costs
Moving data into and out of data centers may result in ingress and egress charges that you need to take into consideration.
- Latency
Database Considerations and Constraints
SQL Database Size
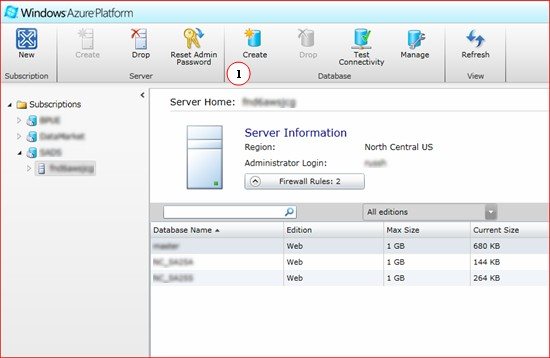
When you create a new SQL Database (https://sql.azure.com/) (Figure 1 #1) set the maximum size (Figure 2) so that it is always larger than the database you deploy. If you don't set the maximum size larger than your deployed database synchronization fails. There currently is no automatic growth in SQL Database, so if you set a maximum size that is less than the database's actual you must drop the existing SQL Database, create a new SQL Database with an adequate size, and then re-set up the Sync Group and sync.

Important: SQL Data Sync stores additional metadata with your database. Be sure to account for this when you calculate space needed. 
Figure 1 - Create a SQL Database
Figure 2 - Set Maximum database size - 1 GB (default) or 5 GBSupported limits on database dimensions
Dimension Limit Database size 20 GB Number of rows 5 million Database, table, schema, and column names 50 characters Tables in a sync group 100 Columns in a table in a sync group 1000
Table Considerations and Constraints
Selecting Tables
Not all tables in a database are required to be in a Sync Group. The selection of which tables to include in a Sync Group and which to exclude (or include in a different Sync Group) can impact efficiency and costs. Include only those tables in a Sync Group that business needs demand and the tables upon which they are dependent.
Note: The only time you can add or remove tables in a Sync Group is when you create the Sync Group. Once the sync group is deployed you cannot make changes in the synchronization data set. To change the synchronization dataset you must remove then recreate the sync group. Primary and Foreign Keys
Each table in a Sync Group must have a Primary Key. The SQL Data Sync service is unable to synchronize any table that does not have a Primary Key.
Synchronization Schedule Considerations
Costs
Even though SQL Data Sync service is currently offered without charge, SQL Database charges are applied to the data that is moved to and from SQL Database data centers.
Therefore, you should synchronize tables that are stable or possess data that doesn't need to be refreshed frequently on a daily or weekly schedule.
Tables that contain time sensitive data or data that is more volatile are better synchronized on a more frequent schedule.
Analyze your business needs and create your Sync Group and schedules appropriately.As data passes into and out of a data center there may also be ingress and egress charges.
Frequency
If you attempt to synchronize a Sync Group that has not completed a synchronization the attempt will fail. Therefore, it is good practice to schedule synchronizations so that each synchronization has time to complete prior to attempting another synchronization.For example:
If you schedule your sync group to sync every five minutes, T0, T0+5, T0+10 ..., but it takes the group six minutes to complete a synchronization then your synchronizations take place at T0, T0+10, T0+20 and so on. T0+5 and T0+15 fail because synchronizations T0 and T0+10 haven't completed.
Sync Provision the Target Database
SQL Data Sync provisioning only partially creates the destination database objects. It creates tables but not other database objects, such as stored procedures, triggers, and constraints. Therefore it is a best practice to provision the destination database yourself with your non-data objects before you run your first synchronization.
 |
Important: The wizard used here is only available in SQL Server 2008 R2. |
 |
Important: When you provision your database do not populate it with data. If you populate it with data then the first time you synchronize every row will create a collision that must be resolved. This greatly slows down your first synchronization. |
First Steps
Before you are ready to provision your target database be sure that you have completed steps 1 through 4 of the [[SQL Data Sync How to Get Started]] article.
- Get a Windows Live ID.
- Create a Windows Azure Account.
- Create a SQL Database Server.
Ensure the Source Database is Compatible with SQL Data Sync
Before you provision your target database it is a best practice to add the source database to the Agent. This will reveal whether there are any incompatibilities such as missing primary keys or unsupported data types. For information on creating an Agent and adding a database to it see Create an Agent.
There are three steps to provisioning your target database.
- Create an Empty Target Database.
- Create a script that replicates the source database schema.
- Run the script against the target database.
Create an Empty Target Database
In this step we create our target database that we want to provision.
- Start SQL Server Management Studio.
- Connect to the server that will host the target database.
- Click New Query.
- In the query window type and run the following script.
CREATE DATABASE <databaseName>
GO
Create a Script that Replicates the Source Database Schema
The easiest and safest way to create the script is with SQL Serer Management Studio.
Start the Script Wizard
Connect to the server that hosts the source database.
Right-click on the name of the source database.
Select Tasks | Generate Scripts....
Click Next.

Figure 1 - Introduction Screen
Select the Database Objects to Script
Click the “Script entire database and all database objects” radio button. (Figure 2 #1)
Click Next.

Figure 2 - Choose Objects
Specify how scripts should be saved or published
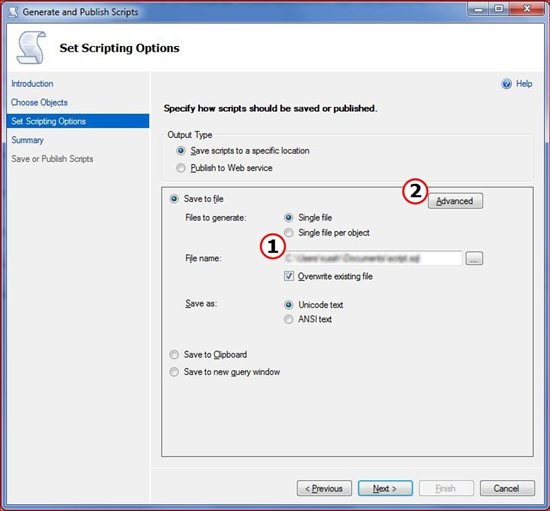
On the "Set Scripting Options" page, keep all the defaults (you can change the file name/path if you want) Figure 3 #1)
Click the Advanced button. (Figure 3 #2)

Figure 3 - Set Scripting Options
Specify how scripts should be saved or published: Advanced
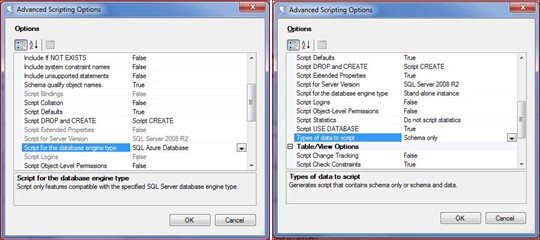
On the "Advanced" screen there are two setting tht are critical - Script for the database engine type and Types of data to script. (Figures 4 and 5)
Make sure Script for the database engine type is changed to SQL Database if the database you are provisioning is a SQL Database.
If the database you are provisioning is a SQL Server database you can keep this at its default value.Make sure the Types of data to script is set to Schema only.
If you script the data as well when SQL Data Sync syncs the first time an error will be generated for each row in your database.

Figure 4 - Script for Database engine type Figure 5 - Types of data to scriptClick OK.
Review your selections
On the Summary page confirm that all selections are correct. (Figure 6)
Click Next.
The Wizard immediately begins to generate the script.
Figure 6 - Summary Page
Save or Publish Scripts
If there are errors
- Click Save Report (Figure 7 #1)
- Read the report to find out what they are.
- Go back and fix them then repeat this process.
If there are no errors, then on the Save or Publish Scripts page click Finish. (Figure 7 #2)

Figure 7 - Save or Publish Scripts
Run the Script Against the Target Database
-
- In SQL Server Management Studio Object Explorer, click on the target database.
- Click New Query.
- Copy/Paste the script created above into the query window.
- Run the script.
You are now ready to create your Sync Group and execute your first synchronization which will create and populate the tables in the target database.
Feedback
This release was provided in order to gather feedback from our customers. Now that you have previewed what the SQL Data Sync team is doing, please let us know what you think of our direction, and tell us about your experiences.
You can send us your thoughts in any of the following ways:
- Send us a note on http://twitter.com/syncfx.
- Post a comment to our blog at http://blogs.msdn.com/sync.
- Post a thread to our forum at http://social.msdn.microsoft.com/forums/en-US/ssdsgetstarted/threads/
For More Information
- [[SQL Data Sync Overview]]
- [[SQL Data Sync Glossary of Terms]]
- Windows Azure SQL Database: http://www.microsoft.com/windowsazure/sqlazure/
- Microsoft Sync Framework Dev Center: http://msdn.microsoft.com/sync