How to Use the Certificates Console
Applies to Windows 2000, Windows XP, Windows Server 2003, Windows Server 2003 R2, Windows Vista, Windows 7, Windows Server 2008, Windows Server 2008 R2, Windows 8, and Windows Server 2012.
Overview
The Certificates console is an Microsoft Management Console (MMC) snap-in that you can use to manage the certificate stores for users, computers, and services.
You can use the Certificates console to perform the following tasks:
View information about certificates, such as certificate contents and the certification path.
Import certificates into a certificate store.
Move certificates between certificate stores.
Export certificates and, optionally, export private keys (if key export is enabled).
Delete certificates from certificate stores.
Request certificates from an enterprise CA for the Personal certificate store.
To add a Certificates console to MMC
Open MMC. If you do not already have a customized MMC console, you can create one. To do so, open a Command Prompt, Windows PowerShell, or the Run dialog box, type MMC and then press ENTER. If you see a User Account Control prompt, ensure that it is displaying the action you want to take and then click Yes.
Click Console, and then click Add/Remove Snap-in.
– Or –
Press CTRL+M.
The Add/Remove Snap-in dialog box appears.Click Add .
The Add Standalone Snap-in dialog box appears.Select Certificates from the list of snap-ins, and then click Add.
The Certificates Snap-in dialog box appears.Select one of the following accounts:
My user account
Service account
Computer account
The Certificates console manages the certificate stores for this account.
Click Next .
If you selected My user account , the Add Standalone Snap-in dialog box appears. You can click Add to add another snap-in.
If you selected Service account or Computer account , the Select Computer dialog box appears. To manage the local computer, click Next . To manage another computer, either type the domain name of the computer in Another computer , or click Browse to select the computer from a list. Then click Next .
If you selected Computer account , the Add Standalone Snap-in dialog box appears. You can click Add to add another snap-in.
If you selected Service account , the Certificates Snap-in dialog box appears. Select a service from the Services account list, and click Finish . When the Add Standalone Snap-in dialog box appears, you can click Add to add another snap-in.When you are finished adding snap-ins, in the Add Standalone Snap-in dialog box, click Close .
The Add/Remove Snap-in dialog box appears and displays the snap-ins that you are installing in MMC.In the Add/Remove Snap-in dialog box, click Close.
Example
The following figure shows an example of three Certificates console nodes that have been added to MMC. The first Certificates console node manages certificates for the logged on user. The second Certificates console node manages certificates for the World Wide Web Publishing service for the local computer. The third Certificates console node manages certificates for the local computer itself.
http://i.technet.microsoft.com/Cc962086.DSCJ07%28en-us,TechNet.10%29.gif
Certificates Console (shown from a Windows 2000 operating system)
The Certificates console nodes in the figure above have been expanded to show the logical certificate stores. This is called the Logical display mode. You also have the option of viewing certificates by their physical stores or by their purpose.
To change the display mode, select the Certificates console (such as the Certificates - Current User console). Click View and then click Options . When the View Options dialog box appears (as shown in the following figure from a Windows 7 operating system), which allows you to select certain display mode options.
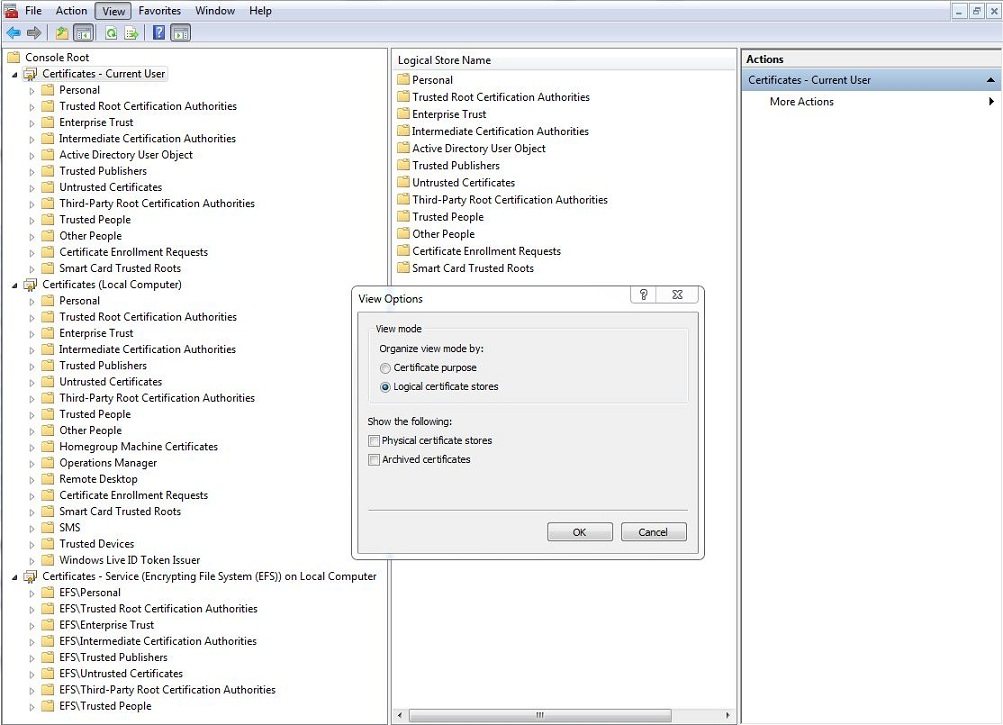
The View Options options are described in the following table.
View Options Dialog Box
Option |
Description |
|---|---|
Certificate purpose |
Select this option to view certificates in the Purposes display mode, in which certificates are grouped by the intended purpose of the certificates, such as Encrypting File System, File Recovery, and Code Signing. |
Logical certificate stores |
Select this option to view certificates in the Logical display mode, in which certificates are grouped by the logical store where they are located. This is the default display mode. |
Physical certificate stores |
Select this option to view the physical stores in addition to the logical stores. This option is available for the Logical display mode only. |
Archived certificates |
Select this option to view archived certificates. When certificates expire or are renewed, an archived version is retained of the certificate and its private keys. Retaining archived certificates is recommended because you might need to use the certificate and its private key later. For example, you might have to verify digital signatures for old documents that were signed with a key for a currently expired or renewed certificate. |
To view information about a certificate
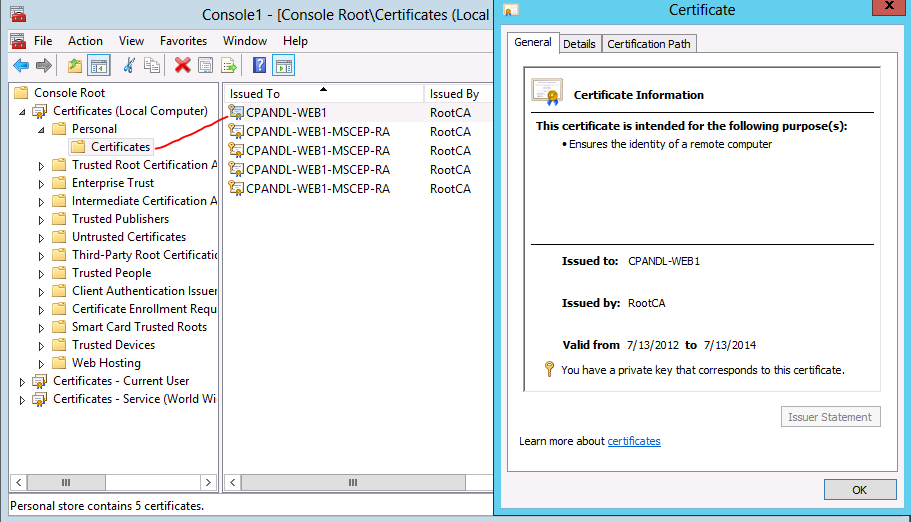
- In the Certificates console pane, select the certificate store where the certificates that you would like to learn more about are located. For example, you can select the Personal store.
- In the details pane, double-click the certificate that you would like to learn more about.
- The certificate will show three tabs: General, Details, and Certification Path. You can click each of these tabs to learn more about certificate issuance, issuance purposes, certificate thumbprint, trust path, and so on.
To import a certificate
- In the Certificates console pane, right-click the certificate store or Certificates container below that store to which you want to import the certificate and then click Import. For example, you can right-click the Personal store or the Certificates container below that store and then click Import. The Certificates container below the store appears only when there are existing certificates in that container. Otherwise, you will just have the certificates store.
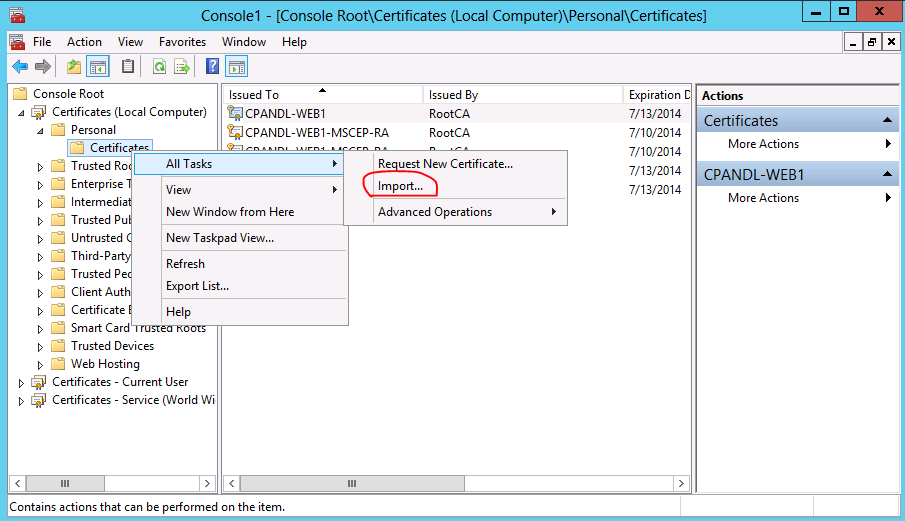
- On the Welcome to the Certificate Import Wizard screen, click Next.
- On the File to Import screen, enter the file path and file name of the file the certificate that you want to import and then click Next. If the file is password protected, you may be prompted to enter the password at this point. If so, enter the password and then click OK.
- On the Certificate Store screen you can select the Automatically select the certificate store based on the type of certificate, or Place all certificates in the following store option. You can use the Browse button to locate a different certificate store. Once you have these options configured correctly, click Next.
- On the Completing the Certificate Import Wizard screen, verify the import information and then click Finish. Click OK to confirm the importation.
To move a certificate
You can move a certificate between stores on the same account. For example, you can move a certificate from the Personal store to the Trusted Root Certification Authorities store on the Local Computer. However, you cannot move a certificate from the Personal store of the Local Computer to the Personal store of the User. If you want to move certificates between accounts, first export the certificate from one account and then import the certificate to the other account.
- In the Certificates console pane, select the Certificates container that appears below the certificate store from which you want to move the certificate. For example, if you want to move a certificate from the Personal store, expand the Personal store and select the Certificates container below it.
- In the Certificates console details pane, right-click the certificate that you want to move and select Cut.
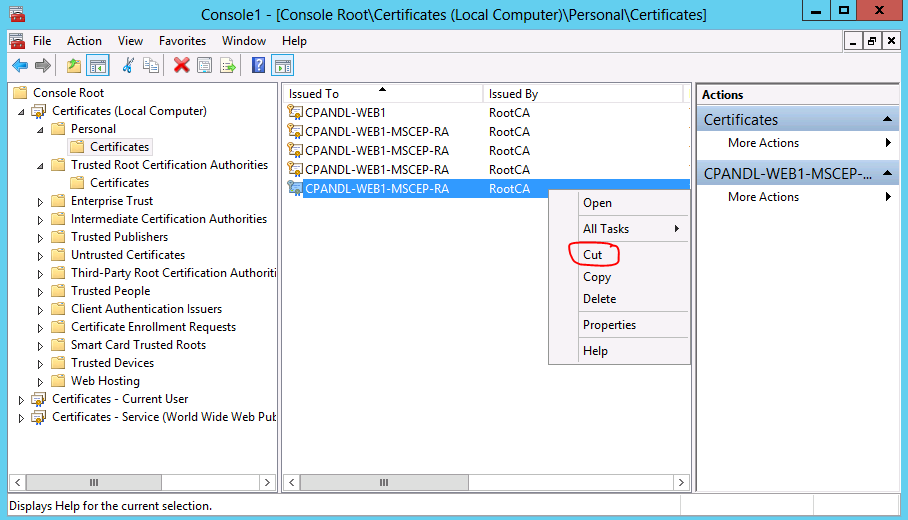
- In the Certificates console pane, select the Certificates container that appears below the certificate store to which you want to move the certificate. If there is no Certificates container below the store to which you want to move the certificate, then select the destination certificate store itself.
- In the Certificates console details pane, right-click and then select Paste. This will move the certificate from the source store to the destination store.
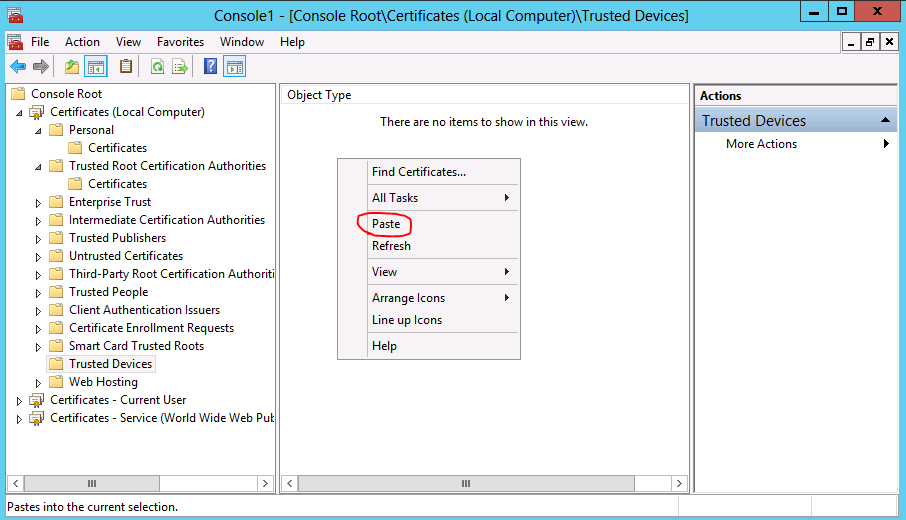
Note: You can also drag and drop certificates from one store to another. To do so, you can select the certificate in the details pane of the source certificate store. Hold the primary mouse button and then drop the certificate by releasing the mouse button when pointing to the destination container.
<return to top>
To export a certificate
- In the Certificates console pane, select the Certificates container that appears below the certificate store from which you want to export the certificate. For example, if you want to export a certificate from the Personal store, expand the Personal store and select the Certificates container below it.
- In the Certificates console details pane, right-click the certificate that you want to export, click All Tasks, and then click Export.
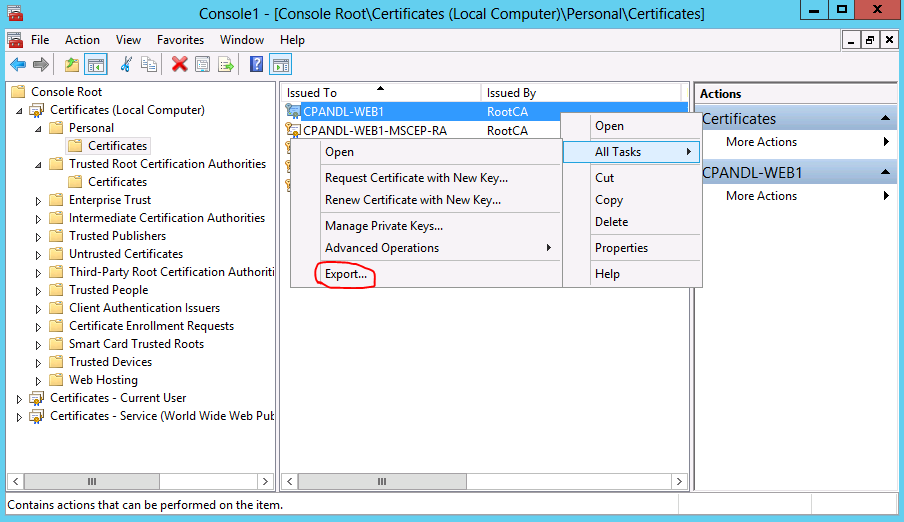
- On the Export Private Key screen, select whether you want to export the private key and then click Next.
- If the private key is not stored with the certificate, then the Export Private Key screen will not appear.
- The option to export the private key will only appear if the private key is marked as exportable. Otherwise, the option to export the private key will not be available.
- On the Export File Format screen, select the type of format that you want to use for the certificate. Click Next.
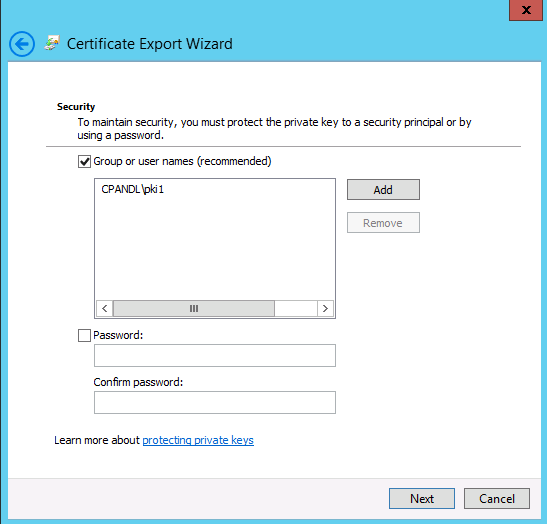
- If you had the option and selected, Yes, export the private key, then you will be asked for a password for the certificate. If you have Windows 8 or Windows Server 2012, you can select Group or user names and specify Active Directory Domain Services (AD DS) user or group accounts. This option is only successful if you have a Windows Server 2012 domain controller available - otherwise you will receive an error when trying to apply it. Protect the file (as appropriate) and then click Next.
- On the File to Export screen, enter the full file path and file name for the certificate file you want to export. You can also use the Browse button to select the location and set the file name. Click Next.
- On the Completing the Certificate Export Wizard screen, confirm the export options and then click Finish. Click OK to confirm the export.
To delete a certificate
You should only delete a certificate that you know is no longer necessary. If you delete a certificate with private key, then you will no longer be able to read encrypted data that uses that certificate. Ensure that you no longer need the certificate (especially with if it also has a private key with it) that you delete.
- In the Certificates console pane, select the Certificates container that appears below the certificate store from which you want to delete the certificate. For example, if you want to delete a certificate from the Personal store, expand the Personal store and select the Certificates container below it.
- In the Certificates console details pane, right-click the certificate that you want to delete and then click Delete.
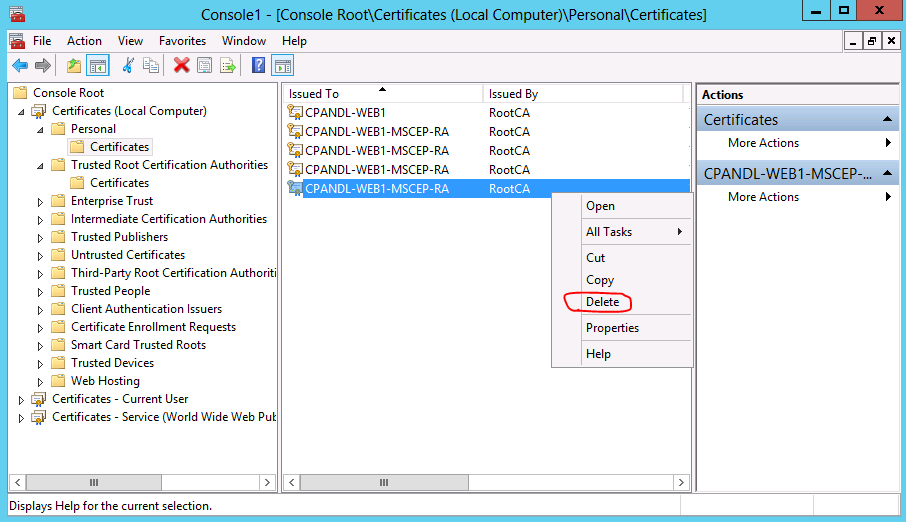
- To confirm deletion of the certificate, click Yes.
To request a certificate
- In the Certificates console pane, select the Certificates container that appears below the certificate store for which you want to request a certificate. For example, if you want to request a certificate for the Personal store, expand the Personal store and select the Certificates container below it. If there is no Certificates container below the store, you can just select the store.
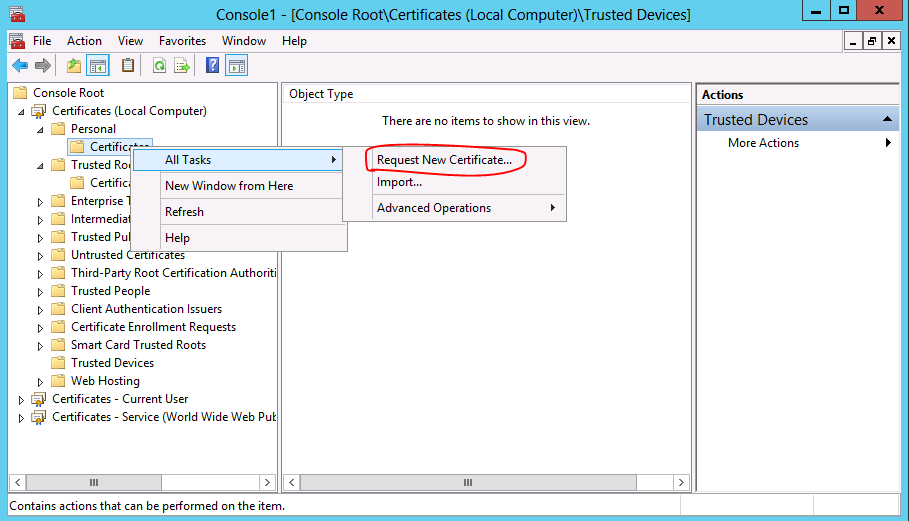
- Right-click the Certificates container (or the store) and then click Request New Certificate.
- On the Before You Begin screen, review the information and then click Next.
- On the Select Certificate Enrollment Policy screen, select the specific enrollment policy that you want to use or click Add New.
- If you select Add New, you will have to fill out a enrollment policy server from which you want to retrieve a certificate. This is something that a certificate administrator would have had to configure in advance and provide. If this is the case,
- Type the appropriate URI under Enter the enrollment policy server URI
- Set the appropriate Authentication Type: Windows integrated, Username/password, or X.509 Certificate
- Use the Validate Server option to verify that the server is available, and then click Add.
- If a caution symbol appears below the certificate, you might need to provide additional information before requesting that type of certificate. Click the "More information is required to enroll for this certificate. Click here to configure settings" message and provide the requested information, such as a subject name or the location of a valid signing certificate.
- Click Next.
- If you select Add New, you will have to fill out a enrollment policy server from which you want to retrieve a certificate. This is something that a certificate administrator would have had to configure in advance and provide. If this is the case,
- On the Request Certificates screen, select the enrollment policy that you want to use and then click Enroll.
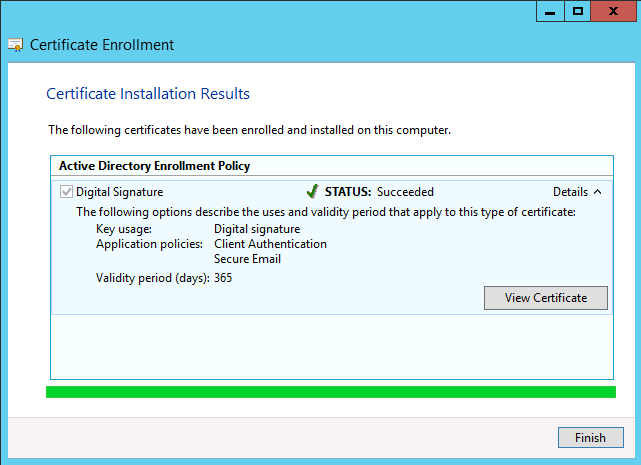
- On the Certificate Installation Results screen, you will see the status message of the enrollment. If the status of the certificate request is Pending, then a certificate administrator must approve the request. The certificate request may also be denied for various reasons. You can learn more about the status of the certificate request by clicking Details. If you see additional details, you can also click View Request, to see the certificate request that was made.
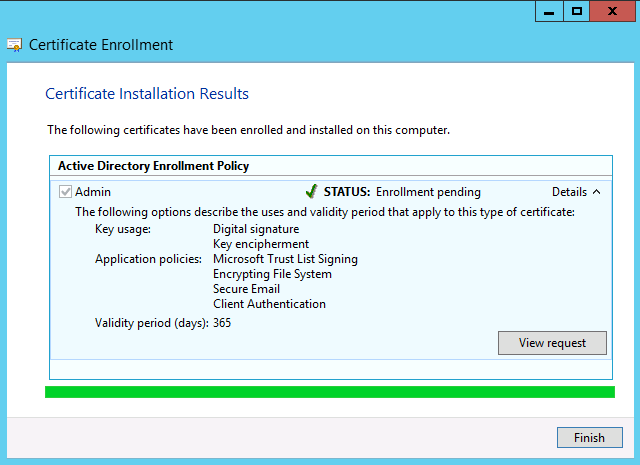
- Once you have verified enrollment status, click Finish.
To retrieve a certificate allowed for automatic enrollment
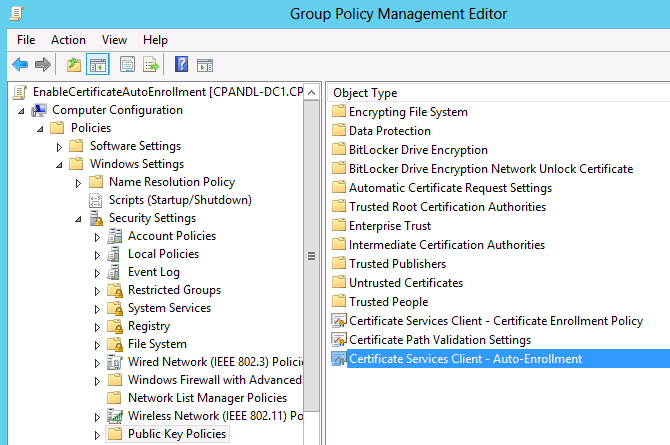
In order for the following steps to work, Certificate Auto-Enrollment must be enabled in the domain. This is something that a domain administrator must configure through Group Policy. Auto-Enrollment is available for Computer Configuration and User Configuration separately.
If a certificate has gone to Pending status and the Certificate Services Client - Auto-Enrollment Group Policy setting is enabled in the domain, then you can retrieve the pending certificate with the Certificates console by using the following steps:
- Right-click the Certificates console container for the account that you want to obtain the certificate and then click Automatically Enroll and Retrieve Certificates. For example, if you were obtaining a certificate that was Pending for the local computer account, then you would right-click Certificates (Local Computer) container. If you were obtaining a certificate for your user account, then you would right-click the Certificates - Current User container.
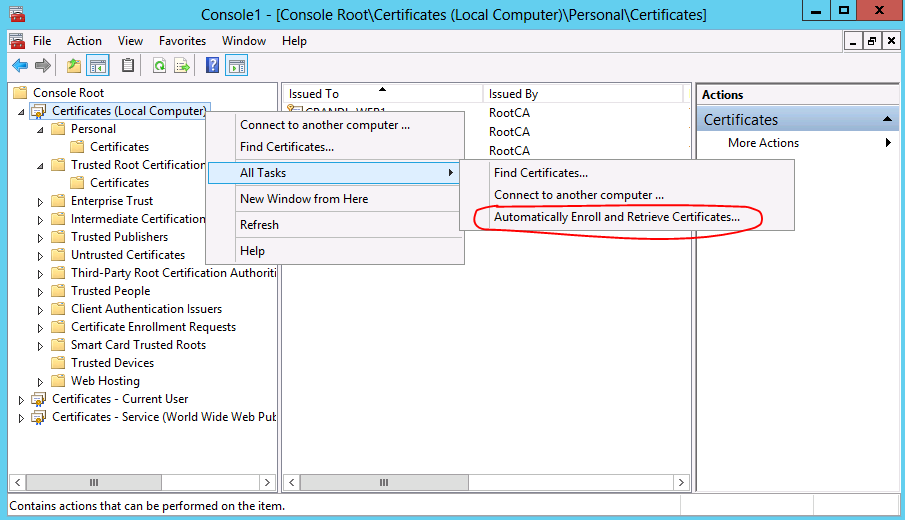
- On the Before You Begin screen, review the information and then click Next.
- On the Request Certificates screen, select the enrollment policy that you used to enroll for the certificate.
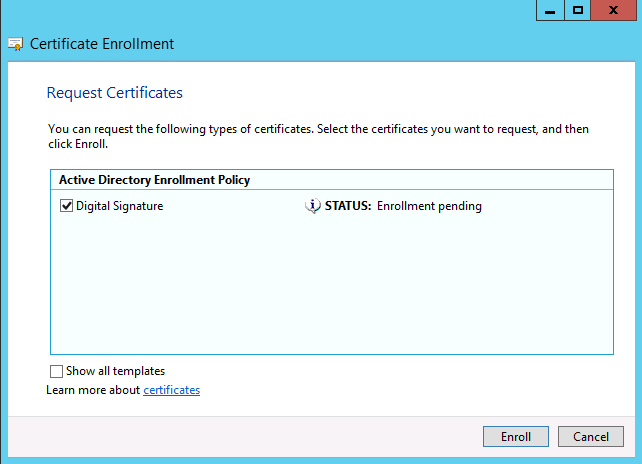
- Once you have selected the appropriate policy, click Enroll. The status of the enrollment is displayed.
- On the Certificate Installation Results screen, the status of the enrollment is displayed. You can see additional information by clicking Details. If the certificate enrollment was unsuccessful, you should see more information as to why it failed. If the certificate enrollment was successful, then you can also click View Certificate. Once you have verified certificate enrollment status, click Finish.
