BizTalk Server 2010: Processing Zip Message Having Multiple Type Files
Introduction
This article intends to demonstrate the step-by-step procedures required to process a zipped file which has files of multiple types.
Scenario
A compressed message (zipped) is received and it has files of a various type which is to be processed individually and is to be routed to destination folder for further processing.
Solution
There is no dedicated default pipeline for accepting the zipped message and unzipping it. Therefore, there arises a need of developing a custom pipeline which will accept the zipped message and a custom disassembler component which will decompress the message and will produce individual files. But only unzipping the message is not sufficient as to route individual files based on its type, some property promotion also needs to be done.
Steps involved in implementing the solution:
- Input analysis
- Developing Custom Disassembler Component(UnzipMessageDisassembler)
- Developing Custom Pipeline(ZipReceivePipeline)
- Configuring the application
- Testing and Output analysis
Input Analysis
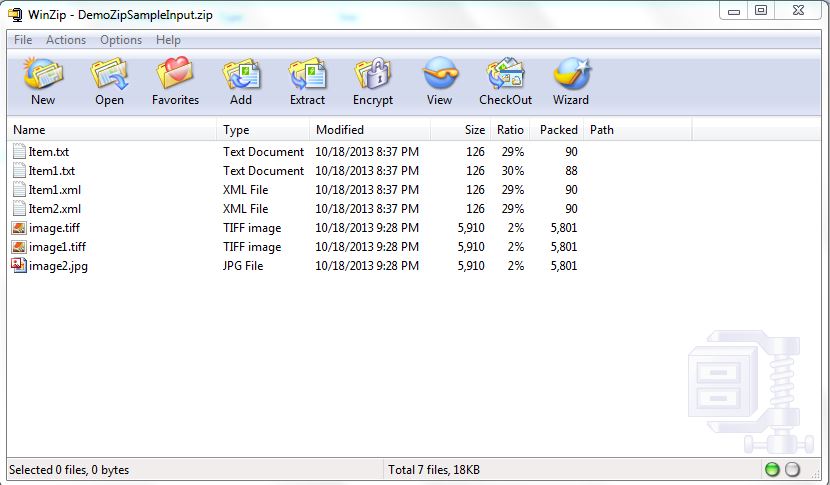
The sample input message (DemoZipSampleInput.zip) used here has xml(.xml),txt(.txt) and image files(.tiff,.jpg) which are zipped.
Developing Custom Disassembler Component (UnzipMessageDisassembler)
1. Create a C# class library project which will hold the custom disassembler component, the purpose of this component is to split messages and promote a custom context property.
2. To develop custom Disassembler Component, four interfaces are to be implemented - IBaseComponent, IComponentUI, IPersistPropertyBag and IDisassemblerComponent. And these Interfaces have Methods and Properties defined which should be implemented.
3. In order to implement these interfaces, we need to use namespaces "Microsoft.BizTalk.Message.Interop","Microsoft.BizTalk.Component.Interop" which belong to "Microsoft.BizTalk.Pipeline.dll" assembly, can be found at C:\Program Files\Microsoft BizTalk Server 2010\Microsoft.BizTalk.Pipeline.dll and also we need to use "Ionic.Zip" namespace which belongs to "Iconic.Zip" assembly can be downloaded from http://dotnetzip.codeplex.com/. There are many other Zip libraries available also.
4. Right click the project and add a reference to Microsoft.BizTalk.Pipeline.dll and Iconic.zip.
using System;
using System.Collections.Generic;
using System.Linq;
using System.Text;
using System.IO;
using Microsoft.BizTalk.Message.Interop;
using Microsoft.BizTalk.Component.Interop;
using Ionic.Zip;
4. To indicate that the component is a custom pipeline component and can only be used in Disassemble stage, a couple of attributes are added to the class. And Unique Identity is to be added.
//Attributes of class
[ComponentCategory(CategoryTypes.CATID_PipelineComponent)]

[ComponentCategory(CategoryTypes.CATID_DisassemblingParser)]

//Generate unique identifier
[System.Runtime.InteropServices.Guid("9ABA4232-1F8E-4a45-B12D-9BE50160464B")]
5. It’s the Disassemble method of IDisaasemblerComponent Interface where the logic to unzip message and promote a custom property will be done.
        private System.Collections.Queue OutFiles = new  System.Collections.Queue();

        public void  Disassemble(IPipelineContext pContext, IBaseMessage pInMsg)
        {
            IBaseMessagePart msgBodyPart = pInMsg.BodyPart;
            if (msgBodyPart != null)
            {
                Stream msgBodyPartStream = msgBodyPart.GetOriginalDataStream();
                if (msgBodyPartStream != null)
                {
                    using (ZipInputStream  zipInputStream = new ZipInputStream(msgBodyPartStream))
                    {
                        ZipEntry entry =  zipInputStream.GetNextEntry();
                        while (entry != null)
                        {
                            MemoryStream memStream = new  MemoryStream();
                            byte[] buffer = new  Byte[1024];

                            int bytesRead = 1024;
                            while (bytesRead != 0)
                            {
                              bytesRead = zipInputStream.Read(buffer, 0, buffer.Length);
                              memStream.Write(buffer, 0,  bytesRead);
                            }

                            //Creating outMessage
                            IBaseMessage outMessage;
                            outMessage = pContext.GetMessageFactory().CreateMessage();
                            outMessage.AddPart("Body", pContext.GetMessageFactory().CreateMessagePart(), true);
                            memStream.Position = 0;
                            outMessage.BodyPart.Data = memStream;
                             outMessage.Context = PipelineUtil.CloneMessageContext(pInMsg.Context);

                            //Add outMessage to queue
                            OutFiles.Enqueue(outMessage);
                             entry = zipInputStream.GetNextEntry();
                        }
                    }
                 }
             }
         }
6. To promote a custom property:
- Add a Property Schema to Project.
- Add a field and name it as per purpose (In this sample “Extension” is used).
- Set the Property Schema Base to MessageContextPropertyBase (this tells that the property is part of Message context).
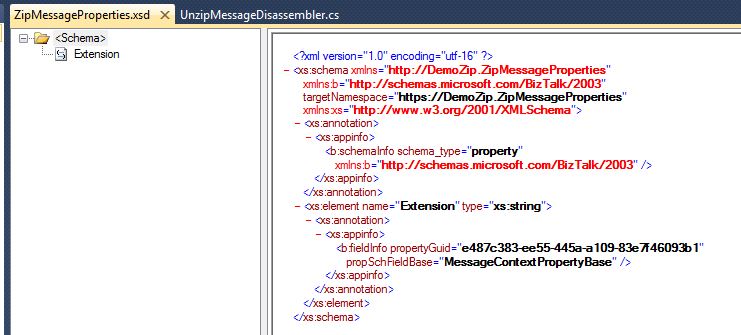
Figure 1. ZipMessageProperties Schema
- Save and Build the project.
- Now in Disassembler component, add the following code.
//Creating custom context property to hold extension of file
string extension = string.Empty;
extension = entry.FileName.Substring(entry.FileName.IndexOf("."));

//Promoting the custom property
pInMsg.Context.Promote("Extension", "https://DemoZip.ZipMessageProperties", extension);
- In the code, we first create a string variable “extension”, which we will use to hold the extension of the unzipped messages.
- To get an extension of the unzipped message, we read the filename and fetch the string after the dot(“.”) is encountered and that is stored in “extension”.
- Next is to promote the value in “extension” variable, associating it with the Name and Namespace.
- The complete code is as below:
using System;
using System.Collections.Generic;
using System.Linq;
using System.Text;
using System.IO;
using Microsoft.BizTalk.Message.Interop;
using Microsoft.BizTalk.Component.Interop;
using Ionic.Zip;

namespace UnzipMessages
{
    //Attributes of class
    [ComponentCategory(CategoryTypes.CATID_PipelineComponent)]
    [ComponentCategory(CategoryTypes.CATID_DisassemblingParser)]

     //Generate unique identifier
    [System.Runtime.InteropServices.Guid("9ABA4232-1F8E-4a45-B12D-9BE50160464B")]
    public class  UnzipMessageDisassembler:IBaseComponent,
                         ComponentUI,
                                          IDisassemblerComponent,
                                          IPersistPropertyBag

    {
        //Implementing Interfaces
        #region IBaseComponent

        private const string  description = "UnzipMessages pipeline component";
        private const string  name = "UnzipMessageDisaasembler";
        private const string  version = "1.0.0.0";

        public string  Description
        {
            get
            {
                returndescription;
            }
        }

        public string  Name
        {
            get
            {
                return name;
            }
        }

        public string  Version
        {
            get
            {
                return version;
            }
        }

        #endregion


        #region IComponentUI

        private IntPtr icon = new IntPtr();

        public IntPtr Icon
        {
            get
            {
                return icon;
            }
        }

        public System.Collections.IEnumerator Validate(object projectsystem)
        {
            return null;
        }

        #endregion


        #region IPersistPropertyBag
        public void  GetClassID(out Guid classid)
        {
            classid = new  System.Guid("9ABA4232-1F8E-4a45-B12D-9BE50160464B");
        }

        public void  InitNew()
        {

        }
        public void  Load(IPropertyBag propertyBag, int errorlog)
        {

        }
        public void  Save(IPropertyBag propertyBag, bool clearDirty, bool saveAllProperties)
        {

        }
        #endregion

        #region IDisassemblerComponent
        // This component will read the zipped input message as a stream and with the help
        // of Zip library the message will unzipped and stored in the Queue.
        private System.Collections.Queue OutFiles = new  System.Collections.Queue();

        public void  Disassemble(IPipelineContext pContext, IBaseMessage pInMsg)
        {
            IBaseMessagePart msgBodyPart = pInMsg.BodyPart;
            if (msgBodyPart != null)
            {
                Stream msgBodyPartStream = msgBodyPart.GetOriginalDataStream();
                if (msgBodyPartStream != null)
                {
                    using (ZipInputStream  zipInputStream = new ZipInputStream(msgBodyPartStream))
                    {
                        ZipEntry entry =  zipInputStream.GetNextEntry();
                        while (entry != null)
                        {
                            MemoryStream memStream = new  MemoryStream();
                            byte[] buffer = new  Byte[1024];

                            int bytesRead = 1024;
                            while (bytesRead != 0)
                            {
                              bytesRead = zipInputStream.Read(buffer, 0, buffer.Length);
                              memStream.Write(buffer, 0,  bytesRead);
                            }

                            //Creating outMessage
                            IBaseMessage outMessage;
                            outMessage = pContext.GetMessageFactory().CreateMessage();
                            outMessage.AddPart("Body", pContext.GetMessageFactory().CreateMessagePart(), true);
                            memStream.Position = 0;
                            outMessage.BodyPart.Data = memStream;

                            //Creating custom context property to hold extension of file
                            string extension = string.Empty;
                            extension = entry.FileName.Substring(entry.FileName.IndexOf("."));

                            //Promoting the custom property
                            pInMsg.Context.Promote("Extension", "https://DemoZip.ZipMessageProperties", extension);

                            outMessage.Context = PipelineUtil.CloneMessageContext(pInMsg.Context);

                            //Add outMessage to queue
                            OutFiles.Enqueue(outMessage);

                            entry = zipInputStream.GetNextEntry();
                       }

                   }

                 }

              }

            }

        public IBaseMessage GetNext(IPipelineContext pContext)
        {
            if (OutFiles.Count > 0)
                return (IBaseMessage)OutFiles.Dequeue();
            else
                return null;

        }
        #endregion
    }
}
8. After development is done sign it and build the project. And add the assembly in GAC.
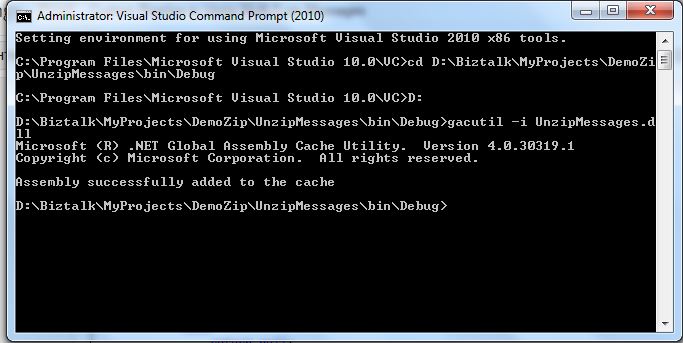
Figure 2. Adding UnzipMessages(pipeline component) to GAC
See more information on Developing Custom Pipeline component.
Developing Custom Receive Pipeline (ZipReceivePipeline)
1. Right-click the project, Add new item and select ReceivePipeline template.
2. To use the above-developed component it needs to be made available in the tool box and to do so copy the component dll at location : C:\Program Files\Microsoft BizTalk Server 2010\Pipeline Components

Figure 3. Adding UnzipMessages.dll to Pipeline components Directory
3. Next to reset the tool box (right click ToolBox section and select Reset ToolBox), doing this makes this component available in the Pipeline Designer Tool Box.
4. Drag and Drop the Component in Disassemble stage.
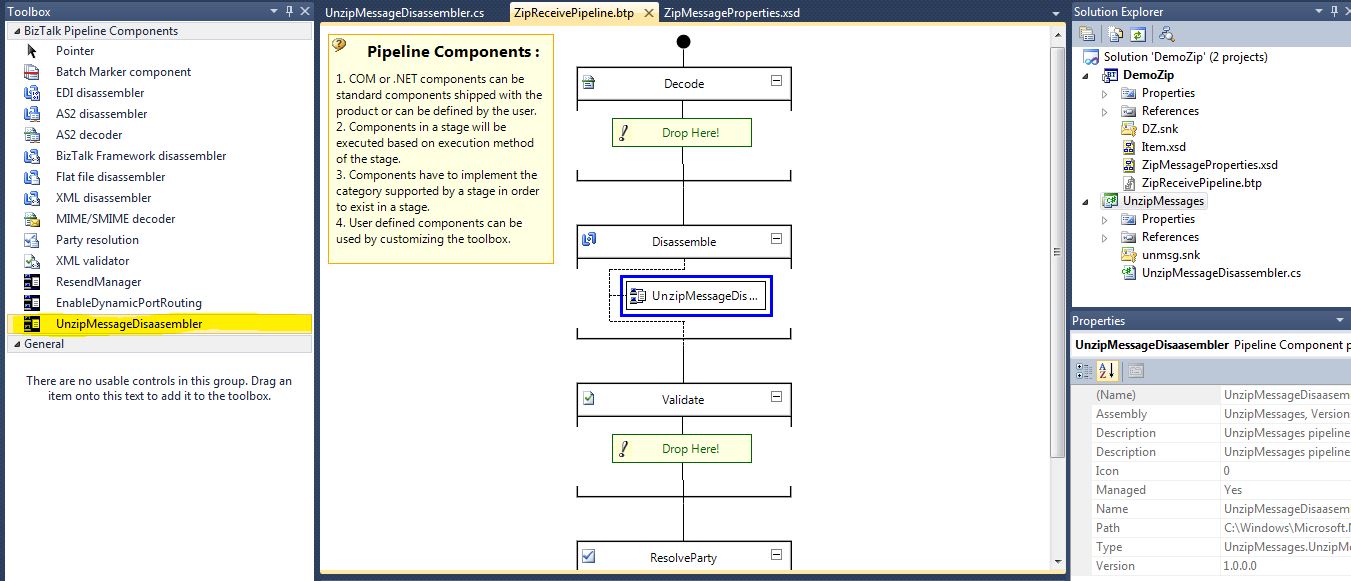
Figure 4.Designing ZipReceivePipeline
5. Sign the project, build the project and deploy the project.
See more information on Custom ZipReceivePipeline to Unzip Multi-Type Messages.
Configuring the Application
1. Create a One-way Receive port with a receive location pointing to Receive folder location to which zipped input message will be dropped/received.
- FileMask: *.zip
- ReceivePipeline: ZipReceivePipeline
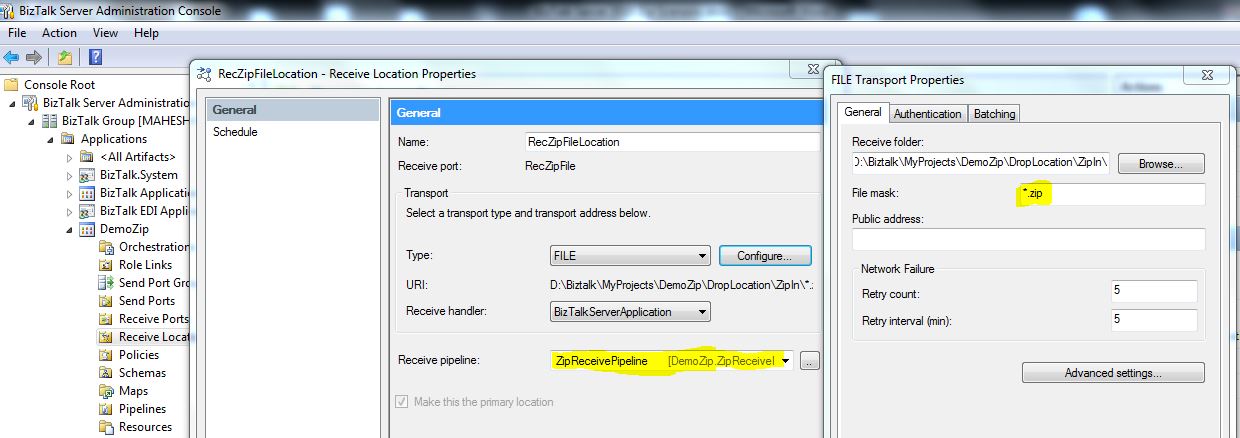
Figure 5.Configuring RecZipFile Port
2. Create four Static One-way Send Port with destination folder set to the respective folders and add filters accordingly.
Here the custom property (extension) which was promoted will be used and it will be available as DemoZip.Extension under Property on Filters tab, where DemoZip is the Namespace and Extension is the name of the property.
2.1.1 Configuring Send Port for XML files
- FileName: %MessageID% .xml
- Send pipeline: XML Transmit
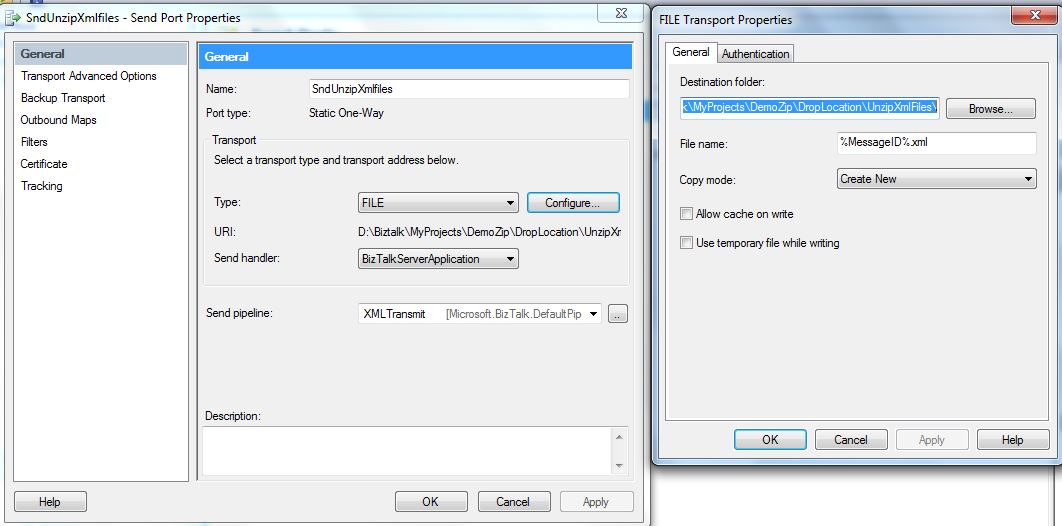
Figure 6.Configuring SndUnzipXmlFiles Port
2.1.2 Adding Filters on Send Port for XML files, creating subscription to pick files from MessageBox which are published by RecZipFile port and having Extension property as ".xml".
- DemoZip.Extension ==. xml
- BTS.ReceivePortName == RecZipFile
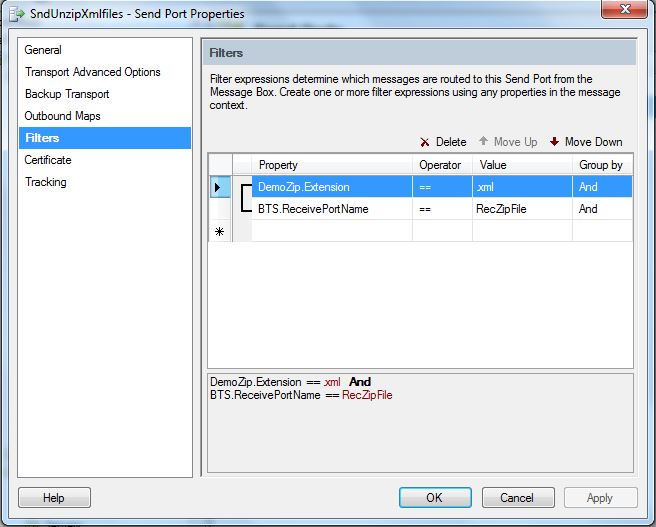
Figure 7.Adding filters on SndUnzipXmlFiles Port
2.2.1 Configuring Send Port for Jpeg files
- FileName: %MessageID% .jpg
- Send pipeline: PassThruTransmit
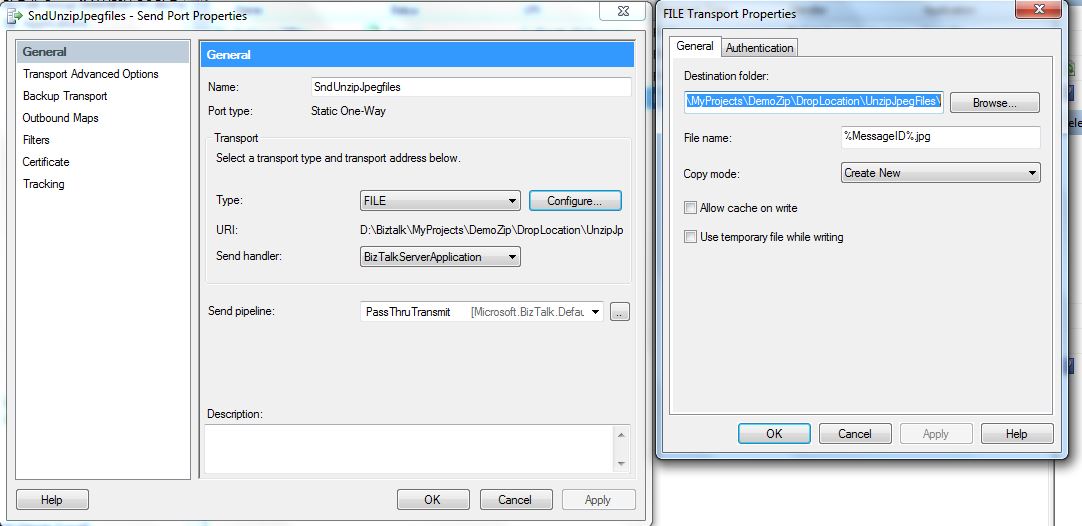
Figure 8.Configuring SndUnzipJpegFiles Port
2.2.2 Adding Filters on Send Port for Jpeg files, creating subscription to pick files from MessageBox which are published by RecZipFile port and having Extension property as ".jpg" or ".jpeg".
- DemoZip.Extension == .jpg
- DemoZip.Extension == .jpeg
- BTS.ReceivePortName == RecZipFile
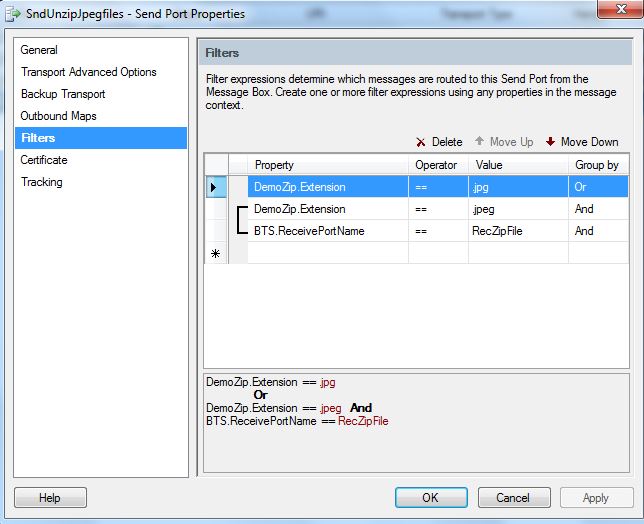
Figure 9.Adding filters on SndUnzipJpegFiles Port
2.3.1 Configuring Send Port for Text files
- FileName: %MessageID% .txt
- Send pipeline: PassThruTransmit
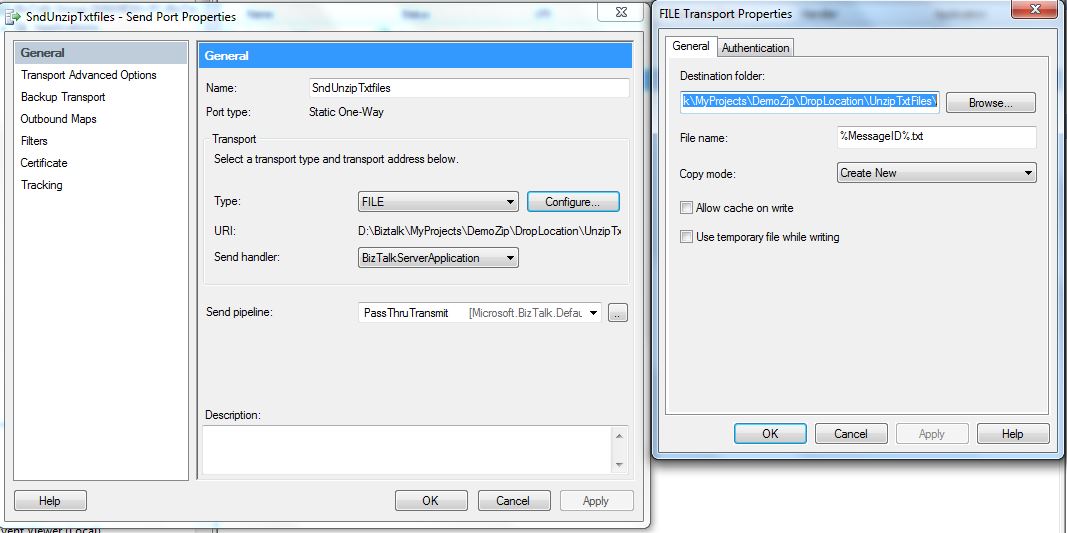
Figure 10.Configuring SndUnzipTxtFiles Port
2.3.2 Adding Filters on Send Port for Text files, creating subscription to pick files from MessageBox which are published by RecZipFile port and having Extension property as ".txt".
- DemoZip.Extension == .txt
- BTS.ReceivePortName == RecZipFile
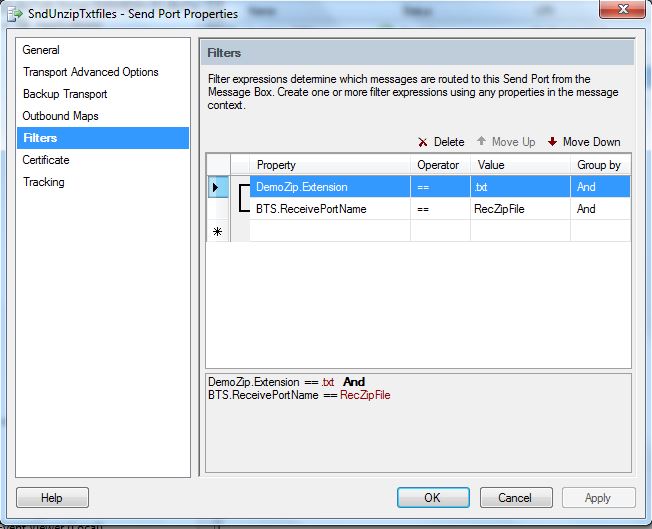
Figure 11.Adding filters on SndUnzipTxtFiles Port
2.4.1 Configuring Send Port for Tiff files
- FileName: %MessageID% .tiff
- Send pipeline: PassThruTransmit
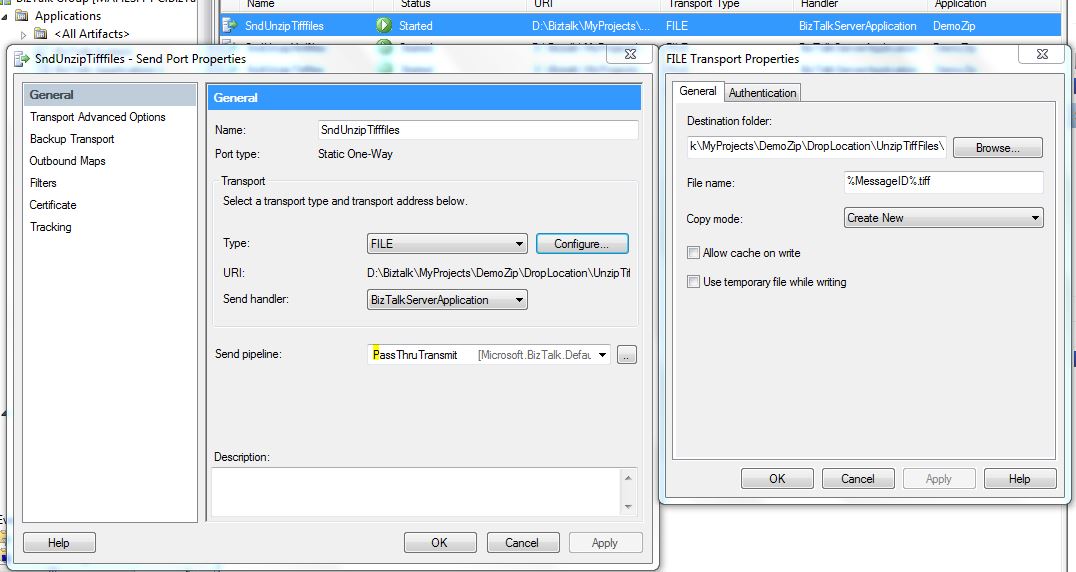
Figure 12.Configuring SndUnzipTiffFiles Port
2.4.2 Adding Filters on Send Port for Tiff files, creating subscription to pick files from MessageBox which are published by RecZipFile port and having Extension property as ".tiff".
- DemoZip.Extension == .tiff
- BTS.ReceivePortName == RecZipFile
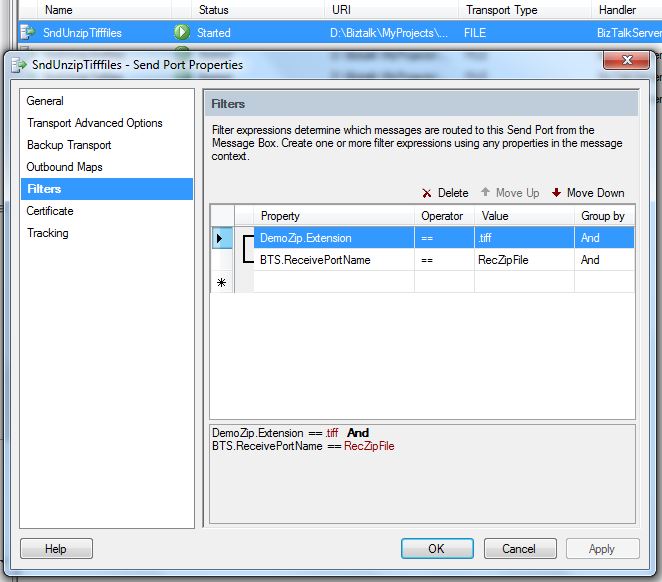
Figure 13.Adding filters on SndUnzipTiffFiles Port
Testing and Output analysis
- Start the application after configuring it.
- Drop the zipped message at the Receive location.
- Check the destination folders.
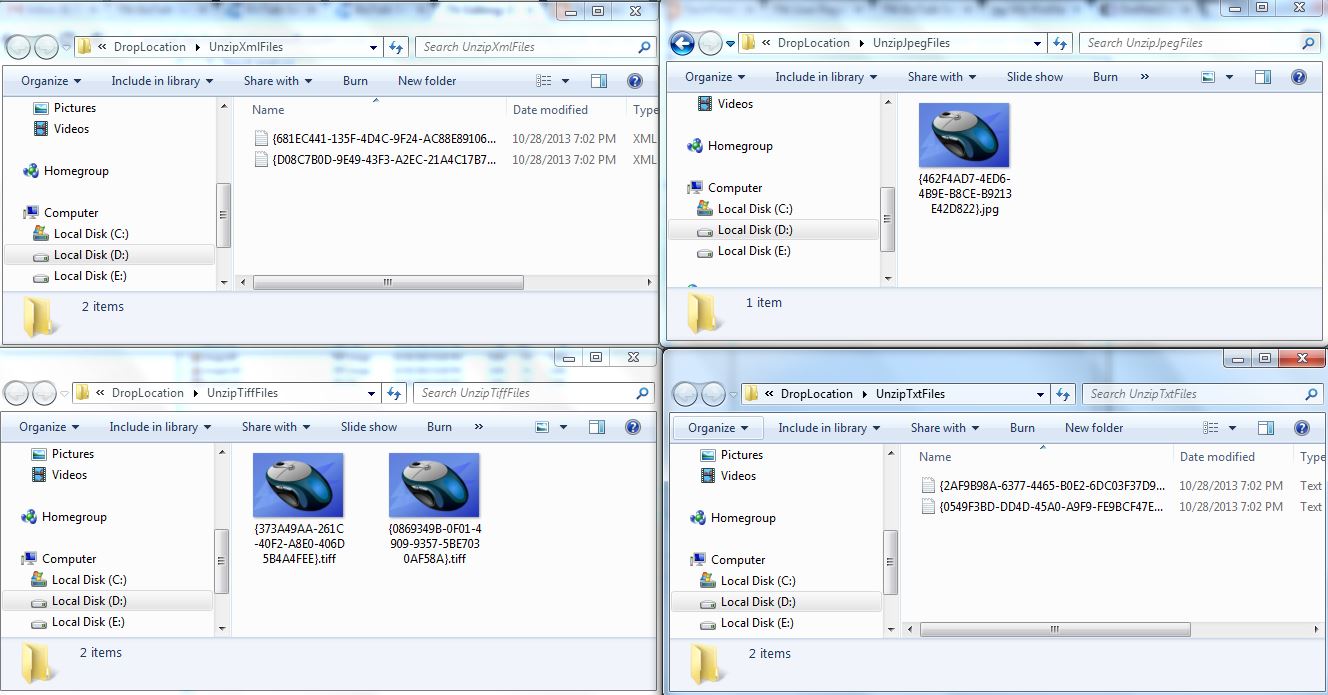
- The zipped message had two xml, two txt, two tiff and one jpeg file, and seen in below figure files are routed to destination folder based on the extensions of the unzipped files.
Figure 14.Files routed to respective folders depending on extension
Download Sample
You can find the source code belonging to this article on MSDN code Gallery at : BizTalk Server 2010: Processing Zip Message Having Multiple Type Files Sample
Author
Maheshkumar S Tiwari | User Page
http://tech-findings.blogspot.com/
See Also
Another important place to find an extensive amount of BizTalk related articles is the TechNet Wiki itself. The best entry point is BizTalk Server Resources on the TechNet Wiki.
This article participates in the TechNet Guru for October competition
