MAP Toolkit: How to use log files?
Step 1: Prepare the Environment
In order for MAP to get user and device access counts for Windows Server, SQL Server, and SharePoint Server, MAP must parse log files. This also means that once a server is configured, there is a necessary waiting period to allow for normal use over time to generate the needed audit logs.
The amount of time needed will vary by environment, and ultimately, you will need to determine what is appropriate for your environment. We recommend between 30 to 90 days. The more time logging is allowed to occur, the more accurate the count will be.
The exception to needing log files
Windows Server 2012 introduced a feature called User Access Logging (UAL). UAL can be queried by WMI or PowerShell and so MAP is able to obtain user and device access information from UAL remotely instead of imported logs. SharePoint 2013 and SQL Server 2012 were the first versions in their product lines to use UAL. This means MAP does not need to parse log files for these situations:
- A computer running Windows Server 2012 or newer
- A computer running SQL Server 2012 (or newer) running on Windows Server 2012 (or newer)
- A computer running SharePoint Server 2013 (or newer) running on Windows Server 2012 (or newer)
For these 3 products, any scenario that doesn’t meet these conditions will require logs to be imported and parsed by MAP.
Windows Server
To capture logon information, the Audit Logon policy needs to be set to “Success” which is the default audit event configuration for Windows security logging for all Windows Server operating systems since Windows Server 2003. You can also set this configuration manually in the Group Policy Management Console (GPMC) or automatically using the Auditpol.exe command-line tool.
For more information about these Group Policy settings, see the following resources:
- For Windows Server 2008, see the Microsoft Help article Microsoft Knowledge Base article 921469
- For Windows Server 2003, see Define or modify auditing policy settings for an event category
SQL Server
IMPORTANT: SQL Server 2008 Enterprise and Datacenter Editions introduced audit event configuration for Windows security logging, which enabled SQL Server 2008 to log logon events to the Windows Security log. The table below shows which versions and editions have the Audit feature that is needed to record the logon events. MAP cannot obtain user and device access information for any other editions or any older versions of SQL Server.
| Datacenter | Enterprise | Business Intelligence | Standard | Workgroup | Web | Express | |
| SQL Server 2008 | N/A |
Yes |
N/A |
No |
No |
No |
No |
SQL Server 2008 R2 |
Yes |
Yes |
N/A |
No |
No |
No |
No |
SQL Server 2012 |
N/A |
Yes |
Yes |
Yes |
N/A |
Yes |
Yes |
To enable SQL Server 2008 or newer to log audit events to the Windows security log
On each SQL Server 2008 or newer instance for which you need to track usage, run the following SQL command:
/* Turn LOGIN logging on  */
USE MASTER
GO

/* Note: the name  'Server_Audit' is  your choice */
CREATE SERVER AUDIT [Server_Audit]
TO SECURITY_LOG WITH ( QUEUE_DELAY = 1000, ON_FAILURE = CONTINUE);
ALTER SERVER AUDIT [Server_Audit] WITH (STATE = ON);
USE MASTER
GO

/* Note: the name  'login_audit' is  your choice */
CREATE SERVER AUDIT SPECIFICATION [login_audit]
FOR SERVER AUDIT Server_Audit ADD (SUCCESSFUL_LOGIN_GROUP) WITH (STATE = ON);
To configure the audit object access setting in the Windows Security event log
The Audit object access setting must be configured to capture the events. The best way to do this varies depending on your operating system. To write to the Windows Security log, the account under which the SQL Server service is running must have the Generate Security Audits permission to write to the Windows Security log. By default, the LOCAL SERVICE and the NETWORK SERVICE accounts have this permission. This step is not required if SQL Server is running under one of those accounts. You must have Administrator privileges on the computer to configure these settings.
To use Auditpol.exe to configure the Audit object access setting for Windows Vista or Windows Server 2008 or later
- Open a command prompt with administrative permissions.
On the Start menu, point to All Programs, point to Accessories, right-click Command Prompt, and then click Run as administrator.
If the User Account Control dialog box opens, click Continue.
Run the following statement* to enable auditing from SQL Server.
auditpol /set /subcategory:"application generated" /success:enable /failure:enable
- Close the command prompt window.
This setting takes effect immediately.
*Note: /subcategory:"application generated" will only work with English language operating systems. If your operating system is a different language, you will need to use the localized parameter.
To use Secpol.msc to configure the Audit object access setting for Windows operating systems earlier than Windows Vista or Windows Server 2008
- On the Start menu, click Run.
- Type secpol.msc and then click OK.
- In the Local Security Policy tool, expand Security Settings, expand Local Policies, and then click Audit Policy.
- In the results pane, double-click Audit object access.
- On the Local Security Setting tab, in the Audit these attempts area, select both Success and Failure.
- Click OK.
- Close the Security Policy tool.
This setting takes effect immediately.
To use Secpol.msc to grant the Generate Security Audits permission to an account
- On the Start menu, click Run.
- Type secpol.msc and then click OK. If the User Access Control dialog box appears, clickContinue.
- In the Local Security Policy tool, expand Security Settings, expand Local Policies, and then click User Rights Assignment.
- In the results pane, double-click Generate security audits.
- On the Local Security Setting tab, click Add User or Group.
- In the Select Users, Computers, or Groups dialog box, either type the name of the user account, such as domain1\user1 and then click OK, or click Advanced and search for the account.
- Click OK.
- Close the Security Policy tool.
This setting takes effect when SQL Server is restarted.
To stop monitoring SQL Server 2008 logon events to the Windows Security log
Run the following SQL command on each SQL Server 2008 instance for which you want to stop monitoring events.
/* Turn LOGIN logging off  */
USE MASTER
GO
ALTER SERVER AUDIT SPECIFICATION [login_audit] WITH (STATE = OFF);
DROP SERVER AUDIT SPECIFICATION [login_audit];
ALTER SERVER AUDIT [Server_Audit] WITH (STATE = OFF);
DROP SERVER AUDIT [Server_Audit];
SharePoint Server
To capture access information for supported versions of Microsoft SharePoint Server, configure the generation of Internet Information Services (IIS) logs on the servers for which you plan to monitor client access.
You must configure IIS logging in the W3C log file format (called “W3C Extended” on some operating systems) with the following fields included:
- date
- time
- c-ip
- cs-username
- s-sitename
- s-computername
- s-ip
- s-port
- cs-uri-stem
- cs-uri-query
- sc-status
SharePoint or IIS administrators might use W3C logging for other reasons. If these administrators require additional fields to be logged, they can add those fields to the configuration. However, administrators should not remove any of the fields that the Software Usage Tracker requires.
For information about enabling W3C logging in IIS, see:
Step 2: Collect the Log Files
Once you have been logging the access events for an acceptable period of time (30-90 days recommended), it is time to save the Windows Security Logs from each server for Windows Server and SQL Server access counts, and the IIS logs for SharePoint Server access counts. I recommend saving them to a central file share or to the MAP machine directly.
Collecting logs for Windows Server and SQL Server
The audit logs for Windows Server and SQL Server are written to the Windows Security Log. MAP needs these files in either the .evt or .evtx formats.
To export the log file:
Go to Start > Control Panel > Administrative Tools and double click Event Viewer
In the console tree, navigate to the log called Security
On the Action menu, click Save All Events As

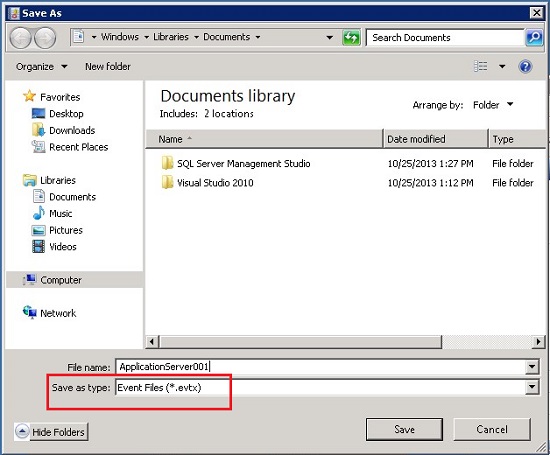
In File name, enter a name for the archived log file.
In Save as type, make sure that it is either .evt or .evtx, and then click Save
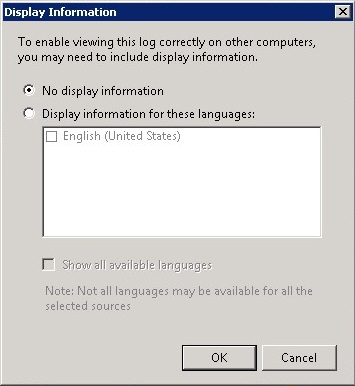
In the Display Information dialog box, accept the default of No display information
Click OK
To export and archive an event log using a command line
Open an elevated command prompt and change the directory to one where you want the file saved
Type the following command:
wevtutil epl security <FileName.evtx>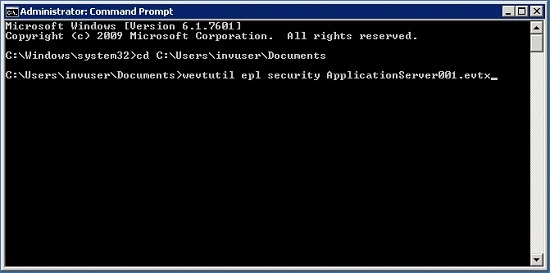
Collecting logs for SharePoint Server
SharePoint user and device access counts come from the IIS logs. By default, these logs are located in %SystemRoot%\inetpub\logs\LogFiles. Gather the log files from all of the SharePoint servers with IIS running.

Step 3: Specify the Location and Parse the Log Files
Before you begin, make sure that you have successfully inventoried the servers and client machines in your environment.
Navigate to the Usage Tracking Scenario Group and then to the Scenario Detail Page (SDP) for Windows Server, SQL Server or SharePoint Server.
In the Options area, click on Configure log parsing.

In the Specify Log File Paths window that pops up, click Add...
Navigate to the directory where the log files are located.
WARNING: MAP will not look for log files in sub-directories. Each directory must be added explicitly. If you have log files in many subfolders, you can follow the directions in this TechNet Wiki article as a workaround for manually entering a large list of file paths. MAP: How to Enter Multiple Log File Paths for Log Parsing
Once you have specified the file path to all of the log files, click Save

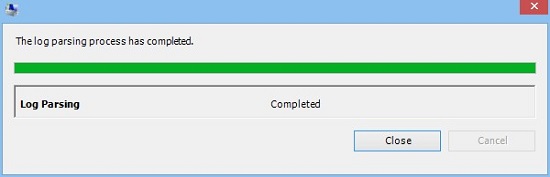
Now that you have specified where MAP can find the log files, in the Options area, click Parse log files. Depending on the amount of data MAP will have to parse, the process could take a while.
Once the status window shows that it has completed, click Close
Step 4: Configure the Date Range
The final step is to set the date range MAP will use when providing a count of the unique devices and users that were in the log files. To do this, in the Options area, click on Configure date range.
In the Configure Date Range dialog box that pops up, you can manually set the dates or use ranges preconfigured in MAP. The choices are:
- Custom – This is used for manually setting the dates
- Earliest to date – This will set the start date to the earliest date that MAP has log data and the end date to today.
- Past 7 days
- Past 30 days
- Past 60 days
- Past 90 days
Once you have the date range that you want, click Save and MAP will adjust the user and device count to show only the number of unique users and devices that were seen within the range specified.