Note
Access to this page requires authorization. You can try signing in or changing directories.
Access to this page requires authorization. You can try changing directories.
Are you looking at System Center Operations Manager (OpsMgr) 2012 R2 Preview and wondering if it is worth a try? Yes? Well, read on if you are planning to monitor Linux/UNIX systems with OpsMgr 2012 R2.
The all new System Center cross platform (SCX) Agents from SCOM2012 R2
With OpsMgr 2012 R2, Microsoft decided to change the technology to monitor SCX systems completely. The OpenPegasus CIM Server used until OpsMgt 2012 SP1 is gone – but hey – long live the CIM Server, which is now available in a new DTFM standard implementation– called Open Management Infrastructure (OMI). OMI is an OpenGroup initiative for standard based management, using free, open-source technology. Large players like Oracle, Microsoft, IBM and HP are part of it.
OMI is a CIM Object Manager (CIMON) similar to OpenPegasus, just with a smaller footprint and easier extensibility.
Like OpenPegasus also OMI uses a provider based concept for extensibility. Microsoft implements providers for the monitoring of CPU, memory, file system, processes etc. as an example.
Good details of the architecture and technology can be found in the following blogs:
- Enabling Management of Open Source Software in System Center Using Standards
- Running and Managing Linux and UNIX with Hyper-V and Microsoft System Center
Hands-on: Getting started with OMI and OpsMgr 2012 R2
Let’s get our hands dirty and go for a deployment.
In this sample deployment I use an OpsMgr 2012 R2 Preview (7.1.10139.0) version and a 64-bit RedHat 6.3 Linux system (Red Hat Enterprise Linux Server release 6.3 (Santiago)). For a full list of Linux/UNIX supported Agents with OpsMgr 2012 R2, please see this Microsoft TechNet Note.
Configuring sudo elevation
As in most environments, the use of the ‘root’ account for monitoring is a no-no, hence the first step will be to prepare the Linux systems sudoers file.
In the first step (or call it prerequisites) sudo elevation needs to be configured. In this case I login with the root account to the Linux system and follow: How to Configure sudo Elevation and SSH Keys on Microsoft TechNet.
BUT there ARE some suggested changes:
Do NOT insert the following in step 4 when configuring the low-privileged user:
opsuser ALL=(ALL) NOPASSWD: ALL
Why?
With the above extension in the sudoers file, the user “opsuser” can easily “sudo su -” to root and become super user. Further: An OpsMgr console user with authoring permissions can create their own task to run any command as root – without the requirement for a root password. If you want to prevent this, I suggest to ONLY add the following lines to the sudoers file:
      Defaults:opsuser !requiretty
      #Run troubleshooting tools
      opsuser ALL=(root) NOPASSWD: /opt/microsoft/scx/bin/tools/*
      # Logfile reader
      opsuser ALL=(root) NOPASSWD: /opt/microsoft/scx/bin/scxlogfilereader
      #Daemon diagnostic and restart recovery tasks example (using cron)
      opsuser ALL=(root) NOPASSWD: /usr/sbin/cron &
When editing the sudoers file: keep in mind that you should always use absolute paths to not create any security back doors.
(See comments in Configuring sudo Elevation for UNIX and Linux Monitoring with System Center 2012 – Operations Manager)

NOTE: This will not allow maintenance of the agent install, uninstall and upgrade using the opsuser! I suggest creating a separate user for agent maintenance.
Agent installation using Discovery Wizard
This is an easy task. Note dialogs or instruction changed between OpsMgr 2012 SP1 and OpsMgr 2012 R2 in the Discovery Wizard! If you would like to go this route, I suggest following this guide. Please use the root account when following the guide. If you applied the opsuser configuration to the sudoers file from above, the steps in the guide will fail, as agent maintenance commands are restricted.
Manual Agent installation
A manual agent installation is typically considered in a secured environment or if you would like to understand the manual process behind it. Furthermore, some organizations don’t allow free SSH traffic. In this case, the discovery wizard will also fail.
For SCOM 2012 SP1 and earlier the manual installation is described. But DON’T look at it for OpsMgr 2012 R2 – yet. The documentation – related to this has not been updated to work with the new SCX agents.
Use the following procedure instead:
A: Transfer the System Center SCX agent to the Linux system.
In Operations Manager 2012 R2, the files are located on any management server in the following directory:
%programfiles%\Microsoft System Center 2012 R2\Operations Manager\Server\AgentManagement\UnixAgents\DownloadedKits
For my RHEL 6.4 system I select scx-1.5.0-114.rhel.6.x64.rpm
The best way to transfer the package is typically WinSCP or similar. Here I copy the package to /tmp/scxagent
B: Login to the system and su to root (sudo su -).
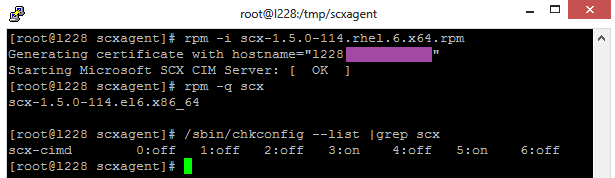
To install the package, type:
rpm -i scx-1.5.0-114.rhel.6.x64.rpm
Further to a quick check if it was installed:
rpm -q scx
And running correctly:
/sbin/chkconfig --list |grep scx
C: Next: Sign the certificate.
This process is described here. On my management server this looks as follows:
 _R
_R
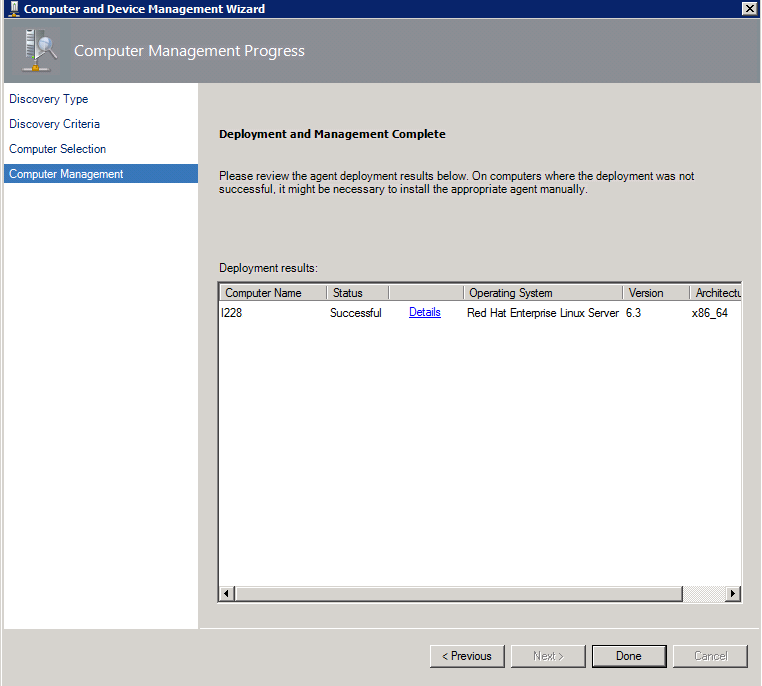
D: Final step: Run the “Discovery Wizard”
As we have setup the agent manually, there is no need for the root account or another privileged user because in this step, the Linux system is just added to the management group. I ran the Wizard with the opsuser as ‘privileged user’.
Troubleshooting
Now for the fun part – if something does not work as expected and you don’t want to call support…
Troubleshooting starting on the management server
From the WS-MAN, you can still use the same commands as is the case with the OpenPegasus CIMOM. If you have several management servers, you should know how the resources groups are assigned. Make sure that the system you are working on has the resources group that contains the target SCX system.
The following command can be used for basic checks:
winrm enumerate http://schemas.microsoft.com/wbem/wscim/1/cim-schema/2/SCX_Agent?__cimnamespace=root/scx -r:https://15.250.250.228/:1270/wsman -auth:basic -skipCACheck -skipCNCheck -encoding:utf-8 -format:pretty -username:opsuser
You then will need to type the password.
Example output:

For more information on general troubleshooting, check here:
Troubleshooting UNIX/Linux Agent Discovery in System Center 2012 Operations Manager
On the node (agent system)
Well, much has changed here from the previous OpsMgr version.
What works is still:
scxadminscxlogfilereaderscxsslconfig (Technet details)
But I would like to look at a new tool available: omicli
In the /opt/microsoft/scx/tools/ directory you will find a new binary: omicli
This replaces the /opt/microsoft/scx/bin/tools/scxcimclithat could be used in the past to query the providers on the system.
Before you can use this command line client, it may be required to set the library path. If not set correctly, you see the following error:
/opt/microsoft/scx/bin/tools/omicli: error while loading shared libraries: libomiclient.so: cannot open shared object file: No such file or directory
Extend the library path:
export LD_LIBRARY_PATH=/opt/microsoft/scx/lib:$LD_LIBRARY_PATH
Usage is as follows:
Usage: /opt/microsoft/scx/bin/tools/omicli [OPTIONS] COMMAND ...
I don’t provide full details here as it is pretty lengthy, however, I have included the most important commands to troubleshoot monitoring on the system (note that we added this to the sudoers file, hence this is available for the “opsuser”).
Enumerate Agent (Information for Agent Discovery)
/opt/microsoft/scx/bin/tools/omicli ei root/scx SCX_Agent
Enumerate Processes (Process Monitoring)
/opt/microsoft/scx/bin/tools/omicli ei root/scx SCX_UnixProcess
Enumerate Filesystems (FS monitoring)
/opt/microsoft/scx/bin/tools/omicli ei root/scx SCX_FileSystem
There are further options, the most powerful is probably to use wql (WMI Query Language):
/opt/microsoft/scx/bin/tools/omicli wql root/scx "select Name, AvailableSpace from SCX_FileSystem where AvailableSpace < 1000000000"
This returns the file names of the file systems with less than 1 GB free.
