How to export file by jQuery in ASP.NET Web Forms and ASP.NET MVC
How To
In this article, I will explain how to export file by jQuery in both ASP.NET Web Forms and ASP.NET MVC. As you know, jQuery is a good foundation and great framework written by Javascript at client-side. It enables any web developers to program these Javascript code fragments such as interact these elements by using selectors, animations, mobile, call ajax and so on. Important of all, It also supports almost all modern browsers(e.g: IE6+, Opera, Firefox, Google Chrome...). Furthermore, it is being widely used by almost web developers all over the development world. So, except for these well-known stuffs in jQuery, I saw that we have the ability to export file by jQuery in almost any dynamic web language such as PHP, ASP.NET Web Forms, ASP.NET MVC, etc... Today, I feel free to write this article to support and help these web developers which have the demand "Export File by jQuery" for their projects. Let's get started!!
Requirements
In order to export file by jQuery in ASP.NET Web Forms and ASP.NET MVC, you must meet the following requirements before do.
- Download the jQuery plugin library "jQuery Unified Export File" here or at github.
- Download NPOI library for .NET here.
- Require .Net Framework 4.0 or higher.
- Require ASP.NET MVC 3 or higher.
- Require Visual Studio 2012 or higher. However, you also can implement on Visual Studio 2010.
Specification
I will propose a common requirement for both ASP.NET Web Forms and ASP.NET MVC. Suppose that we are required to export excel with the person data from the server back to the client on ASP.NET Web Forms and ASP.NET MVC 3. We have to use jQuery to do this goal.
Export Excel using jQuery in ASP.NET Web Forms
In order to achieve this goal, please you follow steps by steps as follows:
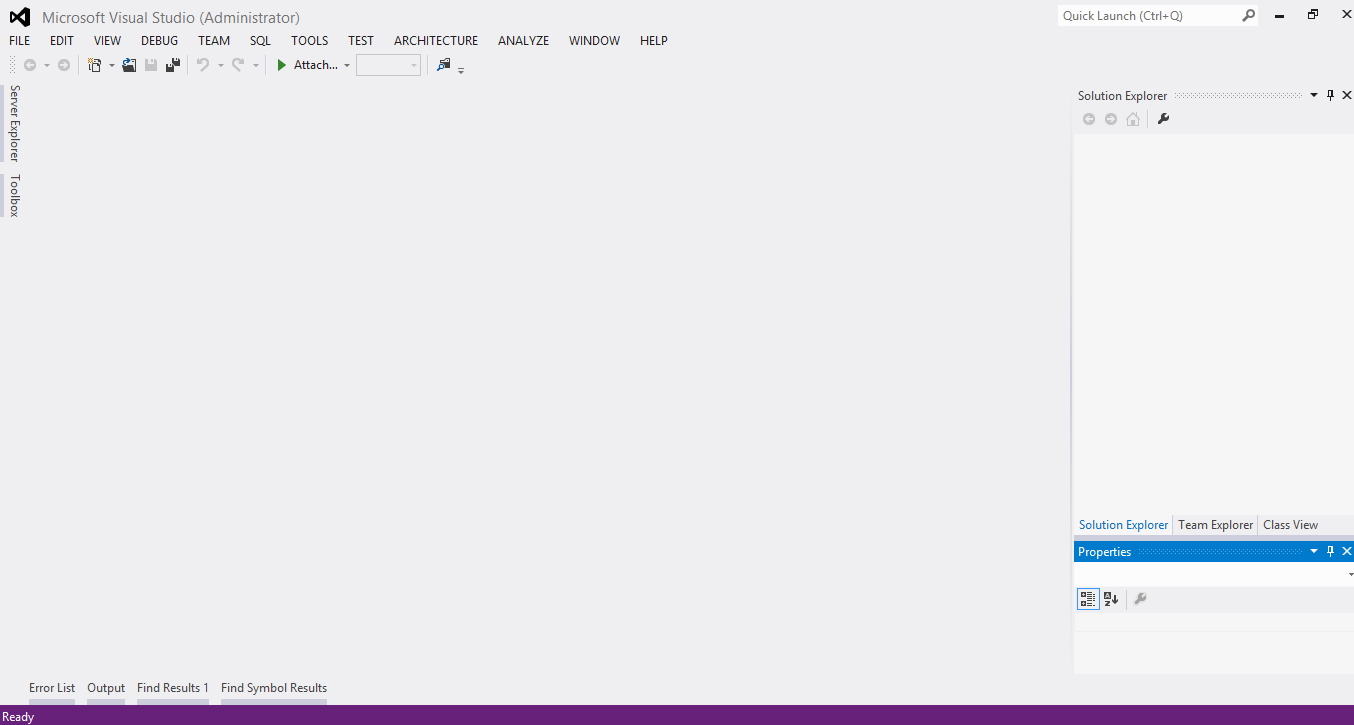
Step 1: Open Visual Studio 2012
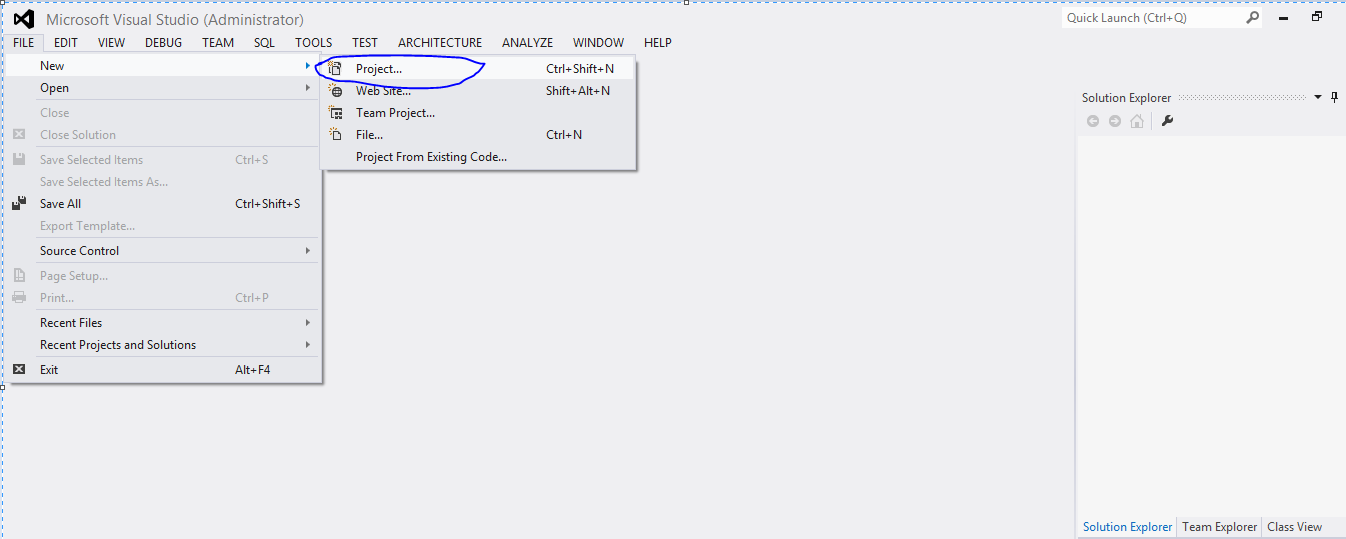
Step 2: Choose menu File > New > Project...
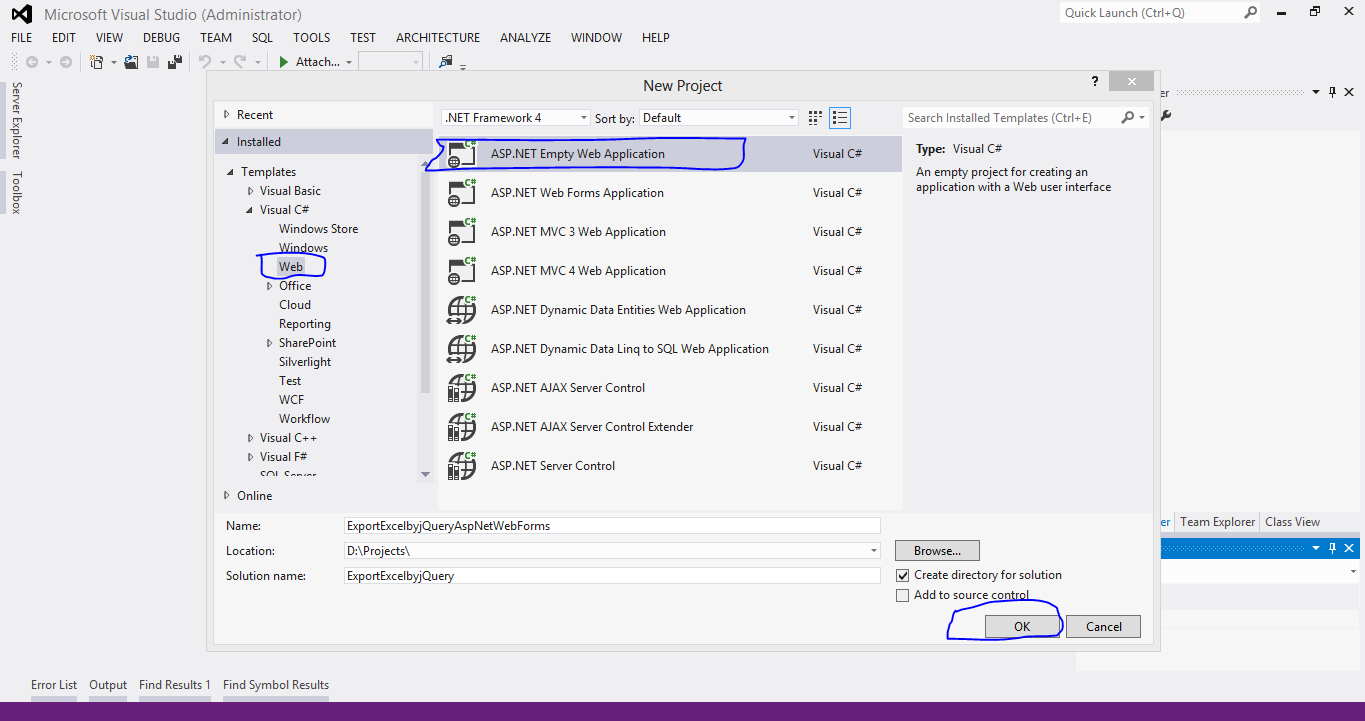
Step 3: Choose tab Visual C# > Web, then select template project "Asp.Net Empty Web Application"
Step 4: Type project Name "ExportExcelbyjQueryAspNetWebForms" and edit solution name "ExportExcelByjQuery". Then, select OK.
Step 5: Create ObjectData folder to contain Person class.
Step 6: Create Person class
using System;
using System.Collections.Generic;
using System.Linq;
using System.Web;

namespace ExportExcelbyjQueryAspNetWebForms.ObjectData
{
    public class  Person
    {
        public int  PersonID { get; set; }
        public string  FirstName { get; set; }
        public string  LastName { get; set; }
        public DateTime Birthday { get; set; }
        public string  BirthPlace { get; set; }
    }
}
Step 7: Create Scripts folder and add two libraries: jquery-1.7.2.min.js and jquery-unified-export-file-1.0.min.js
Step 8: Add new reference to NPOI library.
Step 9: Create Default.aspx under your project folder.
Step 10: Create gridview, loading image and some jQuery code fragments to export file like as this
<%@ Page Language="C#" AutoEventWireup="true" CodeBehind="Default.aspx.cs" Inherits="ExportExcelbyjQueryAspNetWebForms.Default" %>

<!DOCTYPE html>

<html xmlns="http://www.w3.org/1999/xhtml">
<head runat="server">
    <title>Demo Export Excel By jQuery Technique</title>
</head>
<body>
    <form id="frm" class="mainForm" runat="server">
        <div>
            <h2>Export Excel By jQuery Unified Export File</h2>
            <asp:GridView ID="grdView" DataKeyNames="PersonID" AllowPaging="true" OnPageIndexChanging="grdView_PageIndexChanging" AutoGenerateColumns="false" runat="server">
                <Columns>
                    <asp:BoundField DataField="FirstName" HeaderText="First Name"/>
                    <asp:BoundField DataField="LastName" HeaderText="Last Name"/>
                    <asp:BoundField DataField="Birthday" DataFormatString="{0:dd/MM/yyyy}" HeaderText="Birthday"/>
                    <asp:BoundField DataField="BirthPlace" HeaderText="Birth place"/>
                </Columns>
            </asp:GridView>
            <div>
                <img id="loading" src="Images/301.gif" width="30" height="30" style="display: none"/>
            </div>
            <input type="button" class="export-excel" value="Export Excel"/>
        </div>
    </form>
    <script src="<%= Page.ResolveUrl("~/Scripts/jquery-1.7.2.min.js") %>"></script>
    <script src="<%= Page.ResolveUrl("~/Scripts/jquery-unified-export-file-1.0.min.js") %>"></script>
    <script type="text/javascript">
        $(function () {
            $('input.export-excel').bind('click', function () {
                $.UnifiedExportFile({
                    action: '/Default.aspx',
                    data: { IsExportExcel: true },
                    downloadType: 'Progress',
                    ajaxLoadingSelector: '#loading'
                });
            });
        });
    </script>
</body>
</html>
Step 11: Implement custom paging and export excel at server-side like as this
using ExportExcelbyjQueryAspNetWebForms.ObjectData;
using NPOI.HSSF.UserModel;
using System;
using System.Collections.Generic;
using System.IO;
using System.Linq;
using System.Threading;
using System.Web;
using System.Web.UI;
using System.Web.UI.WebControls;

namespace ExportExcelbyjQueryAspNetWebForms
{
    public partial class Default : System.Web.UI.Page
    {
        private List<Person> GetPersons()
        {
            List<Person> persons = new List<Person>();
            for (int i = 0; i < 1000; i++)
            {
                persons.Add(new Person
                {
                    FirstName = "Kevin" + (i + 1),
                    LastName = "Ly",
                    Birthday = new DateTime(1989, 9, 9),
                    BirthPlace = "Ho Chi Minh city"
                });
            }
            return persons;
        }

        protected void Page_Load(object sender, EventArgs e)
        {
            if (!IsPostBack)
            {
                grdView.DataSource = GetPersons();
                grdView.DataBind();
            }
            if (Request.QueryString["IsExportExcel"] != null)
            {
                bool isExportExcel;
                if (bool.TryParse(Request.QueryString["IsExportExcel"], out isExportExcel))
                {
                    if (isExportExcel)
                    {
                        Thread.Sleep(10000);
                        var workbook = new HSSFWorkbook();
                        var sheet = workbook.CreateSheet("Persons");

                        // Add header labels
                        var rowIndex = 0;
                        var row = sheet.CreateRow(rowIndex);
                        row.CreateCell(0).SetCellValue("First Name");
                        row.CreateCell(1).SetCellValue("Last Name");
                        row.CreateCell(2).SetCellValue("Birthday");
                        row.CreateCell(3).SetCellValue("BirthPlace");
                        rowIndex++;

                        // Add data rows
                        foreach (var person in GetPersons())
                        {
                            row = sheet.CreateRow(rowIndex);
                            row.CreateCell(0).SetCellValue(person.FirstName);
                            row.CreateCell(1).SetCellValue(person.LastName);
                            row.CreateCell(2).SetCellValue(person.Birthday.ToString("MM/dd/yyyy"));
                            row.CreateCell(3).SetCellValue(person.BirthPlace);
                            rowIndex++;
                        }

                        // Save the Excel spreadsheet to a MemoryStream and return it to the client
                        using (var exportData = new MemoryStream())
                        {
                            Response.Cookies.Add(new HttpCookie("Downloaded", "True"));
                            workbook.Write(exportData);
                            string saveAsFileName = string.Format("PersonExport-{0:d}.xls", DateTime.Now).Replace("/", "-");
                            Response.ContentType = "application/vnd.ms-excel";
                            Response.AddHeader("Content-Disposition", string.Format("attachment;filename={0}", saveAsFileName));
                            Response.Clear();
                            Response.BinaryWrite(exportData.GetBuffer());
                            Response.End();
                        }
                    }
                }
            }
        }

        protected void grdView_PageIndexChanging(object sender, GridViewPageEventArgs e)
        {
            grdView.PageIndex = e.NewPageIndex;
            grdView.DataSource = GetPersons();
            grdView.DataBind();
        }
    }
}
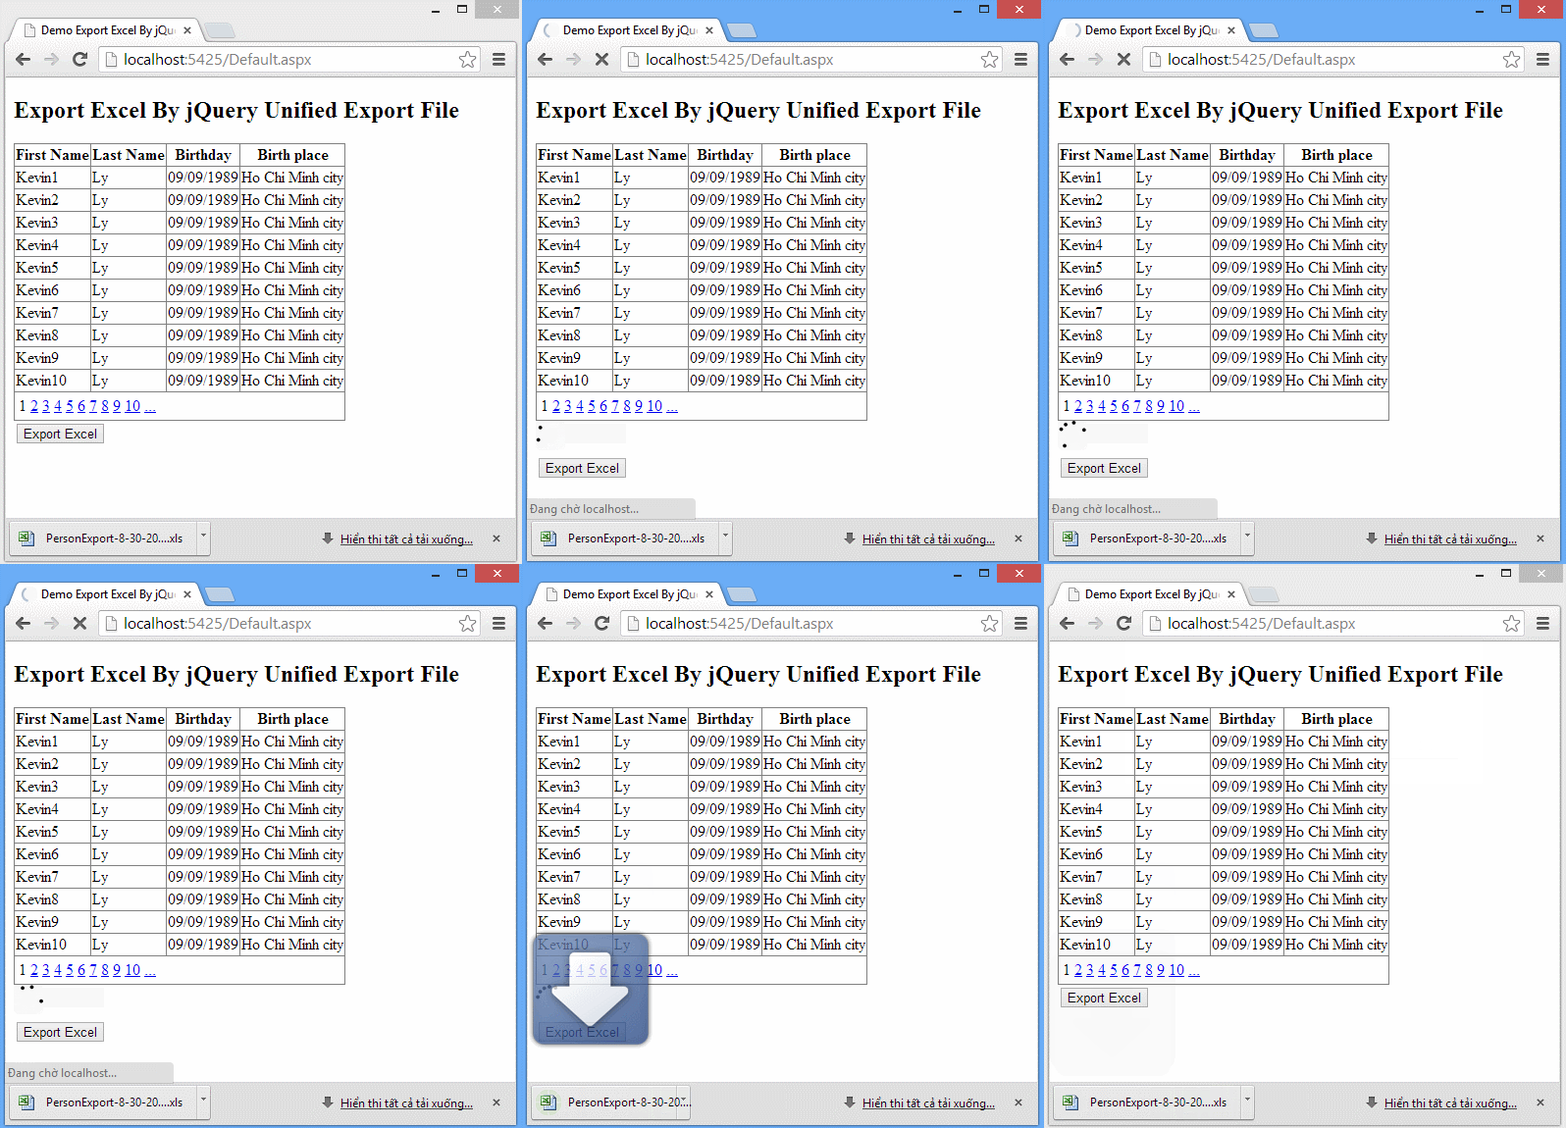
Step 12: Press Ctrl+F5 to run without debugging in Visual Studio 2012
Step 13: View your expected result on the browser. Here we demonstrate on Google Chrome browser
Export Excel using jQuery in ASP.NET MVC
In order to achieve this goal, please you follow steps by steps as follows:
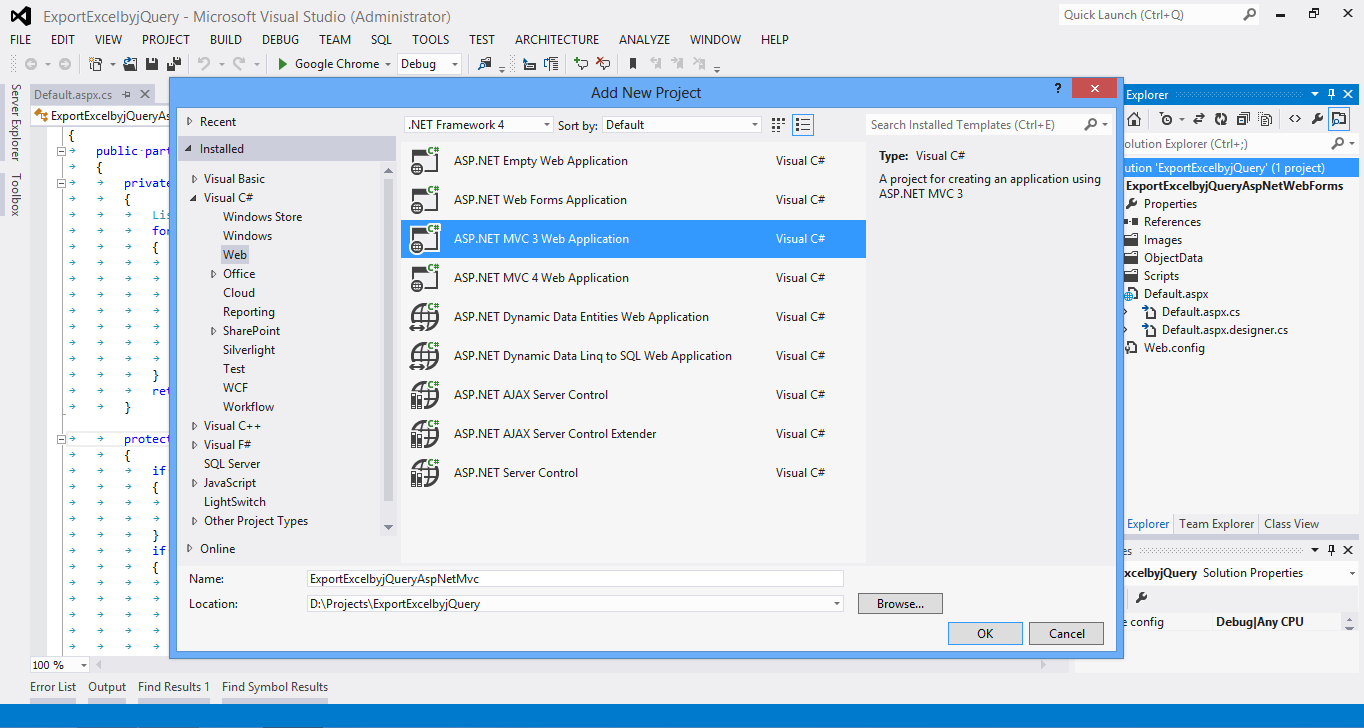
Step 1: Right click on Solution. Then choose menu Add > New Project...
Step 2: Choose tab Visual C# > Web, then select template project "ASP.NET MVC 3 WEB APPLICATION" and type name project "ExportExcelbyjQueryAspNetMvc". The next, click OK.
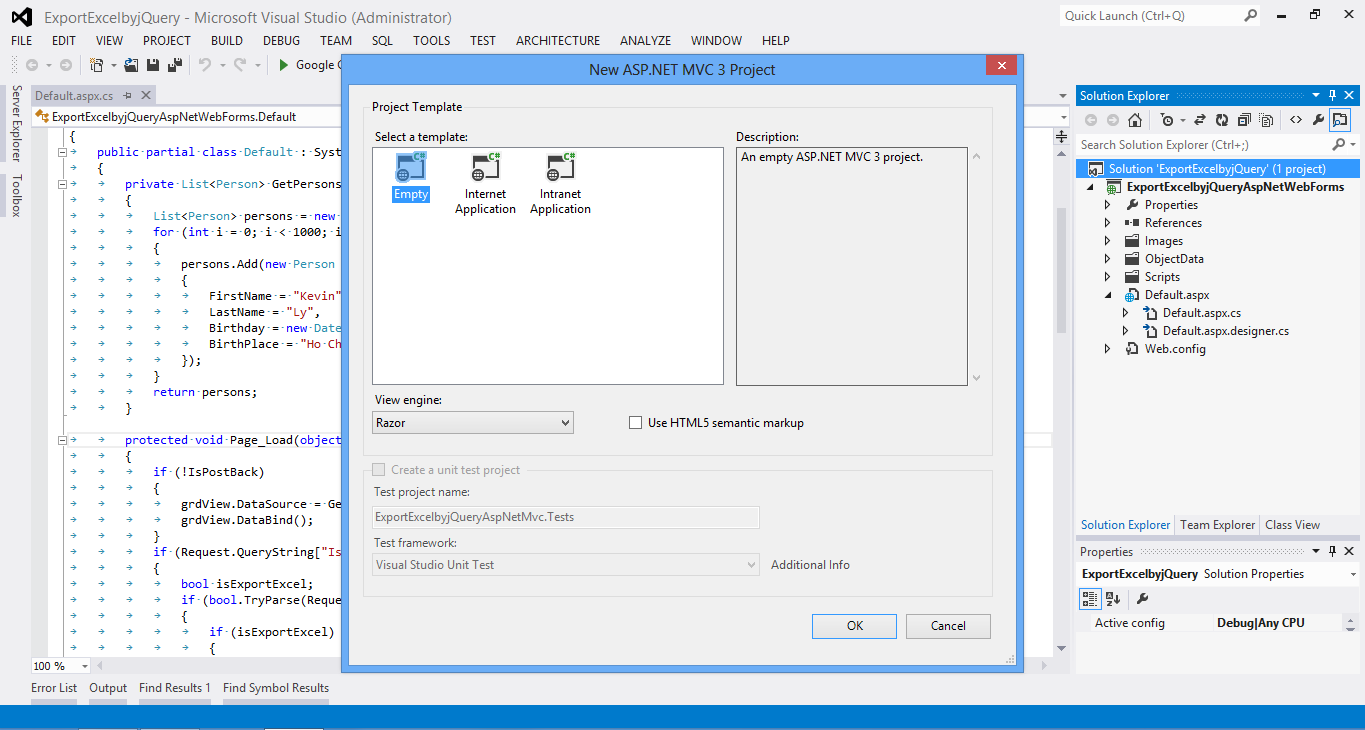
Step 3: A dialog named "New ASP.NET MVC 3 Project" is shown up. Then, you choose Empty template and Razor syntax.
Step 4: Add new reference to NPOI library.
Step 5: Add two libraries: jquery-1.7.2.min.js and jquery-unified-export-file-1.0.min.js into Scripts folder
Step 6: Create Person.cs class by adding it into Models folder.
using System;
using System.Collections.Generic;
using System.Linq;
using System.Web;

namespace ExportExcelbyjQueryAspNetMvc.Models
{
    public class  Person
    {
        public int  PersonID { get; set; }
        public string  FirstName { get; set; }
        public string  LastName { get; set; }
        public DateTime Birthday { get; set; }
        public string  BirthPlace { get; set; }
    }
}
Step 7: Create HomeController.cs by right-clicking on Controllers, then choose menu Add > Controller...
Step 8: Create Index action with a parameter named "IsExportExcel" with type bool?. If IsExportExcel is equal to true, it will export excel back to the client along with a cookie "Downloaded=True". Otherwise, it only show list of persons to view.
using ExportExcelbyjQueryAspNetMvc.Models;
using NPOI.HSSF.UserModel;
using System;
using System.Collections.Generic;
using System.IO;
using System.Linq;
using System.Threading;
using System.Web;
using System.Web.Mvc;

namespace ExportExcelbyjQueryAspNetMvc.Controllers
{
    public class  HomeController : Controller
    {
        private List<Person> GetPersons()
        {
            List<Person> persons = new  List<Person>();
            for (int i = 0; i < 50; i++)
            {
                persons.Add(new Person
                {
                    FirstName = "Kevin" + (i + 1),
                    LastName = "Ly",
                    Birthday = new  DateTime(1989, 9, 9),
                    BirthPlace = "Ho Chi Minh city"
                });
            }
            return persons;
        }

        //
        // GET: /Home/
        public ActionResult Index(bool? IsExportExcel)
        {
            if (IsExportExcel == true)
            {
                Thread.Sleep(10000);
                var workbook = new  HSSFWorkbook();
                var sheet = workbook.CreateSheet("Persons");

                // Add header labels
                var rowIndex = 0;
                var row = sheet.CreateRow(rowIndex);
                row.CreateCell(0).SetCellValue("First Name");
                row.CreateCell(1).SetCellValue("Last Name");
                row.CreateCell(2).SetCellValue("Birthday");
                row.CreateCell(3).SetCellValue("BirthPlace");
                rowIndex++;

                // Add data rows
                foreach (var person in GetPersons())
                {
                    row = sheet.CreateRow(rowIndex);
                    row.CreateCell(0).SetCellValue(person.FirstName);
                    row.CreateCell(1).SetCellValue(person.LastName);
                    row.CreateCell(2).SetCellValue(person.Birthday.ToString("MM/dd/yyyy"));
                    row.CreateCell(3).SetCellValue(person.BirthPlace);
                    rowIndex++;
                }

                // Save the Excel spreadsheet to a MemoryStream and return it to the client
                using (var exportData = new MemoryStream())
                {
                    var cookie = new  HttpCookie("Downloaded", "True");
                    Response.Cookies.Add(cookie);
                    workbook.Write(exportData);
                    string saveAsFileName = string.Format("PersonExport-{0:d}.xls", DateTime.Now).Replace("/", "-");
                    return File(exportData.ToArray(), "application/vnd.ms-excel", string.Format("attachment;filename={0}", saveAsFileName));
                }
            }
            return View(GetPersons());
        }
    }
}
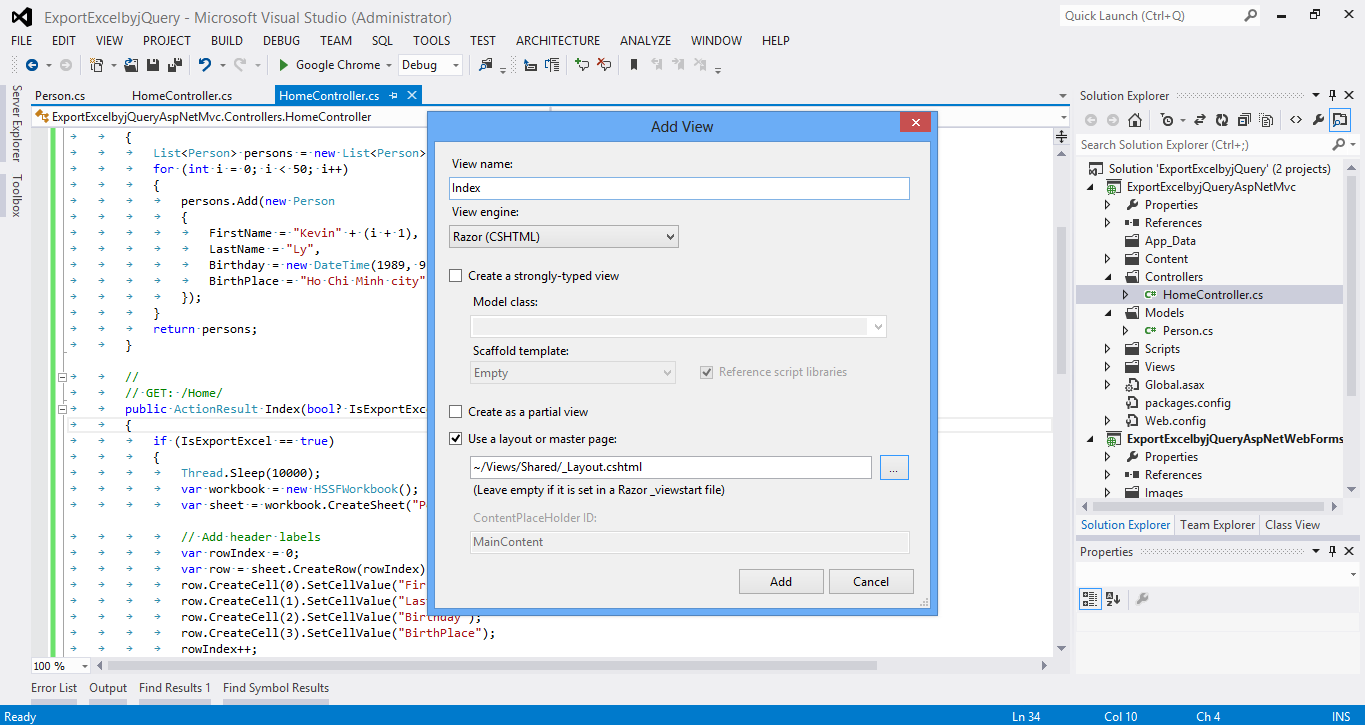
Step 9: Create a view "Index.cshtml" by right-clicking on Index(bool? IsExportExcel) method. Then, choose Add View...
Step 10: Add code into view like as this
@model List<ExportExcelbyjQueryAspNetMvc.Models.Person>
@{
    ViewBag.Title = "Export Excel By jQuery in Asp.Net Mvc";
    Layout = "~/Views/Shared/_Layout.cshtml";
}

<h2>Export Excel By jQuery Unified Export File in ASP.NET MVC 3</h2>

<table border="1">
    <thead>
        <tr>
            <th>First Name</th>
            <th>Last Name</th>
            <th>Birthday</th>
            <th>Birth Place</th>
        </tr>
    </thead>
    <tbody>
        @foreach (var person in Model)
        {
            <tr>
                <th>@person.FirstName</th>
                <th>@person.LastName</th>
                <th>@person.Birthday.ToString("MM/dd/yyyy")</th>
                <th>@person.BirthPlace</th>
            </tr>
        }
    </tbody>
</table>
<div>
    <img id="loading" src="/Content/Images/301.gif" width="50" height="50" style="display: none"/>
</div>
<div>
    <button type="button" class="export-excel">Export Excel</button>
</div>
Step 11: Add code into _Layout.cshtml like as this
<!DOCTYPE html>
<html>
    <head>
        <title>@ViewBag.Title</title>
        <link href="@Url.Content("~/Content/Site.css")" rel="stylesheet" type="text/css" />
        <script src="@Url.Content("~/Scripts/jquery-1.7.2.min.js")" type="text/javascript"></script>
        <script src="@Url.Content("~/Scripts/jquery-unified-export-file-1.0.min.js")" type="text/javascript"></script>
        <script type="text/javascript">
            $(function () {
                $('button.export-excel').bind('click', function () {
                    $.UnifiedExportFile(
                        {
                            action: window.location.href,
                            data: { IsExportExcel: true },
                            downloadType: 'Progress',
                            ajaxLoadingSelector: '#loading'
                        });
                });
            });
        </script>
    </head>

    <body>
        @RenderBody()
    </body>
</html>
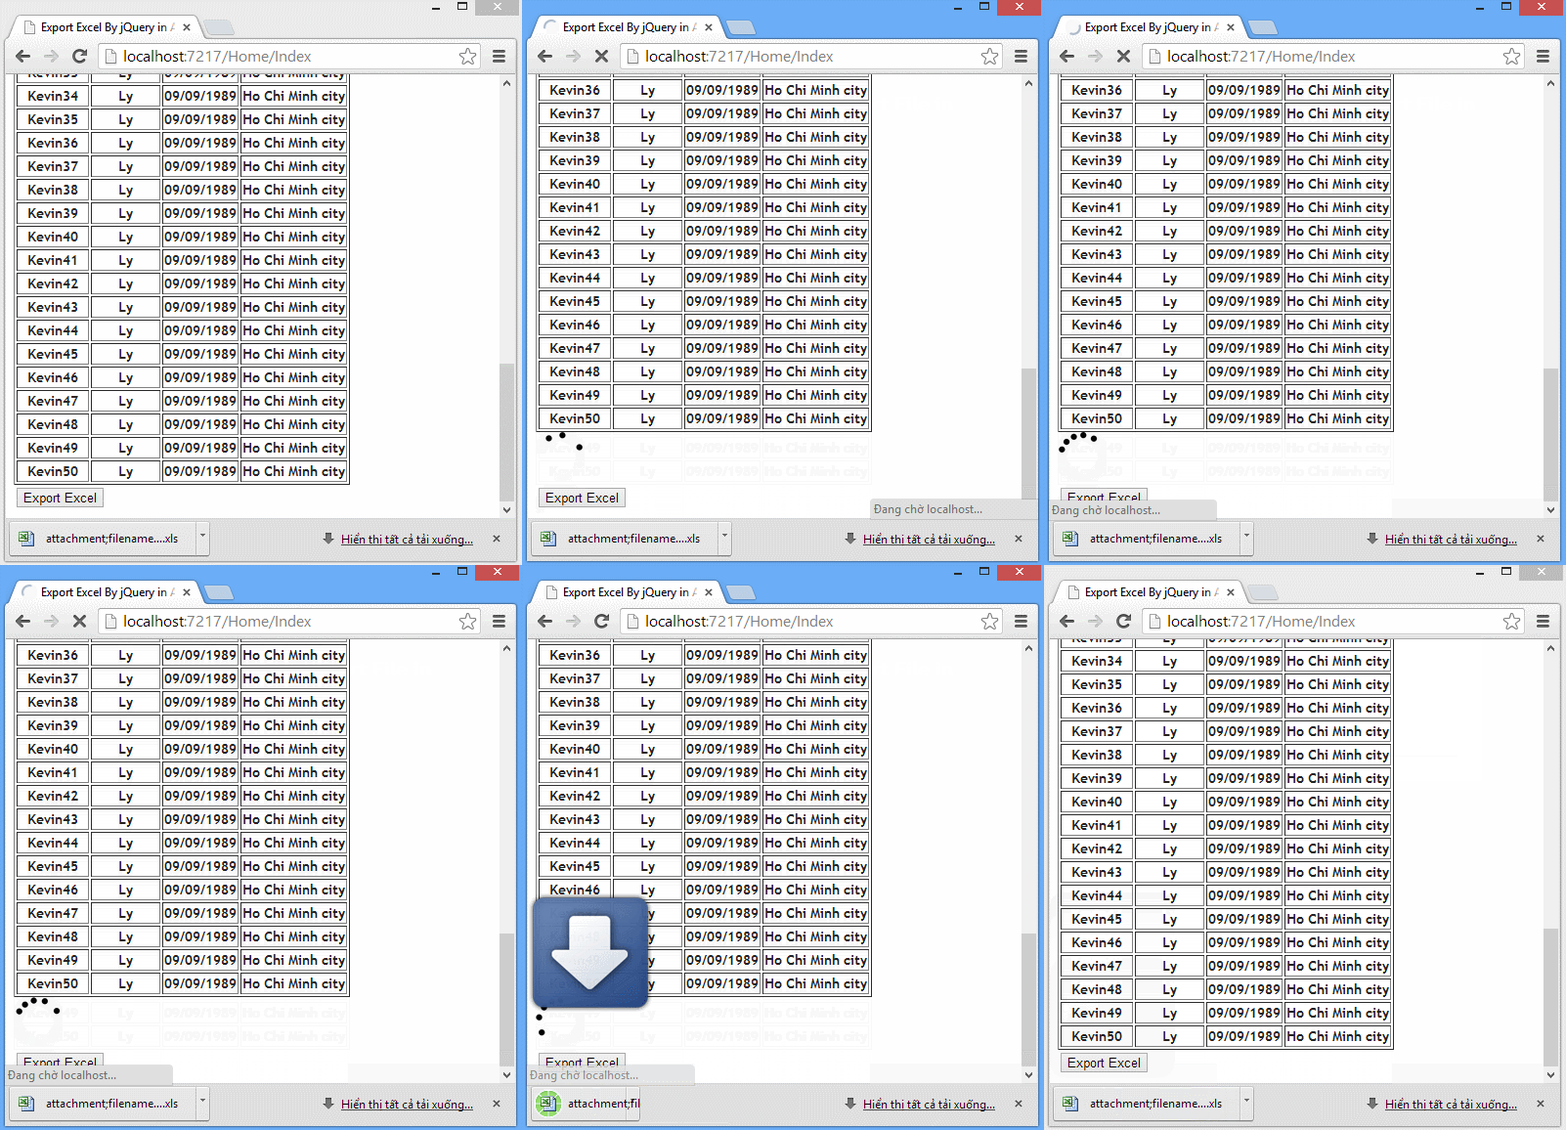
Step 12: Press Ctrl+F5 to run without debugging in Visual Studio 2012. Here we continue running on Google Chrome browser.
Step 13: View your expected result
References
In order to know the further details, please access 2 resource links as follows:
- jQuery Export File: https://jqueryunifiedexportfile.codeplex.com/
- Export File By jQuery in ASP.NET: https://exportfilebyjqueryaspnet.codeplex.com/
- ASP.NET Portal
Conclusion
After this post, you can know how to export file by using jQuery in both ASP.NET Web Forms and ASP.NET MVC. In fact, we also may export file in PHP or any dynamic web languages. Good luck to you!!
DOWNLOAD SOURCE CODE .ZIP HERE
