How to Print a Smart Card using FIM Certificate Management and ID Works Software v6.5 or v5.1
The following article details the installation and configuration of the ID Works Software with Microsoft Forefront Identity Manager 2010 Certificate Management. Setting up ID Works with FIM 2010 Certificate Management consists of the following steps:
Step 1: Install Smart Card Middleware
On the machine that you will be printing from, install the appropriate smart card middleware. This middleware allows FIM CM and the ID Works software to interact with the smart card. The middleware is typically provided by the smart card vendor and can generally be downloaded from their website.
Step 2: Install Datacard Print Driver
On the machine that you will be printing from, install the appropriate Datacard Print Driver. This will depend on whether or not the operating system that is connected to the printer is 32-bit or 64-bit. Information on the Datacard driver can be found at http://www.datacard.com/support-and-drivers
Step 3: Install ID Works 64-bit Support
If the machine that you will be printing from has a 64- bit operating system such as Windows 7 Enterprise 64-bit, install the ID Works v6.5 Support for 64-bit Microsoft® Operating Systems. Do this prior to installing the ID Works Software Enterprise Edition v6.51. Information on this update can be found at http://www.datacard.com/id-software-support-and-upgrades/id-works-identification-software
Step 4: Install ID Works Software Enterprise Edition v6.51
On the machine that you will be printing from install the ID Works Software Enterprise Edition v6.51. For information on installing the ID Works Software Enterprise Edition v6.51, refer to the documentation that comes with the software.
Step 5: Install the FIM CM Client and FIM CM Bulk Issuance Client
On the machine that you will be printing from, install the FIM CM Client and the FIM CM Bulk Issuance Client. For information on installing the FIM CM Client see Installing and Configuring FIM CM Client (http://go.microsoft.com/fwlink/?LinkId=206074). For information on installing the FIM CM Bulk Issuance Client, see Installing and Configuring the Bulk Smart Card Issuance Client (http://go.microsoft.com/fwlink/?LinkId=206075).
Step 6: Configure the Bulk Client
Use the following steps to configure the Bulk Client:
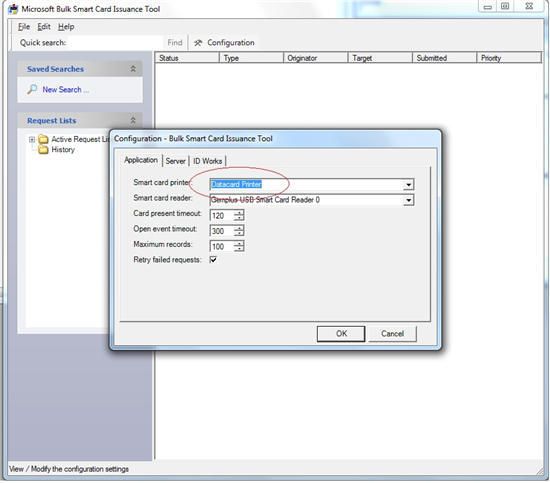
- Open the CM Bulk Issuance Client. Do this by going to Start, select All Programs, select Microsoft Forefront Identity Manager, and click CM Bulk Issuance Client.
- At the top, select Edit and click Configuration.
- On the Application tab, in the box next to Smart card printer, enter Datacard Printer. If you are using a CD800 printer (support for which was added in FIM CM 2010 R2 Service Pack 1) enter XPS Card Printer. (Note: If you are using ID Works v5.1 enter Smart Driver).
- Click OK. Close the CM Bulk Issuance Client.
Step 7: Configure Printer Plug-ins
Use the following steps to configure the Printer Plug-ins:
- Plug in a USB Key. Note: Without the key the ID Works Software will run in evaluation mode.
- Open ID Works Enterprise Administrator. Do this by going to Start, select All Programs, select Datacard, select ID Works, and click ID Works Enterprise Administrator.
- On the ID Works User Login screen, for username enter admin and for password enter admin. Click Log in.
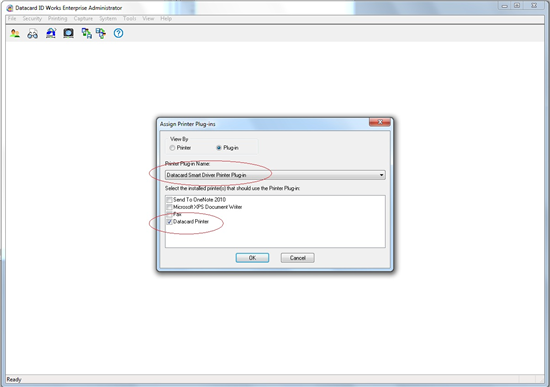
- At the top, select Printing and click Assign Printer Plug-ins…
- From the drop-down, select Datacard Smart Driver Printer Plug-in. If you are using a CD800 printer (support for which was added in FIM CM 2010 R2 Service Pack 1) select XPS Card Printer plug-in. (Note: select Smart Driver Printer Plug-in if using v5.1)
- Place a check in the box next to Datacard Printer
- Click OK.
- Close ID Works Enterprise Administrator.
Step 8: Configure ID Works Project
Use the following steps to configure the ID Works Project:
- Open Datacard ID Works Enterprise Designer. Do this by going to Start, select All Programs, select Datacard, select ID Works, and click ID Works Enterprise Designer.
- On the ID Works User Login screen, for username enter admin and for password enter admin. Click Log in.
- On the Welcome screen, click Create a new project.
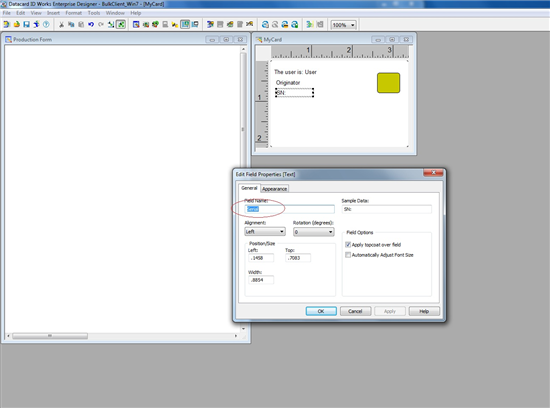
- Insert text fields as appropriate.
- On the menu bar, select Insert.
- Select Text Field.
- Right-click the added text field, and select Properties.
- Enter the desired text field name. This name will be used when configuring the FIM CM profile template.
- Insert smart card chip.
- On the menu bar, select Insert.
- Select Smart Card Field.
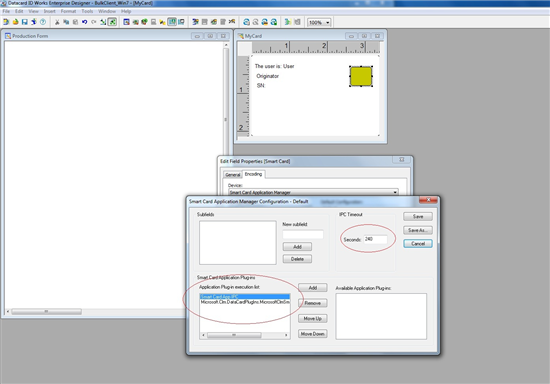
- Right-click the added smart card field and select Field Properties.
- On the Encoding tab, select Edit Configurations…
- Select Default, and click Edit.
- Add the first plug-in, called “Datacard IPC” on ID Works v5.1 and “Smart Card App IPC” on ID Works v6.5.
- Add the second plug-in, “Microsoft.Clm.DataCardPlugIns.MicrosoftClmSmartCardPrintPlugIn”. Note: The plug-in order is important. The IPC plug-in should be before the FIM CM plug-in.
- Ensure the IPC timeout value is 240 seconds.
- Save the project.
Step 9: Configure FIM CM Smart Card Profile Template
Now, configure the FIM CM Smart card Profile Template. Delimit the fields with semi-colons (;) only. Do not sue the newline character. For information on configuring the FIM SM Smart card Profile template, see Configuring Profile Templates (http://go.microsoft.com/fwlink/?LinkId=206086).
Step 10: Provision a Smart Card
Now, provision a smart card of the configured profile template. This can be executed either on the FIM CM Bulk Issuance Client, or on the FIM CM portal as part of the normal enrollment process.